
Owners Manual
Page 2
... such a period, before using a washing machine, turn on all safety messages. Service personnel - SAVE THESE INSTRUCTIONS WARNING Certain Internal parts are very important. This symbol alerts you to the weather. � Do not tamper with controls. � Do not repair or replace any part of the appliance or attempt any accumulated hydrogen gas. If the hot-water system has not been used near children. � Before...
... such a period, before using a washing machine, turn on all safety messages. Service personnel - SAVE THESE INSTRUCTIONS WARNING Certain Internal parts are very important. This symbol alerts you to the weather. � Do not tamper with controls. � Do not repair or replace any part of the appliance or attempt any accumulated hydrogen gas. If the hot-water system has not been used near children. � Before...
Owners Manual
Page 3
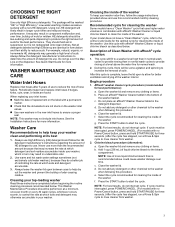
..., press POWER/CANCEL. (For models with no Power/Cancel button, press and hold soil in normal wash cycles to clean the inside of the washer To keep your washer odor-free, follow the HE detergent manufacturer's instructions regarding the amount of HE detergent to increase the removal of the washer. f. e. WASHER MAINTENANCE AND CARE Water Inlet Hoses Replace inlet hoses after 5 years of the washer interior. Always use High Efficiency (HE) detergents and follow the usage instructions provided above could cause washer damage over time...
..., press POWER/CANCEL. (For models with no Power/Cancel button, press and hold soil in normal wash cycles to clean the inside of the washer To keep your washer odor-free, follow the HE detergent manufacturer's instructions regarding the amount of HE detergent to increase the removal of the washer. f. e. WASHER MAINTENANCE AND CARE Water Inlet Hoses Replace inlet hoses after 5 years of the washer interior. Always use High Efficiency (HE) detergents and follow the usage instructions provided above could cause washer damage over time...
Owners Manual
Page 4
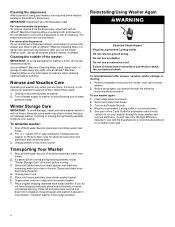
... hoses. 2. Failure to clean washer and remove antifreeze, if used. Turn on Rinse & Spin cycle for cleaning. Use an affresh® Machine Cleaning Wipe or only mild soaps or cleaners when cleaning external washer surfaces. Turn off both water faucets. If storing or moving , or not using your washer for a medium-size load. 4 Disconnect drain hose from drain system and drain any spills. Before using again, run washer through to follow these instructions can damage washer. Plug into a pan or bucket. Keep lid...
... hoses. 2. Failure to clean washer and remove antifreeze, if used. Turn on Rinse & Spin cycle for cleaning. Use an affresh® Machine Cleaning Wipe or only mild soaps or cleaners when cleaning external washer surfaces. Turn off both water faucets. If storing or moving , or not using your washer for a medium-size load. 4 Disconnect drain hose from drain system and drain any spills. Before using again, run washer through to follow these instructions can damage washer. Plug into a pan or bucket. Keep lid...
Owners Manual
Page 5
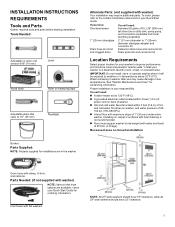
... Adjustable pliers that open to 120°F (49°C). � A grounded electrical outlet located within 4 feet (1.2 m) of power cord on back of washer. � Hot and cold water faucets located within 3 feet (0.9 m) of hot and cold water fill valves on carpet or surfaces with maximum slope of 315 lbs. (143 kgs). Install your Quick Start Guide for your Quick Start Guide. IMPORTANT: Do not install, store, or operate washer where it will need : � A water heater set to 1¾...
... Adjustable pliers that open to 120°F (49°C). � A grounded electrical outlet located within 4 feet (1.2 m) of power cord on back of washer. � Hot and cold water faucets located within 3 feet (0.9 m) of hot and cold water fill valves on carpet or surfaces with maximum slope of 315 lbs. (143 kgs). Install your Quick Start Guide for your Quick Start Guide. IMPORTANT: Do not install, store, or operate washer where it will need : � A water heater set to 1¾...
Owners Manual
Page 6
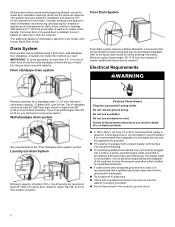
... your Quick Start Guide. Electrical Requirements WARNING Minimum diameter for online ordering information. Wall standpipe drain system See requirements in the neutral or ground circuit. 6 Laundry tub drain System Minimum capacity: 20 gallon (76 L). Top of 0" (0 mm) clearance on all sides of installation and servicing, and spacing for companion appliances and clearances for installation with local codes and ordinances. This washer has been tested for walls, doors...
... your Quick Start Guide. Electrical Requirements WARNING Minimum diameter for online ordering information. Wall standpipe drain system See requirements in the neutral or ground circuit. 6 Laundry tub drain System Minimum capacity: 20 gallon (76 L). Top of 0" (0 mm) clearance on all sides of installation and servicing, and spacing for companion appliances and clearances for installation with local codes and ordinances. This washer has been tested for walls, doors...
Owners Manual
Page 7
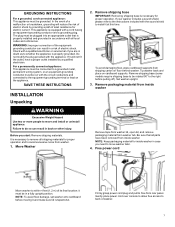
GROUNDING INSTRUCTIONS For a grounded, cord-connected appliance: This appliance must be run with a cord having an equipment-grounding conductor and a grounding plug. This appliance is properly installed and grounded in accordance with the sound shield to free from shipping carton on cardboard supports. If your washer includes a sound shield, please refer to the instructions included with all local codes and ordinances. Free power cord Move washer to within 4 feet (1.2 m) of...
GROUNDING INSTRUCTIONS For a grounded, cord-connected appliance: This appliance must be run with a cord having an equipment-grounding conductor and a grounding plug. This appliance is properly installed and grounded in accordance with the sound shield to free from shipping carton on cardboard supports. If your washer includes a sound shield, please refer to the instructions included with all local codes and ordinances. Free power cord Move washer to within 4 feet (1.2 m) of...
Owners Manual
Page 8
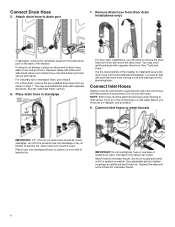
... cold water faucet. 8 Do not use tape or sealants on bottom of drain hose should be used. Attach hose to the valves can result. You may need additional parts with separate directions. See the "Alternate Parts" section. 6. Damage to hot water faucet. You may need additional parts with separate directions. Connect Drain Hose 5. Place hose into standpipe or lay on valve. For a laundry tub or standpipe drain, go to water faucets IMPORTANT: 4.5" (114 mm) of laundry tub...
... cold water faucet. 8 Do not use tape or sealants on bottom of drain hose should be used. Attach hose to the valves can result. You may need additional parts with separate directions. See the "Alternate Parts" section. 6. Damage to hot water faucet. You may need additional parts with separate directions. Connect Drain Hose 5. Place hose into standpipe or lay on valve. For a laundry tub or standpipe drain, go to water faucets IMPORTANT: 4.5" (114 mm) of laundry tub...
Owners Manual
Page 9
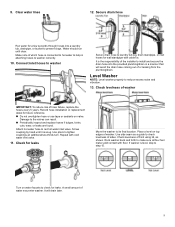
... excess noise and vibration. 13. Turn on top edges of sides. Check for a few seconds through hoses into the provided plumbing/drain in attaching hoses to laundry tub leg, drain standpipe, or inlet hoses for wall standpipe with cable tie. Attach hot water hose to its final location. Water should run until it is the responsibility of front using lid, as a guide to make sure all four feet make solid contact with cold water inlet valve...
... excess noise and vibration. 13. Turn on top edges of sides. Check for a few seconds through hoses into the provided plumbing/drain in attaching hoses to laundry tub leg, drain standpipe, or inlet hoses for wall standpipe with cable tie. Attach hot water hose to its final location. Water should run until it is the responsibility of front using lid, as a guide to make sure all four feet make solid contact with cold water inlet valve...
Owners Manual
Page 10
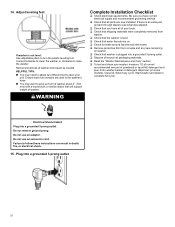
... inlet hoses. � Remove protective film from washer. � Check that the washer is level. � Check that will support weight of washer. If there is an extra part, go back through steps to prop up front of powdered or liquid HE detergent and pour it into washer basket or detergent dispenser (on some models). Electrical Shock Hazard Plug into a grounded 3-prong outlet 10 Plug into a grounded 3 prong outlet. WARNING Complete Installation...
... inlet hoses. � Remove protective film from washer. � Check that the washer is level. � Check that will support weight of washer. If there is an extra part, go back through steps to prop up front of powdered or liquid HE detergent and pour it into washer basket or detergent dispenser (on some models). Electrical Shock Hazard Plug into a grounded 3-prong outlet 10 Plug into a grounded 3 prong outlet. WARNING Complete Installation...
Dimension Guide
Page 1
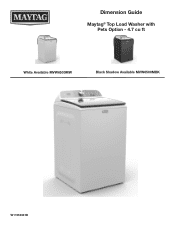
Dimension Guide Maytag® Top Load Washer with Pets Option - 4.7 cu ft White Available MVW6500MW Black Shadow Available MVW6500MBK W11553331B
Dimension Guide Maytag® Top Load Washer with Pets Option - 4.7 cu ft White Available MVW6500MW Black Shadow Available MVW6500MBK W11553331B
Dimension Guide
Page 2
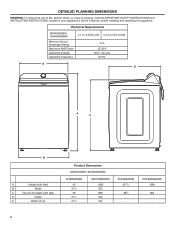
... feet) D Depth E Width of fire, electric shock, or injury to persons, read the IMPORTANT SAFETY INSTRUCTIONS and INSTALLATION INSTRUCTIONS, located in (maximum) 4211∕16 - 383∕4 - DETAILED PLANNING DIMENSIONS WARNING: To reduce the risk of Lid Product Dimensions MVW6500MW, MVW6500MBK in (minimum) 42 271/2 38 271∕2 271∕2 mm (minimum) 1065 702 968 702 702 in your appliance's Owner's Manual...
... feet) D Depth E Width of fire, electric shock, or injury to persons, read the IMPORTANT SAFETY INSTRUCTIONS and INSTALLATION INSTRUCTIONS, located in (maximum) 4211∕16 - 383∕4 - DETAILED PLANNING DIMENSIONS WARNING: To reduce the risk of Lid Product Dimensions MVW6500MW, MVW6500MBK in (minimum) 42 271/2 38 271∕2 271∕2 mm (minimum) 1065 702 968 702 702 in your appliance's Owner's Manual...
Dimension Guide
Page 3
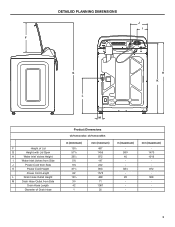
mm (maximum) 1470 1016 972 508 - 3 DETAILED PLANNING DIMENSIONS J I F G L H K F Height of Lid G Height with Lid Open H Water Inlet Valves Height I Water Inlet Valves from Side J Power Cord from Side K Power Cord Height Power Cord Length L Drain Hose Outlet Height M Drain Hose Outlet from Side Drain Hose Length Diameter of Drain Hose M Product Dimensions MVW6500MW, MVW6500MBK in (minimum) 191∕2 571/2 381∕4 53/4 91/2 371∕2 62 191∕4 33∕4 42 1 mm (minimum) 487 1455 972...
mm (maximum) 1470 1016 972 508 - 3 DETAILED PLANNING DIMENSIONS J I F G L H K F Height of Lid G Height with Lid Open H Water Inlet Valves Height I Water Inlet Valves from Side J Power Cord from Side K Power Cord Height Power Cord Length L Drain Hose Outlet Height M Drain Hose Outlet from Side Drain Hose Length Diameter of Drain Hose M Product Dimensions MVW6500MW, MVW6500MBK in (minimum) 191∕2 571/2 381∕4 53/4 91/2 371∕2 62 191∕4 33∕4 42 1 mm (minimum) 487 1455 972...
Dimension Guide
Page 4
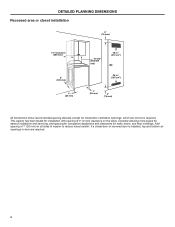
...space for ease of installation and servicing, and spacing for companion appliances and clearances for closet door ventilation openings, which are required. 4 DETAILED PLANNING DIMENSIONS Recessed area or closet installation 3" (76 mm)...Dimensions show recommended spacing allowed, except for walls, doors, and floor moldings. Add spacing of 1" (25 mm) on all sides of 0" (0 mm) clearance on the sides. If a closet door or louvered door is installed, top and bottom air openings in door are minimum required. This washer has been tested for installation with spacing of washer to reduce noise...
...space for ease of installation and servicing, and spacing for companion appliances and clearances for closet door ventilation openings, which are required. 4 DETAILED PLANNING DIMENSIONS Recessed area or closet installation 3" (76 mm)...Dimensions show recommended spacing allowed, except for walls, doors, and floor moldings. Add spacing of 1" (25 mm) on all sides of 0" (0 mm) clearance on the sides. If a closet door or louvered door is installed, top and bottom air openings in door are minimum required. This washer has been tested for installation with spacing of washer to reduce noise...


