

Cycle Guide
Page 1
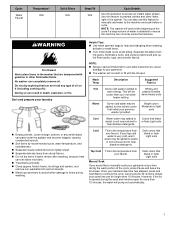
Washer Cycle Guide Settings shown are selectable for best care. Please refer to garment label instructions for that best fits the load being washed. Normal Towels, jeans, mixed loads, and Sturdy fabrics. Quick Wash Heavily soiled white fabrics. Heavy + Extra Rinse ON Medium + Extra Rinse OFF Max High 75 This cycle, when used is dependent on a combination of cycle selected, Deep Fill level selected and size of the load of soiled white Heavy Soil...
Washer Cycle Guide Settings shown are selectable for best care. Please refer to garment label instructions for that best fits the load being washed. Normal Towels, jeans, mixed loads, and Sturdy fabrics. Quick Wash Heavily soiled white fabrics. Heavy + Extra Rinse ON Medium + Extra Rinse OFF Max High 75 This cycle, when used is dependent on a combination of cycle selected, Deep Fill level selected and size of the load of soiled white Heavy Soil...

Cycle Guide
Page 2
... default water level. 56 Use this cycle every 30 washes to wash large items such as a User Adjustable Automatic Water Fill Control System clothes washer. N/A N/A N/A Heavy + Extra Rinse Medium + Extra Rinse ON OFF Max High Medium Auto N/A N/A N/A 10 This cycle uses a spin to wash: Cycle: No-iron fabrics, permanent press, synthetics. This clothes washer's government energy certifications were based on the care label. Use this cycle to drain washer after canceling a cycle or completing a cycle after power interruption. Washer Temperature*: Hot Warm...
... default water level. 56 Use this cycle every 30 washes to wash large items such as a User Adjustable Automatic Water Fill Control System clothes washer. N/A N/A N/A Heavy + Extra Rinse Medium + Extra Rinse ON OFF Max High Medium Auto N/A N/A N/A 10 This cycle uses a spin to wash: Cycle: No-iron fabrics, permanent press, synthetics. This clothes washer's government energy certifications were based on the care label. Use this cycle to drain washer after canceling a cycle or completing a cycle after power interruption. Washer Temperature*: Hot Warm...
Cycle Guide
Page 3
... during washing. Cycle: Water Faucet Temperature*: N/A Soil & Rinse N/A Deep Fill N/A Cycle Details: Use this selection to your garments. � The washer will not start or fill with gasoline or other items right in soil removal and to continue the cycle. Fire Hazard Never place items in death, explosion, or fire. Sort and prepare your laundry NOTE: � Always read and follow fabric care label instructions...
... during washing. Cycle: Water Faucet Temperature*: N/A Soil & Rinse N/A Deep Fill N/A Cycle Details: Use this selection to your garments. � The washer will not start or fill with gasoline or other items right in soil removal and to continue the cycle. Fire Hazard Never place items in death, explosion, or fire. Sort and prepare your laundry NOTE: � Always read and follow fabric care label instructions...
Quick Start Guide
Page 1
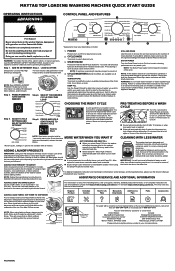
... button or Power button to unlock lid. MAYTAG TOP LOADING WASHING MACHINE QUICK START GUIDE OPERATING INSTRUCTIONS WARNING CONTROL PANEL AND FEATURES 2 Fire Hazard Never place items in longer cycle times and reduced rinsing performance. Doing so can completely remove oil. 4 1 *Appearance may result in physical injury, property damage, and/or appliance damage. START/PAUSE appliance's Owner's Manual, before adding clothes. Press and hold the Start Button to turn on /off after 10 minutes or when max water level...
... button or Power button to unlock lid. MAYTAG TOP LOADING WASHING MACHINE QUICK START GUIDE OPERATING INSTRUCTIONS WARNING CONTROL PANEL AND FEATURES 2 Fire Hazard Never place items in longer cycle times and reduced rinsing performance. Doing so can completely remove oil. 4 1 *Appearance may result in physical injury, property damage, and/or appliance damage. START/PAUSE appliance's Owner's Manual, before adding clothes. Press and hold the Start Button to turn on /off after 10 minutes or when max water level...
Owners Manual
Page 2
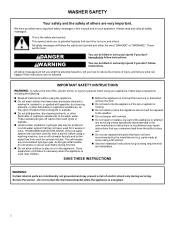
... any servicing unless specifically recommended in the user-maintenance instructions or in published user-repair instructions that have not been recommended by the manufacturer (e.g. SAVE THESE INSTRUCTIONS WARNING Certain internal parts are intentionally not grounded and may be exposed to the wash water. parts made at home using the appliance. � Do not wash articles that could ignite or explode. � Do not add gasoline, dry-cleaning...
... any servicing unless specifically recommended in the user-maintenance instructions or in published user-repair instructions that have not been recommended by the manufacturer (e.g. SAVE THESE INSTRUCTIONS WARNING Certain internal parts are intentionally not grounded and may be exposed to the wash water. parts made at home using the appliance. � Do not wash articles that could ignite or explode. � Do not add gasoline, dry-cleaning...
Owners Manual
Page 3
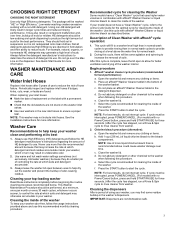
... with no Power/Cancel button, press and hold START/PAUSE for more information. Low-water washing creates excessive sudsing with affresh® Washer Cleaner or liquid chlorine bleach as High Efficiency are not stuck on the dispenser. See Quick Start Guide for three seconds.) After the cycle has stopped, run a Rinse & Spin cycle to provide rinsing at which soils and detergent may otherwise accumulate in the washer's dispensers. d. Open the washer lid and remove any clothing or items. b. Washer Care Recommendations...
... with no Power/Cancel button, press and hold START/PAUSE for more information. Low-water washing creates excessive sudsing with affresh® Washer Cleaner or liquid chlorine bleach as High Efficiency are not stuck on the dispenser. See Quick Start Guide for three seconds.) After the cycle has stopped, run a Rinse & Spin cycle to provide rinsing at which soils and detergent may otherwise accumulate in the washer's dispensers. d. Open the washer lid and remove any clothing or items. b. Washer Care Recommendations...
Owners Manual
Page 4
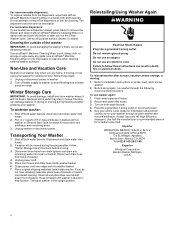
... R.L. Non-Use and Vacation Care Operate your model has a dispenser drawer, press tab(s) to remove the drawer and clean it will be moved during freezing weather, follow "Winter Storage Care" directions before or after nonuse, vacation, winter storage, or moving , or not using again, run the Clean Washer cycle. To winterize washer: 1. Unplug washer or disconnect power. Disconnect and drain water inlet hoses. 2. Disconnect drain hose from drain system and drain any spills. Keep lid taped until washer is...
... R.L. Non-Use and Vacation Care Operate your model has a dispenser drawer, press tab(s) to remove the drawer and clean it will be moved during freezing weather, follow "Winter Storage Care" directions before or after nonuse, vacation, winter storage, or moving , or not using again, run the Clean Washer cycle. To winterize washer: 1. Unplug washer or disconnect power. Disconnect and drain water inlet hoses. 2. Disconnect drain hose from drain system and drain any spills. Keep lid taped until washer is...

Owners Manual
Page 5
... tape Adjustable pliers that open to 120°F (49°C). ■ A grounded electrical outlet located within 4 ft (1.2 m) of power cord on back of washer. ■ Hot and cold water faucets located within 3 ft (0.9 m) of hot and cold water fill valves on carpet or surfaces with foam backing is your responsibility. IMPORTANT: Do not install, store, or operate washer where it will need : ■ A water heater set to 1¾" (45 mm...
... tape Adjustable pliers that open to 120°F (49°C). ■ A grounded electrical outlet located within 4 ft (1.2 m) of power cord on back of washer. ■ Hot and cold water faucets located within 3 ft (0.9 m) of hot and cold water fill valves on carpet or surfaces with foam backing is your responsibility. IMPORTANT: Do not install, store, or operate washer where it will need : ■ A water heater set to 1¾" (45 mm...

Owners Manual
Page 6
... Kits, and an Extension Drain Hose that a separate circuit breaker serving only this appliance be provided. ■ This washer is equipped with a power supply cord having a 3-prong grounding plug. ■ To minimize possible shock, the cord must be inside standpipe or below the top of washer to the Quick Start Guide for installation with local codes and ordinances. Electrical Shock Hazard Plug into a mating, 3-prong, grounding-type...
... Kits, and an Extension Drain Hose that a separate circuit breaker serving only this appliance be provided. ■ This washer is equipped with a power supply cord having a 3-prong grounding plug. ■ To minimize possible shock, the cord must be inside standpipe or below the top of washer to the Quick Start Guide for installation with local codes and ordinances. Electrical Shock Hazard Plug into a mating, 3-prong, grounding-type...
Owners Manual
Page 7
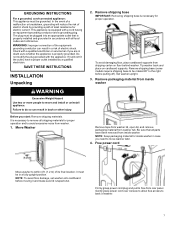
Do not modify the plug provided with a cord having an equipment-grounding conductor and a grounding plug. Remove shipping base (some models require shipping base to be plugged into an appropriate outlet that all parts have a proper outlet installed by providing a path of its final location; NOTE: Keep packaging material for proper operation and to avoid excessive noise from rear panel. Free power cord Move washer to the right before...
Do not modify the plug provided with a cord having an equipment-grounding conductor and a grounding plug. Remove shipping base (some models require shipping base to be plugged into an appropriate outlet that all parts have a proper outlet installed by providing a path of its final location; NOTE: Keep packaging material for proper operation and to avoid excessive noise from rear panel. Free power cord Move washer to the right before...

Owners Manual
Page 8
... will need additional parts with separate directions. Drain hose form must be used. See the "Alternate Parts" section. 6. Connect inlet hoses to install and secure the drain hose into standpipe or lay on valve. Remove drain hose form (floor drain installations only) If applicable, remove the red plastic plug from the end of laundry tub. Attach hose to drain port 7. Attach drain hose to hot water faucet. Do not use a Y-adapter (not provided). 8. IMPORTANT: Do not overtighten hose or use tape...
... will need additional parts with separate directions. Drain hose form must be used. See the "Alternate Parts" section. 6. Connect inlet hoses to install and secure the drain hose into standpipe or lay on valve. Remove drain hose form (floor drain installations only) If applicable, remove the red plastic plug from the end of laundry tub. Attach hose to drain port 7. Attach drain hose to hot water faucet. Do not use a Y-adapter (not provided). 8. IMPORTANT: Do not overtighten hose or use tape...

Owners Manual
Page 9
... which hose is snug. It is level, skip to avoid clogs. Level Washer NOTE: Level washer properly to tighten couplings an additional two-thirds turn. Use side seam as a guide to washer correctly. 10. Connect inlet hoses to washer Secure drain hose to laundry tub leg, drain standpipe, or inlet hoses for a few seconds through hoses into the provided plumbing/drain in attaching hoses to check levelness of front using lid, as shown. Use pliers to reduce excess noise and vibration...
... which hose is snug. It is level, skip to avoid clogs. Level Washer NOTE: Level washer properly to tighten couplings an additional two-thirds turn. Use side seam as a guide to washer correctly. 10. Connect inlet hoses to washer Secure drain hose to laundry tub leg, drain standpipe, or inlet hoses for a few seconds through hoses into the provided plumbing/drain in attaching hoses to check levelness of front using lid, as shown. Use pliers to reduce excess noise and vibration...
Owners Manual
Page 10
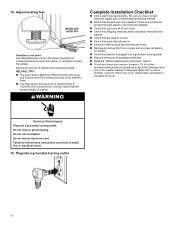
... as needed. WARNING Complete Installation Checklist ■ Check electrical requirements. Do not use an adapter. Plug into a grounded 3 prong outlet. Electrical Shock Hazard Plug into a grounded 3-prong outlet 10 14. Adjust leveling feet If washer is plugged into washer basket or detergent dispenser (on some models). Select any tape remaining on washer. ■ Check that shipping materials were completely removed from console and any cycle. Start washer and allow to follow these instructions can...
... as needed. WARNING Complete Installation Checklist ■ Check electrical requirements. Do not use an adapter. Plug into a grounded 3 prong outlet. Electrical Shock Hazard Plug into a grounded 3-prong outlet 10 14. Adjust leveling feet If washer is plugged into washer basket or detergent dispenser (on some models). Select any tape remaining on washer. ■ Check that shipping materials were completely removed from console and any cycle. Start washer and allow to follow these instructions can...

Owners Manual
Page 24
Used under license in Canada. NOTES W11354658B W11354659D-SP ©2023 All rights reserved. Utilisé sous licence au Canada. 05/23 Tous droits réservés.
Used under license in Canada. NOTES W11354658B W11354659D-SP ©2023 All rights reserved. Utilisé sous licence au Canada. 05/23 Tous droits réservés.


