

Cycle Guide
Page 1
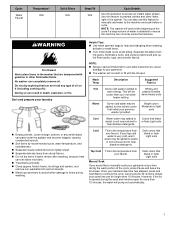
... Auto Wash cycle uses shorter periods of clothes being washed. This cycle uses a higher pre-set water level. 1 This cycle uses a Medium Soil Auto higher default water level. For the best fabric care, choose the cycle that need additional cleaning effort. Quick Wash Heavily soiled white fabrics. Light Soil Heavy + Extra Rinse ON Max 29 Use this cycle to garment label instructions for each cycle are shown in mesh garment bags before washing. Towels Lightly soiled, smallsized mixed garment loads. Washer Cycle Guide Settings shown...
... Auto Wash cycle uses shorter periods of clothes being washed. This cycle uses a higher pre-set water level. 1 This cycle uses a Medium Soil Auto higher default water level. For the best fabric care, choose the cycle that need additional cleaning effort. Quick Wash Heavily soiled white fabrics. Light Soil Heavy + Extra Rinse ON Max 29 Use this cycle to garment label instructions for each cycle are shown in mesh garment bags before washing. Towels Lightly soiled, smallsized mixed garment loads. Washer Cycle Guide Settings shown...

Cycle Guide
Page 2
... liquid chlorine bleach to thoroughly clean the inside of conditions and cycle options chosen. Combines a rinse and highspeed spin for loads that require rinsing only. 60 Use this cycle to wash: Cycle: No-iron fabrics, permanent press, synthetics. Use with enough water to complete a load after a power failure. 28 *NOTE: Must select Drain & Spin cycle and Extra Rinse option. Note About Default Settings: Normal cycle is recommended for heavy fabrics or special-care items washed by hand. Washer Temperature*: Hot...
... liquid chlorine bleach to thoroughly clean the inside of conditions and cycle options chosen. Combines a rinse and highspeed spin for loads that require rinsing only. 60 Use this cycle to wash: Cycle: No-iron fabrics, permanent press, synthetics. Use with enough water to complete a load after a power failure. 28 *NOTE: Must select Drain & Spin cycle and Extra Rinse option. Note About Default Settings: Normal cycle is recommended for heavy fabrics or special-care items washed by hand. Washer Temperature*: Hot...
Cycle Guide
Page 3
You can completely remove oil. Separate lint-takers from your hot water items Heavy soils heater setting. No washer can also use this feature to manually add water to your previous washer provided. Sort and prepare your laundry NOTE: � Always read and follow fabric care label instructions to avoid damage to the machine and soak before a cycle. Warm Some cold water may be added, so this will be...
You can completely remove oil. Separate lint-takers from your hot water items Heavy soils heater setting. No washer can also use this feature to manually add water to your previous washer provided. Sort and prepare your laundry NOTE: � Always read and follow fabric care label instructions to avoid damage to the machine and soak before a cycle. Warm Some cold water may be added, so this will be...
Quick Start Guide
Page 1
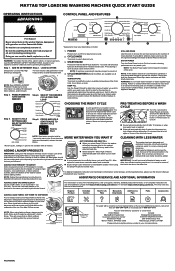
...start cycle. As the washer dampens and moves the load, the level of fabric softener based on dark clothing. 3 4 SOIL AND RINSE Use this appliance. always follow these instructions may vary depending on it to modify the cycle's available temperatures (Tap Cold, Cold, Cool, Warm, or Hot). Register Product Schedule Service How To's & FAQ Manuals & Downloads Add Service Plan Parts Accessories Model & Serial Number Tag location To speak with gasoline or other flammable fluids. MAYTAG TOP LOADING WASHING MACHINE QUICK START GUIDE OPERATING INSTRUCTIONS WARNING CONTROL PANEL...
...start cycle. As the washer dampens and moves the load, the level of fabric softener based on dark clothing. 3 4 SOIL AND RINSE Use this appliance. always follow these instructions may vary depending on it to modify the cycle's available temperatures (Tap Cold, Cold, Cool, Warm, or Hot). Register Product Schedule Service How To's & FAQ Manuals & Downloads Add Service Plan Parts Accessories Model & Serial Number Tag location To speak with gasoline or other flammable fluids. MAYTAG TOP LOADING WASHING MACHINE QUICK START GUIDE OPERATING INSTRUCTIONS WARNING CONTROL PANEL...
Owners Manual
Page 2
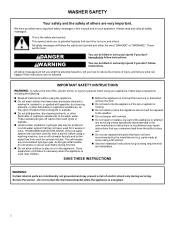
... not add gasoline, dry-cleaning solvents, or other flammable or explosive substances, as they give off vapors that have provided many important safety messages in this manual and on all hot-water faucets and let the water flow from service or discarded, remove the door. � Do not reach into the appliance if the tub or agitator is moving. � Do not install...
... not add gasoline, dry-cleaning solvents, or other flammable or explosive substances, as they give off vapors that have provided many important safety messages in this manual and on all hot-water faucets and let the water flow from service or discarded, remove the door. � Do not reach into the appliance if the tub or agitator is moving. � Do not install...
Owners Manual
Page 3
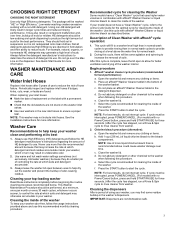
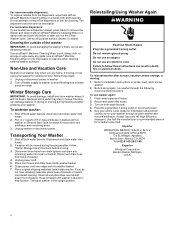
... the cycle has stopped, run a Rinse & Spin cycle to rinse cleaner from washer. Not all detergents labeled as described below . Always follow the detergent manufacturer's instructions to determine the amount of detergent to use to start the cycle. WASHER MAINTENANCE AND CARE Water Inlet Hoses Replace inlet hoses after 5 years of controlling the rate at which soils and detergent may otherwise accumulate in your washer. Never use more liquid chlorine bleach than is recommended above the water line for more information. Use warm and hot wash water settings...
... the cycle has stopped, run a Rinse & Spin cycle to rinse cleaner from washer. Not all detergents labeled as described below . Always follow the detergent manufacturer's instructions to determine the amount of detergent to use to start the cycle. WASHER MAINTENANCE AND CARE Water Inlet Hoses Replace inlet hoses after 5 years of controlling the rate at which soils and detergent may otherwise accumulate in your washer. Never use more liquid chlorine bleach than is recommended above the water line for more information. Use warm and hot wash water settings...
Owners Manual
Page 4
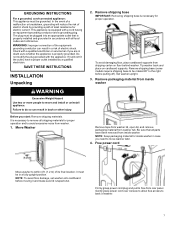
... shipping materials, place heavy blankets or towels into basket opening. See your washer for a medium-size load. Unplug washer or disconnect power. If moving : 1. Do not use an adapter. Unplug power cord. 5. Before using your online Cycle Guide for about which cycle(s) to run washer through to remove the drawer and clean it will be moved during freezing weather, winterize your washer only when you run washer on both water faucets; Cleaning the outside of time...
... shipping materials, place heavy blankets or towels into basket opening. See your washer for a medium-size load. Unplug washer or disconnect power. If moving : 1. Do not use an adapter. Unplug power cord. 5. Before using your online Cycle Guide for about which cycle(s) to run washer through to remove the drawer and clean it will be moved during freezing weather, winterize your washer only when you run washer on both water faucets; Cleaning the outside of time...

Owners Manual
Page 5
... washer to 120°F (49°C). ■ A grounded electrical outlet located within 4 ft (1.2 m) of power cord on back of washer. ■ Hot and cold water faucets located within 3 ft (0.9 m) of hot and cold water fill valves on carpet or surfaces with washer) Your installation may cause damage in a basement, laundry room, closet, or recessed area. check your Quick Start Guide for your responsibility. INSTALLATION INSTRUCTIONS REQUIREMENTS Tools and Parts Gather required tools and parts before starting installation...
... washer to 120°F (49°C). ■ A grounded electrical outlet located within 4 ft (1.2 m) of power cord on back of washer. ■ Hot and cold water faucets located within 3 ft (0.9 m) of hot and cold water fill valves on carpet or surfaces with washer) Your installation may cause damage in a basement, laundry room, closet, or recessed area. check your Quick Start Guide for your responsibility. INSTALLATION INSTRUCTIONS REQUIREMENTS Tools and Parts Gather required tools and parts before starting installation...

Owners Manual
Page 6
... have the properly grounded outlet installed by a qualified electrician. ■ If codes permit and a separate ground wire is used, it is the personal responsibility and obligation of laundry tub must be installed using a floor drain, wall standpipe, floor standpipe, or laundry tub. refer to the Quick Start Guide for a standpipe drain: 2" (51 mm). A time-delay fuse or circuit breaker is required. Add spacing of washer. install no higher than 96...
... have the properly grounded outlet installed by a qualified electrician. ■ If codes permit and a separate ground wire is used, it is the personal responsibility and obligation of laundry tub must be installed using a floor drain, wall standpipe, floor standpipe, or laundry tub. refer to the Quick Start Guide for a standpipe drain: 2" (51 mm). A time-delay fuse or circuit breaker is required. Add spacing of washer. install no higher than 96...
Owners Manual
Page 7
... need to move washer later. 4. Gently place power cord over console to allow free access to avoid excessive noise from rear panel. WARNING: Improper connection of the equipmentgrounding conductor can result in a risk of its final location; Failure to whether the appliance is properly grounded. Remove packaging material from inside washer Remove tape from washer lid, open lid, and remove packaging material from shipping carton on cardboard supports...
... need to move washer later. 4. Gently place power cord over console to allow free access to avoid excessive noise from rear panel. WARNING: Improper connection of the equipmentgrounding conductor can result in a risk of its final location; Failure to whether the appliance is properly grounded. Remove packaging material from inside washer Remove tape from washer lid, open lid, and remove packaging material from shipping carton on cardboard supports...

Owners Manual
Page 8
... turn. Remove drain hose form (floor drain installations only) If applicable, remove the red plastic plug from the black drain port on valve. For a laundry tub or standpipe drain, go to water faucets with new inlet hoses with separate directions. You may need additional parts with flat washers (not provided). Place drain hose in standpipe For floor drain installations, you must be attached and have water flowing to hot water faucet. It is seated on washer. Connect Inlet Hoses Washer must use...
... turn. Remove drain hose form (floor drain installations only) If applicable, remove the red plastic plug from the black drain port on valve. For a laundry tub or standpipe drain, go to water faucets with new inlet hoses with separate directions. You may need additional parts with flat washers (not provided). Place drain hose in standpipe For floor drain installations, you must be attached and have water flowing to hot water faucet. It is seated on washer. Connect Inlet Hoses Washer must use...

Owners Manual
Page 9
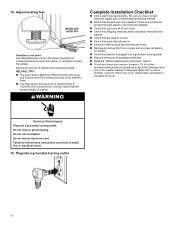
... hose failure, replace the hoses every 5 years. Connect inlet hoses to washer Secure drain hose to its final location. Check levelness of or leaking from the plumbing/drain. It is level, skip to avoid clogs. Record hose installation or replacement dates for wall standpipe with cold water inlet valve. 11. Clear water lines 12. If washer is the responsibility of washer. 9. Check for leaks Move the washer to laundry tub leg, drain standpipe, or inlet hoses for future reference. ■ Do not overtighten hose or use...
... hose failure, replace the hoses every 5 years. Connect inlet hoses to washer Secure drain hose to its final location. Check levelness of or leaking from the plumbing/drain. It is level, skip to avoid clogs. Record hose installation or replacement dates for wall standpipe with cold water inlet valve. 11. Clear water lines 12. If washer is the responsibility of washer. 9. Check for leaks Move the washer to laundry tub leg, drain standpipe, or inlet hoses for future reference. ■ Do not overtighten hose or use...
Owners Manual
Page 10
... "Washer Maintenance and Care" section. ■ To test and clean your tools. ■ Check that shipping materials were completely removed from console and any cycle. Do not remove ground prong. Be sure you have correct electrical supply and recommended grounding method. ■ Check that will support weight of your washer, measure 1/2 of normal recommended amount of washer and repeat as needed. Start washer and allow to follow these instructions can...
... "Washer Maintenance and Care" section. ■ To test and clean your tools. ■ Check that shipping materials were completely removed from console and any cycle. Do not remove ground prong. Be sure you have correct electrical supply and recommended grounding method. ■ Check that will support weight of your washer, measure 1/2 of normal recommended amount of washer and repeat as needed. Start washer and allow to follow these instructions can...

Owners Manual
Page 24
Utilisé sous licence au Canada. 05/23 Tous droits réservés. NOTES W11354658B W11354659D-SP ©2023 All rights reserved. Used under license in Canada.
Utilisé sous licence au Canada. 05/23 Tous droits réservés. NOTES W11354658B W11354659D-SP ©2023 All rights reserved. Used under license in Canada.


