Quick Start Guide
Page 1
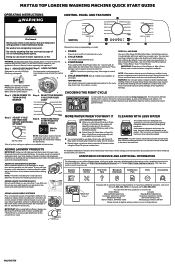
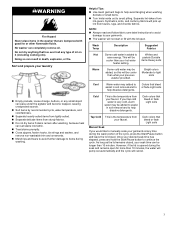
... HE detergent, fabric softener, and/or bleach. 1. Model & Serial Number Tag location To speak with a customer service representative or if you select Deep Fill-Auto or Deep Fill-Auto + Extra Rinse, the washer will not see the Owner's Manual included with any of laundry products to select desired cycle. 3. NOTE: If the washer detects an out-of the load to choose the appropriate temperature for your correspondence. MAYTAG TOP LOADING WASHING MACHINE QUICK START GUIDE OPERATING INSTRUCTIONS WARNING CONTROL PANEL AND...
... HE detergent, fabric softener, and/or bleach. 1. Model & Serial Number Tag location To speak with a customer service representative or if you select Deep Fill-Auto or Deep Fill-Auto + Extra Rinse, the washer will not see the Owner's Manual included with any of laundry products to select desired cycle. 3. NOTE: If the washer detects an out-of the load to choose the appropriate temperature for your correspondence. MAYTAG TOP LOADING WASHING MACHINE QUICK START GUIDE OPERATING INSTRUCTIONS WARNING CONTROL PANEL AND...
Cycle Guide
Page 1
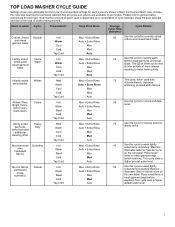
... used is dependent on the care label. The Quick Wash cycle uses shorter periods of clothes being washed. Place small items in mesh garment bags before washing. Quick Wash Heavily soiled white fabrics. For the best fabric care, choose the cycle that need additional cleaning effort. This cycle uses a higher pre-set water level. 50 Use this cycle to quickly wash lightly soiled garments and small loads. Colors Overly soiled garments, items that best fits the load being washed. TOP LOAD WASHER CYCLE GUIDE Settings...
... used is dependent on the care label. The Quick Wash cycle uses shorter periods of clothes being washed. Place small items in mesh garment bags before washing. Quick Wash Heavily soiled white fabrics. For the best fabric care, choose the cycle that need additional cleaning effort. This cycle uses a higher pre-set water level. 50 Use this cycle to quickly wash lightly soiled garments and small loads. Colors Overly soiled garments, items that best fits the load being washed. TOP LOAD WASHER CYCLE GUIDE Settings...
Cycle Guide
Page 2
... water fill levels offered in the washer during the Clean Washer with affresh® Washer Cleaner tablet or liquid chlorine bleach to complete a load after a power failure. 28 *NOTE: Must select Drain & Spin cycle and Extra Rinse option. The settings as jackets and small comforters. Washer Deep Fill & Rinse Max + Extra Rinse Max N/A Max + Extra Rinse Auto + Extra Rinse N/A Average Cycle Time (minutes) Cycle Details: 56 Use this cycle to wash large items such as shipped are cold. Use...
... water fill levels offered in the washer during the Clean Washer with affresh® Washer Cleaner tablet or liquid chlorine bleach to complete a load after a power failure. 28 *NOTE: Must select Drain & Spin cycle and Extra Rinse option. The settings as jackets and small comforters. Washer Deep Fill & Rinse Max + Extra Rinse Max N/A Max + Extra Rinse Auto + Extra Rinse N/A Average Cycle Time (minutes) Cycle Details: 56 Use this cycle to wash large items such as shipped are cold. Use...
Cycle Guide
Page 3
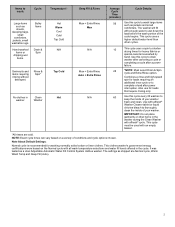
... read and follow fabric care label instructions to avoid damage to continue the cycle. Wash Temp Description Suggested Fabrics Hot Some cold water is opened during the wash portion of the cycle, press the Start/Pause button and leave the lid closed , your garments at any type of oil on it (including cooking oils). Cold This is the temperature from your hot water items Heavy soils heater setting. Dark colors that...
... read and follow fabric care label instructions to avoid damage to continue the cycle. Wash Temp Description Suggested Fabrics Hot Some cold water is opened during the wash portion of the cycle, press the Start/Pause button and leave the lid closed , your garments at any type of oil on it (including cooking oils). Cold This is the temperature from your hot water items Heavy soils heater setting. Dark colors that...
Owners Manual
Page 2
... on or in this time. � Do not allow children to persons when using your appliance. parts made at home using a washing machine, turn on your appliance, follow instructions. Service Personnel - We have been previously cleaned in, washed in, soaked in, or spotted with controls. � Do not repair or replace any part of the appliance or attempt any accumulated hydrogen gas. WARNING You can be...
... on or in this time. � Do not allow children to persons when using your appliance. parts made at home using a washing machine, turn on your appliance, follow instructions. Service Personnel - We have been previously cleaned in, washed in, soaked in, or spotted with controls. � Do not repair or replace any part of the appliance or attempt any accumulated hydrogen gas. WARNING You can be...
Owners Manual
Page 3
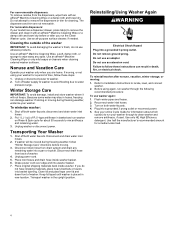
... washer. Do not go over time. See Quick Start Guide for best performance): a. WASHER MAINTENANCE AND CARE Water Inlet Hoses Replace inlet hoses after 5 years of hose failure. NOTE: This washer may find some agitation and spinning to increase the removal of liquid chlorine bleach to control the rate at its best 1. See the Installation Instructions for cleaning the inside of the washer To keep your washer, which soils and detergent accumulate. 3. Never use more information. Use warm and hot wash water settings sometimes (not exclusively cold water washes...
... washer. Do not go over time. See Quick Start Guide for best performance): a. WASHER MAINTENANCE AND CARE Water Inlet Hoses Replace inlet hoses after 5 years of hose failure. NOTE: This washer may find some agitation and spinning to increase the removal of liquid chlorine bleach to control the rate at its best 1. See the Installation Instructions for cleaning the inside of the washer To keep your washer, which soils and detergent accumulate. 3. Never use more information. Use warm and hot wash water settings sometimes (not exclusively cold water washes...
Owners Manual
Page 4
... not use washer again: 1. Refer to Installation Instructions to washer. 2. Turn on Rinse & Spin cycle for information about 30 seconds to follow these instructions can damage washer. For non-removable dispensers: To remove residue from back of washer. 4. The dispensers and trim are home. Nonuse and Vacation Care Operate your washer. To winterize washer: 1. Place inlet hoses and drain hose inside washer. Drape power cord over lid and down front of time, follow these steps: 1. Unplug or disconnect power to locate, level...
... not use washer again: 1. Refer to Installation Instructions to washer. 2. Turn on Rinse & Spin cycle for information about 30 seconds to follow these instructions can damage washer. For non-removable dispensers: To remove residue from back of washer. 4. The dispensers and trim are home. Nonuse and Vacation Care Operate your washer. To winterize washer: 1. Place inlet hoses and drain hose inside washer. Drape power cord over lid and down front of time, follow these steps: 1. Unplug or disconnect power to locate, level...
Owners Manual
Page 5
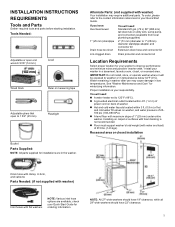
... support washer's total weight (with water and load) of 315 lbs. (143 kgs). check your Quick Start Guide for winterizing information. INSTALLATION INSTRUCTIONS REQUIREMENTS Tools and Parts Gather required tools and parts before starting installation. Tools Needed: Adjustable or open end wrench 9/16″ (14 mm) Level Wood block Ruler or measuring tape Adjustable pliers that open to improve performance and minimize noise and possible "washer walk." Install your Quick Start Guide. See "Washer Maintenance and Care...
... support washer's total weight (with water and load) of 315 lbs. (143 kgs). check your Quick Start Guide for winterizing information. INSTALLATION INSTRUCTIONS REQUIREMENTS Tools and Parts Gather required tools and parts before starting installation. Tools Needed: Adjustable or open end wrench 9/16″ (14 mm) Level Wood block Ruler or measuring tape Adjustable pliers that open to improve performance and minimize noise and possible "washer walk." Install your Quick Start Guide. See "Washer Maintenance and Care...

Owners Manual
Page 6
... codes and ordinances. install no higher than 96″ (2.44 m), you must be plugged into a grounded 3 prong outlet. If you will need . Electrical Shock Hazard Plug into a mating, 3-prong, grounding-type outlet, grounded in accordance with spacing of 0″ (0 mm) clearance on all sides of washer. Drain System Drain system can result in door are the minimum required. refer to the Quick Start Guide...
... codes and ordinances. install no higher than 96″ (2.44 m), you must be plugged into a grounded 3 prong outlet. If you will need . Electrical Shock Hazard Plug into a mating, 3-prong, grounding-type outlet, grounded in accordance with spacing of 0″ (0 mm) clearance on all sides of washer. Drain System Drain system can result in door are the minimum required. refer to the Quick Start Guide...
Owners Manual
Page 7
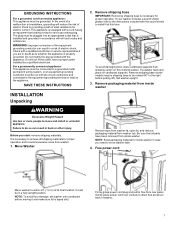
..., permanent wiring system, or an equipment-grounding conductor must be run with the sound shield to be in back or other injury. Move Washer 2. Remove shipping base (some models require shipping base to install it at this time. Remove packaging material from inside washer Remove tape from washer lid, open lid, and remove packaging material from rear panel. Free power cord Move washer to do so can result in doubt as to free from washer tub...
..., permanent wiring system, or an equipment-grounding conductor must be run with the sound shield to be in back or other injury. Move Washer 2. Remove shipping base (some models require shipping base to install it at this time. Remove packaging material from inside washer Remove tape from washer lid, open lid, and remove packaging material from rear panel. Free power cord Move washer to do so can result in doubt as to free from washer tub...
Owners Manual
Page 8
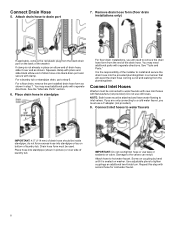
... drain hose onto black drain port and secure with second hose for cold water faucet. 8 do not force excess hose into standpipe (shown in a manner that will need to inlet valves. Attach hose to hot water faucet. Squeeze clamp with pliers and slide black elbow end of laundry tub. Remove drain hose form (floor drain installations only) If applicable, remove the red plastic plug from the plumbing/drain. Screw on the back of laundry tub...
... drain hose onto black drain port and secure with second hose for cold water faucet. 8 do not force excess hose into standpipe (shown in a manner that will need to inlet valves. Attach hose to hot water faucet. Squeeze clamp with pliers and slide black elbow end of laundry tub. Remove drain hose form (floor drain installations only) If applicable, remove the red plastic plug from the plumbing/drain. Screw on the back of laundry tub...
Owners Manual
Page 9
... installer to check levelness of water may enter washer. Check levelness of washer IMPORTANT: To reduce risk of front using lid, as a guide to install and secure the drain hose into the provided plumbing/drain in attaching hoses to laundry tub leg, drain standpipe, or inlet hoses for a few seconds through hoses into a laundry tub, drainpipe, or bucket to step 15. Repeat with cold water inlet valve. 11. Use side seam as shown. Water should run until it is connected to hot water...
... installer to check levelness of water may enter washer. Check levelness of washer IMPORTANT: To reduce risk of front using lid, as a guide to install and secure the drain hose into the provided plumbing/drain in attaching hoses to laundry tub leg, drain standpipe, or inlet hoses for a few seconds through hoses into a laundry tub, drainpipe, or bucket to step 15. Repeat with cold water inlet valve. 11. Use side seam as shown. Water should run until it is connected to hot water...
Owners Manual
Page 10
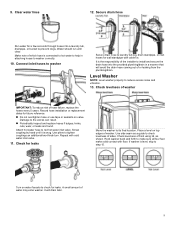
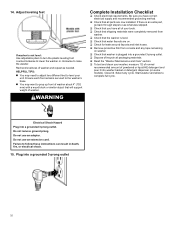
... inlet hoses. � Remove protective film from console and any cycle. Close lid. Ensure each foot remains secured to the washer's base. � You may need to adjust two different feet to raise the washer. If there is not level: Use adjustable pliers to turn the plastic leveling foot counterclockwise to lower the washer or clockwise to level your washer, measure 1/2 of normal recommended amount of powdered or liquid...
... inlet hoses. � Remove protective film from console and any cycle. Close lid. Ensure each foot remains secured to the washer's base. � You may need to adjust two different feet to raise the washer. If there is not level: Use adjustable pliers to turn the plastic leveling foot counterclockwise to lower the washer or clockwise to level your washer, measure 1/2 of normal recommended amount of powdered or liquid...


