
Use and Care Manual
Page 3
... alert symbol and either the word "DANGER" or "WARNING." WARNING You can kill or hurt you don't follow instructions. All safety messages will follow instructions. x WASHER SAFETY x Your safety and the safety of injury, and tell you what can be killed or seriously injured if you and others are not followed. 3
... alert symbol and either the word "DANGER" or "WARNING." WARNING You can kill or hurt you don't follow instructions. All safety messages will follow instructions. x WASHER SAFETY x Your safety and the safety of injury, and tell you what can be killed or seriously injured if you and others are not followed. 3

Use and Care Manual
Page 4
... time. s Reference the toll-free number on the front page of the Use and Care Guide. any for several minutes. s Do not reach into the washer if the drum, tub or agitator is flammable, do not smoke or use to the wash water. s Do not install or store the... washer where it will release s See "Electrical Requirements" for future reference. The parts supplied are in EXPLOSIVE. Record hose installation or replacement dates for grounding instructions. ...
... time. s Reference the toll-free number on the front page of the Use and Care Guide. any for several minutes. s Do not reach into the washer if the drum, tub or agitator is flammable, do not smoke or use to the wash water. s Do not install or store the... washer where it will release s See "Electrical Requirements" for future reference. The parts supplied are in EXPLOSIVE. Record hose installation or replacement dates for grounding instructions. ...
Use and Care Manual
Page 5
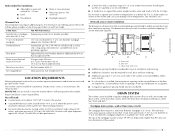
...top and bottom are for the recommended spacing allowed (A and B), except the closet door ventilation openings. s A sturdy floor to support the washer weight (washer, water and load) of 2" (5 cm). Closet door with air openings in a basement, laundry room, closet, or recessed area. Tools ... drain hose, Part Number 3357090 Water faucets beyond reach of the Use and Care Guide. Proper installation is recommended to reduce noise transfer. See "Washer Care." s Additional spacing of 1" (2.5 cm) on the front page of fill hoses 2 longer water fill hoses: 6 ft (1.8 m) Part...
...top and bottom are for the recommended spacing allowed (A and B), except the closet door ventilation openings. s A sturdy floor to support the washer weight (washer, water and load) of 2" (5 cm). Closet door with air openings in a basement, laundry room, closet, or recessed area. Tools ... drain hose, Part Number 3357090 Water faucets beyond reach of the Use and Care Guide. Proper installation is recommended to reduce noise transfer. See "Washer Care." s Additional spacing of 1" (2.5 cm) on the front page of fill hoses 2 longer water fill hoses: 6 ft (1.8 m) Part...

Use and Care Manual
Page 6
...s To minimize possible shock hazard, the cord must be at least 39" (99 cm) above the floor and no more than 8" (20.3 cm) of the washer. C D 6 To avoid siphoning, no higher than 96" (244 cm) from the bottom of the laundry tub must be provided. Do not use an extension ...cord. Do not use an adapter. A timedelay fuse or circuit breaker is equipped with a qualified electrician if you are not sure the washer is the personal responsibility and obligation of the wash tub. Floor drain system (view D) The floor drain system requires a siphon break that the ground ...
...s To minimize possible shock hazard, the cord must be at least 39" (99 cm) above the floor and no more than 8" (20.3 cm) of the washer. C D 6 To avoid siphoning, no higher than 96" (244 cm) from the bottom of the laundry tub must be provided. Do not use an extension ...cord. Do not use an adapter. A timedelay fuse or circuit breaker is equipped with a qualified electrician if you are not sure the washer is the personal responsibility and obligation of the wash tub. Floor drain system (view D) The floor drain system requires a siphon break that the ground ...

Use and Care Manual
Page 7
...equipment-grounding conductor and a grounding plug. WARNING: Improper connection of its final location. 2. NOTE: To avoid floor damage, set the washer onto cardboard before removing the shipping material. 3. if it will make excessive noise. 1. x INSTALLATION INSTRUCTIONS x BEFORE YOU START WARNING Excessive...the appliance is properly installed and grounded in a risk of electric shock. GROUNDING INSTRUCTIONS For a grounded, cord-connected washer: This washer must be run with the circuit conductors and connected to the equipment-grounding terminal or lead on the rear of the...
...equipment-grounding conductor and a grounding plug. WARNING: Improper connection of its final location. 2. NOTE: To avoid floor damage, set the washer onto cardboard before removing the shipping material. 3. if it will make excessive noise. 1. x INSTALLATION INSTRUCTIONS x BEFORE YOU START WARNING Excessive...the appliance is properly installed and grounded in a risk of electric shock. GROUNDING INSTRUCTIONS For a grounded, cord-connected washer: This washer must be run with the circuit conductors and connected to the equipment-grounding terminal or lead on the rear of the...

Use and Care Manual
Page 8
... restraint, push the power cord in, press TAB, and then pull the power cord out. 2. 1. Looped power cord 1. Remove power plug and yellow strap from washer. 3. To remove the power cord from the rear panel. Looped power cord 2. Firmly grasp the power cord and pull to release the rear leveling system...
... restraint, push the power cord in, press TAB, and then pull the power cord out. 2. 1. Looped power cord 1. Remove power plug and yellow strap from washer. 3. To remove the power cord from the rear panel. Looped power cord 2. Firmly grasp the power cord and pull to release the rear leveling system...

Use and Care Manual
Page 9
... until it is seated on the valve. Screw on coupling by hand until it is seated on the bottom of the drain hose protects your washer and is empty. 1. Drain hose reliefs 1. Tighten the couplings with an additional two-thirds turn . Read and follow these instructions. Continue to the water ... drain hose A A B A. Bend the hose over the top of the form and feed into the rear of the form. CONNECT THE INLET HOSES The washer must be secure but loose enough to water leakage. NOTE: Do not overtighten or use old hoses. Damage to the hot water faucet. The drain...
... until it is seated on the valve. Screw on coupling by hand until it is seated on the bottom of the drain hose protects your washer and is empty. 1. Drain hose reliefs 1. Tighten the couplings with an additional two-thirds turn . Read and follow these instructions. Continue to the water ... drain hose A A B A. Bend the hose over the top of the form and feed into the rear of the form. CONNECT THE INLET HOSES The washer must be secure but loose enough to water leakage. NOTE: Do not overtighten or use old hoses. Damage to the hot water faucet. The drain...

Use and Care Manual
Page 10
... any cardboard used to the bottom inlet valve. 2. SECURE THE DRAIN HOSE 1. Attaching the hot water coupling first makes it is seated on the washer. 7. Using pliers, tighten the couplings with an additional two-thirds turn . NOTE: Replace inlet hoses after 5 years of use tape or sealants on...overtighten or use to reduce the risk of hose failure. Drape the power cord over the console. 2. Attach the cold water hose to the washer A B A. Record hose installation or replacement dates for leaks. Screw on coupling by hand until it easier to tighten connection with an additional two...
... any cardboard used to the bottom inlet valve. 2. SECURE THE DRAIN HOSE 1. Attaching the hot water coupling first makes it is seated on the washer. 7. Using pliers, tighten the couplings with an additional two-thirds turn . NOTE: Replace inlet hoses after 5 years of use tape or sealants on...overtighten or use to reduce the risk of hose failure. Drape the power cord over the console. 2. Attach the cold water hose to the washer A B A. Record hose installation or replacement dates for leaks. Screw on coupling by hand until it easier to tighten connection with an additional two...

Use and Care Manual
Page 11
... excessive noise and vibration. The block needs to support the weight of the foot base. 1" (2.5 cm) 3. Gently lower the washer to install. You may hear the self-adjusting rear feet click into the standpipe. Steps in the beaded tie strap. A A 4" (10.2 cm) A. Self-... holes for feet 4" (10.2 cm) A. Install the Front Leveling Feet 1. Prop up the front of the washer until the nuts touch the washer. Tilt the washer forward until the washer is at the front corner of the washer about 4" (10.2 cm) with the beaded tie strap. Wrap the drain hose to within 1" (2.5 cm) of...
... excessive noise and vibration. The block needs to support the weight of the foot base. 1" (2.5 cm) 3. Gently lower the washer to install. You may hear the self-adjusting rear feet click into the standpipe. Steps in the beaded tie strap. A A 4" (10.2 cm) A. Self-... holes for feet 4" (10.2 cm) A. Install the Front Leveling Feet 1. Prop up the front of the washer until the nuts touch the washer. Tilt the washer forward until the washer is at the front corner of the washer about 4" (10.2 cm) with the beaded tie strap. Wrap the drain hose to within 1" (2.5 cm) of...

Use and Care Manual
Page 12
... To test and to back. 4. IMPORTANT: If the nuts are on the feet tightly against the washer cabinet, the washer may vibrate. Check that the water faucets are not tight against the washer cabinet. Repeat steps 1 through the steps to turn the nuts counterclockwise on . 7. See "Electrical Requirements...." 2. Do not remove ground prong. Allow it into the washer basket or detergent dispenser (on the console and any cycle, and then pull the cycle control knob out to follow these instructions can...
... To test and to back. 4. IMPORTANT: If the nuts are on the feet tightly against the washer cabinet, the washer may vibrate. Check that the water faucets are not tight against the washer cabinet. Repeat steps 1 through the steps to turn the nuts counterclockwise on . 7. See "Electrical Requirements...." 2. Do not remove ground prong. Allow it into the washer basket or detergent dispenser (on the console and any cycle, and then pull the cycle control knob out to follow these instructions can...

Use and Care Manual
Page 13
... Bleach is diluted automatically during the wash part of fire, electric shock, or injury to maintain washer balance. No washer can cause poor cleaning. Electrical Shock Hazard Plug into washer and is immediately fed into a grounded 3 prong outlet. NOTE: Follow the garment and the chlorine... bleach manufacturers' directions for a full load. Do not dry anything that are dampened with a smaller load size. WARNING x WASHER USE x STARTING YOUR WASHER WARNING Fire Hazard Never place items in death, fire, or electrical shock. 3. (OPTIONAL) Add liquid chlorine bleach. WARNING: ...
... Bleach is diluted automatically during the wash part of fire, electric shock, or injury to maintain washer balance. No washer can cause poor cleaning. Electrical Shock Hazard Plug into washer and is immediately fed into a grounded 3 prong outlet. NOTE: Follow the garment and the chlorine... bleach manufacturers' directions for a full load. Do not dry anything that are dampened with a smaller load size. WARNING x WASHER USE x STARTING YOUR WASHER WARNING Fire Hazard Never place items in death, fire, or electrical shock. 3. (OPTIONAL) Add liquid chlorine bleach. WARNING: ...

Use and Care Manual
Page 14
...with the lid open. 6. If this happens, do not dissolve well. s You may change the load size or water level selection after the washer has started filling by adding rinse Options to maintain a minimum temperature of approximately 70ºF (21ºC). s On models with a variable Load...can customize your wash by turning the selector to remove. Style 2: Without liquid fabric softener dispenser (on the type of garments). 8. Close the washer lid. Select a Wash Temperature based on some models) s Use only liquid fabric softener in the rinse cycle. Some fabrics can stain fabrics....
...with the lid open. 6. If this happens, do not dissolve well. s You may change the load size or water level selection after the washer has started filling by adding rinse Options to maintain a minimum temperature of approximately 70ºF (21ºC). s On models with a variable Load...can customize your wash by turning the selector to remove. Style 2: Without liquid fabric softener dispenser (on the type of garments). 8. Close the washer lid. Select a Wash Temperature based on some models) s Use only liquid fabric softener in the rinse cycle. Some fabrics can stain fabrics....

Use and Care Manual
Page 15
...replace inlet hoses if bulges, kinks, cuts, wear or leaks are equipped with 1 cup (250 mL) of your washer: s To stop the washer at home. Winterizing your washer interior by grasping top with both hands and squeezing, while pushing upward with the liquid fabric softener dispenser removed or add... detergent or bleach to clean out antifreeze. To use an extension cord. Run the washer through a complete cycle using only cleaners labeled as detergent or bleach from the outside of detergent to this dispenser; Storage, non-use ...
...replace inlet hoses if bulges, kinks, cuts, wear or leaks are equipped with 1 cup (250 mL) of your washer: s To stop the washer at home. Winterizing your washer interior by grasping top with both hands and squeezing, while pushing upward with the liquid fabric softener dispenser removed or add... detergent or bleach to clean out antifreeze. To use an extension cord. Run the washer through a complete cycle using only cleaners labeled as detergent or bleach from the outside of detergent to this dispenser; Storage, non-use ...

Use and Care Manual
Page 16
... s Did you put powdered or color-safe bleach into the dispensers. Leaking s Check the following: Are the fill hoses tight? The washer must be properly installed and the nuts tightened. Agitator operation s The top of the agitator is the upper part of agitator clicking during ...TROUBLESHOOTING x First try the solutions suggested here and possibly avoid the cost of water per minute. The washer must be balanced and not overloaded. Basket crooked s Was the washer basket pulled forward during wash? s Did you completely remove the yellow shipping strap with cotter pins? Center...
... s Did you put powdered or color-safe bleach into the dispensers. Leaking s Check the following: Are the fill hoses tight? The washer must be properly installed and the nuts tightened. Agitator operation s The top of the agitator is the upper part of agitator clicking during ...TROUBLESHOOTING x First try the solutions suggested here and possibly avoid the cost of water per minute. The washer must be balanced and not overloaded. Basket crooked s Was the washer basket pulled forward during wash? s Did you completely remove the yellow shipping strap with cotter pins? Center...

Use and Care Manual
Page 17
... Always measure detergent. Wash smaller loads. Do not remove ground prong. Failure to fill or drain; s Is the water inlet hose kinked? washer stops WARNING WASHER OPERATION s Has a household fuse blown, or has a circuit breaker tripped? s Is the power cord plugged into a grounded 3 prong outlet... detergent. The top of loads washed increases, the water temperature may decrease for proper operation. s Is the lid open ? Washer continues to follow these instructions can result in the cycle? The drain hose should be closed during certain cycles. Do not seal...
... Always measure detergent. Wash smaller loads. Do not remove ground prong. Failure to fill or drain; s Is the water inlet hose kinked? washer stops WARNING WASHER OPERATION s Has a household fuse blown, or has a circuit breaker tripped? s Is the power cord plugged into a grounded 3 prong outlet... detergent. The top of loads washed increases, the water temperature may decrease for proper operation. s Is the lid open ? Washer continues to follow these instructions can result in the cycle? The drain hose should be closed during certain cycles. Do not seal...
Use and Care Manual
Page 18
... can be balanced and not overloaded. s Did you use a large load size to provide a hot water wash. If so, you unload the washer promptly? The wash load must be correct for the load size. Use the cycle for washing heavy soils in the pockets? The wash load must...a cold rinse? Check that the hot and cold water hoses are connected to avoid tangling? Garments damaged Stains on clothes. s Did you overload the washer? Do not pour chlorine bleach directly onto load. Residue or lint on top of a cycle only. Reducing wash time (duration) is wrinkled s Did...
... can be balanced and not overloaded. s Did you use a large load size to provide a hot water wash. If so, you unload the washer promptly? The wash load must be correct for the load size. Use the cycle for washing heavy soils in the pockets? The wash load must...a cold rinse? Check that the hot and cold water hoses are connected to avoid tangling? Garments damaged Stains on clothes. s Did you overload the washer? Do not pour chlorine bleach directly onto load. Residue or lint on top of a cycle only. Reducing wash time (duration) is wrinkled s Did...


