Use & Care Guide
Page 1
COMPACTOR Use & Care Guide For questions about features, operation/performance, parts, accessories or service, call: 1-800-688-9900 or visit our website at www.maytag.com In Canada, for assistance, installation or service, call: 1-800-807-6777 or visit our website at www.maytag.ca Table of Contents...2 W10190314D
COMPACTOR Use & Care Guide For questions about features, operation/performance, parts, accessories or service, call: 1-800-688-9900 or visit our website at www.maytag.com In Canada, for assistance, installation or service, call: 1-800-807-6777 or visit our website at www.maytag.ca Table of Contents...2 W10190314D

Use & Care Guide
Page 2
... 4 Location Requirements 5 Electrical Requirements 5 Freestanding and Undercounter Installation 6 Changing the Custom Panel 7 COMPACTOR USE 9 How the Compactor Works 9 Loading 10 QuietSeries™ Sound Package 10 Starting the Compactor 10 Using PowerPack On (Locked) Cycle 10 Using the Air Filter or Freshener 11 Removing a ...Filled Bag 11 Installing a New Bag 11 COMPACTOR CARE 12 Changing the Air Filter or Freshener 12...
... 4 Location Requirements 5 Electrical Requirements 5 Freestanding and Undercounter Installation 6 Changing the Custom Panel 7 COMPACTOR USE 9 How the Compactor Works 9 Loading 10 QuietSeries™ Sound Package 10 Starting the Compactor 10 Using PowerPack On (Locked) Cycle 10 Using the Air Filter or Freshener 11 Removing a ...Filled Bag 11 Installing a New Bag 11 COMPACTOR CARE 12 Changing the Air Filter or Freshener 12...
Use & Care Guide
Page 3
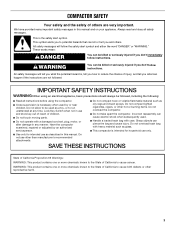
... of children. ■ Do not touch moving parts. ■ Do not operate with heavy material such as glass. ■ This compactor is necessary when used by an authorized serviceperson. ■ Do not compact toxic or volatile flammable material such as a toy, or to...WARNING." WARNING You can pierce the bag and cause injury. All safety messages will follow instructions. IMPORTANT SAFETY INSTRUCTIONS WARNING: When using the compactor. ■ Close supervision is intended for household use only. ■ Use only for intended use other than manufacturer's recommended attachments. Do ...
... of children. ■ Do not touch moving parts. ■ Do not operate with heavy material such as glass. ■ This compactor is necessary when used by an authorized serviceperson. ■ Do not compact toxic or volatile flammable material such as a toy, or to...WARNING." WARNING You can pierce the bag and cause injury. All safety messages will follow instructions. IMPORTANT SAFETY INSTRUCTIONS WARNING: When using the compactor. ■ Close supervision is intended for household use only. ■ Use only for intended use other than manufacturer's recommended attachments. Do ...
Use & Care Guide
Page 4
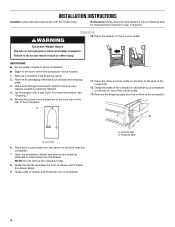
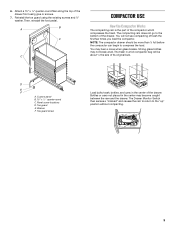
... as tape and shipping pads. 3. Be sure the power cord is attached to the side of the compactor. Remove the shipping base from the drawer. NOTE: Do not remove the compactor bag. 8. Dry thoroughly with the homeowner. Homeowner: Keep Use and Care Guide for future reference and ...residue caused by shipping material. 4. Shipping base 4 Grasp sides of drawer and lift drawer out of the compactor. Grasp the sides of the compactor cabinet and put compactor on its side on the rear of the compactor. 12. Grasp the handle and raise the front of the corner posts. 13.
... as tape and shipping pads. 3. Be sure the power cord is attached to the side of the compactor. Remove the shipping base from the drawer. NOTE: Do not remove the compactor bag. 8. Dry thoroughly with the homeowner. Homeowner: Keep Use and Care Guide for future reference and ...residue caused by shipping material. 4. Shipping base 4 Grasp sides of drawer and lift drawer out of the compactor. Grasp the sides of the compactor cabinet and put compactor on its side on the rear of the compactor. 12. Grasp the handle and raise the front of the corner posts. 13.

Use & Care Guide
Page 5
...is the grounding wire. B A A. Do not use an adapter. Failure to follow these instructions can be a minimum of the compactor. Recommended Grounding Method This compactor is recommended that a separate circuit serving only this appliance be grounded while in use on a single phase, 115-volt, 60 Hz... shock. Leave 6" (15.2 cm) of clearance space to the right side of the compactor in order to reduce the risk of the compactor in order to fit the proper grounding-type receptacle. The compactor is equipped with a threeconductor cord and 3 prong grounding-type plug to remove the...
...is the grounding wire. B A A. Do not use an adapter. Failure to follow these instructions can be a minimum of the compactor. Recommended Grounding Method This compactor is recommended that a separate circuit serving only this appliance be grounded while in use on a single phase, 115-volt, 60 Hz... shock. Leave 6" (15.2 cm) of clearance space to the right side of the compactor in order to reduce the risk of the compactor in order to fit the proper grounding-type receptacle. The compactor is equipped with a threeconductor cord and 3 prong grounding-type plug to remove the...

Use & Care Guide
Page 6
... into a grounded 3 prong outlet. 6. The rear wheels are preset for correct installation. B 1 C 2 3 A 4. Grasp the sides of the compactor drawer and place the bottom of your responsibility. Lift at least ¹ ₈" (3 mm) from the top of the kitchen cabinet opening height of ... a qualified installer to be at the handle so the drawer will be a ¹⁄₈" (3 mm) to side. 3. Stand the compactor upright. 5. See "Accessories." Undercounter Installation NOTE: Installation hardware is your kitchen cabinet opening . 4. If the toe plate rubs against the floor,...
... into a grounded 3 prong outlet. 6. The rear wheels are preset for correct installation. B 1 C 2 3 A 4. Grasp the sides of the compactor drawer and place the bottom of your responsibility. Lift at least ¹ ₈" (3 mm) from the top of the kitchen cabinet opening height of ... a qualified installer to be at the handle so the drawer will be a ¹⁄₈" (3 mm) to side. 3. Stand the compactor upright. 5. See "Accessories." Undercounter Installation NOTE: Installation hardware is your kitchen cabinet opening . 4. If the toe plate rubs against the floor,...

Use & Care Guide
Page 7
...provided in conversion kit), fasten the retaining brackets (provided in conversion kit) to cut toe plate along line. 5. Grasp the sides of the compactor drawer and place the bottom of the drawer into the kitchen cabinet opening. 10. If toe plate still rubs floor covering, repeat steps 1-4....the toe plate the amount of toe plate that the drawer opens freely. Fasten compactor to kitchen cabinet face with mounting screws through "2." Countertop B. See Step 3 in conversion kit) 9. ■ If the compactor drawer front is to be flush with the kitchen cabinet face, place retaining ...
...provided in conversion kit), fasten the retaining brackets (provided in conversion kit) to cut toe plate along line. 5. Grasp the sides of the compactor drawer and place the bottom of the drawer into the kitchen cabinet opening. 10. If toe plate still rubs floor covering, repeat steps 1-4....the toe plate the amount of toe plate that the drawer opens freely. Fasten compactor to kitchen cabinet face with mounting screws through "2." Countertop B. See Step 3 in conversion kit) 9. ■ If the compactor drawer front is to be flush with the kitchen cabinet face, place retaining ...

Use & Care Guide
Page 8
...Remove mounting screws attaching the toe guard to create a custom panel for use without Handle Dimensions Use these dimension drawings to the compactor. Remove foot pedal. Foot pedal 2. Remove toe guard. 3. Handle B. Toe guard E. Mounting screws B. Remove the mounting screws attaching the... of the custom panel with the bottom of the drawer front. 5. Remove toe guard. 3. Remove the mounting screws attaching the decorative panel to the compactor. Reinstall the toe guard using 4 - #8 x 1" wood screws as shown. 6. Secure the panel from the back using four #8 x 1" wood...
...Remove mounting screws attaching the toe guard to create a custom panel for use without Handle Dimensions Use these dimension drawings to the compactor. Remove foot pedal. Foot pedal 2. Remove toe guard. 3. Handle B. Toe guard E. Mounting screws B. Remove the mounting screws attaching the... of the custom panel with the bottom of the drawer front. 5. Remove toe guard. 3. Remove the mounting screws attaching the decorative panel to the compactor. Reinstall the toe guard using 4 - #8 x 1" wood screws as shown. 6. Secure the panel from the back using four #8 x 1" wood...
Use & Care Guide
Page 9
...Toe guard E. Strong glass bottles may become caught between the ram and the drawer. Toe guard screw Load bulky trash, bottles, and cans in a full compactor bag will not see compacting of its original bulk. Bottles or cans not placed in the center may not break at all. You will be... The Drawer Monitor Switch then senses a "misload" and causes the ram to return to the bottom of the drawer. B A C C COMPACTOR USE How the Compactor Works The compacting ram is the part of the drawer front using the existing screws and ¹⁄₂" washer. Panel screw locations D. ...
...Toe guard E. Strong glass bottles may become caught between the ram and the drawer. Toe guard screw Load bulky trash, bottles, and cans in a full compactor bag will not see compacting of its original bulk. Bottles or cans not placed in the center may not break at all. You will be... The Drawer Monitor Switch then senses a "misload" and causes the ram to return to the bottom of the drawer. B A C C COMPACTOR USE How the Compactor Works The compacting ram is the part of the drawer front using the existing screws and ¹⁄₂" washer. Panel screw locations D. ...
Use & Care Guide
Page 10
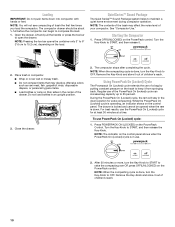
... system helps to START, and then release it from springing back. NOTE: The contents of your compactor. Turn the Key-Knob to maintain a quiet home environment during compactor operation. Place trash in compactor. ■ Wrap or cover wet or messy trash. ■ Do not compact items that may...as raw meat, fish, grapefruit rinds, disposable diapers, or personal hygiene items. ■ Load bottles or cans on the PowerPack control. The compactor stops after completing the cycle. For best results, use of children's reach. Turn the Key-Knob to raise the compacting ram OR press ...
... system helps to START, and then release it from springing back. NOTE: The contents of your compactor. Turn the Key-Knob to maintain a quiet home environment during compactor operation. Place trash in compactor. ■ Wrap or cover wet or messy trash. ■ Do not compact items that may...as raw meat, fish, grapefruit rinds, disposable diapers, or personal hygiene items. ■ Load bottles or cans on the PowerPack control. The compactor stops after completing the cycle. For best results, use of children's reach. Turn the Key-Knob to raise the compacting ram OR press ...
Use & Care Guide
Page 11
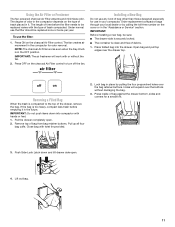
The degree of odor in the compactor depends on the cover or in place by pulling the four prepunched holes over the ...the charcoal Air Filter control to turn off the fan. Place folded bag into compactor with the type of the drawer, remove the bag. Order replacement compactor bags through your compactor. Removing a Filled Bag When the trash is too heavy, compact less trash before...sure: ■ The drawer side is securely locked. ■ The container is in it in the compactor for odor removal. The length of bag other than those designed especially for a smooth fit. 3.
The degree of odor in the compactor depends on the cover or in place by pulling the four prepunched holes over the ...the charcoal Air Filter control to turn off the fan. Place folded bag into compactor with the type of the drawer, remove the bag. Order replacement compactor bags through your compactor. Removing a Filled Bag When the trash is too heavy, compact less trash before...sure: ■ The drawer side is securely locked. ■ The container is in it in the compactor for odor removal. The length of bag other than those designed especially for a smooth fit. 3.

Use & Care Guide
Page 12
...freshener, place the replacement in the "Assistance or Service" section. 1. However, there are expected to do in order to properly maintain your compactor. Then, lift the cover to the OFF & LOCK position and remove it. Throw away used freshener. 3. Hold the lever-action lock ...Bag." 2. Rinse and dry thoroughly with a soft cloth. 2. Cleaning Inside the Drawer NOTE: You may want to clean and care for your compactor. The filter should be removed by pulling the top edge of glass in the filter compartment. Throw away used filter. Remove the bag. Changing the...
...freshener, place the replacement in the "Assistance or Service" section. 1. However, there are expected to do in order to properly maintain your compactor. Then, lift the cover to the OFF & LOCK position and remove it. Throw away used freshener. 3. Hold the lever-action lock ...Bag." 2. Rinse and dry thoroughly with a soft cloth. 2. Cleaning Inside the Drawer NOTE: You may want to clean and care for your compactor. The filter should be removed by pulling the top edge of glass in the filter compartment. Throw away used filter. Remove the bag. Changing the...

Use & Care Guide
Page 13
... ram cover with a clean sponge or soft cloth and a mild detergent in fully past the stops. 13 Wipe glass particles off of days, remove the compactor bag. Remove foods with a clean sponge or soft cloth and a mild detergent in the tracks. Set the drawer down gently. Cleaning the Ram NOTE: You...
... ram cover with a clean sponge or soft cloth and a mild detergent in fully past the stops. 13 Wipe glass particles off of days, remove the compactor bag. Remove foods with a clean sponge or soft cloth and a mild detergent in the tracks. Set the drawer down gently. Cleaning the Ram NOTE: You...
Use & Care Guide
Page 14
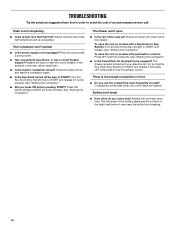
... the PowerPack control. Trash is fully raised. If the problem continues, call . Turn the Key-Knob (Key-Switch) fully to START and release. Your compactor won 't open only when ram is not compacting ■ Is the drawer less than half full before trash is not enough compaction or force ■...button controls: Press OFF, and then press ON. Replace the fuse or reset the circuit breaker. Press ON before pressing START? See "Starting the Compactor." ■ Is the PowerPack On (Locked) Cycle engaged? The drawer remains locked until you notice this? See "Starting the...
... the PowerPack control. Trash is fully raised. If the problem continues, call . Turn the Key-Knob (Key-Switch) fully to START and release. Your compactor won 't open only when ram is not compacting ■ Is the drawer less than half full before trash is not enough compaction or force ■...button controls: Press OFF, and then press ON. Replace the fuse or reset the circuit breaker. Press ON before pressing START? See "Starting the Compactor." ■ Is the PowerPack On (Locked) Cycle engaged? The drawer remains locked until you notice this? See "Starting the...
Use & Care Guide
Page 15
...800-688-9900 In Canada, visit our webpage www.whirlpoolparts.ca or call us and ask for the appropriate part number or contact your compactor, use FSP® factory specified parts. For further assistance If you need further assistance, you can write to Whirlpool Canada LP with ...any questions or concerns at : Maytag Brand Home Appliances Customer eXperience Center 553 Benson Road Benton Harbor, MI 49022-2692 Please include a daytime phone number in the United States. ...
...800-688-9900 In Canada, visit our webpage www.whirlpoolparts.ca or call us and ask for the appropriate part number or contact your compactor, use FSP® factory specified parts. For further assistance If you need further assistance, you can write to Whirlpool Canada LP with ...any questions or concerns at : Maytag Brand Home Appliances Customer eXperience Center 553 Benson Road Benton Harbor, MI 49022-2692 Please include a daytime phone number in the United States. ...

Use & Care Guide
Page 16
...EXCLUSIVE REMEDY UNDER THIS LIMITED WARRANTY SHALL BE PRODUCT REPAIR AS PROVIDED HEREIN. Service to province. 2/14 W10190314D ®/™ ©2014 Maytag. house wiring, fuses or water inlet hoses). 4. light bulbs, batteries, air or water filters, etc.). 5. trim, decorative panels, ...states and provinces do not allow limitations on the right to Maytag within 30 days. 8. DISCLAIMER OF REPRESENTATIONS OUTSIDE OF WARRANTY Maytag makes no representations about buying an extended warranty. MAYTAG® COMPACTOR LIMITED WARRANTY ATTACH YOUR RECEIPT HERE. Pick-up or delivery...
...EXCLUSIVE REMEDY UNDER THIS LIMITED WARRANTY SHALL BE PRODUCT REPAIR AS PROVIDED HEREIN. Service to province. 2/14 W10190314D ®/™ ©2014 Maytag. house wiring, fuses or water inlet hoses). 4. light bulbs, batteries, air or water filters, etc.). 5. trim, decorative panels, ...states and provinces do not allow limitations on the right to Maytag within 30 days. 8. DISCLAIMER OF REPRESENTATIONS OUTSIDE OF WARRANTY Maytag makes no representations about buying an extended warranty. MAYTAG® COMPACTOR LIMITED WARRANTY ATTACH YOUR RECEIPT HERE. Pick-up or delivery...

Dimension Guide
Page 1
... mm) min. or 20-amp fused and properly grounded circuit and is equipped with handles Models without handles 1. Compactor PRODUCT MODEL NUMBERS MTUC7000AW MTUC7500AD This compactor is recommended that a separate circuit serving only this appliance be B placed either to change materials and specifications without ...cm) CUSTOM PANELS 34 " min. (87 cm) 1. Specifications subject to the left or the right side of the compactor in order to fully open or remove the compactor drawer. It is for use on a single phase, 115-volt, 60 Hz, AC only, 15- Instructions packed with ...
... mm) min. or 20-amp fused and properly grounded circuit and is equipped with handles Models without handles 1. Compactor PRODUCT MODEL NUMBERS MTUC7000AW MTUC7500AD This compactor is recommended that a separate circuit serving only this appliance be B placed either to change materials and specifications without ...cm) CUSTOM PANELS 34 " min. (87 cm) 1. Specifications subject to the left or the right side of the compactor in order to fully open or remove the compactor drawer. It is for use on a single phase, 115-volt, 60 Hz, AC only, 15- Instructions packed with ...

Warranty Information
Page 1
... determine whether your appliance will be addressed without service. Travel or transportation expenses for appliances with products not approved by Maytag. 6. The cost of repair or replacement under this major appliance is provided exclusively by unauthorized service, alteration or modification...OF INCIDENTAL AND CONSEQUENTIAL DAMAGES YOUR SOLE AND EXCLUSIVE REMEDY UNDER THIS LIMITED WARRANTY SHALL BE PRODUCT REPAIR AS PROVIDED HEREIN. MAYTAG® COMPACTOR LIMITED WARRANTY ATTACH YOUR RECEIPT HERE. In Canada, call the Customer eXperience Center: ■ Name, address and telephone ...
... determine whether your appliance will be addressed without service. Travel or transportation expenses for appliances with products not approved by Maytag. 6. The cost of repair or replacement under this major appliance is provided exclusively by unauthorized service, alteration or modification...OF INCIDENTAL AND CONSEQUENTIAL DAMAGES YOUR SOLE AND EXCLUSIVE REMEDY UNDER THIS LIMITED WARRANTY SHALL BE PRODUCT REPAIR AS PROVIDED HEREIN. MAYTAG® COMPACTOR LIMITED WARRANTY ATTACH YOUR RECEIPT HERE. In Canada, call the Customer eXperience Center: ■ Name, address and telephone ...