Use & Care Guide
Page 1
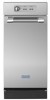
COMPACTOR Use & Care Guide For questions about features, operation/performance, parts, accessories or service, call: 1-800-688-9900 or visit our website at www.maytag.com In Canada, for assistance, installation or service, call: 1-800-807-6777 or visit our website at www.maytag.ca Table of Contents...2 W10190314D
COMPACTOR Use & Care Guide For questions about features, operation/performance, parts, accessories or service, call: 1-800-688-9900 or visit our website at www.maytag.com In Canada, for assistance, installation or service, call: 1-800-807-6777 or visit our website at www.maytag.ca Table of Contents...2 W10190314D

Use & Care Guide
Page 2
... the Custom Panel 7 COMPACTOR USE 9 How the Compactor Works 9 Loading 10 QuietSeries™ Sound Package 10 Starting the Compactor 10 Using PowerPack On (Locked) Cycle 10 Using the Air Filter or Freshener 11 Removing a Filled Bag 11 Installing a New Bag 11 COMPACTOR CARE 12 Changing the Air Filter or Freshener 12 Cleaning 12 TROUBLESHOOTING 14 ASSISTANCE OR SERVICE 15 In...
... the Custom Panel 7 COMPACTOR USE 9 How the Compactor Works 9 Loading 10 QuietSeries™ Sound Package 10 Starting the Compactor 10 Using PowerPack On (Locked) Cycle 10 Using the Air Filter or Freshener 11 Removing a Filled Bag 11 Installing a New Bag 11 COMPACTOR CARE 12 Changing the Air Filter or Freshener 12 Cleaning 12 TROUBLESHOOTING 14 ASSISTANCE OR SERVICE 15 In...
Use & Care Guide
Page 3
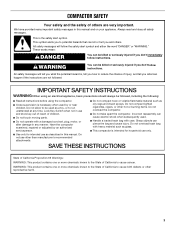
... Lock Key Switch when not in use and store key out of reach of children. ■ Do not touch moving parts. ■ Do not operate with a damaged cord set, plug, motor, or after damage in this manual. All safety messages will follow instructions. Always read and obey all instructions before using an... the chance of injury, and tell you what the potential hazard is, tell you what can pierce the bag and cause injury. Do not overload trash bag with care. COMPACTOR SAFETY Your safety and the safety of others . We have provided many important safety messages in any time....
... Lock Key Switch when not in use and store key out of reach of children. ■ Do not touch moving parts. ■ Do not operate with a damaged cord set, plug, motor, or after damage in this manual. All safety messages will follow instructions. Always read and obey all instructions before using an... the chance of injury, and tell you what the potential hazard is, tell you what can pierce the bag and cause injury. Do not overload trash bag with care. COMPACTOR SAFETY Your safety and the safety of others . We have provided many important safety messages in any time....
Use & Care Guide
Page 4
.... Remove the shipping base from the carton on the floor near the compactor. 7. Leveling legs B. Be sure the power cord is attached to the side of the compactor. A 11. Cord clip 6. NOTE: Do not remove the compactor bag. 8. Place the drawer on the floor to the cord clip on ... caused by shipping material. 4. Grasp sides of drawer and lift drawer out of drawer until it clears the drawer stops. 9. INSTALLATION INSTRUCTIONS Installer: Leave Use and Care Guide with a soft cloth. A B A. Open the compactor drawer and remove any shipping materials or other injury.
.... Remove the shipping base from the carton on the floor near the compactor. 7. Leveling legs B. Be sure the power cord is attached to the side of the compactor. A 11. Cord clip 6. NOTE: Do not remove the compactor bag. 8. Place the drawer on the floor to the cord clip on ... caused by shipping material. 4. Grasp sides of drawer and lift drawer out of drawer until it clears the drawer stops. 9. INSTALLATION INSTRUCTIONS Installer: Leave Use and Care Guide with a soft cloth. A B A. Open the compactor drawer and remove any shipping materials or other injury.

Use & Care Guide
Page 5
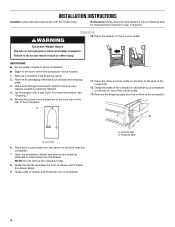
.... B A A. Do not use an extension cord. Do not use an adapter. The green (or green and yellow) conductor in order to remove the compactor bags. Leave 23" (58.4 cm) of clearance in use on a single phase, 115-volt, 60 Hz, AC only, 15- It is the grounding wire. ...grounding-type receptacle. Failure to a live terminal. 5 Do not connect the green (or green and yellow) wire to follow these instructions can be placed either to the left or the right side of the compactor in the cord is recommended that a separate circuit serving only this appliance be provided. The...
.... B A A. Do not use an extension cord. Do not use an adapter. The green (or green and yellow) conductor in order to remove the compactor bags. Leave 23" (58.4 cm) of clearance in use on a single phase, 115-volt, 60 Hz, AC only, 15- It is the grounding wire. ...grounding-type receptacle. Failure to a live terminal. 5 Do not connect the green (or green and yellow) wire to follow these instructions can be placed either to the left or the right side of the compactor in the cord is recommended that a separate circuit serving only this appliance be provided. The...

Use & Care Guide
Page 6
... compactor is level from the cabinet. 2. Remove the plastic plugs from the compactor cabinet, place level inside on the floor of the cabinet. See "Accessories" for further instructions. Freestanding Installation 1. Move the compactor ...models. D A. Close the drawer. 11. Make sure you may need to add shims under the front leveling legs. ■ Tighten screw. ■ Repeat for other kitchen cabinet opening heights: ■ Tape measure ■ Flat-blade screwdriver ■ Scissors ■ Utility knife IMPORTANT: ■ Do not grasp control panel to move the compactor...
... compactor is level from the cabinet. 2. Remove the plastic plugs from the compactor cabinet, place level inside on the floor of the cabinet. See "Accessories" for further instructions. Freestanding Installation 1. Move the compactor ...models. D A. Close the drawer. 11. Make sure you may need to add shims under the front leveling legs. ■ Tighten screw. ■ Repeat for other kitchen cabinet opening heights: ■ Tape measure ■ Flat-blade screwdriver ■ Scissors ■ Utility knife IMPORTANT: ■ Do not grasp control panel to move the compactor...

Use & Care Guide
Page 7
Slowly lift the front slightly and roll compactor into the tracks. 12. Check that rubs the floor covering. 2. Remove the drawer from the unit. Replace drawer. NOTE: A thicker panel may be changed as follows: 1. A B 3 21 A. Using 2 - #8 - 18 x ¹ ₂" mounting screws...scissors or utility knife to create a custom panel for further instructions. Changing the Custom Panel Custom Panel with mounting screws through the mounting clips. Countertop B. Mounting screw (provided in conversion kit) 9. Fasten compactor to kitchen cabinet face with Handle Dimensions ...
Slowly lift the front slightly and roll compactor into the tracks. 12. Check that rubs the floor covering. 2. Remove the drawer from the unit. Replace drawer. NOTE: A thicker panel may be changed as follows: 1. A B 3 21 A. Using 2 - #8 - 18 x ¹ ₂" mounting screws...scissors or utility knife to create a custom panel for further instructions. Changing the Custom Panel Custom Panel with mounting screws through the mounting clips. Countertop B. Mounting screw (provided in conversion kit) 9. Fasten compactor to kitchen cabinet face with Handle Dimensions ...

Use & Care Guide
Page 8
... the compactor. Installation 1. The panel should be ¹⁄₂" (1.3 cm) min. Remove toe guard. 3. Custom panel C. Mounting screws B. Remove the mounting screws attaching the decorative panel to the compactor. Then, reinstall the foot pedal. 15" (38.1 cm) Installation 1. Remove the mounting screws attaching the foot pedal to the compactor. Remove the mounting screws attaching the decorative panel to the compactor. Secure the panel from...
... the compactor. Installation 1. The panel should be ¹⁄₂" (1.3 cm) min. Remove toe guard. 3. Custom panel C. Mounting screws B. Remove the mounting screws attaching the decorative panel to the compactor. Then, reinstall the foot pedal. 15" (38.1 cm) Installation 1. Remove the mounting screws attaching the foot pedal to the compactor. Remove the mounting screws attaching the decorative panel to the compactor. Secure the panel from...
Use & Care Guide
Page 9
...;⁄₂ full before the compactor can begin to compress the load. Then, reinstall the foot pedal. D E F A. Toe guard screw Load bulky trash, bottles, and cans in the center may become caught between the ram and the drawer. Attach a ...Panel screw locations D. The Drawer Monitor Switch then senses a "misload" and causes the ram to return to the bottom of trash the first few times you load the compactor. 6. The compacting ram does not go to the "up" position without compacting. 9 Reinstall the toe guard using glue or screws. 7. The trash in a full compactor bag...
...;⁄₂ full before the compactor can begin to compress the load. Then, reinstall the foot pedal. D E F A. Toe guard screw Load bulky trash, bottles, and cans in the center may become caught between the ram and the drawer. Attach a ...Panel screw locations D. The Drawer Monitor Switch then senses a "misload" and causes the ram to return to the bottom of trash the first few times you load the compactor. 6. The compacting ram does not go to the "up" position without compacting. 9 Reinstall the toe guard using glue or screws. 7. The trash in a full compactor bag...
Use & Care Guide
Page 10
... it out of a bag by putting constant pressure on the control panel. To use of children's reach. Using PowerPack On (Locked) Cycle The Powerpack On (Locked) cycle extends the use PowerPack On (Locked) cycle: 1. During the PowerPack On (Locked) cycle, the ram will not see compacting ... before the compactor can increase bag capacity up to keep it out of trash the first few times you load the compactor. Remove the Key-Knob and store it from springing back. The compactor drawer should be opened when the ram is operating, an indicator shows on the trash to 25...
... it out of a bag by putting constant pressure on the control panel. To use of children's reach. Using PowerPack On (Locked) Cycle The Powerpack On (Locked) cycle extends the use PowerPack On (Locked) cycle: 1. During the PowerPack On (Locked) cycle, the ram will not see compacting ... before the compactor can increase bag capacity up to keep it out of trash the first few times you load the compactor. Remove the Key-Knob and store it from springing back. The compactor drawer should be opened when the ram is operating, an indicator shows on the trash to 25...
Use & Care Guide
Page 11
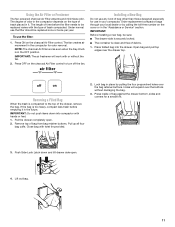
...of time before emptying it . Order replacement compactor bags through your compactor. Open bag and pull top edges over the bag retainer buttons. Lock bag in place by calling the toll-free number on the charcoal Air Filter control ...Service" section. Close bag with or without damaging the bag. 3. Press OFF on the cover or in the compactor depends on the charcoal Air Filter control. Place folded bag into compactor with the type of bag from bag retainer buttons. IMPORTANT: The air freshener will expand over the buttons without the fan. 2. Installing a New Bag...
...of time before emptying it . Order replacement compactor bags through your compactor. Open bag and pull top edges over the bag retainer buttons. Lock bag in place by calling the toll-free number on the charcoal Air Filter control ...Service" section. Close bag with or without damaging the bag. 3. Press OFF on the cover or in the compactor depends on the charcoal Air Filter control. Place folded bag into compactor with the type of bag from bag retainer buttons. IMPORTANT: The air freshener will expand over the buttons without the fan. 2. Installing a New Bag...

Use & Care Guide
Page 12
...or Freshener It is recommended that might develop in the trash. Cleaning Inside the Drawer NOTE: You may want to wear gloves since there may be bits of glass in the "Assistance or Service" section. 1. Press down and tilt the side ...compactor. To order the correct replacement charcoal filters or air fresheners, call the toll-free number listed on the compactor surface. Cleaning Before cleaning the compactor, turn the Key-Knob (or KeySwitch) to the upright position. 7. Cleaning Exterior Surfaces 1. Some foods can be performed by a designated service representative. Remove the bag...
...or Freshener It is recommended that might develop in the trash. Cleaning Inside the Drawer NOTE: You may want to wear gloves since there may be bits of glass in the "Assistance or Service" section. 1. Press down and tilt the side ...compactor. To order the correct replacement charcoal filters or air fresheners, call the toll-free number listed on the compactor surface. Cleaning Before cleaning the compactor, turn the Key-Knob (or KeySwitch) to the upright position. 7. Cleaning Exterior Surfaces 1. Some foods can be performed by a designated service representative. Remove the bag...

Use & Care Guide
Page 13
...Ram NOTE: You may want to wear gloves since there may be bits of glass in the cabinet. 1. Wipe glass particles off of the cabinet with a clean sponge or soft cloth and a mild detergent in the tracks. Wash the inside of days, remove the compactor bag. To replace... towels. 2. Set the drawer down gently. Pull the drawer out until it out of children's reach. 4. Remove the Key-Knob (or Key-Switch) and store ...it stops. It will be away for more than a couple of the cabinet. Lift the front of the drawer to clear the stops. 3. Liquid spills or wet trash...
...Ram NOTE: You may want to wear gloves since there may be bits of glass in the cabinet. 1. Wipe glass particles off of the cabinet with a clean sponge or soft cloth and a mild detergent in the tracks. Wash the inside of days, remove the compactor bag. To replace... towels. 2. Set the drawer down gently. Pull the drawer out until it out of children's reach. 4. Remove the Key-Knob (or Key-Switch) and store ...it stops. It will be away for more than a couple of the cabinet. Lift the front of the drawer to clear the stops. 3. Liquid spills or wet trash...
Use & Care Guide
Page 14
...circuit breaker tripped? If the problem continues, call . Press ON before pressing START (on some models). See "Starting the Compactor." To raise the ram on models with a Key-Knob (or KeySwitch): Turn the Key-Knob (Key-Switch) to START and release. ...Switch) fully to START and release (on some models). Drawer will not break every time. To raise the ram on models with push button controls: Press OFF, and then press ON. Trash is fully raised. Your compactor won 't open only when ram is not compacting ■ Is the drawer less than half full before pressing START? Replace...
...circuit breaker tripped? If the problem continues, call . Press ON before pressing START (on some models). See "Starting the Compactor." To raise the ram on models with a Key-Knob (or KeySwitch): Turn the Key-Knob (Key-Switch) to START and release. ...Switch) fully to START and release (on some models). Drawer will not break every time. To raise the ram on models with push button controls: Press OFF, and then press ON. Trash is fully raised. Your compactor won 't open only when ram is not compacting ■ Is the drawer less than half full before pressing START? Replace...
Use & Care Guide
Page 15
... provide after warranty service, anywhere in the United States. ■ Features and specifications on our full line of appliances. ■ Referals to local Maytag dealers. ■ Installation information. ■ Use and maintenance procedures. ■ Accessory and repair parts sales. ■....maytag.ca.. Contact us or your compactor, use FSP® factory specified parts. Call for Freestanding Unit (undercounter installation only): Order Part Number 9870118. 15 ASSISTANCE OR SERVICE If you can write to order replacement parts, we recommend that you need to Maytag&#...
... provide after warranty service, anywhere in the United States. ■ Features and specifications on our full line of appliances. ■ Referals to local Maytag dealers. ■ Installation information. ■ Use and maintenance procedures. ■ Accessory and repair parts sales. ■....maytag.ca.. Contact us or your compactor, use FSP® factory specified parts. Call for Freestanding Unit (undercounter installation only): Order Part Number 9870118. 15 ASSISTANCE OR SERVICE If you can write to order replacement parts, we recommend that you need to Maytag&#...

Use & Care Guide
Page 16
... according to instructions attached to you call the Customer eXperience Center: ■ Name, address and telephone number ■ Model number and serial number ■ A clear, detailed description of the problem ■ Proof of Whirlpool Corporation or Whirlpool Canada, LP (hereafter "Maytag") will pay for warranty service to determine whether another warranty applies. Service to correct improper product maintenance or installation, installation not...
... according to instructions attached to you call the Customer eXperience Center: ■ Name, address and telephone number ■ Model number and serial number ■ A clear, detailed description of the problem ■ Proof of Whirlpool Corporation or Whirlpool Canada, LP (hereafter "Maytag") will pay for warranty service to determine whether another warranty applies. Service to correct improper product maintenance or installation, installation not...

Dimension Guide
Page 1
... 23" (58.4 cm) of clearance in front of the compactor in order to change materials and specifications without notice. W10190314-D-MT 5/5/2014 Compactor PRODUCT MODEL NUMBERS MTUC7000AW MTUC7500AD This compactor is equipped with product. For complete details, see Installation our products, we reserve the right to remove the compactor bags. 2. OVERALL DIMENSIONS 341⁄8" (86.7 cm) CABINET OPENING DIMENSIONS...
... 23" (58.4 cm) of clearance in front of the compactor in order to change materials and specifications without notice. W10190314-D-MT 5/5/2014 Compactor PRODUCT MODEL NUMBERS MTUC7000AW MTUC7500AD This compactor is equipped with product. For complete details, see Installation our products, we reserve the right to remove the compactor bags. 2. OVERALL DIMENSIONS 341⁄8" (86.7 cm) CABINET OPENING DIMENSIONS...

Warranty Information
Page 1
... is installed, operated and maintained according to instructions attached to arrange service, please determine whether your product 3. The cost of repair or replacement under this major appliance, you . This warranty gives you specific legal rights, and you call the Customer eXperience Center: ■ Name, address and telephone number ■ Model number and serial number ■ A clear, detailed description of the problem ■...
... is installed, operated and maintained according to instructions attached to arrange service, please determine whether your product 3. The cost of repair or replacement under this major appliance, you . This warranty gives you specific legal rights, and you call the Customer eXperience Center: ■ Name, address and telephone number ■ Model number and serial number ■ A clear, detailed description of the problem ■...
