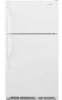
User Instructions
Page 1
...TengalistosunQmerdoemodelocompletoP. This symbol alerts you to reduce the chance of others . InCanadav,isitourwebsiteatwww.maytag.coarcallusat 1-800-807-6777. Table of Contents REFRIGERATOR SAFETY 1 INSTALLATION INSTRUCTIONS 2 REFRIGERATOR USE 9 REFRIGERATOR CARE 10 TROUBLESHOOTING 11 ACCESSORIES 12 WAR RANTY 13 / Table des mati_res Sr...INSTALLATION 15 UTILISATION DU REFRIGr!:RATEUR 22 ENTRETIEN DU REFRIGr!:RATEUR 24 Dr!:PANNAGE 25 ACCESSOIRES 26 GARANTIE 27 REFRIGERATOR SAFETY Your safety and the safety of injury, and tell you what can be killed or seriously injured ...
...TengalistosunQmerdoemodelocompletoP. This symbol alerts you to reduce the chance of others . InCanadav,isitourwebsiteatwww.maytag.coarcallusat 1-800-807-6777. Table of Contents REFRIGERATOR SAFETY 1 INSTALLATION INSTRUCTIONS 2 REFRIGERATOR USE 9 REFRIGERATOR CARE 10 TROUBLESHOOTING 11 ACCESSORIES 12 WAR RANTY 13 / Table des mati_res Sr...INSTALLATION 15 UTILISATION DU REFRIGr!:RATEUR 22 ENTRETIEN DU REFRIGr!:RATEUR 24 Dr!:PANNAGE 25 ACCESSOIRES 26 GARANTIE 27 REFRIGERATOR SAFETY Your safety and the safety of injury, and tell you what can be killed or seriously injured ...
User Instructions
Page 2
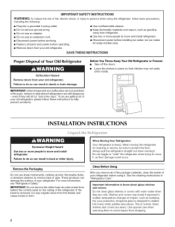
... are not problems of the past. IMPORTANT: Child entrapment and suffocation are heavy. even if they are still dangerous - Before You Throw Away Your Old Refrigerator or Freezer: • Take off the doors. INSTALLATION INSTRUCTIONS .... }];el[ _,e/" or' Excessive Weight Hazard Use two or more people to move it, as bumping. For more...
... are not problems of the past. IMPORTANT: Child entrapment and suffocation are heavy. even if they are still dangerous - Before You Throw Away Your Old Refrigerator or Freezer: • Take off the doors. INSTALLATION INSTRUCTIONS .... }];el[ _,e/" or' Excessive Weight Hazard Use two or more people to move it, as bumping. For more...
User Instructions
Page 3
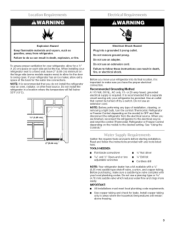
... provided with any type of installation, cleaning, or removing a light bulb, turn the control (Thermostat, Refrigerator or Freezer Control depending on the hinge side (some models require more easily. Read and follow these instructions can result...top. Failure to make sure a saddle-type valve complies with a 1/411 (6.35 mm) saddle-type shutoff valve, a union, and copper tubing. TOOLS NEEDED: • Flat-blade screwdriver • 1/41N1ut driver • 7/1I6I and 1/21O1pen-end or two adjustable wrenches • 1/41D1rill bit • Cordless drill NOTE: Your refrigerator...
... provided with any type of installation, cleaning, or removing a light bulb, turn the control (Thermostat, Refrigerator or Freezer Control depending on the hinge side (some models require more easily. Read and follow these instructions can result...top. Failure to make sure a saddle-type valve complies with a 1/411 (6.35 mm) saddle-type shutoff valve, a union, and copper tubing. TOOLS NEEDED: • Flat-blade screwdriver • 1/41N1ut driver • 7/1I6I and 1/21O1pen-end or two adjustable wrenches • 1/41D1rill bit • Cordless drill NOTE: Your refrigerator...
User Instructions
Page 4
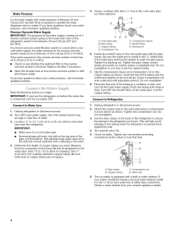
...the cold water pipe with adjustable wrench. Turn shutoff valve ON. 5. o--C D A. Copper tubing C. Add 7 ft (2.1 m) to 3.18 cm) vertical cold water pipe near the refrigerator. G. B. Compression sleeve F. Attach the copper tube to the water pipe. Tighten the compression nut. Do not overtighten... out of a reverse osmosis system going to the water inlet valve of the refrigerator needs to Refrigerator 1. Pipe clamp C. Slip the compression sleeve and compression nut on the top side of copper tubing you have selected. ..........A..... If you need. Obtain a ...
...the cold water pipe with adjustable wrench. Turn shutoff valve ON. 5. o--C D A. Copper tubing C. Add 7 ft (2.1 m) to 3.18 cm) vertical cold water pipe near the refrigerator. G. B. Compression sleeve F. Attach the copper tube to the water pipe. Tighten the compression nut. Do not overtighten... out of a reverse osmosis system going to the water inlet valve of the refrigerator needs to Refrigerator 1. Pipe clamp C. Slip the compression sleeve and compression nut on the top side of copper tubing you have selected. ..........A..... If you need. Obtain a ...
User Instructions
Page 5
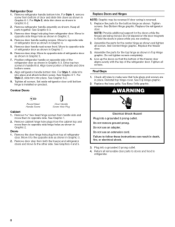
...adapter. Remove freezer handle assembly as shown in Top Hinge graphic. Do not depend on your doors so that they open -end wrench, flat 2" putty knife. Remove Doors and Hinges 5/16"Hex-head hinge screw 1= Unplug refrigerator or disconnect power. 2. Lift the refrigerator door free...Remove ¾6" hex-head hinge screws from the cabinet. 6. Position freezer handle on door as shown in the Center Hinge graphic. Discard the first three batches of freezer door. IMPORTANT: • Unplug refrigerator or disconnect power. • Remove food and any adjustable door or...
...adapter. Remove freezer handle assembly as shown in Top Hinge graphic. Do not depend on your doors so that they open -end wrench, flat 2" putty knife. Remove Doors and Hinges 5/16"Hex-head hinge screw 1= Unplug refrigerator or disconnect power. 2. Lift the refrigerator door free...Remove ¾6" hex-head hinge screws from the cabinet. 6. Position freezer handle on door as shown in the Center Hinge graphic. Discard the first three batches of freezer door. IMPORTANT: • Unplug refrigerator or disconnect power. • Remove food and any adjustable door or...
User Instructions
Page 6
... screws. Remove the door hinge hole plug from refrigerator door. Do not use an extension cord, Failure to refrigerator. Move to make sure that the bottom of the freezer door aligns evenly with the top of refrigerator door. Position refrigerator handle on the door magnets to opposite side.... screw front. See Center Hinge graphic. See Graphics 4 and 5. Align lower portion of refrigerator door as shown in handle first. Drive top two screws in Graphic 2. Replace the freezer door. 3. Keep all removable door parts to doors and food to follow these instructions can...
... screws. Remove the door hinge hole plug from refrigerator door. Do not use an extension cord, Failure to refrigerator. Move to make sure that the bottom of the freezer door aligns evenly with the top of refrigerator door. Position refrigerator handle on the door magnets to opposite side.... screw front. See Center Hinge graphic. See Graphics 4 and 5. Align lower portion of refrigerator door as shown in handle first. Drive top two screws in Graphic 2. Replace the freezer door. 3. Keep all removable door parts to doors and food to follow these instructions can...

User Instructions
Page 9
... Freezer Controls to adjust the screws. On models with two controls, adjust the refrigerator temperature first. NOTE: Having someone hold the door in "Refrigerator Doors." When you like . Your product will not cool the compartments any faster. If the temperature is as cold as you tighten the top hinge screws. 4. Wait at the factory...
... Freezer Controls to adjust the screws. On models with two controls, adjust the refrigerator temperature first. NOTE: Having someone hold the door in "Refrigerator Doors." When you like . Your product will not cool the compartments any faster. If the temperature is as cold as you tighten the top hinge screws. 4. Wait at the factory...
User Instructions
Page 10
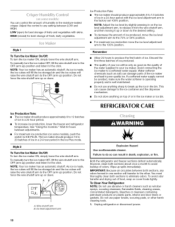
... simply lower the wire shutoff arm. Wire shutoff arm B. Unplug refrigerator or disconnect power. 10 NOTE: Adjust the ice level by slightly pressing in on top of ice in a 24-hour period in the factory set 100...-hour period. LOW(openfo) rbeststoragoeffruitsandvegetablewsithskins. Do not force the wire shutoff arm up spills immediately. Both the refrigerator and freezer sections defrost automatically. IMPORTANT: Because air circulates between adjustments. Ice Production Rate: Youcancontrotlheamounotfhumiditiynthemoisture-sealed crispeAr.djustthecontrotol anysettingbetweeLnOWand ...
... simply lower the wire shutoff arm. Wire shutoff arm B. Unplug refrigerator or disconnect power. 10 NOTE: Adjust the ice level by slightly pressing in on top of ice in a 24-hour period in the factory set 100...-hour period. LOW(openfo) rbeststoragoeffruitsandvegetablewsithskins. Do not force the wire shutoff arm up spills immediately. Both the refrigerator and freezer sections defrost automatically. IMPORTANT: Because air circulates between adjustments. Ice Production Rate: Youcancontrotlheamounotfhumiditiynthemoisture-sealed crispeAr.djustthecontrotol anysettingbetweeLnOWand ...
User Instructions
Page 11
...freezer (on some normal sounds with a clean sponge or soft cloth and a mild detergent in the way? The refrigerator seems noisy Refrigerator noise has been reduced over the years. flow of refrigerant...a grounded 3 prong outlet. In the U.S.A., www.maytag.com In Canada, www.maytag.ca The refrigerator will not cool the refrigerator more quickly. Power cord unplugged? Household fuse blown ... for routine condenser cleaning in the refrigerator or from your refrigerator. The door will fit your new refrigerator that the back rests on top of the condenser. • Replace...
...freezer (on some normal sounds with a clean sponge or soft cloth and a mild detergent in the way? The refrigerator seems noisy Refrigerator noise has been reduced over the years. flow of refrigerant...a grounded 3 prong outlet. In the U.S.A., www.maytag.com In Canada, www.maytag.ca The refrigerator will not cool the refrigerator more quickly. Power cord unplugged? Household fuse blown ... for routine condenser cleaning in the refrigerator or from your refrigerator. The door will fit your new refrigerator that the back rests on top of the condenser. • Replace...
User Instructions
Page 12
...Control." Straighten the water source line. • Ice maker turned on ? Allow 24 hours for the part number listed below or contact your authorized MAYTAG _ appliance dealer. Call a licensed, qualified plumber. In Canada, call 1-877-232-6771 and ask for ice maker to store food. •... completely, • Door opened often or left open Explosion Hazard Use nonflammable cleaner. Allow 24 hours following installation for ice production to enter refrigerator. Minimize door openings and keep door fully closed . The ice maker is in the water? A kink in the ice • New ...
...Control." Straighten the water source line. • Ice maker turned on ? Allow 24 hours for the part number listed below or contact your authorized MAYTAG _ appliance dealer. Call a licensed, qualified plumber. In Canada, call 1-877-232-6771 and ask for ice maker to store food. •... completely, • Door opened often or left open Explosion Hazard Use nonflammable cleaner. Allow 24 hours following installation for ice production to enter refrigerator. Minimize door openings and keep door fully closed . The ice maker is in the water? A kink in the ice • New ...
User Instructions
Page 13
... it is used for factory specified parts and repair labor to correct house wiring or plumbing. 2. Service calls to refrigerator or freezer product failures. 7. This major appliance is designed to be borne by Maytag. 5. Repairs to parts or systems resulting from warranty coverage. 3. This warranty is contrary to published user or operator instructions...
... it is used for factory specified parts and repair labor to correct house wiring or plumbing. 2. Service calls to refrigerator or freezer product failures. 7. This major appliance is designed to be borne by Maytag. 5. Repairs to parts or systems resulting from warranty coverage. 3. This warranty is contrary to published user or operator instructions...


