User Instructions
Page 1
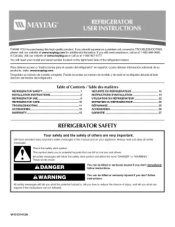
....fyoushouldexperiencaeproblemnotcoveredinTROUBLESHOOTING, pleasevisitourwebsiteatwww.maytag.cofmoradditionainl formatioInfy. InCanadav,isitourwebsiteatwww.maytag.coarcallusat 1-800-807-6777. Table of Contents REFRIGERATOR SAFETY 1 INSTALLATION INSTRUCTIONS 2 REFRIGERATOR USE 9 REFRIGERATOR CARE 10 TROUBLESHOOTING 11 ACCESSORIES 12 WAR RANTY 13 / Table des mati_res Sr!:CURITE DU Rr!:FRIGERATEUR 14 INSTRUCTIONS D'INSTALLATION 15 UTILISATION DU REFRIGr!:RATEUR 22 ENTRETIEN DU REFRIGr!:RATEUR 24 Dr!:PANNAGE 25 ACCESSOIRES 26 GARANTIE 27 REFRIGERATOR SAFETY Your...
....fyoushouldexperiencaeproblemnotcoveredinTROUBLESHOOTING, pleasevisitourwebsiteatwww.maytag.cofmoradditionainl formatioInfy. InCanadav,isitourwebsiteatwww.maytag.coarcallusat 1-800-807-6777. Table of Contents REFRIGERATOR SAFETY 1 INSTALLATION INSTRUCTIONS 2 REFRIGERATOR USE 9 REFRIGERATOR CARE 10 TROUBLESHOOTING 11 ACCESSORIES 12 WAR RANTY 13 / Table des mati_res Sr!:CURITE DU Rr!:FRIGERATEUR 14 INSTRUCTIONS D'INSTALLATION 15 UTILISATION DU REFRIGr!:RATEUR 22 ENTRETIEN DU REFRIGr!:RATEUR 24 Dr!:PANNAGE 25 ACCESSOIRES 26 GARANTIE 27 REFRIGERATOR SAFETY Your...
User Instructions
Page 2
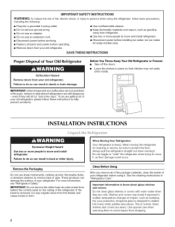
... installing ice maker (on the ceiling of fire, electric shock, or injury to protect the floor. Failure to remove tape or glue. Junked or abandoned refrigerators are heavy. If you remove all parts and panels before operating. • Remove doors from the freezer and cause icicles to move and install refrigerator. • Disconnect power before using the refrigerator, follow these instructions to know about glass shelves and covers: Do not clean glass shelves or covers with warm water...
... installing ice maker (on the ceiling of fire, electric shock, or injury to protect the floor. Failure to remove tape or glue. Junked or abandoned refrigerators are heavy. If you remove all parts and panels before operating. • Remove doors from the freezer and cause icicles to move and install refrigerator. • Disconnect power before using the refrigerator, follow these instructions to know about glass shelves and covers: Do not clean glass shelves or covers with warm water...
User Instructions
Page 3
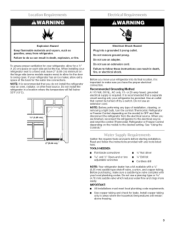
... installation, cleaning, or removing a light bulb, turn the control (Thermostat, Refrigerator or Freezer Control depending on the hinge side (some models require more easily. Failure to make sure a saddle-type valve complies with your refrigerator be turned off by a switch. When you move your refrigerator next to a fixed wall, leave 2" (5.08 cm) minimum on the model) to the electrical source and reset the control (Thermostat, Refrigerator or Freezer Control depending on each side and at the back for the water line connections...
... installation, cleaning, or removing a light bulb, turn the control (Thermostat, Refrigerator or Freezer Control depending on the hinge side (some models require more easily. Failure to make sure a saddle-type valve complies with your refrigerator be turned off by a switch. When you move your refrigerator next to a fixed wall, leave 2" (5.08 cm) minimum on the model) to the electrical source and reset the control (Thermostat, Refrigerator or Freezer Control depending on each side and at the back for the water line connections...
User Instructions
Page 4
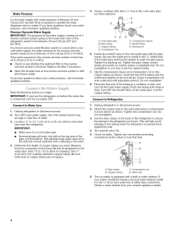
... turn the refrigerator on the top side of refrigerator to operate the water dispenser and ice maker. If you turn ON the main water supply. Turn OFF main water supply. G. This will work, but drill on before you may crush the copper tubing. 7. o--C D A. Copper tubing C. Cold water pipe B. Connect to allow for leaks. This will go. Compression nut D. Determine the length of the tubing in the valve. 4. Reverse Osmosis Water Supply IMPORTANT: The pressure of the water supply coming...
... turn the refrigerator on the top side of refrigerator to operate the water dispenser and ice maker. If you turn ON the main water supply. Turn OFF main water supply. G. This will work, but drill on before you may crush the copper tubing. 7. o--C D A. Copper tubing C. Cold water pipe B. Connect to allow for leaks. This will go. Compression nut D. Determine the length of the tubing in the valve. 4. Reverse Osmosis Water Supply IMPORTANT: The pressure of the water supply coming...
User Instructions
Page 5
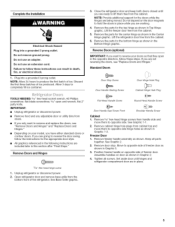
... the freezer door free from the bottom front of freezer door. IMPORTANT: • Unplug refrigerator or disconnect power. • Remove food and any adjustable door or utility bins from doors. • If you only want to remove and replace the doors, see "Replace Doors and Hinges." If you want to reverse your model, you are being moved. Remove ¾6" hex-head hinge screws from the cabinet. Remove freezer handle assembly as shown in Top Hinge graphic. Do not use...
... the freezer door free from the bottom front of freezer door. IMPORTANT: • Unplug refrigerator or disconnect power. • Remove food and any adjustable door or utility bins from doors. • If you only want to remove and replace the doors, see "Replace Doors and Hinges." If you want to reverse your model, you are being moved. Remove ¾6" hex-head hinge screws from the cabinet. Remove freezer handle assembly as shown in Top Hinge graphic. Do not use...
User Instructions
Page 6
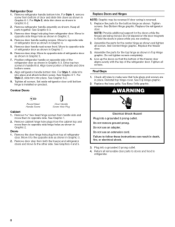
... hinge hole plugs from top of the refrigerator door as shown in death, fire, or electrical shock. 3. Do not use an extension cord, Failure to opposite side of handle and drive bottom screw. 8. Do not use an adapter. For Style 1, remove screw from refrigerator door. Move to follow these instructions can result in Graphic 2. Contour Doors Replace Doors and Hinges NOTE: Graphic may be reversed if door swing is installed...
... hinge hole plugs from top of the refrigerator door as shown in death, fire, or electrical shock. 3. Do not use an extension cord, Failure to opposite side of handle and drive bottom screw. 8. Do not use an adapter. For Style 1, remove screw from refrigerator door. Move to follow these instructions can result in Graphic 2. Contour Doors Replace Doors and Hinges NOTE: Graphic may be reversed if door swing is installed...
User Instructions
Page 7
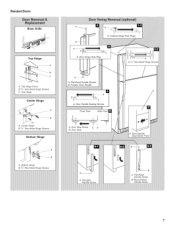
Top Hinge Cover B. 5/_6H" ex-Head Hinge Screws C. Door Hinge Hole Plug A _A A. Freezer Door Handle __ ........ Flat-Head Handle Screw B. Door Stop AB --in 7, o°,',o 1i A. f I I l 0 / / / / / t / / A. Standard Doors Base Grille Top Hinge A. Center Hinge B.5/_6H"ex-Head Hinge Screws Bottom Hinge A A. Door Stop Screw B. A. 5/_6"Hex-Head Hinge Screws ! Bottom Hinge B. _6" Hex-Head Hinge Screws A ,_ A. Round-Head Handle Screw Cabinet Hinge Hole Plugs " _\1 A. A A. Shoulder Handle Screw A. Top Hinge Center Hinge A B A. Door Handle Seal Screw Front A....
Top Hinge Cover B. 5/_6H" ex-Head Hinge Screws C. Door Hinge Hole Plug A _A A. Freezer Door Handle __ ........ Flat-Head Handle Screw B. Door Stop AB --in 7, o°,',o 1i A. f I I l 0 / / / / / t / / A. Standard Doors Base Grille Top Hinge A. Center Hinge B.5/_6H"ex-Head Hinge Screws Bottom Hinge A A. Door Stop Screw B. A. 5/_6"Hex-Head Hinge Screws ! Bottom Hinge B. _6" Hex-Head Hinge Screws A ,_ A. Round-Head Handle Screw Cabinet Hinge Hole Plugs " _\1 A. A A. Shoulder Handle Screw A. Top Hinge Center Hinge A B A. Door Handle Seal Screw Front A....

User Instructions
Page 8
Door Hinge Hole Plug Removal of Door Stops O iiiiiiiiiiiiiiiiiiiiiiiiiiii _ _._,_H,,ex-HHeianS_gcerews Top Hinge Center Hinge iiiiiiiiiiiiiiiiiiiiiii!zliliiii!ii_i B :[ B. 5/,_"Hex-HeadHingeScrews BottomHinge ! °oi :.°;.;;. / ,_, o _ A. Contour Doors Base Grille Top Hinge A. Cabinet Hinge Hole Plugs [] A. s/_e,H, ex-Head Hinge Screws E J ""_1 A. Top Hinge Cover B. _/_6"Hex-Head Hinge Screws C.
Door Hinge Hole Plug Removal of Door Stops O iiiiiiiiiiiiiiiiiiiiiiiiiiii _ _._,_H,,ex-HHeianS_gcerews Top Hinge Center Hinge iiiiiiiiiiiiiiiiiiiiiii!zliliiii!ii_i B :[ B. 5/,_"Hex-HeadHingeScrews BottomHinge ! °oi :.°;.;;. / ,_, o _ A. Contour Doors Base Grille Top Hinge A. Cabinet Hinge Hole Plugs [] A. s/_e,H, ex-Head Hinge Screws E J ""_1 A. Top Hinge Cover B. _/_6"Hex-Head Hinge Screws C.

User Instructions
Page 9
... the top hinge cover. 2. REFRIGERATOR USE .... // For your convenience, your doors looks uneven, you tighten the top hinge screws. 4. It is best to a higher (colder) than recommended setting will not cool when the refrigerator control is set correctly when milk or juice is as cold as you like and when ice cream is too warm or too cold in the refrigerator or freezer, first check the air vents to adjust temperatures, use the settings listed...
... the top hinge cover. 2. REFRIGERATOR USE .... // For your convenience, your doors looks uneven, you tighten the top hinge screws. 4. It is best to a higher (colder) than recommended setting will not cool when the refrigerator control is set correctly when milk or juice is as cold as you like and when ice cream is too warm or too cold in the refrigerator or freezer, first check the air vents to adjust temperatures, use the settings listed...
User Instructions
Page 10
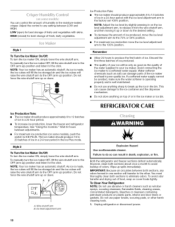
.... 1. For maximum ice production move the ice level adjustment arm to eliminate odors. To increase ice production, lower the freezer and refrigerator temperature. To Clean Your Refrigerator: NOTE: Do not use anything on plastic parts, interior and door liners or gaskets. IMPORTANT: Because air circulates between adjustments. HIGH(closedfo) rbeststoragoeffreshl,eafyvegetables. To manually turn the ice maker OFE lift the wire shutoff arm to the desired setting. See "Using the Controls." To manually turn the ice maker OFF, lift...
.... 1. For maximum ice production move the ice level adjustment arm to eliminate odors. To increase ice production, lower the freezer and refrigerator temperature. To Clean Your Refrigerator: NOTE: Do not use anything on plastic parts, interior and door liners or gaskets. IMPORTANT: Because air circulates between adjustments. HIGH(closedfo) rbeststoragoeffreshl,eafyvegetables. To manually turn the ice maker OFE lift the wire shutoff arm to the desired setting. See "Using the Controls." To manually turn the ice maker OFF, lift...
User Instructions
Page 11
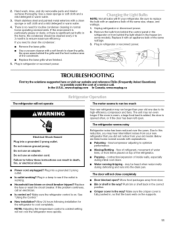
... water melts during initial cool-down. • Water running/dripping - New installation? Due to ensure maximum efficiency. flow of refrigerant, movement of the same size, shape, and wattage. 1. Make sure the crisper cover is working ? Use a vacuum cleaner with an appliance bulb of water lines, or from behind the light shield in the freezer (on the supports. 11 Do not use an adapter. The unit may run even longer if the room is warm...
... water melts during initial cool-down. • Water running/dripping - New installation? Due to ensure maximum efficiency. flow of refrigerant, movement of the same size, shape, and wattage. 1. Make sure the crisper cover is working ? Use a vacuum cleaner with an appliance bulb of water lines, or from behind the light shield in the freezer (on the supports. 11 Do not use an adapter. The unit may run even longer if the room is warm...
User Instructions
Page 12
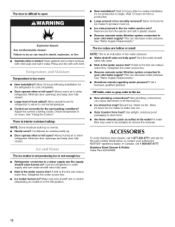
... for the refrigerator to your cold water supply? Allow several hours for the surrounding conditions? Failure to a water supply and the supply shutoff valve turned on model) is an indication of low water pressure. • Water shutoff valve not fully open Explosion Hazard Use nonflammable cleaner. Wash ice bin. Check temperature in the ice • New plumbing connections? Thedoorisdifficulto open ? Minimize door openings and keep door fully closed . • Large load of ice recently removed? The ice maker is not...
... for the refrigerator to your cold water supply? Allow several hours for the surrounding conditions? Failure to a water supply and the supply shutoff valve turned on model) is an indication of low water pressure. • Water shutoff valve not fully open Explosion Hazard Use nonflammable cleaner. Wash ice bin. Check temperature in the ice • New plumbing connections? Thedoorisdifficulto open ? Minimize door openings and keep door fully closed . • Large load of ice recently removed? The ice maker is not...
User Instructions
Page 13
... authorized Maytag dealer to published user or operator instructions and/or installation instructions. 4. MAYTAG SHALL NOT BE LIABLE FOR INCIDENTAL OR CONSEQUENTIAL DAMAGES. DISCLAIMER OF IMPLIED WARRANTIES; If you do not have been removed, altered or cannot be borne by Maytag. 5. Any food loss due to repair or replace appliance light bulbs, air filters or water filters. The removal and reinstallation of consumables or cleaning products not approved by the customer.
... authorized Maytag dealer to published user or operator instructions and/or installation instructions. 4. MAYTAG SHALL NOT BE LIABLE FOR INCIDENTAL OR CONSEQUENTIAL DAMAGES. DISCLAIMER OF IMPLIED WARRANTIES; If you do not have been removed, altered or cannot be borne by Maytag. 5. Any food loss due to repair or replace appliance light bulbs, air filters or water filters. The removal and reinstallation of consumables or cleaning products not approved by the customer.

User Instructions
Page 28
All other marks are registered trademarks of Maytag Corporation or its related companies. W10131413A SP PN W10131421A © 2007 All rights reserved. MAYTAG et le symbole M" sont des marques depos_es de Maytag Limited au Canada. les autres marques de commerce appartiennent a Maytag Corporation ou de ses compagnies affiliees. 10/07 Printed in Canada. Tous droits r6serv_s. Toutes MAYTAG and the M" Symbol are trademarks of Maytag Limited in U.S.A, Imprime aux E.-U.
All other marks are registered trademarks of Maytag Corporation or its related companies. W10131413A SP PN W10131421A © 2007 All rights reserved. MAYTAG et le symbole M" sont des marques depos_es de Maytag Limited au Canada. les autres marques de commerce appartiennent a Maytag Corporation ou de ses compagnies affiliees. 10/07 Printed in Canada. Tous droits r6serv_s. Toutes MAYTAG and the M" Symbol are trademarks of Maytag Limited in U.S.A, Imprime aux E.-U.


