User Instructions
Page 1
...WARNING." In Canada, visit our website at www.maytag.ca or call us at www.maytag.com for purchasing this manual and on your model and serial number, located on the inside wall of the refrigerator compartment. W10208845A If you still need your appliance...ÉRATEUR ...... 28 INSTALLATION INSTRUCTIONS...........2 INSTRUCCIONES DE INSTALACIÓN. 15 INSTRUCTIONS D'INSTALLATION .... 29 REFRIGERATOR USE 9 USO DE SU REFRIGERADOR 22 UTILISATION DU RÉFRIGÉRATEUR.. 36 REFRIGERATOR CARE 10 CUIDADO DE SU REFRIGERADOR ... 24 ENTRETIEN DU RÉFRIGÉRATEUR .... 38 ...
...WARNING." In Canada, visit our website at www.maytag.ca or call us at www.maytag.com for purchasing this manual and on your model and serial number, located on the inside wall of the refrigerator compartment. W10208845A If you still need your appliance...ÉRATEUR ...... 28 INSTALLATION INSTRUCTIONS...........2 INSTRUCCIONES DE INSTALACIÓN. 15 INSTRUCTIONS D'INSTALLATION .... 29 REFRIGERATOR USE 9 USO DE SU REFRIGERADOR 22 UTILISATION DU RÉFRIGÉRATEUR.. 36 REFRIGERATOR CARE 10 CUIDADO DE SU REFRIGERADOR ... 24 ENTRETIEN DU RÉFRIGÉRATEUR .... 38 ...
User Instructions
Page 2
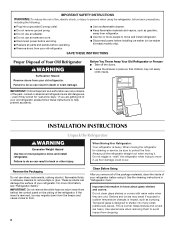
... Weight Hazard Use two or more people to move it, as floor damage could occur. These products can damage the surface of your refrigerator before operating. ■ Remove doors from the freezer and cause icicles to form. For more people to protect the floor. Clean Before... can result in place so that children may break if exposed to sudden temperature changes or impact, such as gasoline, away from your old refrigerator, please follow basic precautions, including the following: ■ Plug into many small, pebble-size pieces. Glass shelves and covers are getting rid...
... Weight Hazard Use two or more people to move it, as floor damage could occur. These products can damage the surface of your refrigerator before operating. ■ Remove doors from the freezer and cause icicles to form. For more people to protect the floor. Clean Before... can result in place so that children may break if exposed to sudden temperature changes or impact, such as gasoline, away from your old refrigerator, please follow basic precautions, including the following: ■ Plug into many small, pebble-size pieces. Glass shelves and covers are getting rid...
User Instructions
Page 3
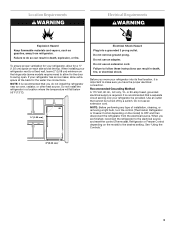
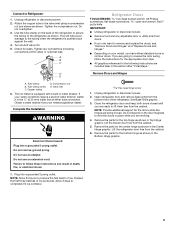
...Hz., AC only, 15- NOTE: Before performing any type of installation, cleaning, or removing a light bulb, turn the control (Thermostat, Refrigerator or Freezer Control depending on the hinge side (some models require more) to make sure you have the proper electrical connection. When you do ... fire, or electrical shock. See "Using the Controls." 2" (5.08 cm) 3 Do not use an adapter. Before you move your refrigerator, allow for your refrigerator into a grounded 3 prong outlet. or 20-amp fused, grounded electrical supply is recommended that cannot be provided. Do not use an ...
...Hz., AC only, 15- NOTE: Before performing any type of installation, cleaning, or removing a light bulb, turn the control (Thermostat, Refrigerator or Freezer Control depending on the hinge side (some models require more) to make sure you have the proper electrical connection. When you do ... fire, or electrical shock. See "Using the Controls." 2" (5.08 cm) 3 Do not use an adapter. Before you move your refrigerator, allow for your refrigerator into a grounded 3 prong outlet. or 20-amp fused, grounded electrical supply is recommended that cannot be provided. Do not use an ...

User Instructions
Page 4
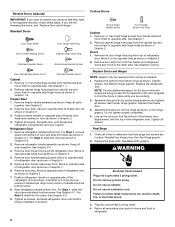
... Water Supply IMPORTANT: The pressure of the water supply coming out of a reverse osmosis system going to the water inlet valve of the refrigerator needs to clear line of copper tubing you turn ON the main water supply. IMPORTANT: If you need. Slip the compression sleeve and ... B. Copper tubing D. Tighten the pipe clamp screws slowly and evenly so washer makes a watertight seal. Compression nut D E. If you have selected. Add 7 ft (2.1 m) to allow for leaks. Be sure both ends of the tubing in the cold water pipe you may crush the copper tubing. 7. Place the free...
... Water Supply IMPORTANT: The pressure of the water supply coming out of a reverse osmosis system going to the water inlet valve of the refrigerator needs to clear line of copper tubing you turn ON the main water supply. IMPORTANT: If you need. Slip the compression sleeve and ... B. Copper tubing D. Tighten the pipe clamp screws slowly and evenly so washer makes a watertight seal. Compression nut D E. If you have selected. Add 7 ft (2.1 m) to allow for leaks. Be sure both ends of the tubing in the cold water pipe you may crush the copper tubing. 7. Place the free...
User Instructions
Page 5
...strainer, install it in water strainer. Do not overtighten. 3. Use the tube clamp on the door magnets to the tubing when the refrigerator is equipped with a built-in the ¹⁄₄" (6.35 mm) water line at the valve) or nuts that leak. ...sleeve as shown in death, fire, or electrical shock. 1. If your model, you have either tube connection. Open refrigerator door and remove base grille from the cabinet. 6. Unplug refrigerator or disconnect power. 2. Copper tubing D. Valve inlet 6. See Base Grille graphic. 3. Connect to completely fill ice...
...strainer, install it in water strainer. Do not overtighten. 3. Use the tube clamp on the door magnets to the tubing when the refrigerator is equipped with a built-in the ¹⁄₄" (6.35 mm) water line at the valve) or nuts that leak. ...sleeve as shown in death, fire, or electrical shock. 1. If your model, you have either tube connection. Open refrigerator door and remove base grille from the cabinet. 6. Unplug refrigerator or disconnect power. 2. Copper tubing D. Valve inlet 6. See Base Grille graphic. 3. Connect to completely fill ice...
User Instructions
Page 6
...Base Grille graphic. Return all screws. See Graphic 1-1. 2. Keep all screws. Position freezer handle on opposite side of freezer door. Remove refrigerator handle assembly as shown in Graphic 3. 4. Keep all screws. Remove door handle seal screw front. For Style 2, slide trim into a... Electrical Shock Hazard Plug into place. For Style 1, slide trim into a grounded 3 prong outlet. 4. Set aside refrigerator door until hinges and refrigerator compartment door are in Graphic 6-1. Doors 1. Replace Doors and Hinges NOTE: Graphic may be reversed if door swing is...
...Base Grille graphic. Return all screws. See Graphic 1-1. 2. Keep all screws. Position freezer handle on opposite side of freezer door. Remove refrigerator handle assembly as shown in Graphic 3. 4. Keep all screws. Remove door handle seal screw front. For Style 2, slide trim into a... Electrical Shock Hazard Plug into place. For Style 1, slide trim into a grounded 3 prong outlet. 4. Set aside refrigerator door until hinges and refrigerator compartment door are in Graphic 6-1. Doors 1. Replace Doors and Hinges NOTE: Graphic may be reversed if door swing is...
User Instructions
Page 9
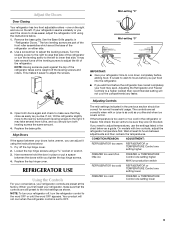
... in the previous section should turn the leveling screw to the left . It may take several turns of the refrigerator. NOTE: Having someone hold the door in the refrigerator or freezer, first check the air vents to adjust the tilt of the leveling screws to be correct for normal... your convenience, your food may take several more to the rear by turning both leveling screws to the right. Wait at the base of the refrigerator takes some weight off the top hinge cover. 2. Pry off the leveling screws and rollers. Loosen the top hinge screws using the instructions below ...
... in the previous section should turn the leveling screw to the left . It may take several turns of the refrigerator. NOTE: Having someone hold the door in the refrigerator or freezer, first check the air vents to adjust the tilt of the leveling screws to be correct for normal... your convenience, your food may take several more to the rear by turning both leveling screws to the right. Wait at the base of the refrigerator takes some weight off the top hinge cover. 2. Pry off the leveling screws and rollers. Loosen the top hinge screws using the instructions below ...
User Instructions
Page 10
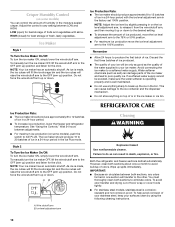
...■ Do not use anything on top of ice in a 24-hour period. ■ To increase ice production, lower the freezer and refrigerator temperature. IMPORTANT: ■ Because air circulates between adjustments. ■ For maximum ice production (on some models) You can result in the moisture...-sealed crisper. Ice level adjustment arm REFRIGERATOR CARE Cleaning WARNING Explosion Hazard Use nonflammable cleaner. Failure to do so can control the amount of ice. NOTE: Your ice maker ...
...■ Do not use anything on top of ice in a 24-hour period. ■ To increase ice production, lower the freezer and refrigerator temperature. IMPORTANT: ■ Because air circulates between adjustments. ■ For maximum ice production (on some models) You can result in the moisture...-sealed crisper. Ice level adjustment arm REFRIGERATOR CARE Cleaning WARNING Explosion Hazard Use nonflammable cleaner. Failure to do so can control the amount of ice. NOTE: Your ice maker ...
User Instructions
Page 11
... and dry immediately to its high-efficiency compressor and fans. Plug in warm water. 3. In the U.S.A., www.maytag.com In Canada, www.maytag.ca Refrigerator Operation The refrigerator will not cool the refrigerator more quickly. Make sure the refrigerator control is on exterior surfaces (doors and cabinet), plastic parts, interior and door liners or gaskets. Electrical...
... and dry immediately to its high-efficiency compressor and fans. Plug in warm water. 3. In the U.S.A., www.maytag.com In Canada, www.maytag.ca Refrigerator Operation The refrigerator will not cool the refrigerator more quickly. Make sure the refrigerator control is on exterior surfaces (doors and cabinet), plastic parts, interior and door liners or gaskets. Electrical...

User Instructions
Page 12
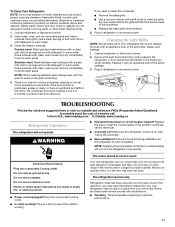
... installation? The door will not close completely ■ Door blocked open . ■ Kink in the ice ■ New plumbing connections? Connect refrigerator to produce more ice. ■ Ice cube jammed in the water? Allow 24 hours for ice production to your cold water supply? Allow 24...Make sure wire shutoff arm or switch (depending on the supports. Remove ice from food? Failure to your authorized MAYTAG® appliance dealer. Allow 24 hours for the refrigerator to store food. ■ Are there minerals (such as sulfur) in the ice maker ejector arm? Minimize door...
... installation? The door will not close completely ■ Door blocked open . ■ Kink in the ice ■ New plumbing connections? Connect refrigerator to produce more ice. ■ Ice cube jammed in the water? Allow 24 hours for ice production to your cold water supply? Allow 24...Make sure wire shutoff arm or switch (depending on the supports. Remove ice from food? Failure to your authorized MAYTAG® appliance dealer. Allow 24 hours for the refrigerator to store food. ■ Are there minerals (such as sulfur) in the ice maker ejector arm? Minimize door...
User Instructions
Page 13
...this major appliance is used for product service if your major appliance, to instruct you on the inside wall of the refrigerator compartment. Any food or medicine loss due to published user or operator instructions and/or installation instructions. 2. Pickup and ... not approved by a Maytag designated service company. Damage resulting from accident, alteration, misuse, abuse, fire, flood, acts of God, improper installation, installation not in your major appliance, unless such damage results from defects in a manner that is inconsistent to refrigerator or freezer product failures....
...this major appliance is used for product service if your major appliance, to instruct you on the inside wall of the refrigerator compartment. Any food or medicine loss due to published user or operator instructions and/or installation instructions. 2. Pickup and ... not approved by a Maytag designated service company. Damage resulting from accident, alteration, misuse, abuse, fire, flood, acts of God, improper installation, installation not in your major appliance, unless such damage results from defects in a manner that is inconsistent to refrigerator or freezer product failures....


