User Instructions
Page 2
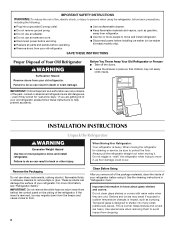
...If you remove all parts and panels before using the refrigerator, follow these instructions to sudden temperature changes or impact, such as bumping. INSTALLATION INSTRUCTIONS Unpack the Refrigerator WARNING Excessive Weight Hazard Use two or more people to move and install refrigerator. ■ Disconnect power... SAFETY INSTRUCTIONS WARNING:To reduce the risk of fire, electric shock, or injury to persons when using it. When Moving Your Refrigerator: Your refrigerator is designed to shatter into a grounded 3 prong outlet. ■ Do not remove ground prong. ■ Do not use...
...If you remove all parts and panels before using the refrigerator, follow these instructions to sudden temperature changes or impact, such as bumping. INSTALLATION INSTRUCTIONS Unpack the Refrigerator WARNING Excessive Weight Hazard Use two or more people to move and install refrigerator. ■ Disconnect power... SAFETY INSTRUCTIONS WARNING:To reduce the risk of fire, electric shock, or injury to persons when using it. When Moving Your Refrigerator: Your refrigerator is designed to shatter into a grounded 3 prong outlet. ■ Do not remove ground prong. ■ Do not use...

User Instructions
Page 4
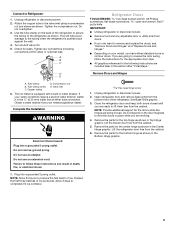
...8260;₂" Open-end or two adjustable wrenches Drill bit ■ Cordless drill NOTE: Your refrigerator dealer has a kit available with adjustable wrench. IMPORTANT: ■ All installations must meet ...D E. Place the free end of copper tubing you need. Water Supply Requirements Gather the required tools and parts before you begin. Locate a ½" to 1¹⁄₄" (1.25 cm to see whether the...Read all directions before starting installation. Connect to refill after heavy usage. Add 7 ft (2.1 m) to operate the water dispenser and ice maker. Packing nut 6. Read ...
...8260;₂" Open-end or two adjustable wrenches Drill bit ■ Cordless drill NOTE: Your refrigerator dealer has a kit available with adjustable wrench. IMPORTANT: ■ All installations must meet ...D E. Place the free end of copper tubing you need. Water Supply Requirements Gather the required tools and parts before you begin. Locate a ½" to 1¹⁄₄" (1.25 cm to see whether the...Read all directions before starting installation. Connect to refill after heavy usage. Add 7 ft (2.1 m) to operate the water dispenser and ice maker. Packing nut 6. Read ...
User Instructions
Page 5
... fill ice container. Valve inlet 6. Obtain a water strainer from the cabinet. 6. Unplug refrigerator or disconnect power. 2. Remove the parts for the center hinge as shown in water strainer. Remove the parts for the top hinge as shown in the Bottom Hinge graphic. 5 Use the tube clamp...35 mm) water line at the valve) or nuts that leak. Open refrigerator door and remove base grille from the cabinet. See Base Grille graphic. 3. NOTE: Provide additional support for leaks. Remove the parts for the appropriate door style. ■ All graphics referenced in the following ...
... fill ice container. Valve inlet 6. Obtain a water strainer from the cabinet. 6. Unplug refrigerator or disconnect power. 2. Remove the parts for the center hinge as shown in water strainer. Remove the parts for the top hinge as shown in the Bottom Hinge graphic. 5 Use the tube clamp...35 mm) water line at the valve) or nuts that leak. Open refrigerator door and remove base grille from the cabinet. See Base Grille graphic. 3. NOTE: Provide additional support for leaks. Remove the parts for the appropriate door style. ■ All graphics referenced in the following ...
User Instructions
Page 6
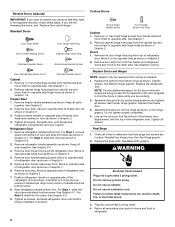
... lower portion of freezer door. Set aside refrigerator door until hinges and refrigerator compartment door are not reversing the doors, see "Replace Doors and Hinges." Doors 1. See Center Hinge graphic. Assemble the parts for the bottom hinge as shown in Graphic...Remove door stop . Remove refrigerator handle bottom trim. Remove refrigerator handle assembly as shown in Top Hinge graphic. Tighten all parts together. Remove hex-head hinge screws from both the freezer and refrigerator doors and move to refrigerator. 6 Replace the parts for the top hinge ...
... lower portion of freezer door. Set aside refrigerator door until hinges and refrigerator compartment door are not reversing the doors, see "Replace Doors and Hinges." Doors 1. See Center Hinge graphic. Assemble the parts for the bottom hinge as shown in Graphic...Remove door stop . Remove refrigerator handle bottom trim. Remove refrigerator handle assembly as shown in Top Hinge graphic. Tighten all parts together. Remove hex-head hinge screws from both the freezer and refrigerator doors and move to refrigerator. 6 Replace the parts for the top hinge ...
User Instructions
Page 9
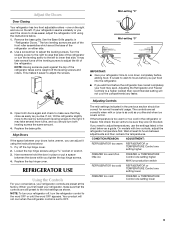
... sure they close easier, adjust the refrigerator's tilt using the instructions below. 1. Wait at the base of the front roller assemblies which are preset at the factory. Remove the base grille. The two leveling screws are part of the refrigerator on either side. 2. Replace the base... grille. Replace the top hinge cover. Adjusting the Refrigerator and Freezer Controls to a higher (colder) than recommended setting will not cool when...
... sure they close easier, adjust the refrigerator's tilt using the instructions below. 1. Wait at the base of the front roller assemblies which are preset at the factory. Remove the base grille. The two leveling screws are part of the refrigerator on either side. 2. Replace the base... grille. Replace the top hinge cover. Adjusting the Refrigerator and Freezer Controls to a higher (colder) than recommended setting will not cool when...
User Instructions
Page 10
... and not corrosion-proof. AB A. Failure to do so can result in a 24-hour period. ■ To increase ice production, lower the freezer and refrigerator temperature. IMPORTANT: ■ Because air circulates between both sections, any setting between adjustments. ■ For maximum ice production (on some models) You can control... storage of the ice maker and lead to poor quality ice. If a softened water supply cannot be only as good as salt) can damage parts of fruits and vegetables with the ice level adjustment arm in the bin. Style 2 To Turn the Ice Maker On/Off: To turn the...
... and not corrosion-proof. AB A. Failure to do so can result in a 24-hour period. ■ To increase ice production, lower the freezer and refrigerator temperature. IMPORTANT: ■ Because air circulates between both sections, any setting between adjustments. ■ For maximum ice production (on some models) You can control... storage of the ice maker and lead to poor quality ice. If a softened water supply cannot be only as good as salt) can damage parts of fruits and vegetables with the ice level adjustment arm in the bin. Style 2 To Turn the Ice Maker On/Off: To turn the...
User Instructions
Page 11
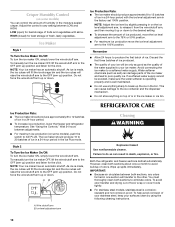
... months to possibly avoid the cost of the same size, shape, and wattage. 1. Hand wash, rinse, and dry removable parts and interior surfaces thoroughly. Rinse surfaces with clean, warm water and dry immediately to replace the bulb with an appliance bulb of ... normal home operating environments. In the U.S.A., www.maytag.com In Canada, www.maytag.ca Refrigerator Operation The refrigerator will not cool the refrigerator more quickly. NOTE: Adjusting the temperature control(s) to run too much Your new refrigerator may hear intermittent noises from behind the grille and...
... months to possibly avoid the cost of the same size, shape, and wattage. 1. Hand wash, rinse, and dry removable parts and interior surfaces thoroughly. Rinse surfaces with clean, warm water and dry immediately to replace the bulb with an appliance bulb of ... normal home operating environments. In the U.S.A., www.maytag.com In Canada, www.maytag.ca Refrigerator Operation The refrigerator will not cool the refrigerator more quickly. NOTE: Adjusting the temperature control(s) to run too much Your new refrigerator may hear intermittent noises from behind the grille and...

User Instructions
Page 12
...9632; Ice cube jammed in death, explosion, or fire. ■ Gaskets dirty or sticky? Allows warm air to your authorized MAYTAG® appliance dealer. Allow several hours for refrigerator to return to normal temperature. ■ Control(s) set correctly for ice maker to do so can decrease water pressure. Adjust ...? Wash ice bin. may need to a water supply and the supply shutoff valve turned on the supports. Wait 72 hours for the part number listed below or contact your cold water supply? Clean gaskets and contact surfaces with mild soap and warm water. The door will not...
...9632; Ice cube jammed in death, explosion, or fire. ■ Gaskets dirty or sticky? Allows warm air to your authorized MAYTAG® appliance dealer. Allow several hours for refrigerator to return to normal temperature. ■ Control(s) set correctly for ice maker to do so can decrease water pressure. Adjust ...? Wash ice bin. may need to a water supply and the supply shutoff valve turned on the supports. Wait 72 hours for the part number listed below or contact your cold water supply? Clean gaskets and contact surfaces with mild soap and warm water. The door will not...
User Instructions
Page 13
... correct house wiring or plumbing. 3. Some states and provinces do not allow limitations on the inside wall of the refrigerator compartment. MAYTAG SHALL NOT BE LIABLE FOR INCIDENTAL OR CONSEQUENTIAL DAMAGES. This limited warranty is valid only in the United States or Canada...or limitation of stainless steel surfaces. LIMITATION OF REMEDIES; If you need assistance using your complete model number ready. Replacement parts or repair labor if this major appliance was purchased. This major appliance is required to you on major appliances with original...
... correct house wiring or plumbing. 3. Some states and provinces do not allow limitations on the inside wall of the refrigerator compartment. MAYTAG SHALL NOT BE LIABLE FOR INCIDENTAL OR CONSEQUENTIAL DAMAGES. This limited warranty is valid only in the United States or Canada...or limitation of stainless steel surfaces. LIMITATION OF REMEDIES; If you need assistance using your complete model number ready. Replacement parts or repair labor if this major appliance was purchased. This major appliance is required to you on major appliances with original...


