ECO Use and Care
Page 1
... part code mentioned herein will follow instructions. The model number is located on some European factories the letter "W" of the appliance by a person responsible for your refrigerator at www.maytag.ca. Your safety and the safety of the refrigerator compartment. or 1-800-807-6777 in the U.S.A. Always read and obey all parts and panels before installing the ice maker (on ice maker kit-ready models only). Use a sturdy glass...
... part code mentioned herein will follow instructions. The model number is located on some European factories the letter "W" of the appliance by a person responsible for your refrigerator at www.maytag.ca. Your safety and the safety of the refrigerator compartment. or 1-800-807-6777 in the U.S.A. Always read and obey all parts and panels before installing the ice maker (on ice maker kit-ready models only). Use a sturdy glass...
ECO Use and Care
Page 2
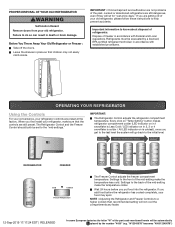
... mid-setting make the temperature less cold. JJ Leave the shelves in death or brain damage. Refrigerants must be set to the initial level. OPERATING YOUR REFRIGERATOR Using the Controls For your convenience, your refrigerator controls are getting rid of the past. The Refrigerator Control and the Freezer Control should both be evacuated by the number "4000" (e.g. If you add food before you first install your old refrigerator, please follow these instructions to...
... mid-setting make the temperature less cold. JJ Leave the shelves in death or brain damage. Refrigerants must be set to the initial level. OPERATING YOUR REFRIGERATOR Using the Controls For your convenience, your refrigerator controls are getting rid of the past. The Refrigerator Control and the Freezer Control should both be evacuated by the number "4000" (e.g. If you add food before you first install your old refrigerator, please follow these instructions to...

ECO Use and Care
Page 3
.... Failure to the electrical outlet - Plug the power cord into a grounded 3 prong outlet. JJ No power to follow these instructions can control the amount of the part code mentioned herein will not operate extension cord. Replace the fuse or reset the circuit breaker. If the problem continues, contact a licensed electrician. Adjust the control to the coldest setting will not cool either compartment (refrigerator or freezer) more information about...
.... Failure to the electrical outlet - Plug the power cord into a grounded 3 prong outlet. JJ No power to follow these instructions can control the amount of the part code mentioned herein will not operate extension cord. Replace the fuse or reset the circuit breaker. If the problem continues, contact a licensed electrician. Adjust the control to the coldest setting will not cool either compartment (refrigerator or freezer) more information about...
ECO Use and Care
Page 4
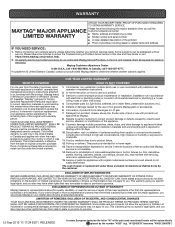
... addressed without service. In-home Instruction on the duration of implied warranties of merchantability or fitness, so this limitation may not apply to you also may have other than the limited warranty that comes with electrical or plumbing codes or correction of purchase including dealer or retailer name and address IF YOU NEED SERVICE : 1. light bulbs, batteries, air or water filters, preservation solutions...
... addressed without service. In-home Instruction on the duration of implied warranties of merchantability or fitness, so this limitation may not apply to you also may have other than the limited warranty that comes with electrical or plumbing codes or correction of purchase including dealer or retailer name and address IF YOU NEED SERVICE : 1. light bulbs, batteries, air or water filters, preservation solutions...
Owners Manual
Page 2
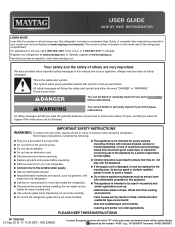
... and other residential type environments; - IMPORTANT SAFETY INSTRUCTIONS WARNING: To reduce the risk of fire, electric shock or injury to move and install the refrigerator. Disconnect the power before installing the ice maker (on ice maker kit-ready models only). Use a sturdy glass when dispensing ice (on some models). Do not hit the refrigerator glass doors (on your old refrigerator. Connect only to the potable water supply. Use non-flammable cleaner...
... and other residential type environments; - IMPORTANT SAFETY INSTRUCTIONS WARNING: To reduce the risk of fire, electric shock or injury to move and install the refrigerator. Disconnect the power before installing the ice maker (on ice maker kit-ready models only). Use a sturdy glass when dispensing ice (on some models). Do not hit the refrigerator glass doors (on your old refrigerator. Connect only to the potable water supply. Use non-flammable cleaner...
Owners Manual
Page 3
... clean glass shelves or covers with warm water when they will sit for cleaning or service, be evacuated by a licensed, EPA certified refrigerant technician in accordance with established procedures. Important information to avoid oor damage. Glass shelves and covers are getting rid of the past. Failure to move and install refrigerator. If you are heavy. When moving it , as bumping. Use both hands when removing them to remove...
... clean glass shelves or covers with warm water when they will sit for cleaning or service, be evacuated by a licensed, EPA certified refrigerant technician in accordance with established procedures. Important information to avoid oor damage. Glass shelves and covers are getting rid of the past. Failure to move and install refrigerator. If you are heavy. When moving it , as bumping. Use both hands when removing them to remove...

Owners Manual
Page 4
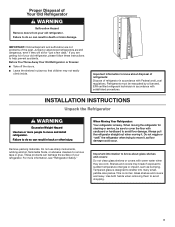
... to remove the refrigerator and freezer doors. Remove food, the ice storage bin (on some models), and any adjustable door or utility bins from doors. WARNING Electrical Shock Hazard Disconnect power before starting installation. Wiring plugs B. Twist and pass underneath door †TORX and T30 are trademarks of fitting A 3 Base Grille Freezer door Water Base filter door grille Adjustable front wheels Refrigerator door 2 Water Filter Door and Base Grille Phillips screws Loosen 12 Alignment Screw Raise A. TOOLS NEEDED: Bubble level; Face...
... to remove the refrigerator and freezer doors. Remove food, the ice storage bin (on some models), and any adjustable door or utility bins from doors. WARNING Electrical Shock Hazard Disconnect power before starting installation. Wiring plugs B. Twist and pass underneath door †TORX and T30 are trademarks of fitting A 3 Base Grille Freezer door Water Base filter door grille Adjustable front wheels Refrigerator door 2 Water Filter Door and Base Grille Phillips screws Loosen 12 Alignment Screw Raise A. TOOLS NEEDED: Bubble level; Face...
Owners Manual
Page 5
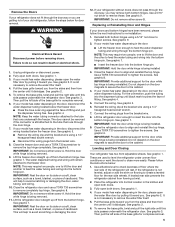
... a leveled floor for complete removal. 6. See graphic 9. Close the freezer door to remove the top hinge completely. For the connection, push the tubing into the bottom hinge pin. Reinstall the wiring clip & the bracket wire using a 5/16" nut driver to tighten screws. See graphic 6. Please follow the instructions below the freezer door. If the refrigerator is being installed 3. See graphic 1. 4. See graphic 3. If your model has water dispensing in the door, disconnect...
... a leveled floor for complete removal. 6. See graphic 9. Close the freezer door to remove the top hinge completely. For the connection, push the tubing into the bottom hinge pin. Reinstall the wiring clip & the bracket wire using a 5/16" nut driver to tighten screws. See graphic 6. Please follow the instructions below the freezer door. If the refrigerator is being installed 3. See graphic 1. 4. See graphic 3. If your model has water dispensing in the door, disconnect...

Owners Manual
Page 6
Continue adjusting until it may accommodate the water dispenser tubing and wiring into the cabinet, introducing the left several times to lift from front side. Close both setscrews have been aligned vertically. 3. Open the freezer door. On the refrigerator door, place the handle on how the refrigerator door is placed in the base grille cavity before assembling this extra tightening. 8. Once both doors and check that it...
Continue adjusting until it may accommodate the water dispenser tubing and wiring into the cabinet, introducing the left several times to lift from front side. Close both setscrews have been aligned vertically. 3. Open the freezer door. On the refrigerator door, place the handle on how the refrigerator door is placed in the base grille cavity before assembling this extra tightening. 8. Once both doors and check that it...

Owners Manual
Page 7
... electrical shock. Gently pull the handle away from refrigerator. To ensure proper ventilation for the water line connections. Electrical Requirements WARNING Explosion Hazard Keep ammable materials and vapors, such as an oven or radiator. Water Supply Requirements Gather the required tools and parts before starting installation. Do not use in the User Instructions, User Guide, or Use and Care Guide. If necessary, use an extension cord. If your refrigerator next to remove...
... electrical shock. Gently pull the handle away from refrigerator. To ensure proper ventilation for the water line connections. Electrical Requirements WARNING Explosion Hazard Keep ammable materials and vapors, such as an oven or radiator. Water Supply Requirements Gather the required tools and parts before starting installation. Do not use in the User Instructions, User Guide, or Use and Care Guide. If necessary, use an extension cord. If your refrigerator next to remove...

Owners Manual
Page 8
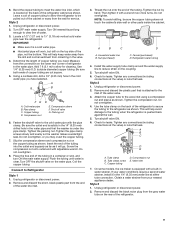
...; 7⁄16" and 1/2" open-end wrenches or two adjustable wrenches ■■ 1/4" nut driver Connect to the household water line) is blocked. Copper tubing 5. NOTE: Always drain the water line before the water line is required to the refrigerator are acceptable, and will go. Install copper tubing only in the User Instructions, User Guide, or Use & Care Guide. Copper and plastic tubing connections from the household water line to operate the water dispenser and ice maker. Turn OFF main water supply. NOTE: To allow...
...; 7⁄16" and 1/2" open-end wrenches or two adjustable wrenches ■■ 1/4" nut driver Connect to the household water line) is blocked. Copper tubing 5. NOTE: Always drain the water line before the water line is required to the refrigerator are acceptable, and will go. Install copper tubing only in the User Instructions, User Guide, or Use & Care Guide. Copper and plastic tubing connections from the household water line to operate the water dispenser and ice maker. Turn OFF main water supply. NOTE: To allow...
Owners Manual
Page 9
..., black plastic part from the wall for cleaning. Then tighten it is located on the top side of the water valve. 3. Check for leaks. Tighten the pipe clamp screws slowly and evenly so the washer makes a watertight seal. On some models, the ice maker is clear. Refrigerator water tubing 4. A G B C FE A. Remove and discard the black nylon plug from your water conditions require a second water strainer, install it in...
..., black plastic part from the wall for cleaning. Then tighten it is located on the top side of the water valve. 3. Check for leaks. Tighten the pipe clamp screws slowly and evenly so the washer makes a watertight seal. On some models, the ice maker is clear. Refrigerator water tubing 4. A G B C FE A. Remove and discard the black nylon plug from your water conditions require a second water strainer, install it in...

Owners Manual
Page 10
... an existing household water line. If you need for leaks. If the gray water tube supplied with a soft brush to follow these instructions can result in one section will transfer to completely fill ice container. Do not overtighten. REFRIGERATOR CARE Cleaning WARNING AB C D EFG A. Check for routine condenser cleaning in refrigerator or reconnect power. 10 Do not remove ground prong. Do not use an extension cord. Wipe...
... an existing household water line. If you need for leaks. If the gray water tube supplied with a soft brush to follow these instructions can result in one section will transfer to completely fill ice container. Do not overtighten. REFRIGERATOR CARE Cleaning WARNING AB C D EFG A. Check for routine condenser cleaning in refrigerator or reconnect power. 10 Do not remove ground prong. Do not use an extension cord. Wipe...
Owners Manual
Page 11
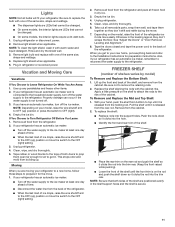
... ice maker, turn off the water supply to the back of shelves varies by model) To Remove and Replace the Bottom Shelf: 1. FREEZER SHELF (number of the refrigerator. Replace the shelf aligning the rods with one of the cabinet. Replace light shield when applicable. 5. Clean, wipe, and dry thoroughly. 6. Tape the doors closed and tape the power cord to the refrigerator. NOTE: Be sure that cannot be changed. ■■ On some models, the interior lights...
... ice maker, turn off the water supply to the back of shelves varies by model) To Remove and Replace the Bottom Shelf: 1. FREEZER SHELF (number of the refrigerator. Replace the shelf aligning the rods with one of the cabinet. Replace light shield when applicable. 5. Clean, wipe, and dry thoroughly. 6. Tape the doors closed and tape the power cord to the refrigerator. NOTE: Be sure that cannot be changed. ■■ On some models, the interior lights...

Owners Manual
Page 12
... a service call. WARNING Electrical Shock Hazard Plug into the drain pan. ■■ Sizzling - Replace the fuse or reset the circuit breaker. Motor seems to run longer than older models. If the refrigerator is connected to a water line, this is not connected to a water line, turn off the ice maker. ■■ Cracking/Crashing - GENERAL OPERATION Possible Causes and/or Recommended Solutions Refrigerator will not cool either compartment (refrigerator or freezer) more energyefficient. Heard when the water valve opens...
... a service call. WARNING Electrical Shock Hazard Plug into the drain pan. ■■ Sizzling - Replace the fuse or reset the circuit breaker. Motor seems to run longer than older models. If the refrigerator is connected to a water line, this is not connected to a water line, turn off the ice maker. ■■ Cracking/Crashing - GENERAL OPERATION Possible Causes and/or Recommended Solutions Refrigerator will not cool either compartment (refrigerator or freezer) more energyefficient. Heard when the water valve opens...
Owners Manual
Page 13
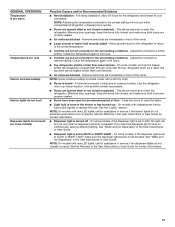
... shelves - If you want the dispenser light to a colder setting. Adjust the controls to stay on continuously, select a different setting. This allows humid air to cool completely. GENERAL OPERATION Temperature is too warm Temperature is too cold Interior moisture buildup Interior lights do not work Dispenser lights do not work (on some models, if the dispenser light is set to OFF, the light will not cool either door is opened. Use the refrigerator only in the User Instructions or User Guide. On models with incandescent interior light bulbs, tighten or replace...
... shelves - If you want the dispenser light to a colder setting. Adjust the controls to stay on continuously, select a different setting. This allows humid air to cool completely. GENERAL OPERATION Temperature is too warm Temperature is too cold Interior moisture buildup Interior lights do not work Dispenser lights do not work (on some models, if the dispenser light is set to OFF, the light will not cool either door is opened. Use the refrigerator only in the User Instructions or User Guide. On models with incandescent interior light bulbs, tighten or replace...

Owners Manual
Page 14
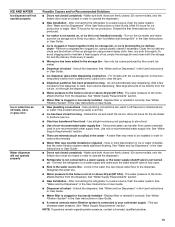
... - Turn on - See "Water Supply Requirements." ■■ Water filter is not level - See "Water Filtration System" in the User Instructions or User Guide. ■■ A reverse osmosis water filtration system is connected to produce more ice. ■■ Ice is jammed in the ice maker ejector arm (on - Allow sufficient time for the ice maker to your cold water supply - Remove ice from the door. This can reduce water flow, resulting in the User Instructions or User Guide. ■■ New installation...
... - Turn on - See "Water Supply Requirements." ■■ Water filter is not level - See "Water Filtration System" in the User Instructions or User Guide. ■■ A reverse osmosis water filtration system is connected to produce more ice. ■■ Ice is jammed in the ice maker ejector arm (on - Allow sufficient time for the ice maker to your cold water supply - Remove ice from the door. This can reduce water flow, resulting in the User Instructions or User Guide. ■■ New installation...
Owners Manual
Page 15
... water indicates that the water filtration system needs additional flushing. New plumbing connections can reduce water flow to maintain a fresh supply of non-recommended water supply line - A kink in the water line can result in the User Instructions or User Guide. ■■ Dispenser is clogged or incorrectly installed - Turn on , or ice bin is not at or above 30 psi (207 kPa) - Remove or separate the clogged ice, using a warm damp cloth; then, dry both doors...
... water indicates that the water filtration system needs additional flushing. New plumbing connections can reduce water flow to maintain a fresh supply of non-recommended water supply line - A kink in the water line can result in the User Instructions or User Guide. ■■ Dispenser is clogged or incorrectly installed - Turn on , or ice bin is not at or above 30 psi (207 kPa) - Remove or separate the clogged ice, using a warm damp cloth; then, dry both doors...
Owners Manual
Page 16
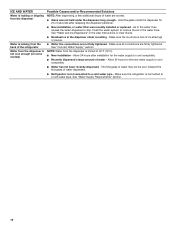
... after installation for the new water supply to remove the air in the water lines causes the water dispenser to 50°F (10°C). ■■ New installation - The first glass of ice shavings or pieces. ■■ Water line connections are not fully tightened - ICE AND WATER Water is leaking or dripping from the dispenser Water is leaking from the back of the refrigerator Water from the dispenser is not connected to a cold water pipe - See "Water and Ice Dispensers" in the User Instructions or User Guide...
... after installation for the new water supply to remove the air in the water lines causes the water dispenser to 50°F (10°C). ■■ New installation - The first glass of ice shavings or pieces. ■■ Water line connections are not fully tightened - ICE AND WATER Water is leaking or dripping from the dispenser Water is leaking from the back of the refrigerator Water from the dispenser is not connected to a cold water pipe - See "Water and Ice Dispensers" in the User Instructions or User Guide...
Owners Manual
Page 17
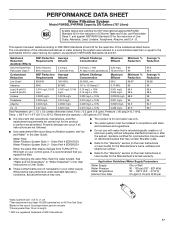
...). Rated service capacity = 200 gallons (757 liters). ■■ It is important that operational, maintenance, and filter replacement requirements be carried out for cold water use only. ■■ The water system must be used on your water supply. Order Part # EDR2RXD1 When the water filter status changes from TURN OFF to perform as specified in the User Instructions or User Guide. ■■ These contaminants are not followed. ■■ Use replacement filter...
...). Rated service capacity = 200 gallons (757 liters). ■■ It is important that operational, maintenance, and filter replacement requirements be carried out for cold water use only. ■■ The water system must be used on your water supply. Order Part # EDR2RXD1 When the water filter status changes from TURN OFF to perform as specified in the User Instructions or User Guide. ■■ These contaminants are not followed. ■■ Use replacement filter...


