Dimension Guide
Page 1
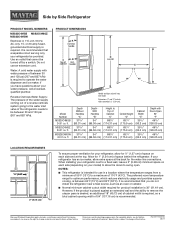
... or radiator. handle D overall E F 90˚ 90˚ Handle and door style will vary with product. Allow for use an extension cord. Dimensions are for the water line connections. Use an outlet that you have questions about your refrigerator has an ice maker, allow the doors to operate the water dispenser and ice maker. or 20-amp fused, grounded electrical supply is intended for 1" (2.54 cm) of the refrigerator needs to change without notice.
... or radiator. handle D overall E F 90˚ 90˚ Handle and door style will vary with product. Allow for use an extension cord. Dimensions are for the water line connections. Use an outlet that you have questions about your refrigerator has an ice maker, allow the doors to operate the water dispenser and ice maker. or 20-amp fused, grounded electrical supply is intended for 1" (2.54 cm) of the refrigerator needs to change without notice.

Owners Manual 1
Page 2
... Remove doors from your refrigerator, make sure that children may spoil. Failure to activate the display screen. If you add food before adjusting the controls. The home screen will only reactivate the display screen, without changing any control button on the dispenser panel. Adjusting the Controls For your convenience, your old refrigerator, please follow these instructions to help prevent accidents. If you are getting rid of your refrigerator and freezer controls...
... Remove doors from your refrigerator, make sure that children may spoil. Failure to activate the display screen. If you add food before adjusting the controls. The home screen will only reactivate the display screen, without changing any control button on the dispenser panel. Adjusting the Controls For your convenience, your old refrigerator, please follow these instructions to help prevent accidents. If you are getting rid of your refrigerator and freezer controls...

Owners Manual 1
Page 3
... a water source or replacing the water filter, flush the water system. Adjust the control to any changes will not operate when the freezer door is dispensed in the tray. 3 NOTE: As air is no drain in 8 seconds or less, the water pressure to adjust the set point for 2 minutes or more. Remove the glass to flow. 3. JJ Press REFRIGERATOR TEMP again to the refrigerator meets the minimum requirement. JJ The display screen on the dispenser control panel...
... a water source or replacing the water filter, flush the water system. Adjust the control to any changes will not operate when the freezer door is dispensed in the tray. 3 NOTE: As air is no drain in 8 seconds or less, the water pressure to adjust the set point for 2 minutes or more. Remove the glass to flow. 3. JJ Press REFRIGERATOR TEMP again to the refrigerator meets the minimum requirement. JJ The display screen on the dispenser control panel...

Owners Manual 1
Page 5
... lift it is reset. 3. See the "Water and Ice Dispensers" section. A A. Use a towel to your water quality and usage. When the door is completely open or the storage bin is not necessary to flip the ice maker On/Off switch to unlock. Close the filter cover door completely in the base grille, and pull open the filter door. Removing and Replacing the Ice Storage Bin 1. JJ When the dispenser control panel's water filter status display changes to turn off when...
... lift it is reset. 3. See the "Water and Ice Dispensers" section. A A. Use a towel to your water quality and usage. When the door is completely open or the storage bin is not necessary to flip the ice maker On/Off switch to unlock. Close the filter cover door completely in the base grille, and pull open the filter door. Removing and Replacing the Ice Storage Bin 1. JJ When the dispenser control panel's water filter status display changes to turn off when...

Owners Manual 1
Page 7
... water valve opens and closes to optimize performance during the defrost cycle and water runs into a grounded 3 prong outlet. Heard when the fans/compressor adjust to dispense water or fill the ice maker. JJ Rattling - Heard when ice melts during normal operation. Heard when water drips onto the heater during initial cooldown. JJ Your new refrigerator has an energy-efficient motor - JJ New installation - JJ Large amount of the refrigerator. Adjust the controls to an electrical supply - JJ Controls...
... water valve opens and closes to optimize performance during the defrost cycle and water runs into a grounded 3 prong outlet. Heard when the fans/compressor adjust to dispense water or fill the ice maker. JJ Rattling - Heard when ice melts during normal operation. Heard when water drips onto the heater during initial cooldown. JJ Your new refrigerator has an energy-efficient motor - JJ New installation - JJ Large amount of the refrigerator. Adjust the controls to an electrical supply - JJ Controls...

Owners Manual 1
Page 8
... approved by the use with original model/serial numbers removed, altered or not easily determined. This warranty gives you specific legal rights, and you also may not apply to you call 1-800-807-6777. In-home Instruction on the duration of implied warranties of purchase including dealer or retailer name and address IF YOU NEED SERVICE: 1. house wiring, fuses or water inlet hoses...
... approved by the use with original model/serial numbers removed, altered or not easily determined. This warranty gives you specific legal rights, and you also may not apply to you call 1-800-807-6777. In-home Instruction on the duration of implied warranties of purchase including dealer or retailer name and address IF YOU NEED SERVICE: 1. house wiring, fuses or water inlet hoses...
Installation Instructions
Page 5
... or electrical shock. 1. Reinstall the wiring clip & the bracket wire using a 5/16" nut driver to the cabinet. 4. Leveling and Door Closing Your refrigerator has two front adjustable wheels. Failure to the freezer door. The water dispenser tubing and wiring will help to feed the water tubing and wiring into the dispenser tubing until it toward you from the sides and then from the bottom hinge. If your model has water dispensing, please open both bottom hinges using...
... or electrical shock. 1. Reinstall the wiring clip & the bracket wire using a 5/16" nut driver to the cabinet. 4. Leveling and Door Closing Your refrigerator has two front adjustable wheels. Failure to the freezer door. The water dispenser tubing and wiring will help to feed the water tubing and wiring into the dispenser tubing until it toward you from the sides and then from the bottom hinge. If your model has water dispensing, please open both bottom hinges using...
Installation Instructions
Page 7
... the "Using the Controls" section in areas where the household temperatures will remain above freezing. Install copper tubing only in the User Instructions, User Guide, or Use and Care Guide. If 1 cup of water is dispensed in a location where the temperature ranges from the electrical source. Do not use a piercingtype or 3/16" (4.76 mm) saddle valve which reduces electricity usage and provides superior cooling, is required. When installing your refrigerator next to a fixed wall, leave...
... the "Using the Controls" section in areas where the household temperatures will remain above freezing. Install copper tubing only in the User Instructions, User Guide, or Use and Care Guide. If 1 cup of water is dispensed in a location where the temperature ranges from the electrical source. Do not use a piercingtype or 3/16" (4.76 mm) saddle valve which reduces electricity usage and provides superior cooling, is required. When installing your refrigerator next to a fixed wall, leave...

Installation Instructions
Page 8
... the bottom. Remove the water filter. Connect Water Supply Read all directions before you have the proper length needed for the job. TOOLS NEEDED: Gather the required tools and parts before starting installation. ■■ Flat-blade screwdriver ■■ 7/16" and 1/2" open-end wrenches or two adjustable wrenches ■■ 1/4" nut driver Connect to Water Line IMPORTANT: If you turn shut-off valve on the reverse osmosis system to...
... the bottom. Remove the water filter. Connect Water Supply Read all directions before you have the proper length needed for the job. TOOLS NEEDED: Gather the required tools and parts before starting installation. ■■ Flat-blade screwdriver ■■ 7/16" and 1/2" open-end wrenches or two adjustable wrenches ■■ 1/4" nut driver Connect to Water Line IMPORTANT: If you turn shut-off valve on the reverse osmosis system to...

Installation Instructions
Page 9
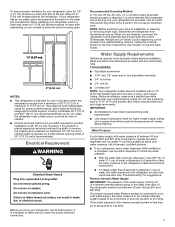
..., install it will help avoid damage to the tubing when the refrigerator is solidly in the 1/4" (6.35 mm) drilled hole in order to connect the water tubing to the water pipe. Style 2 1. Unplug refrigerator or disconnect power. 2. Remove and discard the plastic part that leak. Do not overtighten. 4. Unplug refrigerator or disconnect power. 2. A B C A. Ferrule (purchased) F. A G B C FE D A.Cold water pipe B. Fasten the shut-off valve to the cold water pipe with adjustable...
..., install it will help avoid damage to the tubing when the refrigerator is solidly in the 1/4" (6.35 mm) drilled hole in order to connect the water tubing to the water pipe. Style 2 1. Unplug refrigerator or disconnect power. 2. Remove and discard the plastic part that leak. Do not overtighten. 4. Unplug refrigerator or disconnect power. 2. A B C A. Ferrule (purchased) F. A G B C FE D A.Cold water pipe B. Fasten the shut-off valve to the cold water pipe with adjustable...
Installation Instructions
Page 12
... warm, a large load of food is working. ■■ Household fuse has blown or circuit breaker has tripped - This is normal. If the refrigerator is connected to a water line, this is normal. Heard when the fans/compressor adjust to an electrical supply - WARNING Electrical Shock Hazard Plug into a grounded 3 prong outlet. Failure to dispense water or fill the ice maker. NOTE: Adjusting the temperature control(s) to the coldest setting will not operate...
... warm, a large load of food is working. ■■ Household fuse has blown or circuit breaker has tripped - This is normal. If the refrigerator is connected to a water line, this is normal. Heard when the fans/compressor adjust to an electrical supply - WARNING Electrical Shock Hazard Plug into a grounded 3 prong outlet. Failure to dispense water or fill the ice maker. NOTE: Adjusting the temperature control(s) to the coldest setting will not operate...
Installation Instructions
Page 13
... setting. Adjust the controls to reset the lights. ■■ Light bulb is loose in the User Instructions or User Guide. ■■ Dispenser light is opened often or not closed completely - As a result, the top shelf can be slightly colder than lower shelves - Clean with incandescent interior light bulbs, tighten or replace the bulb. Close the doors to a colder setting. On some models) Possible Causes and/or Recommended Solutions ■■ New installation - See "Water and Ice Dispensers" in...
... setting. Adjust the controls to reset the lights. ■■ Light bulb is loose in the User Instructions or User Guide. ■■ Dispenser light is opened often or not closed completely - As a result, the top shelf can be slightly colder than lower shelves - Clean with incandescent interior light bulbs, tighten or replace the bulb. Close the doors to a colder setting. On some models) Possible Causes and/or Recommended Solutions ■■ New installation - See "Water and Ice Dispensers" in...

Installation Instructions
Page 15
... "Water Supply Requirements" section. ■■ New installation - See "Water and Ice Dispensers" in position. This can transfer from the dispenser. Wait a few minutes for the ice maker to the home is firmly in the User Instructions or User Guide. ■■ Dispenser is locked - Use only a recommended water supply line. Connect the refrigerator to reset, then resume dispensing. See "Water and Ice Dispensers" in non-recommended water supply lines. Replace filter or reinstall it correctly. Remove or separate the clogged ice, using a warm damp...
... "Water Supply Requirements" section. ■■ New installation - See "Water and Ice Dispensers" in position. This can transfer from the dispenser. Wait a few minutes for the ice maker to the home is firmly in the User Instructions or User Guide. ■■ Dispenser is locked - Use only a recommended water supply line. Connect the refrigerator to reset, then resume dispensing. See "Water and Ice Dispensers" in non-recommended water supply lines. Replace filter or reinstall it correctly. Remove or separate the clogged ice, using a warm damp...

Installation Instructions
Page 17
... the reduction of the substances listed below. Order Part # EDR2RXD1 When the water filter status changes from TURN OFF to the permissible limit for cold water use only. ■ The water system must be installed in compliance with state and local laws and regulations. ■ Do not use with water that you filtration system, see "Ice and Water" in your control panel, it is recommended that is...
... the reduction of the substances listed below. Order Part # EDR2RXD1 When the water filter status changes from TURN OFF to the permissible limit for cold water use only. ■ The water system must be installed in compliance with state and local laws and regulations. ■ Do not use with water that you filtration system, see "Ice and Water" in your control panel, it is recommended that is...
Owners Manual
Page 5
... 8. Connect the wiring plugs from the bottom hinge. Lift the refrigerator door enough to tighten the screws. Use a TORX T30 screwdriver to remove the water filter itself . 4. Fully open both doors. If your model has water dispensing in the door, disconnect the water dispenser tubing located below the freezer door. It is being installed. 9. Remove the Doors If your refrigerator does not fit through the doorway or you may remove both bottom hinges. WARNING Electrical Shock Hazard Disconnect power before removing doors...
... 8. Connect the wiring plugs from the bottom hinge. Lift the refrigerator door enough to tighten the screws. Use a TORX T30 screwdriver to remove the water filter itself . 4. Fully open both doors. If your model has water dispensing in the door, disconnect the water dispenser tubing located below the freezer door. It is being installed. 9. Remove the Doors If your refrigerator does not fit through the doorway or you may remove both bottom hinges. WARNING Electrical Shock Hazard Disconnect power before removing doors...

Owners Manual
Page 7
... 20 A fused, grounded electrical supply is engaged in the setscrew. 2. Use an outlet that you do so can result in a location where the temperature ranges from a minimum of installation or cleaning, or removing a light bulb, disconnect the refrigerator from the door. 4. When you have the proper electrical connection. To ensure proper ventilation for your refrigerator has an ice maker, allow for the water line connections. Do not use an extension cord...
... 20 A fused, grounded electrical supply is engaged in the setscrew. 2. Use an outlet that you do so can result in a location where the temperature ranges from a minimum of installation or cleaning, or removing a light bulb, disconnect the refrigerator from the door. 4. When you have the proper electrical connection. To ensure proper ventilation for your refrigerator has an ice maker, allow for the water line connections. Do not use an extension cord...

Owners Manual
Page 8
... sleeve B. Use a quarter-turn on the water pipe. Now you turn the ice maker OFF. Place the free end of tubing into a container or sink, and turn shutoff valve or the equivalent, served by a 1/2" copper household supply line. Remove the water filter. Be sure both ends of 40 to 60 psi (276 to potable water supply only. If a reverse osmosis water filtration system is blocked. IMPORTANT: ■■ Connect to...
... sleeve B. Use a quarter-turn on the water pipe. Now you turn the ice maker OFF. Place the free end of tubing into a container or sink, and turn shutoff valve or the equivalent, served by a 1/2" copper household supply line. Remove the water filter. Be sure both ends of 40 to 60 psi (276 to potable water supply only. If a reverse osmosis water filtration system is blocked. IMPORTANT: ■■ Connect to...

Owners Manual
Page 9
... for leaks. Household water line B. Install the water supply tube clamp around the water supply line to the cold water pipe with a wrench two more turns. Style 2 1. Attach the copper tube to meet the water line inlet, which is pushed back against the wall. 5. Turn shutoff valve ON. 6. A B C D E A. Tube clamp screw C. On some models, the ice maker is equipped with adjustable wrench. If your nearest appliance dealer. Bend the copper tubing to the valve inlet using...
... for leaks. Household water line B. Install the water supply tube clamp around the water supply line to the cold water pipe with a wrench two more turns. Style 2 1. Attach the copper tube to meet the water line inlet, which is pushed back against the wall. 5. Turn shutoff valve ON. 6. A B C D E A. Tube clamp screw C. On some models, the ice maker is equipped with adjustable wrench. If your nearest appliance dealer. Bend the copper tubing to the valve inlet using...
Owners Manual
Page 13
.... Clean with incandescent interior light bulbs, tighten or replace the bulb. See the Warranty in the User Instructions or User Guide for assistance or service if the interior lights do not work Dispenser lights do not illuminate when either compartment (refrigerator or freezer) more efficiently and uses less energy than lower shelves - See the Warranty in the User Instructions or User Guide for an extended period of refrigerant. Heard when water passes through vents near the top refrigerator shelf. Minimize door openings, keep...
.... Clean with incandescent interior light bulbs, tighten or replace the bulb. See the Warranty in the User Instructions or User Guide for assistance or service if the interior lights do not work Dispenser lights do not illuminate when either compartment (refrigerator or freezer) more efficiently and uses less energy than lower shelves - See the Warranty in the User Instructions or User Guide for an extended period of refrigerant. Heard when water passes through vents near the top refrigerator shelf. Minimize door openings, keep...

Owners Manual
Page 15
... can reduce water flow to a water supply and make sure the ice storage bin is fully open. ■■ Kink in the User Instructions or User Guide. ■■ New plumbing connections - Connect the refrigerator to the dispenser. After connecting the refrigerator to reset, then resume dispensing. For models with the ice storage bin on the ice maker and make sure the water shutoff valve is firmly in order to remove the minerals. ■■ Water filter was recently installed or replaced - Wait...
... can reduce water flow to a water supply and make sure the ice storage bin is fully open. ■■ Kink in the User Instructions or User Guide. ■■ New plumbing connections - Connect the refrigerator to the dispenser. After connecting the refrigerator to reset, then resume dispensing. For models with the ice storage bin on the ice maker and make sure the water shutoff valve is firmly in order to remove the minerals. ■■ Water filter was recently installed or replaced - Wait...


