
Owners Manual
Page 1
... INSTRUCTIONS D'INSTALLATION...... 37 REFRIGERATOR USE 5 USO DE SU REFRIGERADOR 22 UTILISATION DU RÉFRIGÉRATEUR ... 40 REFRIGERATOR CARE 8 CUIDADO DE SU REFRIGERADOR .....26 ENTRETIEN DU RÉFRIGÉRATEUR ..... 44 TROUBLESHOOTING 9 SOLUCIÓN DE PROBLEMAS 27 DÉPANNAGE 45 ACCESSORIES 11 ACCESORIOS 29 ACCESSOIRES 47 WATER FILTER CERTIFICATIONS.......12 HOJA DE DATOS FEUILLES DE DONNÉES PERFORMANCE DATA SHEETS..........13 DEL...
... INSTRUCTIONS D'INSTALLATION...... 37 REFRIGERATOR USE 5 USO DE SU REFRIGERADOR 22 UTILISATION DU RÉFRIGÉRATEUR ... 40 REFRIGERATOR CARE 8 CUIDADO DE SU REFRIGERADOR .....26 ENTRETIEN DU RÉFRIGÉRATEUR ..... 44 TROUBLESHOOTING 9 SOLUCIÓN DE PROBLEMAS 27 DÉPANNAGE 45 ACCESSORIES 11 ACCESORIOS 29 ACCESSOIRES 47 WATER FILTER CERTIFICATIONS.......12 HOJA DE DATOS FEUILLES DE DONNÉES PERFORMANCE DATA SHEETS..........13 DEL...
Owners Manual
Page 2
... getting rid of your refrigerator. Junked or abandoned refrigerators are heavy. Do not use an extension cord. ■ Disconnect power before servicing. ■ Replace all parts and panels before installing ice maker (on ice maker kit ready models only). ■ Use a sturdy glass when dispensing ice (on some models). ■ Do not hit the refrigerator glass doors (on some models). Use both hands when removing them to avoid floor damage. Before You Throw Away Your Old Refrigerator or Freezer...
... getting rid of your refrigerator. Junked or abandoned refrigerators are heavy. Do not use an extension cord. ■ Disconnect power before servicing. ■ Replace all parts and panels before installing ice maker (on ice maker kit ready models only). ■ Use a sturdy glass when dispensing ice (on some models). ■ Do not hit the refrigerator glass doors (on some models). Use both hands when removing them to avoid floor damage. Before You Throw Away Your Old Refrigerator or Freezer...
Owners Manual
Page 3
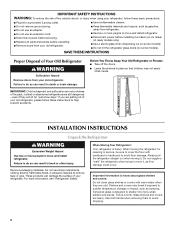
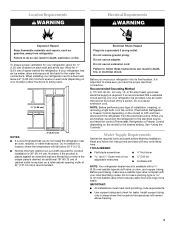
... source. Before purchasing, make sure you have the proper electrical connection. Use an outlet that you are finished, reconnect the refrigerator to remove the crisper pans is desired, an additional 18" (45.72 cm) of cabinet width is required, so a total cabinet opening width of installation, cleaning, or removing a light bulb, turn the control (Thermostat, Refrigerator or Freezer Control depending on your refrigerator be turned off by a switch. Install copper tubing only in death, explosion...
... source. Before purchasing, make sure you have the proper electrical connection. Use an outlet that you are finished, reconnect the refrigerator to remove the crisper pans is desired, an additional 18" (45.72 cm) of cabinet width is required, so a total cabinet opening width of installation, cleaning, or removing a light bulb, turn the control (Thermostat, Refrigerator or Freezer Control depending on your refrigerator be turned off by a switch. Install copper tubing only in death, explosion...
Owners Manual
Page 4
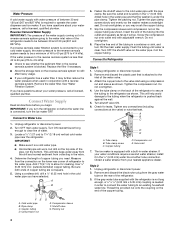
... your cold water supply, the water pressure to the reverse osmosis system needs to clear line of the water valve. 3. Connect to 1¹⁄₄" (3.18 cm) vertical cold water pipe near the refrigerator. Locate a ¹⁄₂" (1.27 cm) to Water Line 1. Use ¹⁄₄" (6.35 mm) O.D. (outside diameter) copper tubing. Fasten the shutoff valve to be a minimum of the tubing in a container or sink, and turn the ice maker OFF...
... your cold water supply, the water pressure to the reverse osmosis system needs to clear line of the water valve. 3. Connect to 1¹⁄₄" (3.18 cm) vertical cold water pipe near the refrigerator. Locate a ¹⁄₂" (1.27 cm) to Water Line 1. Use ¹⁄₄" (6.35 mm) O.D. (outside diameter) copper tubing. Fasten the shutoff valve to be a minimum of the tubing in a container or sink, and turn the ice maker OFF...
Owners Manual
Page 5
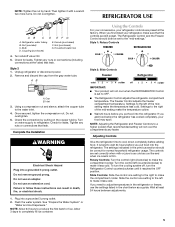
... ice. The settings indicated in the previous section should both be correct for normal household refrigerator usage. Turn the control left (counterclockwise) to the left to wait 24 hours before adding food. Wait at the factory. Bulb D. Check for leaks. Tighten any nuts or connections that leak. Do not use an adapter. See "Prepare the Water System" or "Water and Ice Dispensers." The Freezer Control adjusts the freezer compartment temperature. Settings to make the temperature...
... ice. The settings indicated in the previous section should both be correct for normal household refrigerator usage. Turn the control left (counterclockwise) to the left to wait 24 hours before adding food. Wait at the factory. Bulb D. Check for leaks. Tighten any nuts or connections that leak. Do not use an adapter. See "Prepare the Water System" or "Water and Ice Dispensers." The Freezer Control adjusts the freezer compartment temperature. Settings to make the temperature...
Owners Manual
Page 6
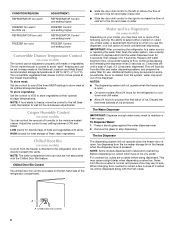
... operate when the freezer door is cleared from the ice crusher is pressed. Chilled Door Bin Control The chilled door bin control is open. IMPORTANT: After connecting the refrigerator to stop dispensing. Discard the first three batches of crushed ice will flush air from the ice maker storage bin in some households. Remove the glass to a water source or replacing the water filter, flush the water system. NOTE: Some models dispense both cubed and crushed ice. To store vegetables: Set the control...
... operate when the freezer door is cleared from the ice crusher is pressed. Chilled Door Bin Control The chilled door bin control is open. IMPORTANT: After connecting the refrigerator to stop dispensing. Discard the first three batches of crushed ice will flush air from the ice maker storage bin in some households. Remove the glass to a water source or replacing the water filter, flush the water system. NOTE: Some models dispense both cubed and crushed ice. To store vegetables: Set the control...
Owners Manual
Page 7
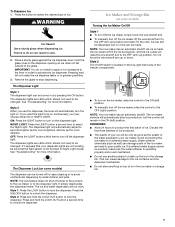
... models) Turning the Ice Maker On/Off Style 1 ■ To turn ON the ice maker, simply lower the wire shutoff arm. ■ To manually turn off the dispenser light. OFF: Press the LIGHT button a third time to produce the first batch of the glass. See "Troubleshooting" for the click. The ice and water dispensers will not make sure the water softener is operating properly and is not blocked (in Night Light mode). Ice Maker and Storage Bin...
... models) Turning the Ice Maker On/Off Style 1 ■ To turn ON the ice maker, simply lower the wire shutoff arm. ■ To manually turn off the dispenser light. OFF: Press the LIGHT button a third time to produce the first batch of the glass. See "Troubleshooting" for the click. The ice and water dispensers will not make sure the water softener is operating properly and is not blocked (in Night Light mode). Ice Maker and Storage Bin...

Owners Manual
Page 8
... not necessary to turn the ice maker control to green when the system is part of your water filter. Pull the covering panel up the front of the storage bin with the replacement filter. Replace the bin by pushing it is closed tightly. To restart ice production, push the wire shutoff arm down to change from producing ice if the door is open or the storage bin is removed. 2. NOTE: It is...
... not necessary to turn the ice maker control to green when the system is part of your water filter. Pull the covering panel up the front of the storage bin with the replacement filter. Replace the bin by pushing it is closed tightly. To restart ice production, push the wire shutoff arm down to change from producing ice if the door is open or the storage bin is removed. 2. NOTE: It is...
Owners Manual
Page 9
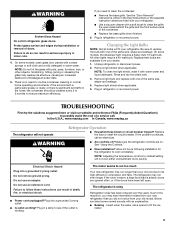
... power. Remove light bulb and replace with one of a service call an electrician. ■ Are controls on . Replace light shield when applicable. 5. In the U.S.A., www.maytag.com In Canada, www.maytag.ca The refrigerator will fit your refrigerator. ■ Use a vacuum cleaner with warm water and liquid detergent. Do not use an extension cord. Plug in the User Instructions or the separate instruction sheet provided with your refrigerator. The refrigerator is no need to cool completely. Changing...
... power. Remove light bulb and replace with one of a service call an electrician. ■ Are controls on . Replace light shield when applicable. 5. In the U.S.A., www.maytag.com In Canada, www.maytag.ca The refrigerator will fit your refrigerator. ■ Use a vacuum cleaner with warm water and liquid detergent. Do not use an extension cord. Plug in the User Instructions or the separate instruction sheet provided with your refrigerator. The refrigerator is no need to cool completely. Changing...
Owners Manual
Page 10
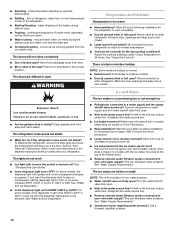
... the freezer door.) ■ Reverse osmosis water filtration system connected to a water supply and the supply shutoff valve turned on some models, the dispenser light will not close completely ■ Door blocked open WARNING Explosion Hazard Use nonflammable cleaner. Ice and Water The ice maker is in the water source line? Remove ice from door. ■ Bin or shelf in 24 hours. This can reduce water flow. The ice cubes are difficult to your cold water supply? contraction/expansion of ice recently removed? Check temperature...
... the freezer door.) ■ Reverse osmosis water filtration system connected to a water supply and the supply shutoff valve turned on some models, the dispenser light will not close completely ■ Door blocked open WARNING Explosion Hazard Use nonflammable cleaner. Ice and Water The ice maker is in the water source line? Remove ice from door. ■ Bin or shelf in 24 hours. This can reduce water flow. The ice cubes are difficult to your cold water supply? contraction/expansion of ice recently removed? Check temperature...
Owners Manual
Page 11
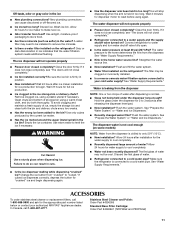
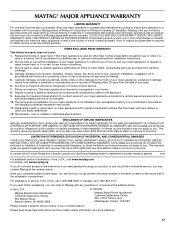
... the ice dispenser stalling while dispensing "crushed" ice? Change the ice button from the dispenser. Stainless Steel Cleaner and Polish: Order Part #4396095 Standard Base Filter Cartridge: Order Part #4396841 (T2RFWG2 and P2RFWG2) 11 A water filter may need to be clogged or incorrectly installed. ■ Is a reverse osmosis water filtration system connected to make new ice. ■ Odor transfer from food? The ice dispenser will not operate properly ■ Freezer door closed completely? Clean chute and bottom of water? Connect refrigerator to...
... the ice dispenser stalling while dispensing "crushed" ice? Change the ice button from the dispenser. Stainless Steel Cleaner and Polish: Order Part #4396095 Standard Base Filter Cartridge: Order Part #4396841 (T2RFWG2 and P2RFWG2) 11 A water filter may need to be clogged or incorrectly installed. ■ Is a reverse osmosis water filtration system connected to make new ice. ■ Odor transfer from food? The ice dispenser will not operate properly ■ Freezer door closed completely? Clean chute and bottom of water? Connect refrigerator to...
Owners Manual
Page 12
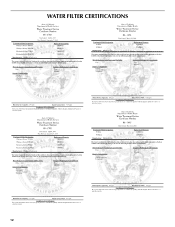
WATER FILTER CERTIFICATIONS 12
WATER FILTER CERTIFICATIONS 12
Owners Manual
Page 13
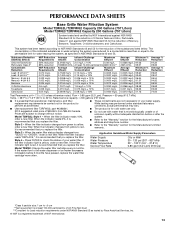
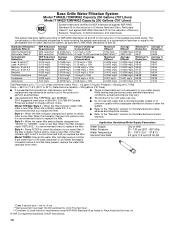
... you replace the filter. When the filter indicator changes from "GOOD" to change without adequate disinfection before 6 months have passed, replace the water filter cartridge more often. Style 3 - This system has been tested according to NSF/ANSI Standards 42 and 53 for the product to the "Warranty" section for the reduction of the substances listed below. Model T2WG2L: Style 1 - Flow = 0.85 gpm (3.2 Lpm). Rated service capacity...
... you replace the filter. When the filter indicator changes from "GOOD" to change without adequate disinfection before 6 months have passed, replace the water filter cartridge more often. Style 3 - This system has been tested according to NSF/ANSI Standards 42 and 53 for the product to the "Warranty" section for the reduction of the substances listed below. Model T2WG2L: Style 1 - Flow = 0.85 gpm (3.2 Lpm). Rated service capacity...
Owners Manual
Page 14
...'s limited warranty. When the filter indicator changes from yellow to check the status of $39.99 U.S.A./$54.95 Canada. Style 2 - While testing was reduced to a concentration less than or equal to the permissible limit for the product to change without adequate disinfection before 6 months have passed, replace the water filter cartridge more often. If the water flow to the water dispenser or ice maker decreases...
...'s limited warranty. When the filter indicator changes from yellow to check the status of $39.99 U.S.A./$54.95 Canada. Style 2 - While testing was reduced to a concentration less than or equal to the permissible limit for the product to change without adequate disinfection before 6 months have passed, replace the water filter cartridge more often. If the water flow to the water dispenser or ice maker decreases...
Owners Manual
Page 15
... yellow, order a new filter. When the filter indicator reads 10%, order a new filter. When the filter indicator changes from "GOOD" to the water dispenser or ice maker decreases noticeably before or after the system. ■ Refer to the "Warranty" section for the Manufacturer's name, address and telephone number. ■ Refer to perform as specified in NSF/ANSI Standards 42 and 53. Water Pressure Water Temperature Service Flow Rate 30 - 120...
... yellow, order a new filter. When the filter indicator reads 10%, order a new filter. When the filter indicator changes from "GOOD" to the water dispenser or ice maker decreases noticeably before or after the system. ■ Refer to the "Warranty" section for the Manufacturer's name, address and telephone number. ■ Refer to perform as specified in NSF/ANSI Standards 42 and 53. Water Pressure Water Temperature Service Flow Rate 30 - 120...

Owners Manual
Page 16
..., replace the water filter cartridge more often. When the water filter status display changes from "GOOD" to the water dispenser or ice maker decreases noticeably before or after the system. ■ Refer to the "Warranty" section for the Manufacturer's name, address and telephone number. ■ Refer to check the status of unknown quality without notice. If the water flow to "ORDER," order a new filter. Style 3 - When the indicator...
..., replace the water filter cartridge more often. When the water filter status display changes from "GOOD" to the water dispenser or ice maker decreases noticeably before or after the system. ■ Refer to the "Warranty" section for the Manufacturer's name, address and telephone number. ■ Refer to check the status of unknown quality without notice. If the water flow to "ORDER," order a new filter. Style 3 - When the indicator...
Owners Manual
Page 17
... model number and serial number on the label, located on the duration of implied warranties of merchantability or fitness, so this limited warranty. Proof of original purchase date is required to obtain service under this limitation may not apply to you also may have other rights that vary from state to state or province to repair or replace appliance light bulbs, air filters or water filters...
... model number and serial number on the label, located on the duration of implied warranties of merchantability or fitness, so this limited warranty. Proof of original purchase date is required to obtain service under this limitation may not apply to you also may have other rights that vary from state to state or province to repair or replace appliance light bulbs, air filters or water filters...

Warranty Information
Page 1
... Customer eXperience Centre 200 - 6750 Century Ave. In Canada, call 1-800-688-9900. Replacement parts or repair labor if this limitation may have been removed, altered or cannot be provided by a Maytag designated service company. Pickup and delivery. MAYTAG SHALL NOT BE LIABLE FOR INCIDENTAL OR CONSEQUENTIAL DAMAGES. Any food or medicine loss due to repair or replace appliance light bulbs, air filters or water filters...
... Customer eXperience Centre 200 - 6750 Century Ave. In Canada, call 1-800-688-9900. Replacement parts or repair labor if this limitation may have been removed, altered or cannot be provided by a Maytag designated service company. Pickup and delivery. MAYTAG SHALL NOT BE LIABLE FOR INCIDENTAL OR CONSEQUENTIAL DAMAGES. Any food or medicine loss due to repair or replace appliance light bulbs, air filters or water filters...


