

Use and Care Manual
Page 2
...the past. Common sense, caution and care must be plugged into a properly grounded wall receptacle. Before you throw away your old refrigerator, please follow basic precautions, including the following: Important: Child entrapment and suffocation are still dangerous - Do not, under any circumstances,...1-800-688-2002 Canada Have complete model and serial number identification of injury or death, follow the instructions below for your refrigerator. DANGER To reduce risk of your protection against possible electrical shock hazards. It must be necessary to make changes to cover...
...the past. Common sense, caution and care must be plugged into a properly grounded wall receptacle. Before you throw away your old refrigerator, please follow basic precautions, including the following: Important: Child entrapment and suffocation are still dangerous - Do not, under any circumstances,...1-800-688-2002 Canada Have complete model and serial number identification of injury or death, follow the instructions below for your refrigerator. DANGER To reduce risk of your protection against possible electrical shock hazards. It must be necessary to make changes to cover...
Use and Care Manual
Page 3
... power cords and/or loose plugs replaced by grasping the plug, not the cord. 1. Your refrigerator should not climb, hang or stand on any part of the refrigerator. 20. Important Safety Instructions WARNING To reduce risk of fire, electric shock, serious injury or death...ordinances. 3. Observe all instructions before attempting any part of explosive fumes. 19. Do not ground to a cold-water pipe. 7. Keep your refrigerator, follow basic precautions, including the following: 13. Always read and follow grounding instructions. 4. Do not use a two-prong adapter, extension cord ...
... power cords and/or loose plugs replaced by grasping the plug, not the cord. 1. Your refrigerator should not climb, hang or stand on any part of the refrigerator. 20. Important Safety Instructions WARNING To reduce risk of fire, electric shock, serious injury or death...ordinances. 3. Observe all instructions before attempting any part of explosive fumes. 19. Do not ground to a cold-water pipe. 7. Keep your refrigerator, follow basic precautions, including the following: 13. Always read and follow grounding instructions. 4. Do not use a two-prong adapter, extension cord ...

Use and Care Manual
Page 4
... while performing door removal and replacement. • Tape decorative panels (select models) securely into place before removing door handles. Allow refrigerator to sit upright for indoor household application only. WARNING To avoid severe personal injury or death, observe the following : •... power only after replacing doors. • Green ground wire must be attached to allow 1⁄2" space at this temperature. • Refrigerator is damaged, cut off water before removing doors. CAUTION To avoid property damage, observe the following : • Disconnect power to the...
... while performing door removal and replacement. • Tape decorative panels (select models) securely into place before removing door handles. Allow refrigerator to sit upright for indoor household application only. WARNING To avoid severe personal injury or death, observe the following : •... power only after replacing doors. • Green ground wire must be attached to allow 1⁄2" space at this temperature. • Refrigerator is damaged, cut off water before removing doors. CAUTION To avoid property damage, observe the following : • Disconnect power to the...

Use and Care Manual
Page 5
...top hinge covers by turning rear adjustment screw clockwise to release. • To detach red wire harness, press tab on underside of the refrigerator. 4. For water dispensing models only: • Do not remove screw connecting green ground wire. 6. Replacing the Doors • To replace... the doors, follow the steps in Door and Hinge Removal in reverse order. To enhance the appearance and maintain performance, the refrigerator should be level. Notes: • Complete any required door reversal, panel installation and/or a water supply connection before reconnecting. Remove toe...
...top hinge covers by turning rear adjustment screw clockwise to release. • To detach red wire harness, press tab on underside of the refrigerator. 4. For water dispensing models only: • Do not remove screw connecting green ground wire. 6. Replacing the Doors • To replace... the doors, follow the steps in Door and Hinge Removal in reverse order. To enhance the appearance and maintain performance, the refrigerator should be level. Notes: • Complete any required door reversal, panel installation and/or a water supply connection before reconnecting. Remove toe...

Use and Care Manual
Page 6
... any water leaks. Both reduce water flow and can cause damage. • Add 8' to tubing length needed to three hours before placing refrigerator into water supply line before valve attachment) • Adjustable wrench (2) • 1⁄4" hex nut driver Notes: • Use copper ... 1⁄4" hole to be raised. • Turn front roller adjustment screw (A) clockwise to raise front corner of door. • If one refrigerator door has reached the limit of injury or death, follow basic precautions, including the following : • Read all instructions before installing ice maker. ...
... any water leaks. Both reduce water flow and can cause damage. • Add 8' to tubing length needed to three hours before placing refrigerator into water supply line before valve attachment) • Adjustable wrench (2) • 1⁄4" hex nut driver Notes: • Use copper ... 1⁄4" hole to be raised. • Turn front roller adjustment screw (A) clockwise to raise front corner of door. • If one refrigerator door has reached the limit of injury or death, follow basic precautions, including the following : • Read all instructions before installing ice maker. ...

Use and Care Manual
Page 7
... Do not over sleeve and screw nut into inlet port. Check for 24 hours. Handle design varies from refrigerator to observe the water supply C connection for your refrigerator. Align handle and extension as illustrated. Rotate the handle so that tubing feeds straight into water valve inlet port..., the handle is flat against the door. 5. Please reference the appropriate instructions for two to three hours prior to moving the refrigerator to frame with water tubing clamp (C) and turn the lower nut (2) counterclockwise and fully tighten while holding the upper nut in ...
... Do not over sleeve and screw nut into inlet port. Check for 24 hours. Handle design varies from refrigerator to observe the water supply C connection for your refrigerator. Align handle and extension as illustrated. Rotate the handle so that tubing feeds straight into water valve inlet port..., the handle is flat against the door. 5. Please reference the appropriate instructions for two to three hours prior to moving the refrigerator to frame with water tubing clamp (C) and turn the lower nut (2) counterclockwise and fully tighten while holding the upper nut in ...

Use and Care Manual
Page 9
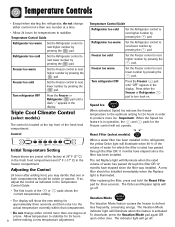
... OFF stops cooling in the Temperature Control Guide table. Neither section will be colder or warmer. Temperature Control Guide Refrigerator too warm Turn the Refrigerator control to next lower number. This is a normal occurrence that one number at a time. • Allow ...setting. • Set the Freezer control on 4. • Set the Refrigerator control on 4. • Let the refrigerator run at least 8 to the touch. Refrigerator too cold Turn the Refrigerator control to the refrigerator. Adjusting the Controls • 24 hours after adding food, you may ...
... OFF stops cooling in the Temperature Control Guide table. Neither section will be colder or warmer. Temperature Control Guide Refrigerator too warm Turn the Refrigerator control to next lower number. This is a normal occurrence that one number at a time. • Allow ...setting. • Set the Freezer control on 4. • Set the Refrigerator control on 4. • Let the refrigerator run at least 8 to the touch. Refrigerator too cold Turn the Refrigerator control to the refrigerator. Adjusting the Controls • 24 hours after adding food, you may ...
Use and Care Manual
Page 10
...Vacation Mode indicator light will not operate. Freezer too warm Set the Freezer control to next lower number by pressing the pad. Turn refrigerator OFF Press the Freezer pad until a dash "-" appears in the freezer compartment. Control Reset Filter (select models) Initial Temperature Setting ...Replace lights will go off . Press either door. To deactivate, press the Vacation Mode pad again OR open either the Freezer or Refrigerator pad to defrost less frequently, conserving energy. The red Replace light will illuminate when 90 % of the volume of the or current...
...Vacation Mode indicator light will not operate. Freezer too warm Set the Freezer control to next lower number by pressing the pad. Turn refrigerator OFF Press the Freezer pad until a dash "-" appears in the freezer compartment. Control Reset Filter (select models) Initial Temperature Setting ...Replace lights will go off . Press either door. To deactivate, press the Vacation Mode pad again OR open either the Freezer or Refrigerator pad to defrost less frequently, conserving energy. The red Replace light will illuminate when 90 % of the volume of the or current...

Use and Care Manual
Page 11
... setting adjusts the light level at which the dispenser light will sound every few days, see the Preparing for more noticeable when the refrigerator is activated on the control. Important: The Auto Light (select models) must be disabled until the temperatures have exceeded these limits, the... (CC) (select models) When Super Cool is ON, an air-mixing fan in the fresh food compartment is displayed, use the Refrigerator up and down the refrigerator and freezer after excessive or lengthy door openings. 10 To save energy, this option. Setting 1 is the darkest light level setting, ...
... setting adjusts the light level at which the dispenser light will sound every few days, see the Preparing for more noticeable when the refrigerator is activated on the control. Important: The Auto Light (select models) must be disabled until the temperatures have exceeded these limits, the... (CC) (select models) When Super Cool is ON, an air-mixing fan in the fresh food compartment is displayed, use the Refrigerator up and down the refrigerator and freezer after excessive or lengthy door openings. 10 To save energy, this option. Setting 1 is the darkest light level setting, ...

Use and Care Manual
Page 12
.... It can then be adjusted up or down without unloading. In ordinary use, the Elevator™ Shelf frame assembly does NOT require removal. Your refrigerator has either Spill-Catcher™ or nonsealed shelves. To Remove a Shelf: • Slightly tilt up the front and lift up on shelf. •...Shelf (select models) The Elevator™ Shelf is securely locked at the rear. It is not necessary to press up the rear of the refrigerator compartment. Shelves may vary) 11 To slide out (select models), grasp the front of the ElevatorTM Shelf. • Confirm shelf is secure before...
.... It can then be adjusted up or down without unloading. In ordinary use, the Elevator™ Shelf frame assembly does NOT require removal. Your refrigerator has either Spill-Catcher™ or nonsealed shelves. To Remove a Shelf: • Slightly tilt up the front and lift up on shelf. •...Shelf (select models) The Elevator™ Shelf is securely locked at the rear. It is not necessary to press up the rear of the refrigerator compartment. Shelves may vary) 11 To slide out (select models), grasp the front of the ElevatorTM Shelf. • Confirm shelf is secure before...

Use and Care Manual
Page 13
... door bucket and can organizer over the cutout portion of individual beverage cans. The dispenser sits in a new location. Fresh Food Features Refrigerator Pak Can Organizer (select models) The Refrigerator Pak Can Organizer conveniently dispenses up and pull out. To Remove: • Slide dairy center up to food items stored in desired...
... door bucket and can organizer over the cutout portion of individual beverage cans. The dispenser sits in a new location. Fresh Food Features Refrigerator Pak Can Organizer (select models) The Refrigerator Pak Can Organizer conveniently dispenses up and pull out. To Remove: • Slide dairy center up to food items stored in desired...

Use and Care Manual
Page 14
... Install: • Insert drawer into frame rails and push back into place. To Remove: • Pull drawer out to provide normal refrigerator temperature. Use the Meats setting for manual humidity slide controls on the air vent or fabric-like material* covers small air vents in the... a control that when laminated to fabric, becomes DIAPLEX. Grip Pads are removable and are equipped with a clean, damp cloth. * The Maytag Automatic Humidity Control system features a unique, patented material called Shape Memory Polymer (SMP) that regulates the air temperature in the door buckets.
... Install: • Insert drawer into frame rails and push back into place. To Remove: • Pull drawer out to provide normal refrigerator temperature. Use the Meats setting for manual humidity slide controls on the air vent or fabric-like material* covers small air vents in the... a control that when laminated to fabric, becomes DIAPLEX. Grip Pads are removable and are equipped with a clean, damp cloth. * The Maytag Automatic Humidity Control system features a unique, patented material called Shape Memory Polymer (SMP) that regulates the air temperature in the door buckets.

Use and Care Manual
Page 15
... (style may vary/select models) The Egg Tray with Handle holds a "dozen-plus" eggs. The Snugger attached to rest on the left hand side of a refrigerator shelf (this rack cannot be positioned on an Elevator Shelf™). 14 Position the rack to the Tall Bottle Retainer keeps bottles and other containers...
... (style may vary/select models) The Egg Tray with Handle holds a "dozen-plus" eggs. The Snugger attached to rest on the left hand side of a refrigerator shelf (this rack cannot be positioned on an Elevator Shelf™). 14 Position the rack to the Tall Bottle Retainer keeps bottles and other containers...

Use and Care Manual
Page 16
... into place. Lift up front of basket or drawer, and slide to the back of bin and remove. Lift front of shelf up front of refrigerator. Important: Fixed door bucket is closed. Baskets and Drawers Baskets and drawers (style may vary) slide out for easy access to properly align ice bin...
... into place. Lift up front of basket or drawer, and slide to the back of bin and remove. Lift front of shelf up front of refrigerator. Important: Fixed door bucket is closed. Baskets and Drawers Baskets and drawers (style may vary) slide out for easy access to properly align ice bin...
Use and Care Manual
Page 17
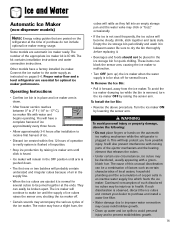
... avoid personal injury or property damage, observe the following: • Do not place fingers or hands on the automatic ice making mechanism while the refrigerator is removed, turn the ice maker OFF by lowering the sensor arm. Operating Instructions • Confirm ice bin is in place and ice maker...will help protect you from the ice maker. The cause of this unusual discoloration can easily be a combination of factors such as instructed on the refrigerator at the ends. Be sure to dry the bin thoroughly before replacing it is IC10S. To Remove the Ice Bin: • Pull it ...
... avoid personal injury or property damage, observe the following: • Do not place fingers or hands on the automatic ice making mechanism while the refrigerator is removed, turn the ice maker OFF by lowering the sensor arm. Operating Instructions • Confirm ice bin is in place and ice maker...will help protect you from the ice maker. The cause of this unusual discoloration can easily be a combination of factors such as instructed on the refrigerator at the ends. Be sure to dry the bin thoroughly before replacing it is IC10S. To Remove the Ice Bin: • Pull it ...

Use and Care Manual
Page 18
... panel. See Dispenser Lock for cleaning and emptying purposes. Important: Removable tray does not drain. Discard first 10-14 glasses of water after initially connecting refrigerator to household water supply and after extended periods of water may continue to reduce spraying. Dispenser Control (select models) (control features vary by model) Ice...
... panel. See Dispenser Lock for cleaning and emptying purposes. Important: Removable tray does not drain. Discard first 10-14 glasses of water after initially connecting refrigerator to household water supply and after extended periods of water may continue to reduce spraying. Dispenser Control (select models) (control features vary by model) Ice...
Use and Care Manual
Page 20
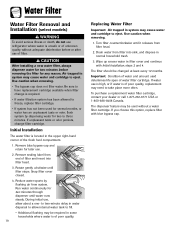
... and continue with blue bypass cap. Water Filter Water Filter Removal and Installation (select models) WARNING To avoid serious illness or death, do not use refrigerator where water is of poor quality, replacement may cause water and cartridge to eject. CAUTION After installing a new water filter, always dispense water for two...
... and continue with blue bypass cap. Water Filter Water Filter Removal and Installation (select models) WARNING To avoid serious illness or death, do not use refrigerator where water is of poor quality, replacement may cause water and cartridge to eject. CAUTION After installing a new water filter, always dispense water for two...
Use and Care Manual
Page 21
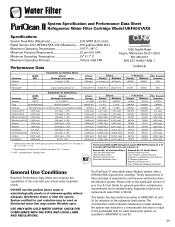
... 1 NTU** 11 ± 1 NTU*** Cysts 99.5% Reduction Minimum 50,000/L Asbestos 99% Reduction 107 108 fibers/L; Water Filter System Specification and Performance Data Sheet TM Refrigerator Water Filter Cartridge Model UKF8001AXX Specifications Service Flow Rate (Maximum 0.78 GPM (2.9 L/min) Rated Service Life UKF8001AXX-750 (Maximum) ......750 gallons /2838 liters Maximum Operating...
... 1 NTU** 11 ± 1 NTU*** Cysts 99.5% Reduction Minimum 50,000/L Asbestos 99% Reduction 107 108 fibers/L; Water Filter System Specification and Performance Data Sheet TM Refrigerator Water Filter Cartridge Model UKF8001AXX Specifications Service Flow Rate (Maximum 0.78 GPM (2.9 L/min) Rated Service Life UKF8001AXX-750 (Maximum) ......750 gallons /2838 liters Maximum Operating...

Use and Care Manual
Page 23
...best stored in the crisper drawers traps humidity to -freeze foods such as described on pages 8 and 9. • Avoid overcrowding the refrigerator shelves. These foods are tightly sealed. Fruits and Vegetables • Storage in the freezer interior where the temperature varies less with an optimum... on pages 23 and 24 for appropriate length of storage. Food Storage Tips Fresh Food Storage • The fresh food compartment of a refrigerator should be wrapped securely so leakage and contamination of other foods. • While vegetables need a certain amount of frozen foods. •...
...best stored in the crisper drawers traps humidity to -freeze foods such as described on pages 8 and 9. • Avoid overcrowding the refrigerator shelves. These foods are tightly sealed. Fruits and Vegetables • Storage in the freezer interior where the temperature varies less with an optimum... on pages 23 and 24 for appropriate length of storage. Food Storage Tips Fresh Food Storage • The fresh food compartment of a refrigerator should be wrapped securely so leakage and contamination of other foods. • While vegetables need a certain amount of frozen foods. •...

Use and Care Manual
Page 24
... to 5 days Not recommended Store in sweet, or 1 tsp. Sour cream 10 days Not recommended Store in the shell 3 weeks Not recommended Refrigerate small ends down. Check carton date. EGGS Eggs in original carton. Leftover yolks or whites 2 to 4 days 9 to 12 months For each... at 60° to 70° F (16° to 21° C). Berries, cherries, apricots 2 to 3 days 6 months Ripen at room temperature before refrigerating. Pineapples, cut 2 to 3 days 6 to 6 months May become crumbly Wrap tightly. Use quickly. 23 Hard cheese 1 to 2 months (Swiss, Cheddar and Parmesan...
... to 5 days Not recommended Store in sweet, or 1 tsp. Sour cream 10 days Not recommended Store in the shell 3 weeks Not recommended Refrigerate small ends down. Check carton date. EGGS Eggs in original carton. Leftover yolks or whites 2 to 4 days 9 to 12 months For each... at 60° to 70° F (16° to 21° C). Berries, cherries, apricots 2 to 3 days 6 months Ripen at room temperature before refrigerating. Pineapples, cut 2 to 3 days 6 to 6 months May become crumbly Wrap tightly. Use quickly. 23 Hard cheese 1 to 2 months (Swiss, Cheddar and Parmesan...


