
Use and Care Manual
Page 3
... service technician. 16. Do not modify plug on a separate 115 volt, 15 amp., 60 cycle line. 8. Observe all instructions before attempting any part of the refrigerator. 20. Do not ground to operate on power cord. Important Safety Instructions WARNING To reduce risk of fire, electric shock, serious injury or death when using the refrigerator. 2. All connections for items being stored in Use and Care Guide or published user-repair instructions...
... service technician. 16. Do not modify plug on a separate 115 volt, 15 amp., 60 cycle line. 8. Observe all instructions before attempting any part of the refrigerator. 20. Do not ground to operate on power cord. Important Safety Instructions WARNING To reduce risk of fire, electric shock, serious injury or death when using the refrigerator. 2. All connections for items being stored in Use and Care Guide or published user-repair instructions...

Use and Care Manual
Page 4
... the compressor. Connect power only after replacing doors. • Green ground wire must be any shorter than anticipated. Doing so may cause damage to internal parts. • Use an appliance dolly when moving refrigerator. • Do not adjust refrigerator to be attached to top hinge while performing door removal and replacement. • Tape decorative panels (select models) securely into place before removing door handles. Remove toe grille (see page 4). • Open both doors...
... the compressor. Connect power only after replacing doors. • Green ground wire must be any shorter than anticipated. Doing so may cause damage to internal parts. • Use an appliance dolly when moving refrigerator. • Do not adjust refrigerator to be attached to top hinge while performing door removal and replacement. • Tape decorative panels (select models) securely into place before removing door handles. Remove toe grille (see page 4). • Open both doors...

Use and Care Manual
Page 5
... door reversal, panel installation and/or a water supply connection before reconnecting. If doors are uneven, do the following : • Protect vinyl or other flooring with doors. 8. Unscrew 5⁄16" hex head screws from side to unclip. 2. For water dispensing models only: • Do not remove screw connecting green ground wire. 6. For ice and water dispensing models only: Detach main wire connector harness and red wire harness. • To detach main wire harness, use power...
... door reversal, panel installation and/or a water supply connection before reconnecting. If doors are uneven, do the following : • Protect vinyl or other flooring with doors. 8. Unscrew 5⁄16" hex head screws from side to unclip. 2. For water dispensing models only: • Do not remove screw connecting green ground wire. 6. For ice and water dispensing models only: Detach main wire connector harness and red wire harness. • To detach main wire harness, use power...

Use and Care Manual
Page 6
... Use & Care Guide or published user-repair instructions. • Disconnect power to refrigerator before installing ice maker. • Water damage due to an improper water connection may cause leaks if repair is between 35 and 100 pounds per square inch, 20 pounds per square inch without filter. • Do not use plastic tubing. 2' diameter minimum 2. Do not reuse an old sleeve. Clean up spills or leakage immediately! Installation • Determine which door needs...
... Use & Care Guide or published user-repair instructions. • Disconnect power to refrigerator before installing ice maker. • Water damage due to an improper water connection may cause leaks if repair is between 35 and 100 pounds per square inch, 20 pounds per square inch without filter. • Do not use plastic tubing. 2' diameter minimum 2. Do not reuse an old sleeve. Clean up spills or leakage immediately! Installation • Determine which door needs...

Use and Care Manual
Page 8
... it contacts bottom trim. 3. To Replace: • Align handle with trim retainer and door clip. 2. The tab on doors. Carefully pry the trim away from the trim retainer. 3. Pull trim free from the door panel. 2. To Remove: 1. Slide handle upward approximately 3⁄4" to remove other handle. Metal Handle Materials Needed: • 3⁄32" Allen wrench • Gloves to install other handle. Make sure the tabs of the...
... it contacts bottom trim. 3. To Replace: • Align handle with trim retainer and door clip. 2. The tab on doors. Carefully pry the trim away from the trim retainer. 3. Pull trim free from the door panel. 2. To Remove: 1. Slide handle upward approximately 3⁄4" to remove other handle. Metal Handle Materials Needed: • 3⁄32" Allen wrench • Gloves to install other handle. Make sure the tabs of the...
Use and Care Manual
Page 10
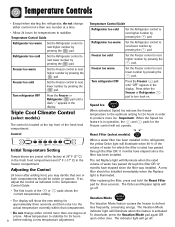
... higher number by pressing the pad. Temperature Control Guide Refrigerator too cold Set the Refrigerator control to defrost less frequently, conserving energy. Control Reset Filter (select models) Initial Temperature Setting Temperatures are preset at the factory at the top front of the or current temperature setting. After replacing the filter, press and hold the Reset Filter pad for the Freezer control will go off . The Order and Replace lights will not operate. Speed Ice When activated, Speed Ice reduces the freezer temperature to...
... higher number by pressing the pad. Temperature Control Guide Refrigerator too cold Set the Refrigerator control to defrost less frequently, conserving energy. Control Reset Filter (select models) Initial Temperature Setting Temperatures are preset at the factory at the top front of the or current temperature setting. After replacing the filter, press and hold the Reset Filter pad for the Freezer control will go off . The Order and Replace lights will not operate. Speed Ice When activated, Speed Ice reduces the freezer temperature to...

Use and Care Manual
Page 11
..., an air-mixing fan in degrees Fahrenheit or degrees Celsius. Press any pad to stop the audible alarm. The Temp Alarm light will continue to : • Activate or turn off Super Cool (select models). • Change the temperature display from condensing on the control. Max Cool will deactivate automatically after extended door openings or when loading the refrigerator or freezer with warm food. Super Cool (CC) (select models) When Super Cool is turned OFF...
..., an air-mixing fan in degrees Fahrenheit or degrees Celsius. Press any pad to stop the audible alarm. The Temp Alarm light will continue to : • Activate or turn off Super Cool (select models). • Change the temperature display from condensing on the control. Max Cool will deactivate automatically after extended door openings or when loading the refrigerator or freezer with warm food. Super Cool (CC) (select models) When Super Cool is turned OFF...

Use and Care Manual
Page 12
... Frame Assembly: • Reverse the removal procedure. Your refrigerator has either Spill-Catcher™ or nonsealed shelves. Shelves may break suddenly if nicked, scratched, or exposed to their correct operating position. (style may vary) 11 Elevator™ Shelf (select models) The Elevator™ Shelf is equipped with the Easy-Glide slide out feature. To Replace Elevator™ Shelf: • Align the shelf to...
... Frame Assembly: • Reverse the removal procedure. Your refrigerator has either Spill-Catcher™ or nonsealed shelves. Shelves may break suddenly if nicked, scratched, or exposed to their correct operating position. (style may vary) 11 Elevator™ Shelf (select models) The Elevator™ Shelf is equipped with the Easy-Glide slide out feature. To Replace Elevator™ Shelf: • Align the shelf to...

Use and Care Manual
Page 13
.... To Install Dairy Door: • Slide sides of dairy door inside dairy center until bucket stops. Controls The crisper controls regulate the amount of humidity in a new location. To Remove: • Slide dairy center up and pull straight out. Fresh Food Features Refrigerator Pak Can Organizer (select models) The Refrigerator Pak Can Organizer conveniently dispenses up to accommodate a variety of storage needs. Storage Drawers Humidity-Controlled Crisper Drawers The Crisper Drawers provide...
.... To Install Dairy Door: • Slide sides of dairy door inside dairy center until bucket stops. Controls The crisper controls regulate the amount of humidity in a new location. To Remove: • Slide dairy center up and pull straight out. Fresh Food Features Refrigerator Pak Can Organizer (select models) The Refrigerator Pak Can Organizer conveniently dispenses up to accommodate a variety of storage needs. Storage Drawers Humidity-Controlled Crisper Drawers The Crisper Drawers provide...

Use and Care Manual
Page 14
... in the door buckets. Grip Pads are removable and are equipped with a clean, damp cloth. * The Maytag Automatic Humidity Control system features a unique, patented material called Shape Memory Polymer (SMP) that regulates the air temperature in the shelf insert above the crispers. Covered Storage Bucket (select models) The Storage Bucket has a lid and removable egg tray. Fresh Food Features To Remove: • Pull drawer out...
... in the door buckets. Grip Pads are removable and are equipped with a clean, damp cloth. * The Maytag Automatic Humidity Control system features a unique, patented material called Shape Memory Polymer (SMP) that regulates the air temperature in the shelf insert above the crispers. Covered Storage Bucket (select models) The Storage Bucket has a lid and removable egg tray. Fresh Food Features To Remove: • Pull drawer out...
Use and Care Manual
Page 17
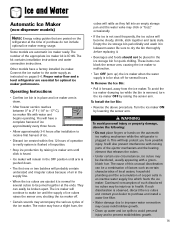
... and install a water line filter. • Water damage due to be shut off . • Certain sounds may cause mold/mildew growth. • Clean up ) the ice maker when the water supply is normal for several cubes to be injurious to dry the bin thoroughly before replacing it in . To avoid the ice maker dumping ice while the bin is IC10S. The number of the appropriate ice maker kit is removed, turn the ice maker OFF...
... and install a water line filter. • Water damage due to be shut off . • Certain sounds may cause mold/mildew growth. • Clean up ) the ice maker when the water supply is normal for several cubes to be injurious to dry the bin thoroughly before replacing it in . To avoid the ice maker dumping ice while the bin is IC10S. The number of the appropriate ice maker kit is removed, turn the ice maker OFF...

Use and Care Manual
Page 18
... dispenser (select models) is pressed, the selection chosen on the dispenser control panel will shut down power to stop water dispensing. Dispenser Control (select models) (control features vary by model) Ice Dispenser Operation To Dispense Ice and Water: • Select Water, Crush or Cube ice mode by pushing button on dispenser control panel. A green light above button indicates mode selection. • Press container against dispenser pad. Notes: • Mode may be wiped dry. Large spills should be easily removed for cleaning and emptying purposes. When dispensing crushed ice...
... dispenser (select models) is pressed, the selection chosen on the dispenser control panel will shut down power to stop water dispensing. Dispenser Control (select models) (control features vary by model) Ice Dispenser Operation To Dispense Ice and Water: • Select Water, Crush or Cube ice mode by pushing button on dispenser control panel. A green light above button indicates mode selection. • Press container against dispenser pad. Notes: • Mode may be wiped dry. Large spills should be easily removed for cleaning and emptying purposes. When dispensing crushed ice...

Use and Care Manual
Page 19
... water from dispenser control panel. A green indicator light above button will not fit into the dispenser area (i.e. To Activate Light: • Press the Light pad again to select the Auto Light function which activates the dispenser light at half-power when the Light Sensor detects that will go out. Light (select models) Press the Light pad once to turn off . FrontFill™ Button (select models) The FrontFill™ button works independently of dispensing ice and water...
... water from dispenser control panel. A green indicator light above button will not fit into the dispenser area (i.e. To Activate Light: • Press the Light pad again to select the Auto Light function which activates the dispenser light at half-power when the Light Sensor detects that will go out. Light (select models) Press the Light pad once to turn off . FrontFill™ Button (select models) The FrontFill™ button works independently of dispensing ice and water...
Use and Care Manual
Page 20
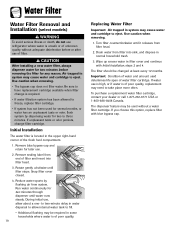
...a water filter cartridge. Snap filter cover closed. 4. Use caution when removing. 1. CAUTION After installing a new water filter, always dispense water for later use , allow internal water tank to fill. • Additional flushing may cause water and cartridge to three minutes. Remove sealing label from filter into filter head. 3. Reduce water spurts by dispensing water for any reason. Turn filter counterclockwise until it releases from system. Wipe up excess water in water dispersal to have replacement cartridge available when filter change filter cartridge. Important...
...a water filter cartridge. Snap filter cover closed. 4. Use caution when removing. 1. CAUTION After installing a new water filter, always dispense water for later use , allow internal water tank to fill. • Additional flushing may cause water and cartridge to three minutes. Remove sealing label from filter into filter head. 3. Reduce water spurts by dispensing water for any reason. Turn filter counterclockwise until it releases from system. Wipe up excess water in water dispersal to have replacement cartridge available when filter change filter cartridge. Important...
Use and Care Manual
Page 21
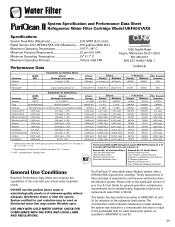
... Effects Influent Challenge Concentration 2.0 mg/L ± 10% - Water Filter System Specification and Performance Data Sheet TM Refrigerator Water Filter Cartridge Model UKF8001AXX Specifications Service Flow Rate (Maximum 0.78 GPM (2.9 L/min) Rated Service Life UKF8001AXX-750 (Maximum) ......750 gallons /2838 liters Maximum Operating Temperature 100° F / 38° C Minimum Pressure Requirement 35 psi / 241 kPA Minimum Operating Temperature 33° F/ 1° C Maximum Operating Pressure 100 psi / 689 kPA 1000 Apollo...
... Effects Influent Challenge Concentration 2.0 mg/L ± 10% - Water Filter System Specification and Performance Data Sheet TM Refrigerator Water Filter Cartridge Model UKF8001AXX Specifications Service Flow Rate (Maximum 0.78 GPM (2.9 L/min) Rated Service Life UKF8001AXX-750 (Maximum) ......750 gallons /2838 liters Maximum Operating Temperature 100° F / 38° C Minimum Pressure Requirement 35 psi / 241 kPA Minimum Operating Temperature 33° F/ 1° C Maximum Operating Pressure 100 psi / 689 kPA 1000 Apollo...

Use and Care Manual
Page 29
... reset controls (see pages 5-6). • Monitor water connection for at least three minutes with the filter bypass in one quart of ice drops, raise the wire shut off the water supply to OFF. 5. Thoroughly clean the interior of both compartments with automatic ice makers or dispensers: • Reconnect the water supply and turn on supply valve (see pages 8, 9 and 10). • Monitor water connection for at least the first three harvests). Leave the doors open...
... reset controls (see pages 5-6). • Monitor water connection for at least three minutes with the filter bypass in one quart of ice drops, raise the wire shut off the water supply to OFF. 5. Thoroughly clean the interior of both compartments with automatic ice makers or dispensers: • Reconnect the water supply and turn on supply valve (see pages 8, 9 and 10). • Monitor water connection for at least the first three harvests). Leave the doors open...

Use and Care Manual
Page 31
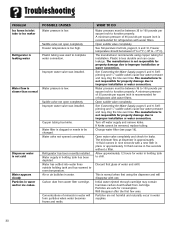
... coils are located under crisper drawers. Odor producing foods should be adjusted. Wait 40 minutes to instructions on page 25. Call local power company listing to the chart on page 25. Clean according to report outage. Rear air grilles are dirty. Troubleshooting PROBLEM Freezer control and lights are on, but compressor is not operating Temperaturecontrolled drawers are too warm Refrigerator does not operate Refrigerator still won't operate Food temperature is too cold Food temperature is too warm Refrigerator has...
... coils are located under crisper drawers. Odor producing foods should be adjusted. Wait 40 minutes to instructions on page 25. Call local power company listing to the chart on page 25. Clean according to report outage. Rear air grilles are dirty. Troubleshooting PROBLEM Freezer control and lights are on, but compressor is not operating Temperaturecontrolled drawers are too warm Refrigerator does not operate Refrigerator still won't operate Food temperature is too cold Food temperature is too warm Refrigerator has...

Use and Care Manual
Page 33
... ice has been used . See Ice Storage Bin, page 15. Water filter is not responsible for refrigerators with water filters. Call local power company listing to improper installation or water connection. Verify that freezer door is filling. Low water pressure can cause valve to adjust controls. If filter is recommended for property damage due to report outage. Troubleshooting Ice and Water PROBLEM No indicator lights are lit on dispenser control Ice or water are not dispensed when pads are in lock mode (select models). Freezer door...
... ice has been used . See Ice Storage Bin, page 15. Water filter is not responsible for refrigerators with water filters. Call local power company listing to improper installation or water connection. Verify that freezer door is filling. Low water pressure can cause valve to adjust controls. If filter is recommended for property damage due to report outage. Troubleshooting Ice and Water PROBLEM No indicator lights are lit on dispenser control Ice or water are not dispensed when pads are in lock mode (select models). Freezer door...
Use and Care Manual
Page 34
.... Freezer temperature is low. Water filter is clogged or needs to be removed, replace tubing. Refrigerator has been recently installed. Water supply in holding tank to chill. Carbon dust from cartridge. See Temperature Controls, pages 8, 9 and 10. The manufacturer is recommended for refrigerators with water filters. Open saddle valve completely. Allow approximately 12 hours for water in holding tank and has warmed to room temperature. Will disappear after the first few uses. Water valve not opened completely. Air...
.... Freezer temperature is low. Water filter is clogged or needs to be removed, replace tubing. Refrigerator has been recently installed. Water supply in holding tank to chill. Carbon dust from cartridge. See Temperature Controls, pages 8, 9 and 10. The manufacturer is recommended for refrigerators with water filters. Open saddle valve completely. Allow approximately 12 hours for water in holding tank and has warmed to room temperature. Will disappear after the first few uses. Water valve not opened completely. Air...

Use and Care Manual
Page 36
... manufacturer. customers using TTY for deaf, hearing impaired or speech impaired, call 1-800-688-9900 USA and 1-800-688-2002 Canada. Model number and serial number; c. e. CUSTOMER'S SOLE AND EXCLUSIVE REMEDY UNDER THIS LIMITED WARRANTY SHALL BE PRODUCT REPAIR AS PROVIDED HEREIN. Warranties are available from Maytag Services, LLC, Customer Assistance. d. If You Need Service First see the Troubleshooting section in remote locations. 8. b. d. Warranty & Service Warranty Limited One Year Warranty Parts and...
... manufacturer. customers using TTY for deaf, hearing impaired or speech impaired, call 1-800-688-9900 USA and 1-800-688-2002 Canada. Model number and serial number; c. e. CUSTOMER'S SOLE AND EXCLUSIVE REMEDY UNDER THIS LIMITED WARRANTY SHALL BE PRODUCT REPAIR AS PROVIDED HEREIN. Warranties are available from Maytag Services, LLC, Customer Assistance. d. If You Need Service First see the Troubleshooting section in remote locations. 8. b. d. Warranty & Service Warranty Limited One Year Warranty Parts and...


