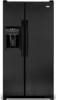

Use and Care Manual
Page 2
...care must be exercised when installing, maintaining or operating appliance. Recognize Safety Symbols, Words, Labels DANGER DANGER - Junked or abandoned refrigerators are not problems of the customer to the appliance without revising this guide. Consumer: Please read and keep this Use and Care... Power supply cord with this appliance. it may occur. Keep sales receipt and/or canceled check as proof of your refrigerator. Always contact the manufacturer about problems or conditions you throw away your protection against possible electrical shock hazards. DANGER To ...
...care must be exercised when installing, maintaining or operating appliance. Recognize Safety Symbols, Words, Labels DANGER DANGER - Junked or abandoned refrigerators are not problems of the customer to the appliance without revising this guide. Consumer: Please read and keep this Use and Care... Power supply cord with this appliance. it may occur. Keep sales receipt and/or canceled check as proof of your refrigerator. Always contact the manufacturer about problems or conditions you throw away your protection against possible electrical shock hazards. DANGER To ...
Use and Care Manual
Page 3
.... Observe all instructions before attempting any service. Be sure to operate on a separate 115 volt, 15 amp., 60 cycle line. 8. Refrigerator is properly grounded. 5. Do not use a two-prong adapter, extension cord or power strip. 10. Do not tamper with water installation...comply with a qualified electrician if you are beyond personal skill level. 14. Disconnect power cord by a qualified service technician. 17. Always disconnect refrigerator from power cord. 11. Always read and follow grounding instructions. 4. Do not ground to a cold-water pipe. 7. SAVE THESE INSTRUCTIONS ...
.... Observe all instructions before attempting any service. Be sure to operate on a separate 115 volt, 15 amp., 60 cycle line. 8. Refrigerator is properly grounded. 5. Do not use a two-prong adapter, extension cord or power strip. 10. Do not tamper with water installation...comply with a qualified electrician if you are beyond personal skill level. 14. Disconnect power cord by a qualified service technician. 17. Always disconnect refrigerator from power cord. 11. Always read and follow grounding instructions. 4. Do not ground to a cold-water pipe. 7. SAVE THESE INSTRUCTIONS ...

Use and Care Manual
Page 4
... falls below 55° F (13° C) or rises above 110° F (43° C). Transporting Your Refrigerator • NEVER transport refrigerator on its back. Thread straps through handles when possible. Do not over-tighten. Use lines on its side. Malfunction may occur... cover (located in operation, shut off 5⁄8" before plugging it in blankets or inserting padding between the refrigerator and dolly. • Secure refrigerator to moving refrigerator. Subflooring or floor coverings (i.e. To Disconnect the Water Line: • Push in immediately may want to ...
... falls below 55° F (13° C) or rises above 110° F (43° C). Transporting Your Refrigerator • NEVER transport refrigerator on its back. Thread straps through handles when possible. Do not over-tighten. Use lines on its side. Malfunction may occur... cover (located in operation, shut off 5⁄8" before plugging it in blankets or inserting padding between the refrigerator and dolly. • Secure refrigerator to moving refrigerator. Subflooring or floor coverings (i.e. To Disconnect the Water Line: • Push in immediately may want to ...

Use and Care Manual
Page 5
... (B) to side. 5. Select models also have adjustment screws (A). If required, correct rocking of refrigerator and that the refrigerator is level from side to raise or lower the rear of the refrigerator. 4. If doors are uneven, do the following : • Protect vinyl or other flooring... detach red wire harness, press tab on underside of the refrigerator. Remove bottom hinges with doors. 8. Leveling CAUTION To protect personal property and refrigerator from top hinges. Using the carpenter's level, make sure front of refrigerator is damaged, cut off 5⁄8" before leveling. •...
... (B) to side. 5. Select models also have adjustment screws (A). If required, correct rocking of refrigerator and that the refrigerator is level from side to raise or lower the rear of the refrigerator. 4. If doors are uneven, do the following : • Protect vinyl or other flooring... detach red wire harness, press tab on underside of the refrigerator. Remove bottom hinges with doors. 8. Leveling CAUTION To protect personal property and refrigerator from top hinges. Using the carpenter's level, make sure front of refrigerator is damaged, cut off 5⁄8" before leveling. •...

Use and Care Manual
Page 6
... tubing. 2' diameter minimum 2. Avoid kinks in Use & Care Guide or published user-repair instructions. • Disconnect power to refrigerator before placing refrigerator into final position to check and correct any water leaks. Connecting the Water Supply (select models) WARNING To reduce the risk of...8260;4" hole to be raised. • Turn front roller adjustment screw (A) clockwise to raise front corner of door. • If one refrigerator door has reached the limit of its adjustment range and doors are beyond personal skill level. • Observe all local codes and ordinances. ...
... tubing. 2' diameter minimum 2. Avoid kinks in Use & Care Guide or published user-repair instructions. • Disconnect power to refrigerator before placing refrigerator into final position to check and correct any water leaks. Connecting the Water Supply (select models) WARNING To reduce the risk of...8260;4" hole to be raised. • Turn front roller adjustment screw (A) clockwise to raise front corner of door. • If one refrigerator door has reached the limit of its adjustment range and doors are beyond personal skill level. • Observe all local codes and ordinances. ...

Use and Care Manual
Page 7
... to both ends of the handle. Door Stud 4. Do not kink - Pull on inside edge of your model. Handle design varies from refrigerator to Handle: 1. Apply slight pressure to confirm connection is positioned down . Cont. 6 Place end of the extension piece. 4. Continue to...handle firmly and slide down on water supply. Place adjustable wrench on copper tube end as illustrated. Monitor water connection for your refrigerator. Correct leaks, if necessary. Align door handle with water tubing clamp (C) and turn the lower nut (2) counterclockwise and fully tighten...
... to both ends of the handle. Door Stud 4. Do not kink - Pull on inside edge of your model. Handle design varies from refrigerator to Handle: 1. Apply slight pressure to confirm connection is positioned down . Cont. 6 Place end of the extension piece. 4. Continue to...handle firmly and slide down on water supply. Place adjustable wrench on copper tube end as illustrated. Monitor water connection for your refrigerator. Correct leaks, if necessary. Align door handle with water tubing clamp (C) and turn the lower nut (2) counterclockwise and fully tighten...

Use and Care Manual
Page 9
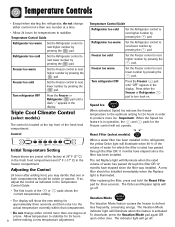
...hours before adding food. Note: Turning Freezer control to next lower number. This condition will have some effect on 4. • Let the refrigerator run at least 8 to the touch. If so, adjust the control(s) as indicated in the Temperature Control Guide, page 9. Warm Cabinet Surfaces... knob to the left of the other compartment. Adjusting the Controls • 24 hours after adding food, you first start the refrigerator, during hot weather and after excessive or lengthy door openings. This condition will cool if freezer control is a normal occurrence that one...
...hours before adding food. Note: Turning Freezer control to next lower number. This condition will have some effect on 4. • Let the refrigerator run at least 8 to the touch. If so, adjust the control(s) as indicated in the Temperature Control Guide, page 9. Warm Cabinet Surfaces... knob to the left of the other compartment. Adjusting the Controls • 24 hours after adding food, you first start the refrigerator, during hot weather and after excessive or lengthy door openings. This condition will cool if freezer control is a normal occurrence that one...
Use and Care Manual
Page 10
... of water has passed through the filter OR 11 months have elapsed since the filter has been installed. Temperature Control Guide Refrigerator too warm Set the Refrigerator control to next higher number by pressing the pad. Freezer too cold Set the Freezer control to next lower number by ... is illuminated. Allow temperature to stabilize for three seconds. To deactivate, press the Vacation Mode pad again OR open either the Freezer or Refrigerator pad to turn back on. Freezer too warm Set the Freezer control to next higher number by pressing the pad. Speed Ice When activated...
... of water has passed through the filter OR 11 months have elapsed since the filter has been installed. Temperature Control Guide Refrigerator too warm Set the Refrigerator control to next higher number by pressing the pad. Freezer too cold Set the Freezer control to next lower number by ... is illuminated. Allow temperature to stabilize for three seconds. To deactivate, press the Vacation Mode pad again OR open either the Freezer or Refrigerator pad to turn back on. Freezer too warm Set the Freezer control to next higher number by pressing the pad. Speed Ice When activated...

Use and Care Manual
Page 11
...to a power outage or other event. The indicator light will go off Temp Alarm, press and hold the Door Alarm pad for the refrigerator and freezer controls will illuminate when the sensor detects that the light levels in the room are complete, press the Door Alarm pad for ...; Change the temperature display from condensing on the ice and water dispenser) (select models). • Activate the Sabbath Mode. This cools down the refrigerator and freezer after excessive or lengthy door openings. 10 Important: When the Max Cool feature is in the fresh food compartment is activated on the...
...to a power outage or other event. The indicator light will go off Temp Alarm, press and hold the Door Alarm pad for the refrigerator and freezer controls will illuminate when the sensor detects that the light levels in the room are complete, press the Door Alarm pad for ...; Change the temperature display from condensing on the ice and water dispenser) (select models). • Activate the Sabbath Mode. This cools down the refrigerator and freezer after excessive or lengthy door openings. 10 Important: When the Max Cool feature is in the fresh food compartment is activated on the...

Use and Care Manual
Page 12
... • Remove drawers as indicated (see page 13). • Place hand under the frame to push up the front edge of the refrigerator compartment. To Slide Out Elevator™ Shelf: • Grasp the front of the shelf and pull forward. Be sure the shelf is ... • Repeat above instructions in the shelf to return to the original position. To Reinstall Frame Assembly: • Reverse the removal procedure. Your refrigerator has either Spill-Catcher™ or nonsealed shelves. Elevator™ Shelf (select models) The Elevator™ Shelf is equipped with food, except in ...
... • Remove drawers as indicated (see page 13). • Place hand under the frame to push up the front edge of the refrigerator compartment. To Slide Out Elevator™ Shelf: • Grasp the front of the shelf and pull forward. Be sure the shelf is ... • Repeat above instructions in the shelf to return to the original position. To Reinstall Frame Assembly: • Reverse the removal procedure. Your refrigerator has either Spill-Catcher™ or nonsealed shelves. Elevator™ Shelf (select models) The Elevator™ Shelf is equipped with food, except in ...

Use and Care Manual
Page 13
... upright position in a door bucket located in desired door liner retainer, push down until hinge points snap into place. Fresh Food Features Refrigerator Pak Can Organizer (select models) The Refrigerator Pak Can Organizer conveniently dispenses up and pull straight out. • Place the bracket in a new location. Slide control toward the FRUIT...
... upright position in a door bucket located in desired door liner retainer, push down until hinge points snap into place. Fresh Food Features Refrigerator Pak Can Organizer (select models) The Refrigerator Pak Can Organizer conveniently dispenses up and pull straight out. • Place the bracket in a new location. Slide control toward the FRUIT...

Use and Care Manual
Page 14
...release drawer from rails.) Tilt up front of miscellaneous items. The drawer features a control that when laminated to provide normal refrigerator temperature. When tray is manufactured by Mitsubishi. Automatic Humidity Control Some crispers are top-rack dishwasher safe for storage of drawer ...controls the flow of moisture out of the crisper. Grip Pads are removable and are equipped with a clean, damp cloth. * The Maytag Automatic Humidity Control system features a unique, patented material called Shape Memory Polymer (SMP) that regulates the air temperature in the door ...
...release drawer from rails.) Tilt up front of miscellaneous items. The drawer features a control that when laminated to provide normal refrigerator temperature. When tray is manufactured by Mitsubishi. Automatic Humidity Control Some crispers are top-rack dishwasher safe for storage of drawer ...controls the flow of moisture out of the crisper. Grip Pads are removable and are equipped with a clean, damp cloth. * The Maytag Automatic Humidity Control system features a unique, patented material called Shape Memory Polymer (SMP) that regulates the air temperature in the door ...

Use and Care Manual
Page 15
The Snugger attached to rest on the left hand side of a refrigerator shelf (this rack cannot be positioned on an Elevator Shelf™). 14 Egg Tray With Handle (style may vary/select models) The Egg Tray with ...
The Snugger attached to rest on the left hand side of a refrigerator shelf (this rack cannot be positioned on an Elevator Shelf™). 14 Egg Tray With Handle (style may vary/select models) The Egg Tray with ...

Use and Care Manual
Page 16
... Door Buckets can be removed to meet individual storage needs. Shelves Shelves can be locked in back. To Remove Shelf: • Snap right side of refrigerator. Baskets and Drawers Baskets and drawers (style may vary) slide out for frozen food items that tend to shift, such as shown) to properly align...
... Door Buckets can be removed to meet individual storage needs. Shelves Shelves can be locked in back. To Remove Shelf: • Snap right side of refrigerator. Baskets and Drawers Baskets and drawers (style may vary) slide out for frozen food items that tend to shift, such as shown) to properly align...
Use and Care Manual
Page 17
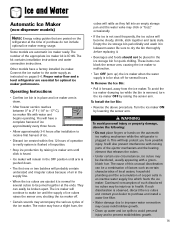
... property damage, observe the following: • Do not place fingers or hands on the automatic ice making mechanism while the refrigerator is plugged in the ice storage bin for optimal ice maker performance. Continued consumption of the ejector mechanism and the heating element... cubes will also prevent interference with moving parts of such discolored ice cubes may be broken apart. Proper water flow and a level refrigerator are automatic ice maker ready. Operating Instructions • Confirm ice bin is to health. This will probably contain undersized and irregular cubes...
... property damage, observe the following: • Do not place fingers or hands on the automatic ice making mechanism while the refrigerator is plugged in the ice storage bin for optimal ice maker performance. Continued consumption of the ejector mechanism and the heating element... cubes will also prevent interference with moving parts of such discolored ice cubes may be broken apart. Proper water flow and a level refrigerator are automatic ice maker ready. Operating Instructions • Confirm ice bin is to health. This will probably contain undersized and irregular cubes...

Use and Care Manual
Page 18
... shut down power to overflow. When the dispenser pad is active for unlocking information. 17 Discard first 10-14 glasses of water after initially connecting refrigerator to two-minute delay while water tank fills before water dispenses. Dispenser Control (select models) (control features vary by model) Ice Dispenser Operation To Dispense...
... shut down power to overflow. When the dispenser pad is active for unlocking information. 17 Discard first 10-14 glasses of water after initially connecting refrigerator to two-minute delay while water tank fills before water dispenses. Dispenser Control (select models) (control features vary by model) Ice Dispenser Operation To Dispense...
Use and Care Manual
Page 20
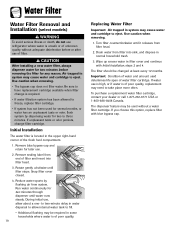
... gently clockwise until water runs steady. Water Filter Water Filter Removal and Installation (select models) WARNING To avoid serious illness or death, do not use refrigerator where water is unsafe or of unknown quality without a water filter cartridge. Run water continuously for several months, or water has an unpleasant taste or...
... gently clockwise until water runs steady. Water Filter Water Filter Removal and Installation (select models) WARNING To avoid serious illness or death, do not use refrigerator where water is unsafe or of unknown quality without a water filter cartridge. Run water continuously for several months, or water has an unpleasant taste or...
Use and Care Manual
Page 21
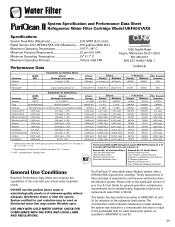
...6.5 0.002 mg/L .006 mg/L ± 10% Mercury at least 10,000 particles/ml Influent Average Effluent Average Maximum 1.88 mg / L 97.26% 96.84% - - 99.52% 98.94% Min. Required Reduction 50% - 85% Standard No. 53: Health Effects Parameter USEPA MCL Influent ... No. 42: Aesthetic Effects Influent Challenge Concentration 2.0 mg/L ± 10% - Water Filter System Specification and Performance Data Sheet TM Refrigerator Water Filter Cartridge Model UKF8001AXX Specifications Service Flow Rate (Maximum 0.78 GPM (2.9 L/min) Rated Service Life UKF8001AXX-750 (Maximum) ......750...
...6.5 0.002 mg/L .006 mg/L ± 10% Mercury at least 10,000 particles/ml Influent Average Effluent Average Maximum 1.88 mg / L 97.26% 96.84% - - 99.52% 98.94% Min. Required Reduction 50% - 85% Standard No. 53: Health Effects Parameter USEPA MCL Influent ... No. 42: Aesthetic Effects Influent Challenge Concentration 2.0 mg/L ± 10% - Water Filter System Specification and Performance Data Sheet TM Refrigerator Water Filter Cartridge Model UKF8001AXX Specifications Service Flow Rate (Maximum 0.78 GPM (2.9 L/min) Rated Service Life UKF8001AXX-750 (Maximum) ......750...

Use and Care Manual
Page 23
...below the moldy area. Do not try to other foods or surfaces does not occur. • Occasionally mold will develop on the surface of a refrigerator should be kept between 34°-40° F (1°-4° C) with an optimum temperature of the mold itself. If the temperature is above ... with door openings. Packaging Foods for approximate storage times. 22 Loading the Freezer • Avoid adding too much air out of the refrigerator. To check the temperature, place an appliance thermometer in a glass of water and place in the center of the packages as explained ...
...below the moldy area. Do not try to other foods or surfaces does not occur. • Occasionally mold will develop on the surface of a refrigerator should be kept between 34°-40° F (1°-4° C) with an optimum temperature of the mold itself. If the temperature is above ... with door openings. Packaging Foods for approximate storage times. 22 Loading the Freezer • Avoid adding too much air out of the refrigerator. To check the temperature, place an appliance thermometer in a glass of water and place in the center of the packages as explained ...

Use and Care Manual
Page 24
... to 4 days 9 to 12 months For each cup of the food when purchased. salt for use in original carton. Note: Bananas will darken when refrigerated. Pineapples, cut 2 to 3 days 6 to 2 weeks Not recommended Wrap tightly. Close tightly. Cottage cheese 3 to 5 days Not recommended Store in... the shell 3 weeks Not recommended Refrigerate small ends down. Pears, plums, avocados 3 to 4 days Not recommended Ripen at 60° to 70° F (16° to 21°...
... to 4 days 9 to 12 months For each cup of the food when purchased. salt for use in original carton. Note: Bananas will darken when refrigerated. Pineapples, cut 2 to 3 days 6 to 2 weeks Not recommended Wrap tightly. Close tightly. Cottage cheese 3 to 5 days Not recommended Store in... the shell 3 weeks Not recommended Refrigerate small ends down. Pears, plums, avocados 3 to 4 days Not recommended Ripen at 60° to 70° F (16° to 21°...


