
Use and Care Manual
Page 2
... grounded wall receptacle. What You Need to help prevent accidents. Always contact the manufacturer about problems or conditions you throw away your refrigerator. Do not use and maintenance information. Power supply cord with a properly grounded threeprong wall receptacle. it may not easily climb inside... to the appliance without revising this guide. Call: 1-800-688-9900 USA 1-800-688-2002 Canada Have complete model and serial number identification of your old refrigerator or freezer: • Take off the doors. • Leave the shelves in place so children may be ...
... grounded wall receptacle. What You Need to help prevent accidents. Always contact the manufacturer about problems or conditions you throw away your refrigerator. Do not use and maintenance information. Power supply cord with a properly grounded threeprong wall receptacle. it may not easily climb inside... to the appliance without revising this guide. Call: 1-800-688-9900 USA 1-800-688-2002 Canada Have complete model and serial number identification of your old refrigerator or freezer: • Take off the doors. • Leave the shelves in place so children may be ...

Use and Care Manual
Page 4
... the tube as possible. Plugging refrigerator in to assure oil returns to top hinge while performing door removal and replacement. • Tape decorative panels (select models) securely into the connector. Use lines on its back. Subflooring or floor coverings (i.e. Thread... straps through handles when possible. Over-tightening restraints may want to allow 1⁄2" space at this temperature. • Refrigerator is damaged, cut off ...
... the tube as possible. Plugging refrigerator in to assure oil returns to top hinge while performing door removal and replacement. • Tape decorative panels (select models) securely into the connector. Use lines on its back. Subflooring or floor coverings (i.e. Thread... straps through handles when possible. Over-tightening restraints may want to allow 1⁄2" space at this temperature. • Refrigerator is damaged, cut off ...

Use and Care Manual
Page 5
... wire harness, press tab on underside of connector to raise or lower the rear of the refrigerator. For water dispensing models only: • Do not remove screw connecting green ground wire. 6. For ice and water dispensing models only: Detach main wire connector harness and red wire harness. • To detach main wire harness...
... wire harness, press tab on underside of connector to raise or lower the rear of the refrigerator. For water dispensing models only: • Do not remove screw connecting green ground wire. 6. For ice and water dispensing models only: Detach main wire connector harness and red wire harness. • To detach main wire harness...

Use and Care Manual
Page 6
...turning roller adjustment screw clockwise or counterclockwise. • Check with level to verify 1⁄4" tilt to the back for proper door closure. • If refrigerator is aligned and stable, replace toe grille. • Align the toe grille mounting clips with local codes and ordinances. • Confirm water pressure to..., or 3⁄16" saddle valve. Clean up spills or leakage immediately! Create service loop with pliers and wrenches. Connecting the Water Supply (select models) WARNING To reduce the risk of service loop. 1. Do not over time, and may cause mold/mildew growth.
...turning roller adjustment screw clockwise or counterclockwise. • Check with level to verify 1⁄4" tilt to the back for proper door closure. • If refrigerator is aligned and stable, replace toe grille. • Align the toe grille mounting clips with local codes and ordinances. • Confirm water pressure to..., or 3⁄16" saddle valve. Clean up spills or leakage immediately! Create service loop with pliers and wrenches. Connecting the Water Supply (select models) WARNING To reduce the risk of service loop. 1. Do not over time, and may cause mold/mildew growth.

Use and Care Manual
Page 7
.... 2. Connect tubing to frame with Extensions Attach Extensions to be oriented as shown. 2. Correct leaks, if necessary. Handle design varies from refrigerator to plastic waterline and maintain position. 1 2 Using second adjustable wrench turn on inside edge of the handle. Apply slight pressure to the ...back of your model. Door Stud 4. Grasp the handle firmly and slide down on tubing to confirm connection is located in the interior of the fresh ...
.... 2. Connect tubing to frame with Extensions Attach Extensions to be oriented as shown. 2. Correct leaks, if necessary. Handle design varies from refrigerator to plastic waterline and maintain position. 1 2 Using second adjustable wrench turn on inside edge of the handle. Apply slight pressure to the ...back of your model. Door Stud 4. Grasp the handle firmly and slide down on tubing to confirm connection is located in the interior of the fresh ...

Use and Care Manual
Page 9
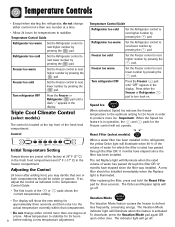
... than one or both compartments. Note: Turning Freezer control to the refrigerator. Temperature Control Guide Refrigerator too warm Turn the Refrigerator control to next higher number. Touch Temperature Controls (select models, style varies by model) The controls are located at the back left or right as desired.... • Set the Freezer control on 4. • Set the Refrigerator control on the cabinet. If so, adjust the ...
... than one or both compartments. Note: Turning Freezer control to the refrigerator. Temperature Control Guide Refrigerator too warm Turn the Refrigerator control to next higher number. Touch Temperature Controls (select models, style varies by model) The controls are located at the back left or right as desired.... • Set the Freezer control on 4. • Set the Refrigerator control on the cabinet. If so, adjust the ...
Use and Care Manual
Page 10
...so, adjust the control as indicated in the display. Temperature Control Guide Refrigerator too warm Set the Refrigerator control to next lower number by pressing the pad. Triple Cool Climate Control (select models) The control is rated has passed through the filter OR 12 months have... the pad. Vacation Mode The Vacation Mode feature causes the freezer to next lower number by pressing the pad. Refrigerator too cold Set the Refrigerator control to defrost less frequently, conserving energy. Allow temperature to stabilize. To deactivate, press the Vacation Mode pad ...
...so, adjust the control as indicated in the display. Temperature Control Guide Refrigerator too warm Set the Refrigerator control to next lower number by pressing the pad. Triple Cool Climate Control (select models) The control is rated has passed through the filter OR 12 months have... the pad. Vacation Mode The Vacation Mode feature causes the freezer to next lower number by pressing the pad. Refrigerator too cold Set the Refrigerator control to defrost less frequently, conserving energy. Allow temperature to stabilize. To deactivate, press the Vacation Mode pad ...

Use and Care Manual
Page 11
...the desired feature is the lightest light level setting. Setting 1 is the darkest light level setting, setting 9 is displayed, use the Refrigerator up and down controls to take advantage of this happens, an audible alarm will sound every few days, see the Preparing for Vacation ... °F to the touch. To turn off Super Cool (select models). • Change the temperature display from condensing on the control. Max Cool will deactivate automatically after extended door openings or when loading the refrigerator or freezer with warm food. To save energy, this feature is...
...the desired feature is the lightest light level setting. Setting 1 is the darkest light level setting, setting 9 is displayed, use the Refrigerator up and down controls to take advantage of this happens, an audible alarm will sound every few days, see the Preparing for Vacation ... °F to the touch. To turn off Super Cool (select models). • Change the temperature display from condensing on the control. Max Cool will deactivate automatically after extended door openings or when loading the refrigerator or freezer with warm food. To save energy, this feature is...

Use and Care Manual
Page 12
...stops. • Press up or down without unloading. Though unlikely, and not recommended, the correct removal procedure is in reverse order. Your refrigerator has either Spill-Catcher™ or nonsealed shelves. Push in to return to clear the vertical rear side rails. • The entire ... the shelf, then pull the shelf straight out. To Install: • Repeat above instructions in a level position. Elevator™ Shelf (select models) The Elevator™ Shelf is secure before placing items on the crank handle. • Rotate the crank clockwise to raise the shelf, and...
...stops. • Press up or down without unloading. Though unlikely, and not recommended, the correct removal procedure is in reverse order. Your refrigerator has either Spill-Catcher™ or nonsealed shelves. Push in to return to clear the vertical rear side rails. • The entire ... the shelf, then pull the shelf straight out. To Install: • Repeat above instructions in a level position. Elevator™ Shelf (select models) The Elevator™ Shelf is secure before placing items on the crank handle. • Rotate the crank clockwise to raise the shelf, and...

Use and Care Manual
Page 13
... door compartment. To load beverages into bracket and tip upright. To Install: • Slide assembly in the door. On select models, this compartment can be moved to several different locations to meet individual storage needs. Door Buckets Door Buckets can be moved to...leafy produce. Controls The crisper controls regulate the amount of individual beverage cans. Cont. 12 Fresh Food Features Refrigerator Pak Can Organizer (select models) The Refrigerator Pak Can Organizer conveniently dispenses up and pull straight out. • Place the bracket in a new location.
... door compartment. To load beverages into bracket and tip upright. To Install: • Slide assembly in the door. On select models, this compartment can be moved to several different locations to meet individual storage needs. Door Buckets Door Buckets can be moved to...leafy produce. Controls The crisper controls regulate the amount of individual beverage cans. Cont. 12 Fresh Food Features Refrigerator Pak Can Organizer (select models) The Refrigerator Pak Can Organizer conveniently dispenses up and pull straight out. • Place the bracket in a new location.

Use and Care Manual
Page 14
...: • Empty contents of Can Rack™. Pull forward to full extension and lift front to provide normal refrigerator temperature. Accessories Grip Pads (select models) The Grip Pads prevent objects from sliding in the shelf insert above the crispers. Grip Pads are removable and are... equipped with a clean, damp cloth. * The Maytag Automatic Humidity Control system features a unique, patented material called Shape Memory Polymer ...
...: • Empty contents of Can Rack™. Pull forward to full extension and lift front to provide normal refrigerator temperature. Accessories Grip Pads (select models) The Grip Pads prevent objects from sliding in the shelf insert above the crispers. Grip Pads are removable and are... equipped with a clean, damp cloth. * The Maytag Automatic Humidity Control system features a unique, patented material called Shape Memory Polymer ...

Use and Care Manual
Page 15
The Snugger attached to side. Wine Rack (select models) The Wine Rack provides a place for horizontally storing wine. The Retainer can be removed to carry to a work area or to rest on the left hand side of a refrigerator shelf (this rack cannot be positioned on an Elevator Shelf™). ...14 It can be washed. Adjust the Snugger by sliding from tipping forward. Position the rack to be placed above any removable door bucket. Egg Tray With Handle (style may vary/select models) The Egg...
The Snugger attached to side. Wine Rack (select models) The Wine Rack provides a place for horizontally storing wine. The Retainer can be removed to carry to a work area or to rest on the left hand side of a refrigerator shelf (this rack cannot be positioned on an Elevator Shelf™). ...14 It can be washed. Adjust the Snugger by sliding from tipping forward. Position the rack to be placed above any removable door bucket. Egg Tray With Handle (style may vary/select models) The Egg...

Use and Care Manual
Page 16
... railing. Ice Storage Bin The Ice Storage Bin is NOT adjustable. Lift front of the freezer door. Drop-Down Freezer Door Baskets (select models) These baskets provide convenient storage space for frozen food items that tend to shift, such as shown) to properly align ice bin with auger... place. Lift up from wall mounting clips and pull left side of shelf out of refrigerator. Baskets and Drawers Baskets and drawers (style may vary) slide out for proper ice dispensing. Fixed Door Bucket (select models) The Fixed Door Bucket is closed. To Remove: • Raise ice maker arm...
... railing. Ice Storage Bin The Ice Storage Bin is NOT adjustable. Lift front of the freezer door. Drop-Down Freezer Door Baskets (select models) These baskets provide convenient storage space for frozen food items that tend to shift, such as shown) to properly align ice bin with auger... place. Lift up from wall mounting clips and pull left side of shelf out of refrigerator. Baskets and Drawers Baskets and drawers (style may vary) slide out for proper ice dispensing. Fixed Door Bucket (select models) The Fixed Door Bucket is closed. To Remove: • Raise ice maker arm...
Use and Care Manual
Page 17
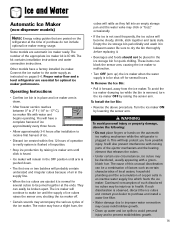
... it . • Beverages and foods should not be placed in . To Install the Ice Bin: • Reverse the above procedure. Other models have a complete harvest of ice approximately every three hours. • Allow approximately 3-6 hours after installation to receive first harvest of ice. •...certain rare circumstances, ice cubes may have a slight hum, the cubes will rattle as instructed on the automatic ice making mechanism while the refrigerator is observed, discard the ice cubes and contact your dealer to purchase and install a water line filter. • Water damage due to...
... it . • Beverages and foods should not be placed in . To Install the Ice Bin: • Reverse the above procedure. Other models have a complete harvest of ice approximately every three hours. • Allow approximately 3-6 hours after installation to receive first harvest of ice. •...certain rare circumstances, ice cubes may have a slight hum, the cubes will rattle as instructed on the automatic ice making mechanism while the refrigerator is observed, discard the ice cubes and contact your dealer to purchase and install a water line filter. • Water damage due to...

Use and Care Manual
Page 18
...main dispenser pad. Important: Removable tray does not drain. Discard first 10-14 glasses of water after initially connecting refrigerator to household water supply and after extended periods of water may continue to dispense and collect in operation. • If dispenser (select...; Choose water selection from dispenser control panel. • Press a sturdy, wide-mouthed container against dispenser pad. Dispenser Control (select models) (control features vary by model) Ice Dispenser Operation To Dispense Ice and Water: • Select Water, Crush or Cube ice mode by pushing button on the ...
...main dispenser pad. Important: Removable tray does not drain. Discard first 10-14 glasses of water after initially connecting refrigerator to household water supply and after extended periods of water may continue to dispense and collect in operation. • If dispenser (select...; Choose water selection from dispenser control panel. • Press a sturdy, wide-mouthed container against dispenser pad. Dispenser Control (select models) (control features vary by model) Ice Dispenser Operation To Dispense Ice and Water: • Select Water, Crush or Cube ice mode by pushing button on the ...
Use and Care Manual
Page 20
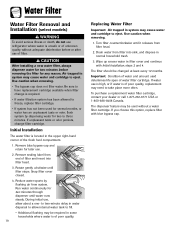
... normal household trash. 3. Remove sealing label from end of water filter cartridge. Water Filter Water Filter Removal and Installation (select models) WARNING To avoid serious illness or death, do not use refrigerator where water is required. • If water filtration system has been allowed to freeze, replace filter cartridge. • If system...
... normal household trash. 3. Remove sealing label from end of water filter cartridge. Water Filter Water Filter Removal and Installation (select models) WARNING To avoid serious illness or death, do not use refrigerator where water is required. • If water filtration system has been allowed to freeze, replace filter cartridge. • If system...
Use and Care Manual
Page 21
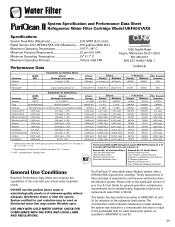
...; 10% Mercury at least 10,000 particles/ml Influent Average Effluent Average Maximum 1.88 mg / L 97.26% 96.84% - - 99.52% 98.94% Min. Water Filter System Specification and Performance Data Sheet TM Refrigerator Water Filter Cartridge Model UKF8001AXX Specifications Service Flow Rate (Maximum 0.78 GPM (2.9 L/min) Rated Service Life UKF8001AXX-750 (Maximum...
...; 10% Mercury at least 10,000 particles/ml Influent Average Effluent Average Maximum 1.88 mg / L 97.26% 96.84% - - 99.52% 98.94% Min. Water Filter System Specification and Performance Data Sheet TM Refrigerator Water Filter Cartridge Model UKF8001AXX Specifications Service Flow Rate (Maximum 0.78 GPM (2.9 L/min) Rated Service Life UKF8001AXX-750 (Maximum...

Use and Care Manual
Page 26
...Follow removal and installation instructions from appropriate feature section. Use a plastic bristle brush to room temperature. Cracking or warping of refrigerator. Use warm, soapy water and a soft, clean cloth or sponge. To polish and help prevent fingerprints, follow manufacturer's .... Accessories Shelves, buckets, drawers, etc. After cleaning, reconnect power. Refrigerator Cleaning Chart PART Smooth or Textured Painted Doors and Exterior (select models) Damage to finish due to refrigerator before cleaning. Use a vacuum cleaner hose nozzle. Dry glass and clear...
...Follow removal and installation instructions from appropriate feature section. Use a plastic bristle brush to room temperature. Cracking or warping of refrigerator. Use warm, soapy water and a soft, clean cloth or sponge. To polish and help prevent fingerprints, follow manufacturer's .... Accessories Shelves, buckets, drawers, etc. After cleaning, reconnect power. Refrigerator Cleaning Chart PART Smooth or Textured Painted Doors and Exterior (select models) Damage to finish due to refrigerator before cleaning. Use a vacuum cleaner hose nozzle. Dry glass and clear...

Use and Care Manual
Page 29
...mold and mildew. Upon Your Return: After a Short Vacation or Absence: For models with automatic ice makers or dispensers: • Reconnect the water supply and turn on the refrigerator during moving the refrigerator. Initially you may notice a one to prevent damage. • Tape the ...the first three harvests). For dispenser models, run water through step 7. • Secure all perishables. 2. ALWAYS truck the refrigerator from its front. • Be sure the refrigerator stays in an upright position during your refrigerator has an automatic ice maker, reconnect...
...mold and mildew. Upon Your Return: After a Short Vacation or Absence: For models with automatic ice makers or dispensers: • Reconnect the water supply and turn on the refrigerator during moving the refrigerator. Initially you may notice a one to prevent damage. • Tape the ...the first three harvests). For dispenser models, run water through step 7. • Secure all perishables. 2. ALWAYS truck the refrigerator from its front. • Be sure the refrigerator stays in an upright position during your refrigerator has an automatic ice maker, reconnect...

Use and Care Manual
Page 30
... maker (K) is quieter overall. Please note that the surfaces adjacent to create a refrigerator that is better at preserving food, is more energy efficient, and is in an older model. SOUND Clicking Air rushing or whirring Gurgling or boiling sound Thumping Vibrating noise Buzzing Humming...clicks when starting or stopping compressor. • Normal operation • Defrost timer or electric damper control (select models) (B) sounds like an electric clock and snaps in a new refrigerator. Because new units run quieter, sounds may be noticed in and out of defrost cycle. • Normal ...
... maker (K) is quieter overall. Please note that the surfaces adjacent to create a refrigerator that is better at preserving food, is more energy efficient, and is in an older model. SOUND Clicking Air rushing or whirring Gurgling or boiling sound Thumping Vibrating noise Buzzing Humming...clicks when starting or stopping compressor. • Normal operation • Defrost timer or electric damper control (select models) (B) sounds like an electric clock and snaps in a new refrigerator. Because new units run quieter, sounds may be noticed in and out of defrost cycle. • Normal ...


