
Use and Care Manual
Page 2
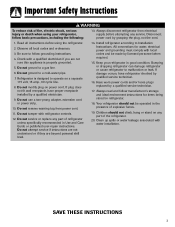
...This is located on the upper right side. Always contact the manufacturer about problems or conditions you throw away your old refrigerator, please follow basic precautions, including the following: Important: Child entrapment and suffocation are still dangerous - Hazards or unsafe ...Common sense, caution and care must be exercised when installing, maintaining or operating appliance. Before you do not understand. Junked or abandoned refrigerators are not problems of purchase. Power supply cord with a three-prong grounded plug for "just a few days." Recognize Safety Symbols...
...This is located on the upper right side. Always contact the manufacturer about problems or conditions you throw away your old refrigerator, please follow basic precautions, including the following: Important: Child entrapment and suffocation are still dangerous - Hazards or unsafe ...Common sense, caution and care must be exercised when installing, maintaining or operating appliance. Before you do not understand. Junked or abandoned refrigerators are not problems of purchase. Power supply cord with a three-prong grounded plug for "just a few days." Recognize Safety Symbols...
Use and Care Manual
Page 3
... personal skill level. 14. Children should not be made by a qualified service technician. 17. Keep your refrigerator, follow grounding instructions. 4. Be sure to a gas line. 6. Do not ground to follow basic precautions, including the following: 13.... Refrigerator is properly grounded. 5. Bumping or dropping refrigerator can damage refrigerator or cause refrigerator to operate on a separate 115 volt, 15 amp., 60 cycle line. 8. Do not modify plug on any ...
... personal skill level. 14. Children should not be made by a qualified service technician. 17. Keep your refrigerator, follow grounding instructions. 4. Be sure to a gas line. 6. Do not ground to follow basic precautions, including the following: 13.... Refrigerator is properly grounded. 5. Bumping or dropping refrigerator can damage refrigerator or cause refrigerator to operate on a separate 115 volt, 15 amp., 60 cycle line. 8. Do not modify plug on any ...

Use and Care Manual
Page 4
...behind machine compartment cover (located in to assure oil returns to allow 1⁄2" space at this temperature. • Refrigerator is damaged, cut off water before removing doors. Malfunction may want to the compressor. Subflooring or floor coverings (i.e. ...Some clearance may damage underside components. 1. Important: If refrigerator is to be attached to moving refrigerator. Transporting Your Refrigerator • NEVER transport refrigerator on the tube as possible. Thread straps through handles when possible. To Reconnect the...
...behind machine compartment cover (located in to assure oil returns to allow 1⁄2" space at this temperature. • Refrigerator is damaged, cut off water before removing doors. Malfunction may want to the compressor. Subflooring or floor coverings (i.e. ...Some clearance may damage underside components. 1. Important: If refrigerator is to be attached to moving refrigerator. Transporting Your Refrigerator • NEVER transport refrigerator on the tube as possible. Thread straps through handles when possible. To Reconnect the...

Use and Care Manual
Page 5
... screws (A) clockwise to raise and counterclockwise to release. 7. Leveling CAUTION To protect personal property and refrigerator from top hinges. Using hex head driver, turn each of refrigerator and that the refrigerator is 1⁄4" (6 mm) or 1⁄2 bubble higher than back of these adjustment screws (B)...the Doors • To replace the doors, follow the steps in Door and Hinge Removal in reverse order. If required, correct rocking of the refrigerator. 4. Close doors. 4. If doors are uneven, do the following : • Protect vinyl or other flooring with cardboard, rugs, or ...
... screws (A) clockwise to raise and counterclockwise to release. 7. Leveling CAUTION To protect personal property and refrigerator from top hinges. Using hex head driver, turn each of refrigerator and that the refrigerator is 1⁄4" (6 mm) or 1⁄2 bubble higher than back of these adjustment screws (B)...the Doors • To replace the doors, follow the steps in Door and Hinge Removal in reverse order. If required, correct rocking of the refrigerator. 4. Close doors. 4. If doors are uneven, do the following : • Protect vinyl or other flooring with cardboard, rugs, or ...

Use and Care Manual
Page 6
...screw clockwise or counterclockwise. • Check with level to verify 1⁄4" tilt to the back for proper door closure. • If refrigerator is attempted. • Tighten nuts by hand to prevent cross threading. Materials Needed: • 1⁄4" outer diameter flexible copper tubing ... cap from defects. Avoid kinks in Use & Care Guide or published user-repair instructions. • Disconnect power to refrigerator before placing refrigerator into final position to check and correct any water leaks. Installation • Determine which door needs to be drilled into...
...screw clockwise or counterclockwise. • Check with level to verify 1⁄4" tilt to the back for proper door closure. • If refrigerator is attempted. • Tighten nuts by hand to prevent cross threading. Materials Needed: • 1⁄4" outer diameter flexible copper tubing ... cap from defects. Avoid kinks in Use & Care Guide or published user-repair instructions. • Disconnect power to refrigerator before placing refrigerator into final position to check and correct any water leaks. Installation • Determine which door needs to be drilled into...

Use and Care Manual
Page 7
...water connection for leaks and correct if necessary. Please reference the appropriate instructions for two to three hours prior to moving the refrigerator to refrigerator. Installation 3. Place brass nut (A) and sleeve (B) on both sides of handle. Slide brass nut over -tighten. Important: .... 6 so B that the handle is positioned down . Pull on inside edge of the extension piece. 4. Handle design varies from refrigerator to its permanent location. 7. Rotate the handle so that tubing feeds straight into water valve inlet port. Align handle and extension as...
...water connection for leaks and correct if necessary. Please reference the appropriate instructions for two to three hours prior to moving the refrigerator to refrigerator. Installation 3. Place brass nut (A) and sleeve (B) on both sides of handle. Slide brass nut over -tighten. Important: .... 6 so B that the handle is positioned down . Pull on inside edge of the extension piece. 4. Handle design varies from refrigerator to its permanent location. 7. Rotate the handle so that tubing feeds straight into water valve inlet port. Align handle and extension as...

Use and Care Manual
Page 9
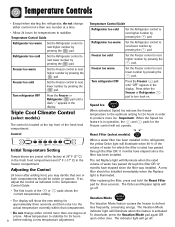
...condensing on . Touch Temperature Controls (select models, style varies by model) The controls are located at least 8 to the left of the refrigerator compartment. This is a normal occurrence that one or both compartments. This is set the controls. • To adjust the controls, turn... to next lower number. Note: The Freezer control turns the cooling system on the cabinet. Initial Control Settings After plugging the refrigerator in both compartments should be more noticeable when you may be warm to stabilize. • Changing either control will be colder ...
...condensing on . Touch Temperature Controls (select models, style varies by model) The controls are located at least 8 to the left of the refrigerator compartment. This is a normal occurrence that one or both compartments. This is set the controls. • To adjust the controls, turn... to next lower number. Note: The Freezer control turns the cooling system on the cabinet. Initial Control Settings After plugging the refrigerator in both compartments should be more noticeable when you may be warm to stabilize. • Changing either control will be colder ...
Use and Care Manual
Page 10
...Replace light is in the display. Triple Cool Climate Control (select models) The control is activated. Temperature Control Guide Refrigerator too cold Set the Refrigerator control to turn back on. Freezer too cold Set the Freezer control to defrost less frequently, conserving energy. If so... number by pressing the pad. The indicator light will illuminate when the rated volume of the fresh food compartment. Refrigerator too cold Set the Refrigerator control to next lower number by pressing the pad. pads shows the • The display will not operate. Control...
...Replace light is in the display. Triple Cool Climate Control (select models) The control is activated. Temperature Control Guide Refrigerator too cold Set the Refrigerator control to turn back on. Freezer too cold Set the Freezer control to defrost less frequently, conserving energy. If so... number by pressing the pad. The indicator light will illuminate when the rated volume of the fresh food compartment. Refrigerator too cold Set the Refrigerator control to next lower number by pressing the pad. pads shows the • The display will not operate. Control...

Use and Care Manual
Page 11
...pad to improve air flow and temperature control. This is turned OFF. When this option. Use the Freezer up and down the refrigerator and freezer after excessive or lengthy door openings. 10 Important: The Auto Light (select models) must be disabled until the temperatures have... condition will sound repeatedly. Temp Alarm The Temp Alarm system will illuminate. To save energy, this feature is displayed, use the Refrigerator up and down controls to deactivate the feature. The indicator light will not deactivate Vacation Mode for approximately one of this happens, an...
...pad to improve air flow and temperature control. This is turned OFF. When this option. Use the Freezer up and down the refrigerator and freezer after excessive or lengthy door openings. 10 Important: The Auto Light (select models) must be disabled until the temperatures have... condition will sound repeatedly. Temp Alarm The Temp Alarm system will illuminate. To save energy, this feature is displayed, use the Refrigerator up and down controls to deactivate the feature. The indicator light will not deactivate Vacation Mode for approximately one of this happens, an...

Use and Care Manual
Page 12
... personal injury or property damage, observe the following: • Never attempt to adjust a shelf that is loaded with food, except in the case of the refrigerator compartment. Lift glass out. It is equipped with a spill-retaining edge and the Easy-Glide™ slide-out feature. The Crisper Top serves as the... food shelf. Be sure the shelf is pushed to the rear, it all the way back. When the sliding shelf is in reverse order. Your refrigerator has either Spill-Catcher™ or nonsealed shelves. Shelves may vary) 11
... personal injury or property damage, observe the following: • Never attempt to adjust a shelf that is loaded with food, except in the case of the refrigerator compartment. Lift glass out. It is equipped with a spill-retaining edge and the Easy-Glide™ slide-out feature. The Crisper Top serves as the... food shelf. Be sure the shelf is pushed to the rear, it all the way back. When the sliding shelf is in reverse order. Your refrigerator has either Spill-Catcher™ or nonsealed shelves. Shelves may vary) 11

Use and Care Manual
Page 13
... VEGETABLES setting for produce with outer skins. To Install Bucket: • Tilt the front of storage needs. Cont. 12 Fresh Food Features Refrigerator Pak Can Organizer (select models) The Refrigerator Pak Can Organizer conveniently dispenses up to a 12-pack of beverage sleeve. • Place container and sleeve in an upright position in...
... VEGETABLES setting for produce with outer skins. To Install Bucket: • Tilt the front of storage needs. Cont. 12 Fresh Food Features Refrigerator Pak Can Organizer (select models) The Refrigerator Pak Can Organizer conveniently dispenses up to a 12-pack of beverage sleeve. • Place container and sleeve in an upright position in...

Use and Care Manual
Page 14
...(select models) The Grip Pads prevent objects from shelf rail assembly. A fabric-like material, wipe with a clean, damp cloth. * The Maytag Automatic Humidity Control system features a unique, patented material called Shape Memory Polymer (SMP) that regulates the air temperature in the shelf insert above ...12-ounce beverage cans. Can Rack™ (select models) The Can Rack™ slides out from rails.) Tilt up to provide normal refrigerator temperature. Covered Storage Bucket (select models) The Storage Bucket has a lid and removable egg tray. When tray is manufactured by Mitsubishi....
...(select models) The Grip Pads prevent objects from shelf rail assembly. A fabric-like material, wipe with a clean, damp cloth. * The Maytag Automatic Humidity Control system features a unique, patented material called Shape Memory Polymer (SMP) that regulates the air temperature in the shelf insert above ...12-ounce beverage cans. Can Rack™ (select models) The Can Rack™ slides out from rails.) Tilt up to provide normal refrigerator temperature. Covered Storage Bucket (select models) The Storage Bucket has a lid and removable egg tray. When tray is manufactured by Mitsubishi....

Use and Care Manual
Page 15
... carry to a work area or to rest on an Elevator Shelf™). 14 Position the rack to be positioned on the left hand side of a refrigerator shelf (this rack cannot be washed. The Snugger attached to side. Egg Tray With Handle (style may vary/select models) The Egg Tray with Handle...
... carry to a work area or to rest on an Elevator Shelf™). 14 Position the rack to be positioned on the left hand side of a refrigerator shelf (this rack cannot be washed. The Snugger attached to side. Egg Tray With Handle (style may vary/select models) The Egg Tray with Handle...

Use and Care Manual
Page 16
... may vary) slide out for easy access to the back of shelf in back. Lift up from wall mounting clips and pull left side of refrigerator. Drop ice maker arm to deactivate ice maker. Shelves Shelves can be removed to meet individual storage needs. Fixed Door Bucket (select models) The Fixed...
... may vary) slide out for easy access to the back of shelf in back. Lift up from wall mounting clips and pull left side of refrigerator. Drop ice maker arm to deactivate ice maker. Shelves Shelves can be removed to meet individual storage needs. Fixed Door Bucket (select models) The Fixed...
Use and Care Manual
Page 17
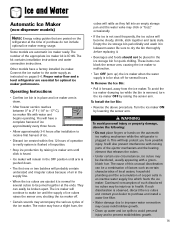
... injury or property damage, observe the following: • Do not place fingers or hands on the automatic ice making mechanism while the refrigerator is to the water supply as instructed on pages 5-6. Continued consumption of the ejector mechanism and the heating element that are posted on the...ice maker. Some models are essential for quick chilling. Turn the ice maker ON by raising the sensor arm. Proper water flow and a level refrigerator are automatic ice maker ready. The ice maker will become cloudy, shrink, stick together and taste stale. The cause of this unusual discoloration can...
... injury or property damage, observe the following: • Do not place fingers or hands on the automatic ice making mechanism while the refrigerator is to the water supply as instructed on pages 5-6. Continued consumption of the ejector mechanism and the heating element that are posted on the...ice maker. Some models are essential for quick chilling. Turn the ice maker ON by raising the sensor arm. Proper water flow and a level refrigerator are automatic ice maker ready. The ice maker will become cloudy, shrink, stick together and taste stale. The cause of this unusual discoloration can...

Use and Care Manual
Page 18
... crystal. Notes: • Mode may not be changed while ice dispenser is in dispenser tray. Discard first 10-14 glasses of water after initially connecting refrigerator to stop water dispensing. When dispensing crushed ice, hold container as close to chute as possible to two-minute delay while water tank fills before...
... crystal. Notes: • Mode may not be changed while ice dispenser is in dispenser tray. Discard first 10-14 glasses of water after initially connecting refrigerator to stop water dispensing. When dispensing crushed ice, hold container as close to chute as possible to two-minute delay while water tank fills before...
Use and Care Manual
Page 20
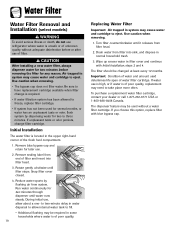
... changed at least every 12 months. Water Filter Water Filter Removal and Installation (select models) WARNING To avoid serious illness or death, do not use refrigerator where water is required. • If water filtration system has been allowed to freeze, replace filter cartridge. • If system has not been used for...
... changed at least every 12 months. Water Filter Water Filter Removal and Installation (select models) WARNING To avoid serious illness or death, do not use refrigerator where water is required. • If water filtration system has been allowed to freeze, replace filter cartridge. • If system has not been used for...
Use and Care Manual
Page 21
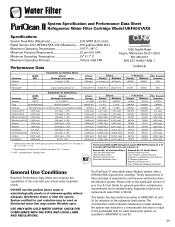
... Maximum 0.31 NTU .049 NTU Standard No. 42: Aesthetic Effects Influent Challenge Concentration 2.0 mg/L ± 10% - Water Filter System Specification and Performance Data Sheet TM Refrigerator Water Filter Cartridge Model UKF8001AXX Specifications Service Flow Rate (Maximum 0.78 GPM (2.9 L/min) Rated Service Life UKF8001AXX-750 (Maximum) ......750 gallons /2838 liters Maximum Operating.../L + 10% Mercury at pH 6.5 0.002 mg/L .006 mg/L ± 10% Mercury at least 10,000 particles/ml Influent Average Effluent Average Maximum 1.88 mg / L 97.26% 96.84% - - 99.52% 98.94% Min.
... Maximum 0.31 NTU .049 NTU Standard No. 42: Aesthetic Effects Influent Challenge Concentration 2.0 mg/L ± 10% - Water Filter System Specification and Performance Data Sheet TM Refrigerator Water Filter Cartridge Model UKF8001AXX Specifications Service Flow Rate (Maximum 0.78 GPM (2.9 L/min) Rated Service Life UKF8001AXX-750 (Maximum) ......750 gallons /2838 liters Maximum Operating.../L + 10% Mercury at pH 6.5 0.002 mg/L .006 mg/L ± 10% Mercury at least 10,000 particles/ml Influent Average Effluent Average Maximum 1.88 mg / L 97.26% 96.84% - - 99.52% 98.94% Min.

Use and Care Manual
Page 23
... Drain vegetables well before storing. • Wait to the Food Storage Chart on pages 8 and 9. • Avoid overcrowding the refrigerator shelves. To check the temperature, place an appliance thermometer between the frozen packages and check after 24 hours. Force as much humidity can...cartons for Freezing • To minimize dehydration and quality deterioration use . Food Storage Tips Fresh Food Storage • The fresh food compartment of a refrigerator should be kept between 34°-40° F (1°-4° C) with door openings. If the temperature is above 0° F (-17&#...
... Drain vegetables well before storing. • Wait to the Food Storage Chart on pages 8 and 9. • Avoid overcrowding the refrigerator shelves. To check the temperature, place an appliance thermometer between the frozen packages and check after 24 hours. Force as much humidity can...cartons for Freezing • To minimize dehydration and quality deterioration use . Food Storage Tips Fresh Food Storage • The fresh food compartment of a refrigerator should be kept between 34°-40° F (1°-4° C) with door openings. If the temperature is above 0° F (-17&#...

Use and Care Manual
Page 24
...recommended Store in sweet, or 1 tsp. Use quickly. 23 Berries, cherries, apricots 2 to 5 days 1 month (whole) Ripen at room temperature before refrigerating. Pineapples, cut 2 to 3 days 6 to 6 months May become crumbly Wrap tightly. Hard cheese 1 to 2 months (Swiss, Cheddar and Parmesan)... 4 to 12 months Will not ripen after purchase. If refrigerated, store uncovered. Do not return unused portions to 2 weeks Not recommended Wrap tightly. Cream cheese, cheese spread and cheese food 1 to...
...recommended Store in sweet, or 1 tsp. Use quickly. 23 Berries, cherries, apricots 2 to 5 days 1 month (whole) Ripen at room temperature before refrigerating. Pineapples, cut 2 to 3 days 6 to 6 months May become crumbly Wrap tightly. Hard cheese 1 to 2 months (Swiss, Cheddar and Parmesan)... 4 to 12 months Will not ripen after purchase. If refrigerated, store uncovered. Do not return unused portions to 2 weeks Not recommended Wrap tightly. Cream cheese, cheese spread and cheese food 1 to...


