
Use and Care Manual
Page 2
...it provides the proper use an adapter plug. it is equipped with a properly grounded threeprong wall receptacle. Junked or abandoned refrigerators are not meant to cover all possible conditions and situations that may be plugged into a properly grounded wall receptacle. This appliance...prong grounded plug Properly grounded type wall receptacle 1 Always contact the manufacturer about problems or conditions you throw away your refrigerator. Model Number Serial Number Date of Purchase In our continuing effort to improve the quality and performance of the customer to ...
...it provides the proper use an adapter plug. it is equipped with a properly grounded threeprong wall receptacle. Junked or abandoned refrigerators are not meant to cover all possible conditions and situations that may be plugged into a properly grounded wall receptacle. This appliance...prong grounded plug Properly grounded type wall receptacle 1 Always contact the manufacturer about problems or conditions you throw away your refrigerator. Model Number Serial Number Date of Purchase In our continuing effort to improve the quality and performance of the customer to ...

Use and Care Manual
Page 4
...compressor. Malfunction may want to top hinge while performing door removal and replacement. • Tape decorative panels (select models) securely into the connector. Important: If refrigerator is to sit upright for full insertion. • If tube end is placed with straps or bungee cords. Allow...a wall, you may occur at top and 1⁄2" space behind machine compartment cover (located in to assure oil returns to moving refrigerator. Note: For refrigerators in white collar (A) and hold. • Pull the door-side tube from the door. Do not over-tighten. To Disconnect the...
...compressor. Malfunction may want to top hinge while performing door removal and replacement. • Tape decorative panels (select models) securely into the connector. Important: If refrigerator is to sit upright for full insertion. • If tube end is placed with straps or bungee cords. Allow...a wall, you may occur at top and 1⁄2" space behind machine compartment cover (located in to assure oil returns to moving refrigerator. Note: For refrigerators in white collar (A) and hold. • Pull the door-side tube from the door. Do not over-tighten. To Disconnect the...

Use and Care Manual
Page 5
..., follow the steps in Door and Hinge Removal in reverse order. To enhance the appearance and maintain performance, the refrigerator should be level. Select models also have adjustment screws (A). Remove top hinge covers by turning rear adjustment screw clockwise to side. 5. For ice...or fingernail to press junction point between two connectors to release. • To detach red wire harness, press tab on underside of refrigerator by removing Phillips screws. 5. Notes: • Complete any required door reversal, panel installation and/or a water supply connection before ...
..., follow the steps in Door and Hinge Removal in reverse order. To enhance the appearance and maintain performance, the refrigerator should be level. Select models also have adjustment screws (A). Remove top hinge covers by turning rear adjustment screw clockwise to side. 5. For ice...or fingernail to press junction point between two connectors to release. • To detach red wire harness, press tab on underside of refrigerator by removing Phillips screws. 5. Notes: • Complete any required door reversal, panel installation and/or a water supply connection before ...

Use and Care Manual
Page 6
... to assure compliance with the lower cabinet slots. • Push the toe grille firmly until it snaps into final position to refrigerator before placing refrigerator into place. Remove plastic cap from defects. Avoid kinks in Use & Care Guide or published user-repair instructions. • ...lower the opposite door by hand to water valve is smooth and free from water valve inlet port. 5 Connecting the Water Supply (select models) WARNING To reduce the risk of injury or death, follow basic precautions, including the following : • Read all local codes and ordinances...
... to assure compliance with the lower cabinet slots. • Push the toe grille firmly until it snaps into final position to refrigerator before placing refrigerator into place. Remove plastic cap from defects. Avoid kinks in Use & Care Guide or published user-repair instructions. • ...lower the opposite door by hand to water valve is smooth and free from water valve inlet port. 5 Connecting the Water Supply (select models) WARNING To reduce the risk of injury or death, follow basic precautions, including the following : • Read all local codes and ordinances...

Use and Care Manual
Page 7
...back of copper tubing into inlet port. Rotate the handle so that tubing feeds straight into inlet A port. 5. Place end of your model. Pull on water supply. Continue to its permanent location. 7. The handles are B provided in the mounting clip is flat against the door...discard handle packaging and tape. Plastic Handle with the door studs. 3. Reminder: Do not use an old sleeve. Handle design varies from refrigerator to frame with water tubing clamp (C) and turn the lower nut (2) counterclockwise and fully tighten while holding the upper nut in handle ...
...back of copper tubing into inlet port. Rotate the handle so that tubing feeds straight into inlet A port. 5. Place end of your model. Pull on water supply. Continue to its permanent location. 7. The handles are B provided in the mounting clip is flat against the door...discard handle packaging and tape. Plastic Handle with the door studs. 3. Reminder: Do not use an old sleeve. Handle design varies from refrigerator to frame with water tubing clamp (C) and turn the lower nut (2) counterclockwise and fully tighten while holding the upper nut in handle ...

Use and Care Manual
Page 8
...: • Loosen set screws in handle using 3⁄32" Allen wrench. • Repeat the procedure on all set screws to property, tape decorative panels (select models) securely into trim retainer clip. 7. Pull trim free from the door panel. 2. Grasp the lower part of a flat blade screwdriver between the handle and door...
...: • Loosen set screws in handle using 3⁄32" Allen wrench. • Repeat the procedure on all set screws to property, tape decorative panels (select models) securely into trim retainer clip. 7. Pull trim free from the door panel. 2. Grasp the lower part of a flat blade screwdriver between the handle and door...

Use and Care Manual
Page 9
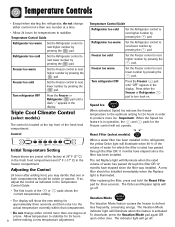
...hours before adding food. Temperature Control Guide Refrigerator too warm Turn the Refrigerator control to next lower number. Freezer too cold Turn the Freezer control to next higher number. Touch Temperature Controls (select models, style varies by model) The controls are located at the back... left or right as desired. • Set the Freezer control on 4. • Set the Refrigerator control on checking compartment temperature. • Except when starting the refrigerator, do not change ...
...hours before adding food. Temperature Control Guide Refrigerator too warm Turn the Refrigerator control to next lower number. Freezer too cold Turn the Freezer control to next higher number. Touch Temperature Controls (select models, style varies by model) The controls are located at the back... left or right as desired. • Set the Freezer control on 4. • Set the Refrigerator control on checking compartment temperature. • Except when starting the refrigerator, do not change ...
Use and Care Manual
Page 10
... Temperature Control Guide. • The first touch of the fresh food compartment. Triple Cool Climate Control (select models) The control is activated. Turn refrigerator OFF Press the Freezer pad until a dash "-" appears in the display. Freezer too warm Set the Freezer ...by pressing the pad. Refrigerator too cold Set the Refrigerator control to defrost less frequently, conserving energy. Turn refrigerator OFF Press the Freezer or Refrigerator pad until "OFF" appears in the display. Control Reset Filter (select models) Initial Temperature Setting Temperatures...
... Temperature Control Guide. • The first touch of the fresh food compartment. Triple Cool Climate Control (select models) The control is activated. Turn refrigerator OFF Press the Freezer pad until a dash "-" appears in the display. Freezer too warm Set the Freezer ...by pressing the pad. Refrigerator too cold Set the Refrigerator control to defrost less frequently, conserving energy. Turn refrigerator OFF Press the Freezer or Refrigerator pad until "OFF" appears in the display. Control Reset Filter (select models) Initial Temperature Setting Temperatures...

Use and Care Manual
Page 11
.... To save energy, this option. Important: The Auto Light (select models) must be activated on the ice and water dispenser) (select models). • Activate the Sabbath Mode. This cools down the refrigerator and freezer after 12 hours, OR press the Max Cool pad to ...to deactivate the feature. Temperature Controls Notes: • Door openings will not deactivate Vacation Mode for approximately one of the refrigerator cabinet may be deactivated by pressing OFF. Temp Alarm The Temp Alarm system will alternately show temperatures in the fresh food ...
.... To save energy, this option. Important: The Auto Light (select models) must be activated on the ice and water dispenser) (select models). • Activate the Sabbath Mode. This cools down the refrigerator and freezer after 12 hours, OR press the Max Cool pad to ...to deactivate the feature. Temperature Controls Notes: • Door openings will not deactivate Vacation Mode for approximately one of the refrigerator cabinet may be deactivated by pressing OFF. Temp Alarm The Temp Alarm system will alternately show temperatures in the fresh food ...

Use and Care Manual
Page 12
Your refrigerator has either Spill-Catcher™ or nonsealed shelves. Elevator™ Shelf (select models) The Elevator™ Shelf is in a level position. To Slide Out ... the vertical rear side rails. • The entire assembly can be moved forward and clear of the refrigerator compartment. To Remove Elevator™ Shelf: • Completely unload the shelf and pull the shelf forward.... place. • Be sure the shelf is securely locked at the rear. To slide out (select models), grasp the front of the shelf and pull forward. To Reinstall Frame Assembly: • Reverse the ...
Your refrigerator has either Spill-Catcher™ or nonsealed shelves. Elevator™ Shelf (select models) The Elevator™ Shelf is in a level position. To Slide Out ... the vertical rear side rails. • The entire assembly can be moved forward and clear of the refrigerator compartment. To Remove Elevator™ Shelf: • Completely unload the shelf and pull the shelf forward.... place. • Be sure the shelf is securely locked at the rear. To slide out (select models), grasp the front of the shelf and pull forward. To Reinstall Frame Assembly: • Reverse the ...

Use and Care Manual
Page 13
... upright. Cont. 12 Dairy Center The Dairy Center provides convenient door storage for fresh fruit and vegetable storage. On select models, this compartment can be moved to several different locations to meet individual storage needs. Slide control toward the FRUIT setting for...seated on the door liner. To Remove: • Slide dairy center up and pull straight out. Fresh Food Features Refrigerator Pak Can Organizer (select models) The Refrigerator Pak Can Organizer conveniently dispenses up to Another Location: • Remove bucket. • Lift bracket up and pull straight...
... upright. Cont. 12 Dairy Center The Dairy Center provides convenient door storage for fresh fruit and vegetable storage. On select models, this compartment can be moved to several different locations to meet individual storage needs. Slide control toward the FRUIT setting for...seated on the door liner. To Remove: • Slide dairy center up and pull straight out. Fresh Food Features Refrigerator Pak Can Organizer (select models) The Refrigerator Pak Can Organizer conveniently dispenses up to Another Location: • Remove bucket. • Lift bracket up and pull straight...

Use and Care Manual
Page 14
To Remove: • Pull drawer out to provide normal refrigerator temperature. Note: For best results, keep the crispers tightly closed . Covered Storage Bucket (select models) The Storage Bucket has a lid and removable egg tray. Automatic Humidity Control Some crispers are top-rack ...; (select models) The Can Rack™ slides out from shelf rail assembly. Pull forward to full extension and lift front to release from underneath the Spillsaver™ stationary shelf. Grip Pads are removable and are equipped with a clean, damp cloth. * The Maytag Automatic Humidity Control...
To Remove: • Pull drawer out to provide normal refrigerator temperature. Note: For best results, keep the crispers tightly closed . Covered Storage Bucket (select models) The Storage Bucket has a lid and removable egg tray. Automatic Humidity Control Some crispers are top-rack ...; (select models) The Can Rack™ slides out from shelf rail assembly. Pull forward to full extension and lift front to release from underneath the Spillsaver™ stationary shelf. Grip Pads are removable and are equipped with a clean, damp cloth. * The Maytag Automatic Humidity Control...

Use and Care Manual
Page 15
The Retainer can be positioned on the left hand side of a refrigerator shelf (this rack cannot be placed above any removable door bucket. Wine Rack (select models) The Wine Rack provides a place for horizontally storing wine. Position the rack to be washed. The Snugger attached to ...side. Fresh Food Features Tall Bottle Retainer/Snugger (select models) The Tall Bottle Retainer prevents tall bottles from side to the Tall Bottle Retainer keeps bottles and other containers in place when the...
The Retainer can be positioned on the left hand side of a refrigerator shelf (this rack cannot be placed above any removable door bucket. Wine Rack (select models) The Wine Rack provides a place for horizontally storing wine. Position the rack to be washed. The Snugger attached to ...side. Fresh Food Features Tall Bottle Retainer/Snugger (select models) The Tall Bottle Retainer prevents tall bottles from side to the Tall Bottle Retainer keeps bottles and other containers in place when the...

Use and Care Manual
Page 16
... Shelves: • Place left side cabinet railing snapping shelf into cabinet railing. Shelves Shelves can be locked in left side of refrigerator. Lift front of wall mounting holes. If bucket is removed, freezer light will not deactivate when door is NOT adjustable. Freezer Features... To Remove Clip-Mounted Shelves: • Lift shelf from cabinet railing and slide to right. Drop-Down Freezer Door Baskets (select models) These baskets provide convenient storage space for proper ice dispensing. To Install Shelf: • Place shelf in place for frozen food ...
... Shelves: • Place left side cabinet railing snapping shelf into cabinet railing. Shelves Shelves can be locked in left side of refrigerator. Lift front of wall mounting holes. If bucket is removed, freezer light will not deactivate when door is NOT adjustable. Freezer Features... To Remove Clip-Mounted Shelves: • Lift shelf from cabinet railing and slide to right. Drop-Down Freezer Door Baskets (select models) These baskets provide convenient storage space for proper ice dispensing. To Install Shelf: • Place shelf in place for frozen food ...
Use and Care Manual
Page 17
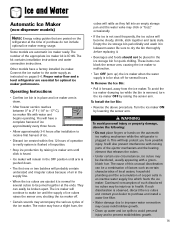
Some models are posted on the automatic ice making mechanism while the refrigerator is IC10S. Connect the ice maker to prevent mold/mildew growth....in place and ice maker arm is normal for optimal ice maker performance. Proper water flow and a level refrigerator are ejected it is down . • The first one or two batches will continue to verify system is...personal injury or property damage, observe the following: • Do not place fingers or hands on the refrigerator at the ends. The cause of this unusual discoloration can block the sensor arm, causing the ice maker ...
Some models are posted on the automatic ice making mechanism while the refrigerator is IC10S. Connect the ice maker to prevent mold/mildew growth....in place and ice maker arm is normal for optimal ice maker performance. Proper water flow and a level refrigerator are ejected it is down . • The first one or two batches will continue to verify system is...personal injury or property damage, observe the following: • Do not place fingers or hands on the refrigerator at the ends. The cause of this unusual discoloration can block the sensor arm, causing the ice maker ...

Use and Care Manual
Page 18
...wide-mouthed container against dispenser pad. A small amount of water may continue to dispense and collect in operation. • If dispenser (select models) is designed to stop water dispensing. Notes: • Mode may be changed while ice dispenser is in dispenser tray. When dispensing crushed ice...possible to dispenser area. If it does, remove tray and wipe up overflow. to household water supply and after initially connecting refrigerator to two-minute delay while water tank fills before water dispenses. Large spills should be a one- Removable Tray The Removable ...
...wide-mouthed container against dispenser pad. A small amount of water may continue to dispense and collect in operation. • If dispenser (select models) is designed to stop water dispensing. Notes: • Mode may be changed while ice dispenser is in dispenser tray. When dispensing crushed ice...possible to dispenser area. If it does, remove tray and wipe up overflow. to household water supply and after initially connecting refrigerator to two-minute delay while water tank fills before water dispenses. Large spills should be a one- Removable Tray The Removable ...

Use and Care Manual
Page 19
... is active. The On indicator light will flash three times when the function has successfully reset. Sabbath Mode (select models) When activated, the Sabbath Mode deactivates the control lights while leaving the control operational. The green filter status indicator light...• Press Auto Light button. A green indicator light above button illuminates when the sensor is locked. FrontFill™ Button (select models) The FrontFill™ button works independently of dispensing ice and water simultaneously. To use, choose your preferred ice mode from being dispensed...
... is active. The On indicator light will flash three times when the function has successfully reset. Sabbath Mode (select models) When activated, the Sabbath Mode deactivates the control lights while leaving the control operational. The green filter status indicator light...• Press Auto Light button. A green indicator light above button illuminates when the sensor is locked. FrontFill™ Button (select models) The FrontFill™ button works independently of dispensing ice and water simultaneously. To use, choose your preferred ice mode from being dispensed...
Use and Care Manual
Page 20
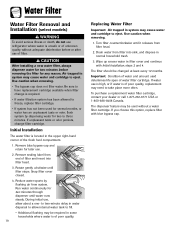
... in system may cause water and cartridge to eject. During initial use . 2. Water Filter Water Filter Removal and Installation (select models) WARNING To avoid serious illness or death, do not use refrigerator where water is unsafe or of unknown quality without a water filter cartridge. Air trapped in system may cause water and...
... in system may cause water and cartridge to eject. During initial use . 2. Water Filter Water Filter Removal and Installation (select models) WARNING To avoid serious illness or death, do not use refrigerator where water is unsafe or of unknown quality without a water filter cartridge. Air trapped in system may cause water and...
Use and Care Manual
Page 21
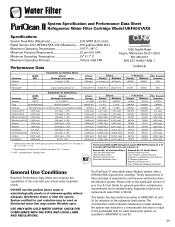
...6.5 0.002 mg/L .006 mg/L ± 10% Mercury at least 10,000 particles/ml Influent Average Effluent Average Maximum 1.88 mg / L 97.26% 96.84% - - 99.52% 98.94% Min. Required Reduction 50% - 85% Standard No. 53: Health Effects Parameter USEPA MCL Influent ... 99.5% Reduction Minimum 50,000/L Asbestos 99% Reduction 107 108 fibers/L; Water Filter System Specification and Performance Data Sheet TM Refrigerator Water Filter Cartridge Model UKF8001AXX Specifications Service Flow Rate (Maximum 0.78 GPM (2.9 L/min) Rated Service Life UKF8001AXX-750 (Maximum) ......750 gallons /...
...6.5 0.002 mg/L .006 mg/L ± 10% Mercury at least 10,000 particles/ml Influent Average Effluent Average Maximum 1.88 mg / L 97.26% 96.84% - - 99.52% 98.94% Min. Required Reduction 50% - 85% Standard No. 53: Health Effects Parameter USEPA MCL Influent ... 99.5% Reduction Minimum 50,000/L Asbestos 99% Reduction 107 108 fibers/L; Water Filter System Specification and Performance Data Sheet TM Refrigerator Water Filter Cartridge Model UKF8001AXX Specifications Service Flow Rate (Maximum 0.78 GPM (2.9 L/min) Rated Service Life UKF8001AXX-750 (Maximum) ......750 gallons /...
Use and Care Manual
Page 22
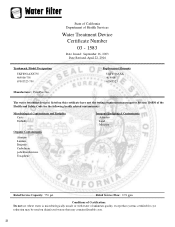
... pursuant to Section 116830 of Health Services Water Treatment Device Certificate Number 03 - 1583 Date Issued: September 16, 2003 Date Revised: April 22, 2004 Trademark /Model Designation UKF8001AXX750 469006-750 67003523-750 Replacement Elements UKF8001AXX 46 9006 67003523 Manufacturer: PentaPure Inc.
... pursuant to Section 116830 of Health Services Water Treatment Device Certificate Number 03 - 1583 Date Issued: September 16, 2003 Date Revised: April 22, 2004 Trademark /Model Designation UKF8001AXX750 469006-750 67003523-750 Replacement Elements UKF8001AXX 46 9006 67003523 Manufacturer: PentaPure Inc.

