Use and Care Manual
Page 2
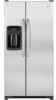
...Guide for "just a few days." Call: 1-800-688-9900 USA 1-800-688-2002 Canada Have complete model and serial number identification of your old refrigerator, please follow basic precautions, including the following: Important: Child entrapment and suffocation are getting rid of your... protection against possible electrical shock hazards. Model Number Serial Number Date of Purchase In our continuing effort ...
...Guide for "just a few days." Call: 1-800-688-9900 USA 1-800-688-2002 Canada Have complete model and serial number identification of your old refrigerator, please follow basic precautions, including the following: Important: Child entrapment and suffocation are getting rid of your... protection against possible electrical shock hazards. Model Number Serial Number Date of Purchase In our continuing effort ...

Use and Care Manual
Page 4
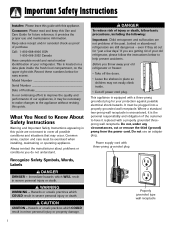
...When installing your opening smaller than 681⁄2" tall (minus hinge and cap). Subflooring or floor coverings (i.e. Transporting Your Refrigerator • NEVER transport refrigerator on its back. Thread straps through handles when possible. Connect power only after replacing doors. • Green ground ...Line: • Push in immediately may want to top hinge while performing door removal and replacement. • Tape decorative panels (select models) securely into the connector. WARNING To avoid severe personal injury or death, observe the following : • Protect vinyl or other ...
...When installing your opening smaller than 681⁄2" tall (minus hinge and cap). Subflooring or floor coverings (i.e. Transporting Your Refrigerator • NEVER transport refrigerator on its back. Thread straps through handles when possible. Connect power only after replacing doors. • Green ground ...Line: • Push in immediately may want to top hinge while performing door removal and replacement. • Tape decorative panels (select models) securely into the connector. WARNING To avoid severe personal injury or death, observe the following : • Protect vinyl or other ...
Use and Care Manual
Page 5
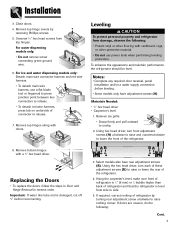
...hex head driver, turn each of these adjustment screws (B) to raise rocking corner. If required, correct rocking of refrigerator and that the refrigerator is damaged, cut off 5⁄8" before leveling. • Some models only have rear adjustment screws (B). Using the carpenter's level, make sure front of... • To detach red wire harness, press tab on underside of connector to lower the front of the refrigerator. 4. Close doors. 4. For ice and water dispensing models only: Detach main wire connector harness and red wire harness. • To detach main wire harness, use ...
...hex head driver, turn each of these adjustment screws (B) to raise rocking corner. If required, correct rocking of refrigerator and that the refrigerator is damaged, cut off 5⁄8" before leveling. • Some models only have rear adjustment screws (B). Using the carpenter's level, make sure front of... • To detach red wire harness, press tab on underside of connector to lower the front of the refrigerator. 4. Close doors. 4. For ice and water dispensing models only: Detach main wire connector harness and red wire harness. • To detach main wire harness, use ...
Use and Care Manual
Page 6
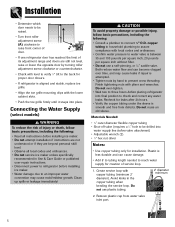
Do not use a self-piercing, or 3⁄16" saddle valve. Connecting the Water Supply (select models) WARNING To reduce the risk of injury or death, follow basic precautions, including the following : • Read all instructions before installing ice maker.... roller adjustment screw clockwise or counterclockwise. • Check with level to verify 1⁄4" tilt to the back for proper door closure. • If refrigerator is aligned and stable, replace toe grille. • Align the toe grille mounting clips with copper tubing (minimum 2' diameter). CAUTION To avoid property ...
Do not use a self-piercing, or 3⁄16" saddle valve. Connecting the Water Supply (select models) WARNING To reduce the risk of injury or death, follow basic precautions, including the following : • Read all instructions before installing ice maker.... roller adjustment screw clockwise or counterclockwise. • Check with level to verify 1⁄4" tilt to the back for proper door closure. • If refrigerator is aligned and stable, replace toe grille. • Align the toe grille mounting clips with copper tubing (minimum 2' diameter). CAUTION To avoid property ...
Use and Care Manual
Page 7
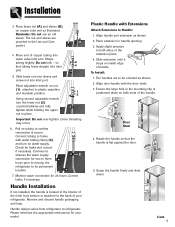
.... Slide brass nut over -tighten. Cross threading may occur. 6. Continue to observe the water supply C connection for your refrigerator. Door Stud 4. Shape tubing slightly. Important: Do not over sleeve and screw nut into water valve inlet port. Connect tubing ...pressure to plastic waterline and maintain position. 1 2 Using second adjustable wrench turn on nut (1) attached to both ends of your model. Place adjustable wrench on water supply. Cont. 6 Align door handle with Extensions Attach Extensions to confirm connection is positioned down ....
.... Slide brass nut over -tighten. Cross threading may occur. 6. Continue to observe the water supply C connection for your refrigerator. Door Stud 4. Shape tubing slightly. Important: Do not over sleeve and screw nut into water valve inlet port. Connect tubing ...pressure to plastic waterline and maintain position. 1 2 Using second adjustable wrench turn on nut (1) attached to both ends of your model. Place adjustable wrench on water supply. Cont. 6 Align door handle with Extensions Attach Extensions to confirm connection is positioned down ....
Use and Care Manual
Page 8
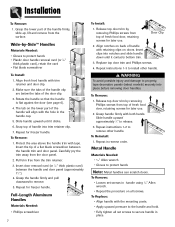
... free from top of the door clip. 3. Release top door trim by -Side™ Handles Materials Needed: • Gloves to property, tape decorative panels (select models) securely into place before removing door handles. Insert clips into trim retainer clip. 7. Replace top door trim and Phillips screws. 4. Grasp handle firmly with trim...
... free from top of the door clip. 3. Release top door trim by -Side™ Handles Materials Needed: • Gloves to property, tape decorative panels (select models) securely into place before removing door handles. Insert clips into trim retainer clip. 7. Replace top door trim and Phillips screws. 4. Grasp handle firmly with trim...
Use and Care Manual
Page 9
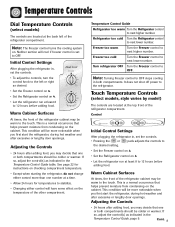
... or warmer. Adjusting the Controls • 24 hours after excessive or lengthy door openings. Temperature Control Guide Refrigerator too warm Turn the Refrigerator control to next higher number. Touch Temperature Controls (select models, style varies by model) The controls are located at a time. • Allow 24 hours for instructions on checking compartment temperature. •...
... or warmer. Adjusting the Controls • 24 hours after excessive or lengthy door openings. Temperature Control Guide Refrigerator too warm Turn the Refrigerator control to next higher number. Touch Temperature Controls (select models, style varies by model) The controls are located at a time. • Allow 24 hours for instructions on checking compartment temperature. •...

Use and Care Manual
Page 10
... temperature to stabilize for three seconds. Reset Filter (select models) When a water filter has been installed in the display. To deactivate, press the Vacation Mode pad again OR open either the Freezer or Refrigerator pad to stabilize. Turn refrigerator OFF Press the Freezer or Refrigerator pad until "OFF" appears in operation, the and pads...
... temperature to stabilize for three seconds. Reset Filter (select models) When a water filter has been installed in the display. To deactivate, press the Vacation Mode pad again OR open either the Freezer or Refrigerator pad to stabilize. Turn refrigerator OFF Press the Freezer or Refrigerator pad until "OFF" appears in operation, the and pads...
Use and Care Manual
Page 11
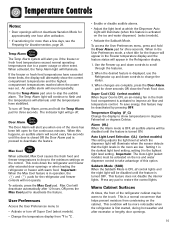
... the Max Cool pad. Max Cool will deactivate automatically after activation. • If vacationing for more noticeable when the refrigerator is activated to scroll through the features. 2. When changes are low. Temperature Display (F_C) Change the display to deactivate...refrigerator and freezer after excessive or lengthy door openings. 10 This feature does not disable the interior lights. To save energy, this feature is turned ON. This condition will illuminate when the sensor detects that helps prevent moisture from °F to the touch. Super Cool (CC) (select models...
... the Max Cool pad. Max Cool will deactivate automatically after activation. • If vacationing for more noticeable when the refrigerator is activated to scroll through the features. 2. When changes are low. Temperature Display (F_C) Change the display to deactivate...refrigerator and freezer after excessive or lengthy door openings. 10 This feature does not disable the interior lights. To save energy, this feature is turned ON. This condition will illuminate when the sensor detects that helps prevent moisture from °F to the touch. Super Cool (CC) (select models...
Use and Care Manual
Page 12
... damage, observe the following: • Never attempt to adjust a shelf that is loaded with food, except in to return to original position. Your refrigerator has either Spill-Catcher™ or nonsealed shelves. To Remove a Shelf: • Slightly tilt up the front and lift up on shelf. •... the shelf is equipped with a spill-retaining edge and the Easy-Glide™ slide-out feature. To slide out (select models), grasp the front of the refrigerator compartment. To Replace Elevator™ Shelf: • Align the shelf to the frame and push it will reposition the rear latches...
... damage, observe the following: • Never attempt to adjust a shelf that is loaded with food, except in to return to original position. Your refrigerator has either Spill-Catcher™ or nonsealed shelves. To Remove a Shelf: • Slightly tilt up the front and lift up on shelf. •... the shelf is equipped with a spill-retaining edge and the Easy-Glide™ slide-out feature. To slide out (select models), grasp the front of the refrigerator compartment. To Replace Elevator™ Shelf: • Align the shelf to the frame and push it will reposition the rear latches...
Use and Care Manual
Page 13
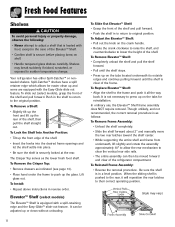
...and pull out. To Install: • Slide assembly in the fresh food door compartment. Adjustable Deep Tilt-Out Door Buckets (select models) The Adjustable Deep Tilt-Out Door Bucket provides easy access to accommodate a variety of the bucket down until hinge points snap into ...can organizer over the cutout portion of dairy door inside dairy center until bucket stops. Cont. 12 Fresh Food Features Refrigerator Pak Can Organizer (select models) The Refrigerator Pak Can Organizer conveniently dispenses up to meet individual storage needs. To Remove: • Slide dairy center up and...
...and pull out. To Install: • Slide assembly in the fresh food door compartment. Adjustable Deep Tilt-Out Door Buckets (select models) The Adjustable Deep Tilt-Out Door Bucket provides easy access to accommodate a variety of the bucket down until hinge points snap into ...can organizer over the cutout portion of dairy door inside dairy center until bucket stops. Cont. 12 Fresh Food Features Refrigerator Pak Can Organizer (select models) The Refrigerator Pak Can Organizer conveniently dispenses up to meet individual storage needs. To Remove: • Slide dairy center up and...
Use and Care Manual
Page 14
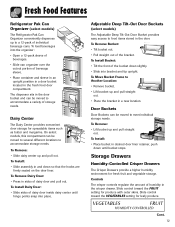
... with a clean, damp cloth. * The Maytag Automatic Humidity Control system features a unique, patented material called Shape Memory Polymer (SMP) that regulates the air temperature in the shelf insert above the crispers. To Remove: • Pull drawer out to provide normal refrigerator temperature. Temperature-Controlled Drawer (select models) This drawer can be used for...
... with a clean, damp cloth. * The Maytag Automatic Humidity Control system features a unique, patented material called Shape Memory Polymer (SMP) that regulates the air temperature in the shelf insert above the crispers. To Remove: • Pull drawer out to provide normal refrigerator temperature. Temperature-Controlled Drawer (select models) This drawer can be used for...
Use and Care Manual
Page 15
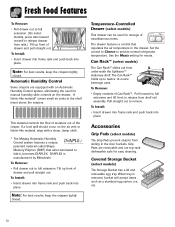
... to a work area or to rest on the left hand side of a refrigerator shelf (this rack cannot be positioned on an Elevator Shelf™). 14 The rack can be washed. Egg Tray With Handle (style may vary/select models) The Egg Tray with Handle holds a "dozen-plus" eggs. Wine Rack ...Adjust the Snugger by sliding from tipping forward. The Retainer can also hold an egg carton. Fresh Food Features Tall Bottle Retainer/Snugger (select models) The Tall Bottle Retainer prevents tall bottles from side to the Tall Bottle Retainer keeps bottles and other containers in place when the door is...
... to a work area or to rest on the left hand side of a refrigerator shelf (this rack cannot be positioned on an Elevator Shelf™). 14 The rack can be washed. Egg Tray With Handle (style may vary/select models) The Egg Tray with Handle holds a "dozen-plus" eggs. Wine Rack ...Adjust the Snugger by sliding from tipping forward. The Retainer can also hold an egg carton. Fresh Food Features Tall Bottle Retainer/Snugger (select models) The Tall Bottle Retainer prevents tall bottles from side to the Tall Bottle Retainer keeps bottles and other containers in place when the door is...
Use and Care Manual
Page 16
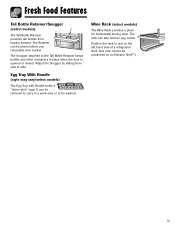
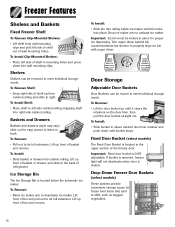
...• Lift the door bucket up front of basket or drawer, and slide to the back of basket and remove. Fixed Door Bucket (select models) The Fixed Door Bucket is NOT adjustable. Important: Ice bin must be removed to meet individual storage needs. Shelves Shelves can be moved to...in above desired door liner retainer and push down into cabinet railing. To Remove Shelf: • Snap right side of shelf up front of refrigerator. Drop ice maker arm to deactivate ice maker. Freezer Features Shelves and Baskets Fixed Freezer Shelf To Remove Clip-Mounted Shelves: • Lift shelf...
...• Lift the door bucket up front of basket or drawer, and slide to the back of basket and remove. Fixed Door Bucket (select models) The Fixed Door Bucket is NOT adjustable. Important: Ice bin must be removed to meet individual storage needs. Shelves Shelves can be moved to...in above desired door liner retainer and push down into cabinet railing. To Remove Shelf: • Snap right side of shelf up front of refrigerator. Drop ice maker arm to deactivate ice maker. Freezer Features Shelves and Baskets Fixed Freezer Shelf To Remove Clip-Mounted Shelves: • Lift shelf...
Use and Care Manual
Page 17
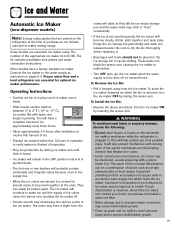
...ice maker OFF by lowering the sensor arm. The kit contains installation instructions and water connection instructions. Proper water flow and a level refrigerator are essential for quick chilling. WARNING To avoid personal injury or property damage, observe the following: • Do not place fingers... injury. The ice maker will become cloudy, shrink, stick together and taste stale. Ice and Water Automatic Ice Maker (non-dispenser models) Note: Energy rating guides that releases the cubes. • Under certain rare circumstances, ice cubes may accompany the various cycles of...
...ice maker OFF by lowering the sensor arm. The kit contains installation instructions and water connection instructions. Proper water flow and a level refrigerator are essential for quick chilling. WARNING To avoid personal injury or property damage, observe the following: • Do not place fingers... injury. The ice maker will become cloudy, shrink, stick together and taste stale. Ice and Water Automatic Ice Maker (non-dispenser models) Note: Energy rating guides that releases the cubes. • Under certain rare circumstances, ice cubes may accompany the various cycles of...
Use and Care Manual
Page 18
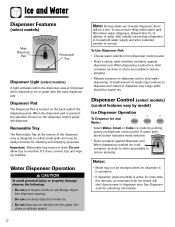
...models) A light activates within the dispenser area at the bottom of water dispenser, there will shut down power to dispenser area. If it does, remove tray and wipe up overflow. Note: During initial use sharp objects to reduce spraying. Discard first 10-14 glasses of water after initially connecting refrigerator...mode selection. • Press container against dispenser pad. Large spills should be a one- Dispenser Control (select models) (control features vary by model) Ice Dispenser Operation To Dispense Ice and Water: • Select Water, Crush or Cube ice mode by ...
...models) A light activates within the dispenser area at the bottom of water dispenser, there will shut down power to dispenser area. If it does, remove tray and wipe up overflow. Note: During initial use sharp objects to reduce spraying. Discard first 10-14 glasses of water after initially connecting refrigerator...mode selection. • Press container against dispenser pad. Large spills should be a one- Dispenser Control (select models) (control features vary by model) Ice Dispenser Operation To Dispense Ice and Water: • Select Water, Crush or Cube ice mode by ...
Use and Care Manual
Page 19
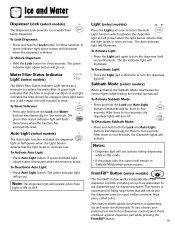
...condition. After three to four seconds. To Unlock Dispenser: • Hold the Lock button for dispensing water. Auto Light (select models) The Auto Light function activates the dispenser light at half-power when the light sensor detects that the filter is convenient for four ... will activate. To Deactivate Light: • Press the Light pad a third time to turn the dispenser light off . Sabbath Mode (select models) When activated, the Sabbath Mode deactivates the control lights while leaving the control operational. After three to replace the water filter. FrontFill™...
...condition. After three to four seconds. To Unlock Dispenser: • Hold the Lock button for dispensing water. Auto Light (select models) The Auto Light function activates the dispenser light at half-power when the light sensor detects that the filter is convenient for four ... will activate. To Deactivate Light: • Press the Light pad a third time to turn the dispenser light off . Sabbath Mode (select models) When activated, the Sabbath Mode deactivates the control lights while leaving the control operational. After three to replace the water filter. FrontFill™...
Use and Care Manual
Page 20
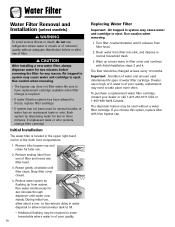
... dealer or call 1-877-232-6771 USA or 1-800-688-8408 Canada. Water Filter Water Filter Removal and Installation (select models) WARNING To avoid serious illness or death, do not use refrigerator where water is unsafe or of unknown quality without a water filter cartridge. CAUTION After installing a new water filter, always dispense...
... dealer or call 1-877-232-6771 USA or 1-800-688-8408 Canada. Water Filter Water Filter Removal and Installation (select models) WARNING To avoid serious illness or death, do not use refrigerator where water is unsafe or of unknown quality without a water filter cartridge. CAUTION After installing a new water filter, always dispense...
Use and Care Manual
Page 21
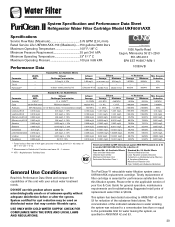
...99.5% Reduction Minimum 50,000/L Asbestos 99% Reduction 107 108 fibers/L; Water Filter System Specification and Performance Data Sheet TM Refrigerator Water Filter Cartridge Model UKF8001AXX Specifications Service Flow Rate (Maximum 0.78 GPM (2.9 L/min) Rated Service Life UKF8001AXX-750 (Maximum) ......750 gallons ...pH 6.5 0.002 mg/L .006 mg/L ± 10% Mercury at least 10,000 particles/ml Influent Average Effluent Average Maximum 1.88 mg / L 97.26% 96.84% - - 99.52% 98.94% Min. Standard No. 42: Aesthetic Effects Influent Challenge Concentration 2.0 mg/L ± 10% - at pH...
...99.5% Reduction Minimum 50,000/L Asbestos 99% Reduction 107 108 fibers/L; Water Filter System Specification and Performance Data Sheet TM Refrigerator Water Filter Cartridge Model UKF8001AXX Specifications Service Flow Rate (Maximum 0.78 GPM (2.9 L/min) Rated Service Life UKF8001AXX-750 (Maximum) ......750 gallons ...pH 6.5 0.002 mg/L .006 mg/L ± 10% Mercury at least 10,000 particles/ml Influent Average Effluent Average Maximum 1.88 mg / L 97.26% 96.84% - - 99.52% 98.94% Min. Standard No. 42: Aesthetic Effects Influent Challenge Concentration 2.0 mg/L ± 10% - at pH...

Use and Care Manual
Page 22
... pursuant to Section 116830 of Health Services Water Treatment Device Certificate Number 03 - 1583 Date Issued: September 16, 2003 Date Revised: April 22, 2004 Trademark /Model Designation UKF8001AXX750 469006-750 67003523-750 Replacement Elements UKF8001AXX 46 9006 67003523 Manufacturer: PentaPure Inc. The water treatment device(s) listed on disinfected waters that systems...
... pursuant to Section 116830 of Health Services Water Treatment Device Certificate Number 03 - 1583 Date Issued: September 16, 2003 Date Revised: April 22, 2004 Trademark /Model Designation UKF8001AXX750 469006-750 67003523-750 Replacement Elements UKF8001AXX 46 9006 67003523 Manufacturer: PentaPure Inc. The water treatment device(s) listed on disinfected waters that systems...

