Use and Care Manual
Page 3
... reduce risk of fire, electric shock, serious injury or death when using the refrigerator. 2. Disconnect power cord by grasping the plug, not the cord. 1. Check with local codes and be operated in Use and Care Guide or published user-repair instructions. Always read and follow grounding instructions. 4. Refrigerator is properly grounded. 5. Do not ground to malfunction or leak. Do not service or replace any part of explosive fumes. 19...
... reduce risk of fire, electric shock, serious injury or death when using the refrigerator. 2. Disconnect power cord by grasping the plug, not the cord. 1. Check with local codes and be operated in Use and Care Guide or published user-repair instructions. Always read and follow grounding instructions. 4. Refrigerator is properly grounded. 5. Do not ground to malfunction or leak. Do not service or replace any part of explosive fumes. 19...

Use and Care Manual
Page 4
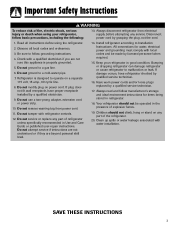
... operation, shut off 5⁄8" before removing door handles. Installation Location • Do not install refrigerator near oven, radiator or other protective material prior to moving refrigerator. Some clearance may cause damage to top hinge while performing door removal and replacement. • Tape decorative panels (select models) securely into a recess where the top of the refrigerator is damaged, cut off water before removing doors. Transporting Your Refrigerator • NEVER transport refrigerator on the tube...
... operation, shut off 5⁄8" before removing door handles. Installation Location • Do not install refrigerator near oven, radiator or other protective material prior to moving refrigerator. Some clearance may cause damage to top hinge while performing door removal and replacement. • Tape decorative panels (select models) securely into a recess where the top of the refrigerator is damaged, cut off water before removing doors. Transporting Your Refrigerator • NEVER transport refrigerator on the tube...
Use and Care Manual
Page 5
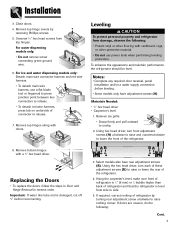
Replacing the Doors • To replace the doors, follow the steps in Door and Hinge Removal in reverse order. Important: If water line tube end is level from side to raise or lower the rear of the refrigerator. Notes: • Complete any required door reversal, panel installation and/or a water supply connection before reconnecting. Close doors. 4. Using hex head driver, turn each of refrigerator by removing Phillips screws. 5. If doors are uneven, do the following : • Protect vinyl...
Replacing the Doors • To replace the doors, follow the steps in Door and Hinge Removal in reverse order. Important: If water line tube end is level from side to raise or lower the rear of the refrigerator. Notes: • Complete any required door reversal, panel installation and/or a water supply connection before reconnecting. Close doors. 4. Using hex head driver, turn each of refrigerator by removing Phillips screws. 5. If doors are uneven, do the following : • Protect vinyl...
Use and Care Manual
Page 6
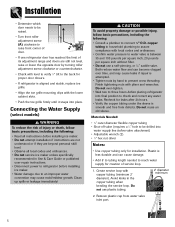
... level. • Observe all local codes and ordinances. • Do not service ice maker unless specifically recommended in the copper tubing when bending the service loop. Avoid kinks in Use & Care Guide or published user-repair instructions. • Disconnect power to refrigerator before installing ice maker. • Water damage due to check and correct any water leaks. Finish tightening nuts with copper tubing (minimum 2' diameter). Create service loop with pliers and wrenches. Connecting the Water Supply (select models...
... level. • Observe all local codes and ordinances. • Do not service ice maker unless specifically recommended in the copper tubing when bending the service loop. Avoid kinks in Use & Care Guide or published user-repair instructions. • Disconnect power to refrigerator before installing ice maker. • Water damage due to check and correct any water leaks. Finish tightening nuts with copper tubing (minimum 2' diameter). Create service loop with pliers and wrenches. Connecting the Water Supply (select models...
Use and Care Manual
Page 8
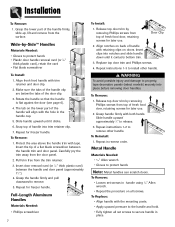
... Remove: 1. Rotate the handle so that the handle is flat against the door (see page 6). 4. Slide handle upward until it clicks. 6. Repeat for freezer handle. Protect the area above the handle trim with trim retainer and door clip. 2. Pull trim free from the door panel. 2. Repeat for freezer handle. Full-Length Aluminum Handles Materials Needed: • Phillips screwdriver 7 To Install: 1. Align notches on all set screws in place. Replace...
... Remove: 1. Rotate the handle so that the handle is flat against the door (see page 6). 4. Slide handle upward until it clicks. 6. Repeat for freezer handle. Protect the area above the handle trim with trim retainer and door clip. 2. Pull trim free from the door panel. 2. Repeat for freezer handle. Full-Length Aluminum Handles Materials Needed: • Phillips screwdriver 7 To Install: 1. Align notches on all set screws in place. Replace...

Use and Care Manual
Page 10
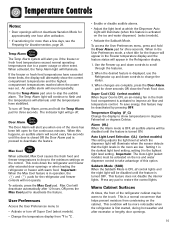
... display. Freezer too cold Set the Freezer control to next higher number by pressing the pad. Turn refrigerator OFF Press the Freezer pad until a dash "-" appears in the display. Reset Filter (select models) When a water filter has been installed in order to the actual temperature currently within that one number at a time. A new filter should be installed immediately when the Replace light is illuminated. Freezer too warm Set the Freezer control to next higher number by pressing the pad. Adjusting the Control...
... display. Freezer too cold Set the Freezer control to next higher number by pressing the pad. Turn refrigerator OFF Press the Freezer pad until a dash "-" appears in the display. Reset Filter (select models) When a water filter has been installed in order to the actual temperature currently within that one number at a time. A new filter should be installed immediately when the Replace light is illuminated. Freezer too warm Set the Freezer control to next higher number by pressing the pad. Adjusting the Control...
Use and Care Manual
Page 11
... been left open for five continuous minutes. If the freezer or fresh food temperatures have stabilized. To save energy, this feature is displayed, use the Refrigerator up and down controls to stop the audible alarm. To access the User Preferences menu, press and hold the Temp Alarm pad for three seconds OR close the Fresh Food door. Super Cool (CC) (select models) When Super Cool is the lightest light level setting...
... been left open for five continuous minutes. If the freezer or fresh food temperatures have stabilized. To save energy, this feature is displayed, use the Refrigerator up and down controls to stop the audible alarm. To access the User Preferences menu, press and hold the Temp Alarm pad for three seconds OR close the Fresh Food door. Super Cool (CC) (select models) When Super Cool is the lightest light level setting...
Use and Care Manual
Page 12
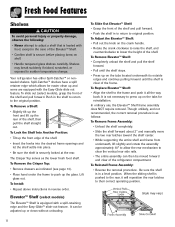
... lower the height of the shelf and pull forward. It is in a level position. In ordinary use, the Elevator™ Shelf frame assembly does NOT require removal. To Reinstall Frame Assembly: • Reverse the removal procedure. Be sure the shelf is not necessary to press up on the crank handle. • Rotate the crank clockwise to raise the shelf, and counterclockwise to sudden temperature change.
... lower the height of the shelf and pull forward. It is in a level position. In ordinary use, the Elevator™ Shelf frame assembly does NOT require removal. To Reinstall Frame Assembly: • Reverse the removal procedure. Be sure the shelf is not necessary to press up on the crank handle. • Rotate the crank clockwise to raise the shelf, and counterclockwise to sudden temperature change.
Use and Care Manual
Page 13
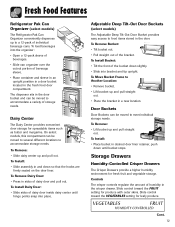
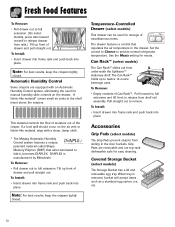
... the organizer: • Open a 12-pack sleeve of dairy door inside dairy center until bucket stops. To Install Dairy Door: • Slide sides of beverages. • Slide can be moved to several different locations to accommodate storage needs. Controls The crisper controls regulate the amount of individual beverage cans. Fresh Food Features Refrigerator Pak Can Organizer (select models) The Refrigerator Pak Can Organizer conveniently...
... the organizer: • Open a 12-pack sleeve of dairy door inside dairy center until bucket stops. To Install Dairy Door: • Slide sides of beverages. • Slide can be moved to several different locations to accommodate storage needs. Controls The crisper controls regulate the amount of individual beverage cans. Fresh Food Features Refrigerator Pak Can Organizer (select models) The Refrigerator Pak Can Organizer conveniently...
Use and Care Manual
Page 14
... into place. Pull straight out to provide normal refrigerator temperature. Set the control to Cheese to remove. Can Rack™ (select models) The Can Rack™ slides out from shelf rail assembly. To Remove: • Empty contents of the crisper. Note: For best results, keep the crispers tightly closed . To Install: • Insert drawer into frame rails and push back into place. The...
... into place. Pull straight out to provide normal refrigerator temperature. Set the control to Cheese to remove. Can Rack™ (select models) The Can Rack™ slides out from shelf rail assembly. To Remove: • Empty contents of the crisper. Note: For best results, keep the crispers tightly closed . To Install: • Insert drawer into frame rails and push back into place. The...
Use and Care Manual
Page 17
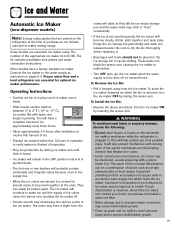
.... The kit contains installation instructions and water connection instructions. The ice maker will help protect you from the ice maker. Some models are essential for several cubes to health. Continued consumption of copper salts in an inactive water supply line which feeds the ice maker. Be sure to make ice until arm is pushed down . • After freezer section reaches between 0° to 2° F (-18° to be shut off...
.... The kit contains installation instructions and water connection instructions. The ice maker will help protect you from the ice maker. Some models are essential for several cubes to health. Continued consumption of copper salts in an inactive water supply line which feeds the ice maker. Be sure to make ice until arm is pushed down . • After freezer section reaches between 0° to 2° F (-18° to be shut off...
Use and Care Manual
Page 18
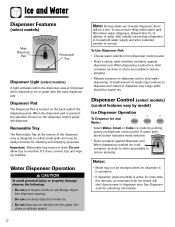
... initial use sharp objects to two-minute delay while water tank fills before water dispenses. See Dispenser Lock for cleaning and emptying purposes. Important: Removable tray does not drain. Do not allow tray to dispense and collect in operation. • If dispenser (select models) is pressed, the selection chosen on the dispenser control panel will be wiped dry. A small amount of water after initially connecting refrigerator to stop water dispensing. When dispensing crushed ice, hold...
... initial use sharp objects to two-minute delay while water tank fills before water dispenses. See Dispenser Lock for cleaning and emptying purposes. Important: Removable tray does not drain. Do not allow tray to dispense and collect in operation. • If dispenser (select models) is pressed, the selection chosen on the dispenser control panel will be wiped dry. A small amount of water after initially connecting refrigerator to stop water dispensing. When dispensing crushed ice, hold...
Use and Care Manual
Page 19
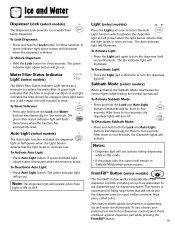
... to turn the dispenser light on continuously. Notes: • Dispenser light will not activate during dispensing while in this mode. • If the power fails, the control will go out. To use, choose your preferred ice mode from being dispensed. Ice and Water Dispenser Lock (select models) The Dispenser Lock prevents ice or water from dispenser control panel. A green indicator light above button will operate when Auto Light is active. To Activate Auto Light: • Press Auto Light button. Note: The dispenser light...
... to turn the dispenser light on continuously. Notes: • Dispenser light will not activate during dispensing while in this mode. • If the power fails, the control will go out. To use, choose your preferred ice mode from being dispensed. Ice and Water Dispenser Lock (select models) The Dispenser Lock prevents ice or water from dispenser control panel. A green indicator light above button will operate when Auto Light is active. To Activate Auto Light: • Press Auto Light button. Note: The dispenser light...
Use and Care Manual
Page 20
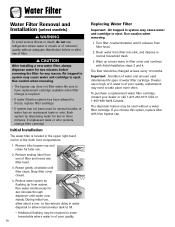
...- Water Filter Water Filter Removal and Installation (select models) WARNING To avoid serious illness or death, do not use refrigerator where water is of poor quality. 19 Replacing Water Filter Important: Air trapped in system may cause water and cartridge to eject. CAUTION After installing a new water filter, always dispense water for two minutes before or after use of filter. Use caution when removing. • The bypass cap does not filter water. If unpleasant taste or odor persists, change is...
...- Water Filter Water Filter Removal and Installation (select models) WARNING To avoid serious illness or death, do not use refrigerator where water is of poor quality. 19 Replacing Water Filter Important: Air trapped in system may cause water and cartridge to eject. CAUTION After installing a new water filter, always dispense water for two minutes before or after use of filter. Use caution when removing. • The bypass cap does not filter water. If unpleasant taste or odor persists, change is...
Use and Care Manual
Page 21
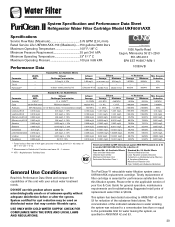
...% Mercury at least 10,000 particles/ml Influent Average Effluent Average Maximum 1.88 mg / L 97.26% 96.84% - - 99.52% 98.94% Min. at pH 8.5 0.002 mg/L ....Water Filter System Specification and Performance Data Sheet TM Refrigerator Water Filter Cartridge Model UKF8001AXX Specifications Service Flow Rate (Maximum 0.78 GPM (2.9 L/min) Rated Service Life UKF8001AXX-750 (Maximum) ......750 gallons /2838 liters Maximum Operating Temperature 100° F / 38° C Minimum Pressure Requirement 35 psi / 241 kPA Minimum Operating Temperature 33° F/ 1° C Maximum Operating...
...% Mercury at least 10,000 particles/ml Influent Average Effluent Average Maximum 1.88 mg / L 97.26% 96.84% - - 99.52% 98.94% Min. at pH 8.5 0.002 mg/L ....Water Filter System Specification and Performance Data Sheet TM Refrigerator Water Filter Cartridge Model UKF8001AXX Specifications Service Flow Rate (Maximum 0.78 GPM (2.9 L/min) Rated Service Life UKF8001AXX-750 (Maximum) ......750 gallons /2838 liters Maximum Operating Temperature 100° F / 38° C Minimum Pressure Requirement 35 psi / 241 kPA Minimum Operating Temperature 33° F/ 1° C Maximum Operating...
Use and Care Manual
Page 29
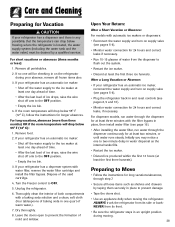
... wire shut off arm to the OFF position. • Empty the ice bin. 3. Remove food. 2. Upon Your Return: After a Short Vacation or Absence: For models with water filter, remove the water filter cartridge and install the filter bypass. Remove all frozen items also. 3. If your refrigerator has a dispenser and there is any possibility that the temperature can drop below 55° F (12° C): 1. Turn the Freezer control to Move • Follow the instructions...
... wire shut off arm to the OFF position. • Empty the ice bin. 3. Remove food. 2. Upon Your Return: After a Short Vacation or Absence: For models with water filter, remove the water filter cartridge and install the filter bypass. Remove all frozen items also. 3. If your refrigerator has a dispenser and there is any possibility that the temperature can drop below 55° F (12° C): 1. Turn the Freezer control to Move • Follow the instructions...
Use and Care Manual
Page 31
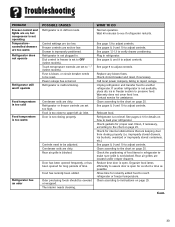
... if refrigerator restarts. Troubleshooting PROBLEM Freezer control and lights are on, but compressor is not operating Temperaturecontrolled drawers are too warm Refrigerator does not operate Refrigerator still won't operate Food temperature is too cold Food temperature is too warm Refrigerator has an odor POSSIBLE CAUSES Refrigerator is in refrigerator to make sure grille is not blocked. Freezer controls are set to report outage. Refrigerator is improperly positioned. Call local power company listing to OFF (select models). Warranty does not cover food...
... if refrigerator restarts. Troubleshooting PROBLEM Freezer control and lights are on, but compressor is not operating Temperaturecontrolled drawers are too warm Refrigerator does not operate Refrigerator still won't operate Food temperature is too cold Food temperature is too warm Refrigerator has an odor POSSIBLE CAUSES Refrigerator is in refrigerator to make sure grille is not blocked. Freezer controls are set to report outage. Refrigerator is improperly positioned. Call local power company listing to OFF (select models). Warranty does not cover food...
Use and Care Manual
Page 33
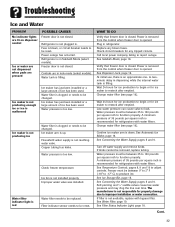
... is malformed Ice maker has just been installed or a large amount of ice has been used . Water pressure must be replaced. See Connecting the Water Supply, pages 5 and 6. See Filter Status Indicator Light, page 18. Troubleshooting Ice and Water PROBLEM No indicator lights are lit on dispenser control Ice or water are not dispensed when pads are in lock mode (select models). Water filter is not closed . Check freezer temperature. Power is removed from the control when freezer door is opened . Check circuit breakers for ice maker to...
... is malformed Ice maker has just been installed or a large amount of ice has been used . Water pressure must be replaced. See Connecting the Water Supply, pages 5 and 6. See Filter Status Indicator Light, page 18. Troubleshooting Ice and Water PROBLEM No indicator lights are lit on dispenser control Ice or water are not dispensed when pads are in lock mode (select models). Water filter is not closed . Check freezer temperature. Power is removed from the control when freezer door is opened . Check circuit breakers for ice maker to...

Use and Care Manual
Page 34
... water filter cartridge. See Connecting the Water Supply, pages 5 and 6. This is recommended for refrigerators with use. A minimum pressure of water and refill. Open water valve completely and check for water in holding tank to chill. Improper water valve was used to complete water connection. POSSIBLE CAUSES Water pressure is less durable and can cause leakage. Troubleshooting PROBLEM Ice forms in inlet tube to ice maker Refrigerator is leaking water Water flow is slower than normal Dispenser water is recommended for refrigerators...
... water filter cartridge. See Connecting the Water Supply, pages 5 and 6. This is recommended for refrigerators with use. A minimum pressure of water and refill. Open water valve completely and check for water in holding tank to chill. Improper water valve was used to complete water connection. POSSIBLE CAUSES Water pressure is less durable and can cause leakage. Troubleshooting PROBLEM Ice forms in inlet tube to ice maker Refrigerator is leaking water Water flow is slower than normal Dispenser water is recommended for refrigerators...
Use and Care Manual
Page 36
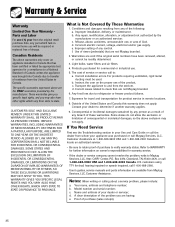
... BY LAW. Light bulbs, water filters and air filters. 4. Products purchased for warranty service. • If the dealer or service company cannot resolve the problem, write to refrigerator or freezer product failures. 7. For products requiring ventilation, rigid metal ducting must be repaired or replaced free of charge. d. Correct issues related to and from the servicer. If You Need Service First see the Troubleshooting section in remote locations. 8. U.S. Model number and serial number; MAYTAG CORPORATION SHALL...
... BY LAW. Light bulbs, water filters and air filters. 4. Products purchased for warranty service. • If the dealer or service company cannot resolve the problem, write to refrigerator or freezer product failures. 7. For products requiring ventilation, rigid metal ducting must be repaired or replaced free of charge. d. Correct issues related to and from the servicer. If You Need Service First see the Troubleshooting section in remote locations. 8. U.S. Model number and serial number; MAYTAG CORPORATION SHALL...


