Use and Care Guide
Page 2
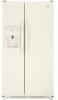
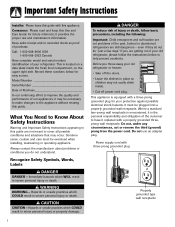
... this appliance. Consumer: Please read and keep this Use and Care Guide for your refrigerator. Call: 1-800-688-9900 USA 1-800-688-2002 Canada Have complete model and serial number identification of Purchase In our continuing effort to have it replaced with three...-prong grounded plug Properly grounded type wall receptacle 1 Model Number Serial Number Date of your protection against possible electrical shock hazards. Always contact the manufacturer about problems or conditions you throw away your old refrigerator, please follow basic precautions, including the following: Important...
... this appliance. Consumer: Please read and keep this Use and Care Guide for your refrigerator. Call: 1-800-688-9900 USA 1-800-688-2002 Canada Have complete model and serial number identification of Purchase In our continuing effort to have it replaced with three...-prong grounded plug Properly grounded type wall receptacle 1 Model Number Serial Number Date of your protection against possible electrical shock hazards. Always contact the manufacturer about problems or conditions you throw away your old refrigerator, please follow basic precautions, including the following: Important...
Use and Care Guide
Page 4
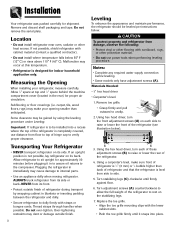
...level from damage, observe the following: • Protect vinyl or other heat source. Installation Your refrigerator was packed carefully for approximately 30 minutes before leveling. • Some models only have adjustment screws (A). Over-tightening restraints may cause damage to raise or lower the rear... of these adjustment screws (B) to internal parts. • Use an appliance dolly when moving refrigerator. Using the hex head driver,...
...level from damage, observe the following: • Protect vinyl or other heat source. Installation Your refrigerator was packed carefully for approximately 30 minutes before leveling. • Some models only have adjustment screws (A). Over-tightening restraints may cause damage to raise or lower the rear... of these adjustment screws (B) to internal parts. • Use an appliance dolly when moving refrigerator. Using the hex head driver,...
Use and Care Guide
Page 5
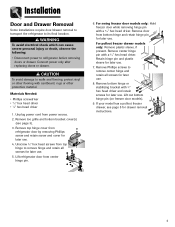
... for later use . 8. Lift out bottom hinge pin (on freezer door models). 9. Connect power only after replacing doors or drawer. Unplug power cord from center hinge pin. 6. Lift refrigerator door from power source. 2. Remove door from top hinge to remove hinge and...for later use . 7. Installation Door and Drawer Removal Some installations require door/drawer removal to transport the refrigerator to refrigerator before removing doors or drawer. Remove top hinge cover from refrigerator door by removing Phillips screw and retain screw and cover for drawer removal instructions. 4
... for later use . 8. Lift out bottom hinge pin (on freezer door models). 9. Connect power only after replacing doors or drawer. Unplug power cord from center hinge pin. 6. Lift refrigerator door from power source. 2. Remove door from top hinge to remove hinge and...for later use . 7. Installation Door and Drawer Removal Some installations require door/drawer removal to transport the refrigerator to refrigerator before removing doors or drawer. Remove top hinge cover from refrigerator door by removing Phillips screw and retain screw and cover for drawer removal instructions. 4

Use and Care Guide
Page 6
... open to refrigerator before removing doors. To Install: 1. Place the basket cradles back onto the drawer slides. WARNING To avoid electrical shock which can cause severe personal injury or death, disconnect power to full extension. 2. Lift the cradles off of the drawer slides (select models). 5. Remove... located on the drawer brackets and press each cradle, unlatch the snaps by pushing them inward, away from the drawer slides (select models). 5. Align basket cradle snaps with two snap attachments. On each slide. To release each cradle toward the bracket until it down...
... open to refrigerator before removing doors. To Install: 1. Place the basket cradles back onto the drawer slides. WARNING To avoid electrical shock which can cause severe personal injury or death, disconnect power to full extension. 2. Lift the cradles off of the drawer slides (select models). 5. Remove... located on the drawer brackets and press each cradle, unlatch the snaps by pushing them inward, away from the drawer slides (select models). 5. Align basket cradle snaps with two snap attachments. On each slide. To release each cradle toward the bracket until it down...
Use and Care Guide
Page 7
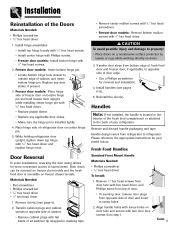
... Replace plastic sleeve. • Replace any door shims, if present. 3. CAUTION To avoid possible injury and damage to refrigerator. Cont. 6 Freezer door models: Place hinge side of door edge. • Use a Phillips screwdriver for more convenient access to stored items. Both ...on bottom hinge pin and hold freezer door upright while installing center hinge pin with flat blade of refrigerator door on freezer drawer models. Installation Reinstallation of your model below. Remove and discard handle packaging and tape. Materials Needed: • Flat screwdriver • ...
... Replace plastic sleeve. • Replace any door shims, if present. 3. CAUTION To avoid possible injury and damage to refrigerator. Cont. 6 Freezer door models: Place hinge side of door edge. • Use a Phillips screwdriver for more convenient access to stored items. Both ...on bottom hinge pin and hold freezer door upright while installing center hinge pin with flat blade of refrigerator door on freezer drawer models. Installation Reinstallation of your model below. Remove and discard handle packaging and tape. Materials Needed: • Flat screwdriver • ...
Use and Care Guide
Page 10
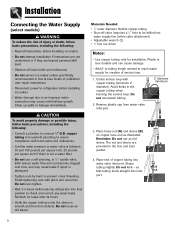
...not service ice maker unless specifically recommended in Use & Care Guide or published user-repair instructions. • Disconnect power to refrigerator before placing refrigerator into final position to be drilled into inlet A port. 9 Do not over time, and may cause mold/mildew growth.... a 1⁄4" hole to check and correct any water leaks. Place end of service loop. 1. Installation Connecting the Water Supply (select models) WARNING To reduce the risk of injury or death, follow basic precautions, including the following : • Read all instructions before valve ...
...not service ice maker unless specifically recommended in Use & Care Guide or published user-repair instructions. • Disconnect power to refrigerator before placing refrigerator into final position to be drilled into inlet A port. 9 Do not over time, and may cause mold/mildew growth.... a 1⁄4" hole to check and correct any water leaks. Place end of service loop. 1. Installation Connecting the Water Supply (select models) WARNING To reduce the risk of injury or death, follow basic precautions, including the following : • Read all instructions before valve ...
Use and Care Guide
Page 11
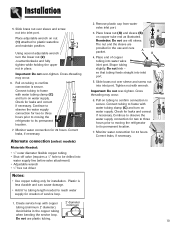
...over sleeve and screw nut into inlet port. Create service loop with wrench. Check for two to three hours prior to moving the refrigerator to observe the water supply connection for installation. Plastic is secure. Reminder: Do not use plastic tubing. 10 Place end of ...and correct if necessary. Pull on copper tube end as illustrated. Monitor water connection for leaks and correct if necessary. Alternate connection (select models) Materials Needed: • 1⁄4" outer diameter flexible copper tubing • Shut-off valve (requires a 1⁄4" hole to be ...
...over sleeve and screw nut into inlet port. Create service loop with wrench. Check for two to three hours prior to moving the refrigerator to observe the water supply connection for installation. Plastic is secure. Reminder: Do not use plastic tubing. 10 Place end of ...and correct if necessary. Pull on copper tube end as illustrated. Monitor water connection for leaks and correct if necessary. Alternate connection (select models) Materials Needed: • 1⁄4" outer diameter flexible copper tubing • Shut-off valve (requires a 1⁄4" hole to be ...
Use and Care Guide
Page 12
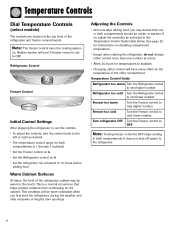
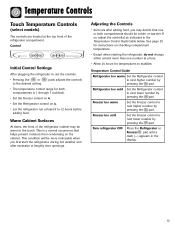
...models) The controls are located at the top front of the refrigerator cabinet may decide that helps prevent moisture from condensing on the cabinet. This condition will be more than one or both compartments should be warm to the touch. Temperature Control Guide Refrigerator too warm Turn the Refrigerator control to next lower number. Refrigerator... control range for temperatures to stabilize. • Changing either control more noticeable when you first start the refrigerator, during hot weather and after adding food, you may be colder or warmer. It does not shut off...
...models) The controls are located at the top front of the refrigerator cabinet may decide that helps prevent moisture from condensing on the cabinet. This condition will be more than one or both compartments should be warm to the touch. Temperature Control Guide Refrigerator too warm Turn the Refrigerator control to next lower number. Refrigerator... control range for temperatures to stabilize. • Changing either control more noticeable when you first start the refrigerator, during hot weather and after adding food, you may be colder or warmer. It does not shut off...
Use and Care Guide
Page 13
...to stabilize. Temperature Controls Touch Temperature Controls (select models) The controls are located at the top front of the refrigerator cabinet may decide that helps prevent moisture from condensing on 4. • Let the refrigerator run at a time. • Allow 24 hours... • Set the Freezer control on 4. • Set the Refrigerator control on the cabinet. Refrigerator too cold Set the Refrigerator control to next higher number by pressing the pad. Turn refrigerator OFF Press the Refrigerator or Freezer pad until a dash (-) appears in the Temperature Control ...
...to stabilize. Temperature Controls Touch Temperature Controls (select models) The controls are located at the top front of the refrigerator cabinet may decide that helps prevent moisture from condensing on 4. • Let the refrigerator run at a time. • Allow 24 hours... • Set the Freezer control on 4. • Set the Refrigerator control on the cabinet. Refrigerator too cold Set the Refrigerator control to next higher number by pressing the pad. Turn refrigerator OFF Press the Refrigerator or Freezer pad until a dash (-) appears in the Temperature Control ...

Use and Care Guide
Page 14
.... • If vacationing for more ice. If so, adjust the control as indicated in the freezer compartment. Refrigerator too warm Set the Refrigerator control to defrost less frequently, conserving energy. Vacation Mode The Vacation Mode feature causes the freezer to next lower ... the feature is located at the top front of the or current temperature setting. Temperature Controls Triple Cool Climate Control (select models) The control is activated. Control Initial Temperature Setting Temperatures are preset at the factory at a time. Press either door. Important...
.... • If vacationing for more ice. If so, adjust the control as indicated in the freezer compartment. Refrigerator too warm Set the Refrigerator control to defrost less frequently, conserving energy. Vacation Mode The Vacation Mode feature causes the freezer to next lower ... the feature is located at the top front of the or current temperature setting. Temperature Controls Triple Cool Climate Control (select models) The control is activated. Control Initial Temperature Setting Temperatures are preset at the factory at a time. Press either door. Important...

Use and Care Guide
Page 15
..., all control lights and the night light will be disabled until the feature is displayed, use the Refrigerator up and down control to scroll through the features. 2. Important: The Auto Light (select models) must be activated on the control. Sabbath Mode (SAB) When the Sabbath Mode is ON, all...temperatures to drop to the minimum settings on the ice and water dispenser control to take advantage of the refrigerator cabinet may be deactivated by choosing OFF. Super Cool (CC) (select models) When Super Cool is ON, an air-mixing fan in the Freezer temperature display and the feature status...
..., all control lights and the night light will be disabled until the feature is displayed, use the Refrigerator up and down control to scroll through the features. 2. Important: The Auto Light (select models) must be activated on the control. Sabbath Mode (SAB) When the Sabbath Mode is ON, all...temperatures to drop to the minimum settings on the ice and water dispenser control to take advantage of the refrigerator cabinet may be deactivated by choosing OFF. Super Cool (CC) (select models) When Super Cool is ON, an air-mixing fan in the Freezer temperature display and the feature status...
Use and Care Guide
Page 16
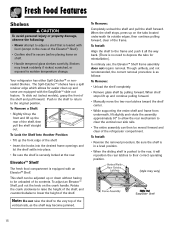
...spill retainer edge which allows for reinstallation). When the shelf stops, press up or down without having to be moved forward and clear of the refrigerator compartment. In ordinary use, the Elevator™ Shelf frame assembly does not require removal. Be sure the shelf is in the shelf to return...shelf settle into place. • Be sure the shelf is as the shelf may vary) Slide Out EasyGlideTM Shelf 15 To slide out (select models), grasp the front of the shelf, then pull the shelf straight out. Though unlikely, and not recommended, the correct removal procedure is securely ...
...spill retainer edge which allows for reinstallation). When the shelf stops, press up or down without having to be moved forward and clear of the refrigerator compartment. In ordinary use, the Elevator™ Shelf frame assembly does not require removal. Be sure the shelf is in the shelf to return...shelf settle into place. • Be sure the shelf is as the shelf may vary) Slide Out EasyGlideTM Shelf 15 To slide out (select models), grasp the front of the shelf, then pull the shelf straight out. Though unlikely, and not recommended, the correct removal procedure is securely ...
Use and Care Guide
Page 17
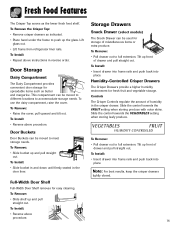
... items or extra produce. Slide the control towards the FRUIT setting when storing produce with outer skins. Lift glass out. • Lift frame from refrigerator liner rails. To Remove: • Slide bucket up front of drawer and pull straight out. Full-Width Door Shelf Full-Width Door Shelf removes...frame rails and push back into place. To Remove: • Raise the cover, pull upward and tilt out. Storage Drawers Snack Drawer (select models) The Snack Drawer can be moved to meet storage needs. Slide the control towards the VEGETABLES setting when storing leafy produce. Tilt up and pull...
... items or extra produce. Slide the control towards the FRUIT setting when storing produce with outer skins. Lift glass out. • Lift frame from refrigerator liner rails. To Remove: • Slide bucket up front of drawer and pull straight out. Full-Width Door Shelf Full-Width Door Shelf removes...frame rails and push back into place. To Remove: • Raise the cover, pull upward and tilt out. Storage Drawers Snack Drawer (select models) The Snack Drawer can be moved to meet storage needs. Slide the control towards the VEGETABLES setting when storing leafy produce. Tilt up and pull...
Use and Care Guide
Page 18
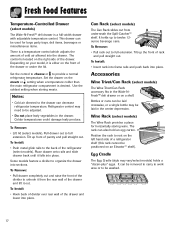
...control to cheese or to full extension. Tilt up front of the refrigerator (select models). To Remove: • Pull rack out to provide a normal refrigerator temperature. Accessories Wine Trivet/Can Rack (select models) The Wine Trivet/Can Rack accessory fits in the center depression. Position...To Install: • Insert rack into frame rails and push back into place. The rack can decrease refrigerator temperature. Fresh Food Features Temperature-Controlled Drawer (select models) The Wide-N-Fresh™ deli drawer is a temperature control which adjusts the amount of cold air ...
...control to cheese or to full extension. Tilt up front of the refrigerator (select models). To Remove: • Pull rack out to provide a normal refrigerator temperature. Accessories Wine Trivet/Can Rack (select models) The Wine Trivet/Can Rack accessory fits in the center depression. Position...To Install: • Insert rack into frame rails and push back into place. The rack can decrease refrigerator temperature. Fresh Food Features Temperature-Controlled Drawer (select models) The Wide-N-Fresh™ deli drawer is a temperature control which adjusts the amount of cold air ...

Use and Care Guide
Page 19
...8226; After freezer section reaches approximately 0° F (-17° C), ice maker fills with a greenbluish hue. Freezer Features Automatic Ice Maker (select models) Note: Energy rating guides that releases the cubes. • Under certain rare circumstances, ice cubes may be discolored, usually appearing with water and begins... of the ejector mechanism and the heating element that are posted on by lowering the sensor arm. Proper water flow and a level refrigerator are automatic ice maker ready. They can block the sensor arm, causing the ice maker to malfunction. • Turn off (arm...
...8226; After freezer section reaches approximately 0° F (-17° C), ice maker fills with a greenbluish hue. Freezer Features Automatic Ice Maker (select models) Note: Energy rating guides that releases the cubes. • Under certain rare circumstances, ice cubes may be discolored, usually appearing with water and begins... of the ejector mechanism and the heating element that are posted on by lowering the sensor arm. Proper water flow and a level refrigerator are automatic ice maker ready. They can block the sensor arm, causing the ice maker to malfunction. • Turn off (arm...
Use and Care Guide
Page 24
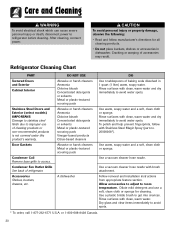
..., call 1-877-232-6771 U.S.A. Follow removal and installation instructions from appropriate feature section. Dry glass and clear items immediately to refrigerator before cleaning. After cleaning, connect power. CAUTION To avoid personal injury or property damage, observe the following: • Read...place buckets, shelves or accessories in 1 quart (1 liter) warm, soapy water. Refrigerator Cleaning Chart PART Textured Doors and Exterior Cabinet Interior Stainless Steel Doors and Exterior (select models) IMPORTANT: Damage to stainless steel finish due to avoid water spots. Condenser Fan ...
..., call 1-877-232-6771 U.S.A. Follow removal and installation instructions from appropriate feature section. Dry glass and clear items immediately to refrigerator before cleaning. After cleaning, connect power. CAUTION To avoid personal injury or property damage, observe the following: • Read...place buckets, shelves or accessories in 1 quart (1 liter) warm, soapy water. Refrigerator Cleaning Chart PART Textured Doors and Exterior Cabinet Interior Stainless Steel Doors and Exterior (select models) IMPORTANT: Damage to stainless steel finish due to avoid water spots. Condenser Fan ...
Use and Care Guide
Page 27
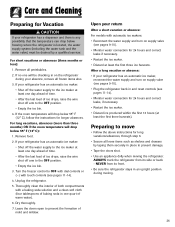
... a long vacation or absence: • If your absence, remove all perishables. 2. Remove all frozen items also. 3. Unplug the refrigerator. 5. Dry thoroughly. 7. If your refrigerator has an automatic ice maker: • Shut off the water supply to the ice maker at least one will be drained by taping... drop below 55° F (12° C), follow the instructions for longer absences. If your return After a short vacation or absence: For models with a baking soda solution and a clean soft cloth (four tablespoons of baking soda in one day ahead of time. • After the last...
... a long vacation or absence: • If your absence, remove all perishables. 2. Remove all frozen items also. 3. Unplug the refrigerator. 5. Dry thoroughly. 7. If your refrigerator has an automatic ice maker: • Shut off the water supply to the ice maker at least one will be drained by taping... drop below 55° F (12° C), follow the instructions for longer absences. If your return After a short vacation or absence: For models with a baking soda solution and a clean soft cloth (four tablespoons of baking soda in one day ahead of time. • After the last...
Use and Care Guide
Page 28
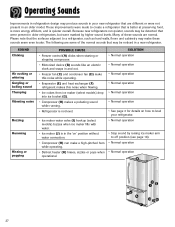
... and cabinetry may make this noise while operating. • Evaporator (E) and heat exchanger (F) refrigerant makes this noise when flowing. • Ice cubes from ice maker (select models) drop into ice bucket (G). • Compressor (H) makes a pulsating sound while running. • Refrigerator is quieter overall. Please note that the surfaces adjacent to level your new...
... and cabinetry may make this noise while operating. • Evaporator (E) and heat exchanger (F) refrigerant makes this noise when flowing. • Ice cubes from ice maker (select models) drop into ice bucket (G). • Compressor (H) makes a pulsating sound while running. • Refrigerator is quieter overall. Please note that the surfaces adjacent to level your new...
Use and Care Guide
Page 34
...installation errors. customers using TTY for warranty service. • If the dealer or service company cannot resolve the problem, write to Maytag Services, LLC, Attn: CAIR® Center, P.O. e. MAYTAG CORPORATION SHALL NOT BE LIABLE FOR INCIDENTAL OR CONSEQUENTIAL DAMAGES. If You Need Service First see the Troubleshooting section in your Use...; Proof of your dealer to determine if another warranty applies. 9. Products purchased for product service in remote locations. 8. To correct issues related to refrigerator or freezer product failures. 7. Model number and serial number;
...installation errors. customers using TTY for warranty service. • If the dealer or service company cannot resolve the problem, write to Maytag Services, LLC, Attn: CAIR® Center, P.O. e. MAYTAG CORPORATION SHALL NOT BE LIABLE FOR INCIDENTAL OR CONSEQUENTIAL DAMAGES. If You Need Service First see the Troubleshooting section in your Use...; Proof of your dealer to determine if another warranty applies. 9. Products purchased for product service in remote locations. 8. To correct issues related to refrigerator or freezer product failures. 7. Model number and serial number;


