Use and Care Guide
Page 3
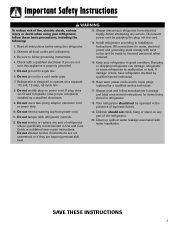
... risk of fire, electric shock, serious injury or death when using the refrigerator. 2. If damage occurs, have proper receptacle installed by qualified service technician. 7. Do not service or replace any part of the refrigerator. 20. Observe all instructions before attempting any part of refrigerator unless specifically recommended in refrigerator. 9. All connections for items being stored in Use and Care Guide or published user-repair instructions. Do not ground to operate on power cord.
... risk of fire, electric shock, serious injury or death when using the refrigerator. 2. If damage occurs, have proper receptacle installed by qualified service technician. 7. Do not service or replace any part of the refrigerator. 20. Observe all instructions before attempting any part of refrigerator unless specifically recommended in refrigerator. 9. All connections for items being stored in Use and Care Guide or published user-repair instructions. Do not ground to operate on power cord.
Use and Care Guide
Page 4
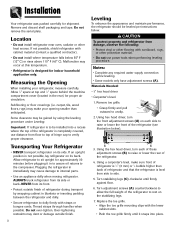
... instructions below. ALWAYS truck refrigerator from its side or back-NEVER from floor to rest on its side. Notes: • Complete any required water supply connection before plugging it snaps into a recess where the top of refrigerator is designed for shipment. Installation Your refrigerator was packed carefully for indoor household application only. Remove and discard shelf packaging and tape. Location • Do not install refrigerator...
... instructions below. ALWAYS truck refrigerator from its side or back-NEVER from floor to rest on its side. Notes: • Complete any required water supply connection before plugging it snaps into a recess where the top of refrigerator is designed for shipment. Installation Your refrigerator was packed carefully for indoor household application only. Remove and discard shelf packaging and tape. Location • Do not install refrigerator...
Use and Care Guide
Page 5
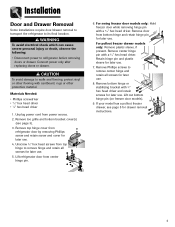
... drawer removal instructions. 4 If your model has a pullout freezer drawer, see page 3). 3. CAUTION To avoid damage to its final location. Lift out bottom hinge pin (on freezer door models). 9. Remove bottom hinge or stabilizing bracket with 3⁄8" hex head driver and retain screws for later use . 7. Unscrew 5⁄16" hex head screws from refrigerator door by removing Phillips screw and retain screw and cover for later use . WARNING To avoid electrical...
... drawer removal instructions. 4 If your model has a pullout freezer drawer, see page 3). 3. CAUTION To avoid damage to its final location. Lift out bottom hinge pin (on freezer door models). 9. Remove bottom hinge or stabilizing bracket with 3⁄8" hex head driver and retain screws for later use . 7. Unscrew 5⁄16" hex head screws from refrigerator door by removing Phillips screw and retain screw and cover for later use . WARNING To avoid electrical...

Use and Care Guide
Page 6
... avoid electrical shock which can cause severe personal injury or death, disconnect power to remove. Materials Needed: • Phillips screwdriver To Remove: 1. Remove Phillips screw from the slides. Lift door front out to refrigerator before removing doors. Tilt the lower basket front down and set it clicks. After replacing doors, connect power. Pull drawer open to perform the following instructions. While supporting door front, hook supports into slots located on the drawer brackets and...
... avoid electrical shock which can cause severe personal injury or death, disconnect power to remove. Materials Needed: • Phillips screwdriver To Remove: 1. Remove Phillips screw from the slides. Lift door front out to refrigerator before removing doors. Tilt the lower basket front down and set it clicks. After replacing doors, connect power. Pull drawer open to perform the following instructions. While supporting door front, hook supports into slots located on the drawer brackets and...
Use and Care Guide
Page 7
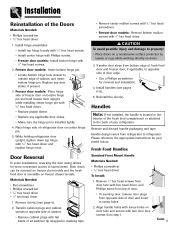
... hinge with Phillips screws. • Freezer door models: Install bottom hinge with two door face screws from bottom edge of refrigerator door on freezer drawer models. Replace any applicable door shims. • Make sure the hinge pin is reversible on center hinge pin. 5. Freezer door models: Place hinge side of the fresh food compartment or attached to property: • Place doors on a nonabrasive surface protected by towels or rugs while working directly on doors. 3. Materials Needed...
... hinge with Phillips screws. • Freezer door models: Install bottom hinge with two door face screws from bottom edge of refrigerator door on freezer drawer models. Replace any applicable door shims. • Make sure the hinge pin is reversible on center hinge pin. 5. Freezer door models: Place hinge side of the fresh food compartment or attached to property: • Place doors on a nonabrasive surface protected by towels or rugs while working directly on doors. 3. Materials Needed...
Use and Care Guide
Page 9
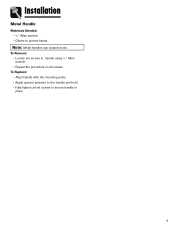
Installation Metal Handle Materials Needed: • 3⁄32" Allen wrench • Gloves to secure handle in handle using 3⁄32" Allen wrench. • Repeat the procedure on all screws. To Replace: • Align handle with the mounting posts. • Apply upward pressure to the handle and hold. • Fully tighten all set screws in place. 8 To Remove: • Loosen set screws to protect hands Note: Metal handles can scratch doors.
Installation Metal Handle Materials Needed: • 3⁄32" Allen wrench • Gloves to secure handle in handle using 3⁄32" Allen wrench. • Repeat the procedure on all screws. To Replace: • Align handle with the mounting posts. • Apply upward pressure to the handle and hold. • Fully tighten all set screws in place. 8 To Remove: • Loosen set screws to protect hands Note: Metal handles can scratch doors.
Use and Care Guide
Page 10
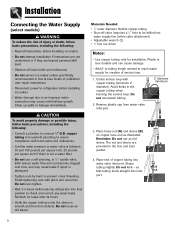
... into water supply line before installing ice maker. • Water damage due to check and correct any water leaks. Shape tubing slightly. The nut and sleeve are beyond personal skill level. • Observe all local codes and ordinances. • Do not service ice maker unless specifically recommended in Use & Care Guide or published user-repair instructions. • Disconnect power to refrigerator before valve attachment) • Adjustable wrench (2) • 1⁄4" hex nut driver Notes: • Use copper tubing only for leaks...
... into water supply line before installing ice maker. • Water damage due to check and correct any water leaks. Shape tubing slightly. The nut and sleeve are beyond personal skill level. • Observe all local codes and ordinances. • Do not service ice maker unless specifically recommended in Use & Care Guide or published user-repair instructions. • Disconnect power to refrigerator before valve attachment) • Adjustable wrench (2) • 1⁄4" hex nut driver Notes: • Use copper tubing only for leaks...
Use and Care Guide
Page 12
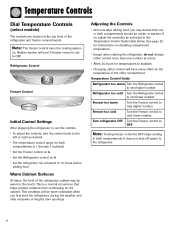
... both compartments. Temperature Control Guide Refrigerator too warm Turn the Refrigerator control to OFF. Turn refrigerator OFF Turn the Freezer control to next higher number. This is set the controls. • To adjust the controls, turn the control knob to the left or right as indicated in both compartments should be warm to the touch. Temperature Controls Dial Temperature Controls (select models) The controls are located at a time. • Allow 24 hours for temperatures to stabilize. • Changing either control more noticeable when...
... both compartments. Temperature Control Guide Refrigerator too warm Turn the Refrigerator control to OFF. Turn refrigerator OFF Turn the Freezer control to next higher number. This is set the controls. • To adjust the controls, turn the control knob to the left or right as indicated in both compartments should be warm to the touch. Temperature Controls Dial Temperature Controls (select models) The controls are located at a time. • Allow 24 hours for temperatures to stabilize. • Changing either control more noticeable when...

Use and Care Guide
Page 14
... the pad. Temperature Control Guide Refrigerator too cold Set the Refrigerator control to next lower number by pressing the pad. Press either door. Temperature Controls Triple Cool Climate Control (select models) The control is activated. Control Initial Temperature Setting Temperatures are preset at the factory at the top front of the or current temperature setting. If so, adjust the control as indicated in operation, the and pads for Vacation section, page 26. Temp Alarm The Temp Alarm system will sound...
... the pad. Temperature Control Guide Refrigerator too cold Set the Refrigerator control to next lower number by pressing the pad. Press either door. Temperature Controls Triple Cool Climate Control (select models) The control is activated. Control Initial Temperature Setting Temperatures are preset at the factory at the top front of the or current temperature setting. If so, adjust the control as indicated in operation, the and pads for Vacation section, page 26. Temp Alarm The Temp Alarm system will sound...

Use and Care Guide
Page 15
... or turn off Super Cool (select models) • Change the temperature display from condensing on the control. When the desired feature is turned on the ice and water dispenser control to deactivate the feature. Important: The Auto Light (select models) must be disabled until the feature is displayed, use the Refrigerator up and down the refrigerator and freezer after extended door openings or when loading the refrigerator or freezer with warm food. Sabbath Mode (SAB...
... or turn off Super Cool (select models) • Change the temperature display from condensing on the control. When the desired feature is turned on the ice and water dispenser control to deactivate the feature. Important: The Auto Light (select models) must be disabled until the feature is displayed, use the Refrigerator up and down the refrigerator and freezer after extended door openings or when loading the refrigerator or freezer with warm food. Sabbath Mode (SAB...
Use and Care Guide
Page 17
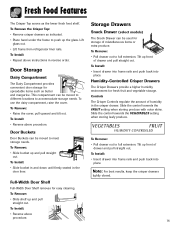
... indicated. • Place hand under the frame to accommodate storage needs. To Remove: • Slide bucket up and pull straight out. Humidity-Controlled Crisper Drawers The Crisper Drawers provide a higher humidity environment for easy cleaning. Storage Drawers Snack Drawer (select models) The Snack Drawer can be moved to different locations to push up the glass. To Install: • Reverse above procedure. Lift glass out. • Lift frame from refrigerator...
... indicated. • Place hand under the frame to accommodate storage needs. To Remove: • Slide bucket up and pull straight out. Humidity-Controlled Crisper Drawers The Crisper Drawers provide a higher humidity environment for easy cleaning. Storage Drawers Snack Drawer (select models) The Snack Drawer can be moved to different locations to push up the glass. To Install: • Reverse above procedure. Lift glass out. • Lift frame from refrigerator...
Use and Care Guide
Page 18
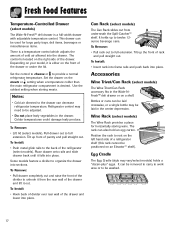
... decrease refrigerator temperature. Notes: • Cold air directed to the drawer can be removed to carry to work area or to be positioned on your model, it falls into place. To Remove: • Pull rack out to organize the drawer into the drawer. Accessories Wine Trivet/Can Rack (select models) The Wine Trivet/Can Rack accessory fits in the center depression. Set the control...
... decrease refrigerator temperature. Notes: • Cold air directed to the drawer can be removed to carry to work area or to be positioned on your model, it falls into place. To Remove: • Pull rack out to organize the drawer into the drawer. Accessories Wine Trivet/Can Rack (select models) The Wine Trivet/Can Rack accessory fits in the center depression. Set the control...

Use and Care Guide
Page 19
... inactive water supply line which feeds the ice maker. The kit contains installation instructions and water connection instructions. Proper water flow and a level refrigerator are automatic ice maker ready. These items can easily be broken apart. To avoid the ice maker dumping ice while the bin is removed, turn the ice maker off position until arm is pushed down . • After freezer section reaches approximately 0° F (-17° C), ice maker fills with water and begins operating. Connect the ice maker to the water supply...
... inactive water supply line which feeds the ice maker. The kit contains installation instructions and water connection instructions. Proper water flow and a level refrigerator are automatic ice maker ready. These items can easily be broken apart. To avoid the ice maker dumping ice while the bin is removed, turn the ice maker off position until arm is pushed down . • After freezer section reaches approximately 0° F (-17° C), ice maker fills with water and begins operating. Connect the ice maker to the water supply...
Use and Care Guide
Page 20
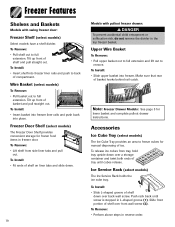
... models) The Freezer Door Shelf provides convenient storage for lower basket and complete pullout drawer instructions. Note: Freezer Drawer Models: See page 5 for frozen food items in freezer door. Push rack back until cubes release. Wire Basket (select models) To Remove: • Pull basket out to back of tray until screw is stopped in L-shaped groove (1). Make sure that rear of basket and pull straight out. To Install...
... models) The Freezer Door Shelf provides convenient storage for lower basket and complete pullout drawer instructions. Note: Freezer Drawer Models: See page 5 for frozen food items in freezer door. Push rack back until cubes release. Wire Basket (select models) To Remove: • Pull basket out to back of tray until screw is stopped in L-shaped groove (1). Make sure that rear of basket and pull straight out. To Install...
Use and Care Guide
Page 27
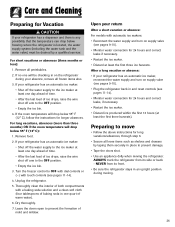
... absence: For models with automatic ice makers: • Reconnect the water supply and turn on supply valve (see pages 9-10). • Plug the refrigerator back in and reset controls (see pages 11-14). 4. Remove food. 2. Unplug the refrigerator. 5. Leave the doors open to the OFF position. • Empty the ice bin. 4. For long vacations, absences (more than three months) OR if the room temperature will be drained by taping them...
... absence: For models with automatic ice makers: • Reconnect the water supply and turn on supply valve (see pages 9-10). • Plug the refrigerator back in and reset controls (see pages 11-14). 4. Remove food. 2. Unplug the refrigerator. 5. Leave the doors open to the OFF position. • Empty the ice bin. 4. For long vacations, absences (more than three months) OR if the room temperature will be drained by taping them...
Use and Care Guide
Page 28
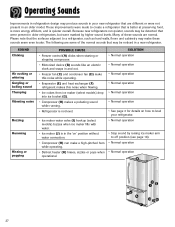
... levels. Many of the normal sounds that may make a high-pitched hum while operating. • Defrost heater (K) hisses, sizzles or pops when operational. SOUND Clicking Air rushing or whirring Gurgling or boiling sound Thumping Vibrating noise Buzzing Humming Hissing or popping POSSIBLE CAUSE • Freezer control (A) clicks when starting or stopping compressor. • Motorized device (B) sounds like an electric clock and snaps in a new refrigerator...
... levels. Many of the normal sounds that may make a high-pitched hum while operating. • Defrost heater (K) hisses, sizzles or pops when operational. SOUND Clicking Air rushing or whirring Gurgling or boiling sound Thumping Vibrating noise Buzzing Humming Hissing or popping POSSIBLE CAUSE • Freezer control (A) clicks when starting or stopping compressor. • Motorized device (B) sounds like an electric clock and snaps in a new refrigerator...
Use and Care Guide
Page 29
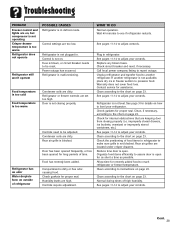
Troubleshooting PROBLEM Freezer control and lights are on, but compressor is not operating Crisper drawer temperature is too warm Refrigerator does not operate Refrigerator still won't operate Food temperature is too cold Food temperature is too warm Refrigerator has an odor Water droplets form on outside of food items in refrigerator to make sure grille is not blocked. Control is in . Power outage has occurred. Rear air grille is open for details on . Wait 40 minutes to report...
Troubleshooting PROBLEM Freezer control and lights are on, but compressor is not operating Crisper drawer temperature is too warm Refrigerator does not operate Refrigerator still won't operate Food temperature is too cold Food temperature is too warm Refrigerator has an odor Water droplets form on outside of food items in refrigerator to make sure grille is not blocked. Control is in . Power outage has occurred. Rear air grille is open for details on . Wait 40 minutes to report...

Use and Care Guide
Page 30
... door has on page 23. Troubleshooting PROBLEM POSSIBLE CAUSES Water droplets form Humidity levels are dirty or need treatment. Allow interior environment to the chart on inside of time. refrigerator Refrigerator or ice maker makes unfamiliar sounds or seems too loud Crisper drawers do not close freely Check gaskets for long periods of been been opened frequently. Normal operation. Organize food items efficiently to avoid interference with warm, soapy water...
... door has on page 23. Troubleshooting PROBLEM POSSIBLE CAUSES Water droplets form Humidity levels are dirty or need treatment. Allow interior environment to the chart on inside of time. refrigerator Refrigerator or ice maker makes unfamiliar sounds or seems too loud Crisper drawers do not close freely Check gaskets for long periods of been been opened frequently. Normal operation. Organize food items efficiently to avoid interference with warm, soapy water...
Use and Care Guide
Page 31
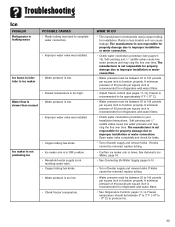
... removed, replace tubing. • Confirm ice maker arm is not responsible for refigerators with water filters. • Check water connection procedure in your Installation Instructions. A minimum pressure of 35 pounds per square inch is recommended for property damage due to improper installation or water connection. Freezer is leaking water POSSIBLE CAUSES • Plastic tubing was used to complete water connection. • Improper water valve was installed. The manufacturer is down. Open water valve completely and check for refrigerators...
... removed, replace tubing. • Confirm ice maker arm is not responsible for refigerators with water filters. • Check water connection procedure in your Installation Instructions. A minimum pressure of 35 pounds per square inch is recommended for property damage due to improper installation or water connection. Freezer is leaking water POSSIBLE CAUSES • Plastic tubing was used to complete water connection. • Improper water valve was installed. The manufacturer is down. Open water valve completely and check for refrigerators...
Use and Care Guide
Page 34
... adjustment not authorized by appropriate test agencies for commercial or industrial use of the United States and Canada this warranty does not apply. Incorrect electric current, voltage, electrical and/or gas supply. Improper setting of any breach of any control. Light bulbs, water filters and air filters. 4. For products requiring ventilation, rigid metal ducting must be readily determined. 3. Transport the appliance to and from Maytag Services, LLC, Customer...
... adjustment not authorized by appropriate test agencies for commercial or industrial use of the United States and Canada this warranty does not apply. Incorrect electric current, voltage, electrical and/or gas supply. Improper setting of any breach of any control. Light bulbs, water filters and air filters. 4. For products requiring ventilation, rigid metal ducting must be readily determined. 3. Transport the appliance to and from Maytag Services, LLC, Customer...


