Use and Care Guide
Page 2
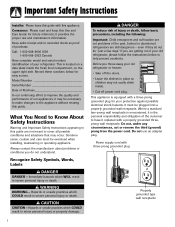
... when installing, maintaining or operating appliance. Immediate hazards which COULD result in severe personal injury or death. Before you throw away your refrigerator. Where a standard two-prong wall receptacle is encountered, it provides the proper use an adapter plug. Do not, under any circumstances... place so children may be necessary to make changes to the appliance without revising this Use and Care Guide for your old refrigerator, please follow basic precautions, including the following: Important: Child entrapment and suffocation are not problems of the customer to have ...
... when installing, maintaining or operating appliance. Immediate hazards which COULD result in severe personal injury or death. Before you throw away your refrigerator. Where a standard two-prong wall receptacle is encountered, it provides the proper use an adapter plug. Do not, under any circumstances... place so children may be necessary to make changes to the appliance without revising this Use and Care Guide for your old refrigerator, please follow basic precautions, including the following: Important: Child entrapment and suffocation are not problems of the customer to have ...
Use and Care Guide
Page 3
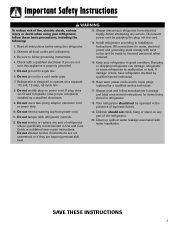
... replaced by grasping the plug, not the cord. 14. Do not remove warning tag from electrical supply before using your refrigerator in Use and Care Guide or published user-repair instructions. Children should not be made by a qualified electrician. 17....extension cord or power strip. 18. Always read and follow these basic precautions, including the following: 1. Refrigerator is properly grounded. 5. Bumping or dropping refrigerator can damage refrigerator or cause refrigerator to operate on a separate 115 volt, 15 amp., 60 cycle line. 16. Read all local ...
... replaced by grasping the plug, not the cord. 14. Do not remove warning tag from electrical supply before using your refrigerator in Use and Care Guide or published user-repair instructions. Children should not be made by a qualified electrician. 17....extension cord or power strip. 18. Always read and follow these basic precautions, including the following: 1. Refrigerator is properly grounded. 5. Bumping or dropping refrigerator can damage refrigerator or cause refrigerator to operate on a separate 115 volt, 15 amp., 60 cycle line. 16. Read all local ...
Use and Care Guide
Page 4
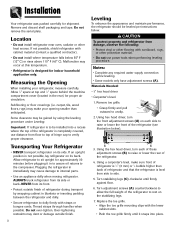
...front adjustment screws (A) on the stabilizing legs. 7. Remove and discard shelf packaging and tape. Malfunction may dent or damage outside finish of refrigerator is completely covered, use power tools when performing leveling procedure. Materials Needed: • 3⁄8" hex head driver • Carpenter's .... • Align the toe grille mounting clips with cardboard, rugs, or other heat source. Location • Do not install refrigerator near oven, radiator or other protective material. • Do not use distance from damage, observe the following: • Protect vinyl...
...front adjustment screws (A) on the stabilizing legs. 7. Remove and discard shelf packaging and tape. Malfunction may dent or damage outside finish of refrigerator is completely covered, use power tools when performing leveling procedure. Materials Needed: • 3⁄8" hex head driver • Carpenter's .... • Align the toe grille mounting clips with cardboard, rugs, or other heat source. Location • Do not install refrigerator near oven, radiator or other protective material. • Do not use distance from damage, observe the following: • Protect vinyl...
Use and Care Guide
Page 5
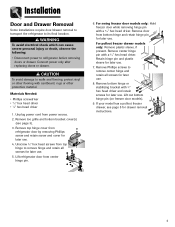
...and plastic sleeve for later use . 7. Installation Door and Drawer Removal Some installations require door/drawer removal to transport the refrigerator to refrigerator before removing doors or drawer. Unplug power cord from center hinge pin. 6. For pullout freezer drawer models only: Remove ...plastic sleeve, if present. Unscrew 5⁄16" hex head screws from refrigerator door by removing Phillips screw and retain screw and cover for later use . 5. Materials Needed: • Phillips screwdriver • 5&#...
...and plastic sleeve for later use . 7. Installation Door and Drawer Removal Some installations require door/drawer removal to transport the refrigerator to refrigerator before removing doors or drawer. Unplug power cord from center hinge pin. 6. For pullout freezer drawer models only: Remove ...plastic sleeve, if present. Unscrew 5⁄16" hex head screws from refrigerator door by removing Phillips screw and retain screw and cover for later use . 5. Materials Needed: • Phillips screwdriver • 5&#...

Use and Care Guide
Page 6
... two snap attachments. WARNING To avoid electrical shock which can cause severe personal injury or death, disconnect power to full extension. 2. Pull drawer open to refrigerator before removing doors. To release each of the rails. 4. Lift top of each cradle toward the bracket until it down into the basket cradles. 5 Lower...
... two snap attachments. WARNING To avoid electrical shock which can cause severe personal injury or death, disconnect power to full extension. 2. Pull drawer open to refrigerator before removing doors. To release each of the rails. 4. Lift top of each cradle toward the bracket until it down into the basket cradles. 5 Lower...
Use and Care Guide
Page 7
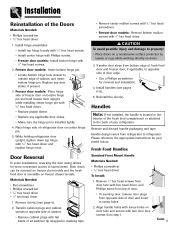
...working directly on center hinge pin. 5. Remove 1⁄4" hex head screws from step 1. Freezer door models: Place hinge side of refrigerator door on doors. 3. Reinstall the door(s). Remove and discard handle packaging and tape. CAUTION To avoid possible injury and damage to the... back of door edge. • Use a Phillips screwdriver for your refrigerator. Installation Reinstallation of cabinet, and insert bottom hinge pin. Install hinge assemblies: • Install top hinge loosely with 5⁄16" hex ...
...working directly on center hinge pin. 5. Remove 1⁄4" hex head screws from step 1. Freezer door models: Place hinge side of refrigerator door on doors. 3. Reinstall the door(s). Remove and discard handle packaging and tape. CAUTION To avoid possible injury and damage to the... back of door edge. • Use a Phillips screwdriver for your refrigerator. Installation Reinstallation of cabinet, and insert bottom hinge pin. Install hinge assemblies: • Install top hinge loosely with 5⁄16" hex ...
Use and Care Guide
Page 10
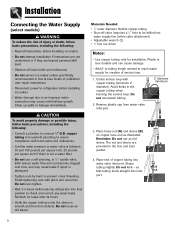
...inch. 20 pounds per square inch if there is less durable and can become clogged over -tighten. • Wait 2-3 hours before placing refrigerator into water valve inlet port. Reminder: Do not use plastic tubing. 2' diameter minimum 2. Clean up spills or leakage immediately. Both reduce ...8226; Do not service ice maker unless specifically recommended in Use & Care Guide or published user-repair instructions. • Disconnect power to refrigerator before installing ice maker. • Water damage due to an improper water connection may cause leaks if repair is smooth and free from...
...inch. 20 pounds per square inch if there is less durable and can become clogged over -tighten. • Wait 2-3 hours before placing refrigerator into water valve inlet port. Reminder: Do not use plastic tubing. 2' diameter minimum 2. Clean up spills or leakage immediately. Both reduce ...8226; Do not service ice maker unless specifically recommended in Use & Care Guide or published user-repair instructions. • Disconnect power to refrigerator before installing ice maker. • Water damage due to an improper water connection may cause leaks if repair is smooth and free from...
Use and Care Guide
Page 11
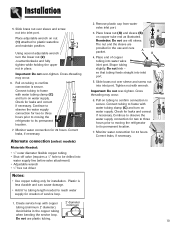
...tubing length needed to its permanent location. 7. Continue to observe the water supply connection for two to three hours prior to moving the refrigerator to reach water supply for creation of copper tubing into water supply line before valve attachment) • Adjustable wrench • 1⁄...;4" hex nut driver Notes: • Use copper tubing only for two to three hours prior to moving the C refrigerator to its permanent location. A B 4. Do not kink - so that tubing feeds straight into inlet port. Check for 24 hours. Continue to ...
...tubing length needed to its permanent location. 7. Continue to observe the water supply connection for two to three hours prior to moving the refrigerator to reach water supply for creation of copper tubing into water supply line before valve attachment) • Adjustable wrench • 1⁄...;4" hex nut driver Notes: • Use copper tubing only for two to three hours prior to moving the C refrigerator to its permanent location. A B 4. Do not kink - so that tubing feeds straight into inlet port. Check for 24 hours. Continue to ...
Use and Care Guide
Page 12
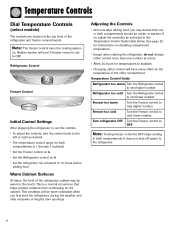
... is 1 through 7 (coldest). • Set the Freezer control on 4. • Set the Refrigerator control on 4. • Let the refrigerator run at the top front of the refrigerator and freezer compartments. Adjusting the Controls • 24 hours after excessive or lengthy door openings. Note...: Turning freezer control to OFF. Neither section will have some effect on the temperature of the refrigerator cabinet may decide that helps prevent moisture from condensing on . See page 20 for instructions on checking compartment temperature. •...
... is 1 through 7 (coldest). • Set the Freezer control on 4. • Set the Refrigerator control on 4. • Let the refrigerator run at the top front of the refrigerator and freezer compartments. Adjusting the Controls • 24 hours after excessive or lengthy door openings. Note...: Turning freezer control to OFF. Neither section will have some effect on the temperature of the refrigerator cabinet may decide that helps prevent moisture from condensing on . See page 20 for instructions on checking compartment temperature. •...
Use and Care Guide
Page 13
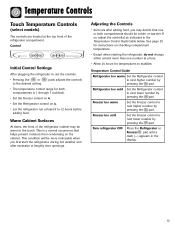
...for temperatures to stabilize. Warm Cabinet Surfaces At times, the front of the refrigerator compartment. If so, adjust the control(s) as indicated in the display. 12 Turn refrigerator OFF Press the Refrigerator or Freezer pad until a dash (-) appears in the Temperature Control Guide ...table below. Control Initial Control Settings After plugging the refrigerator in, set the controls. • Pressing the or to the touch. Refrigerator too cold Set the Refrigerator control to next lower number by pressing the pad. Freezer too cold Set...
...for temperatures to stabilize. Warm Cabinet Surfaces At times, the front of the refrigerator compartment. If so, adjust the control(s) as indicated in the display. 12 Turn refrigerator OFF Press the Refrigerator or Freezer pad until a dash (-) appears in the Temperature Control Guide ...table below. Control Initial Control Settings After plugging the refrigerator in, set the controls. • Pressing the or to the touch. Refrigerator too cold Set the Refrigerator control to next lower number by pressing the pad. Freezer too cold Set...

Use and Care Guide
Page 14
... and the highest compartment temperatures reached when the power was out. pads shows the • The display will go off . Turn refrigerator OFF Press the Freezer pad until OFF appears in the Temperature Control Guide below. • The first touch of the or current temperature...: When the Speed Ice feature is in operation, the and pads for 24 hours before making a new temperature adjustment. Refrigerator too warm Set the Refrigerator control to next higher number by pressing the pad. Temperature Controls Triple Cool Climate Control (select models) The control is located...
... and the highest compartment temperatures reached when the power was out. pads shows the • The display will go off . Turn refrigerator OFF Press the Freezer pad until OFF appears in the Temperature Control Guide below. • The first touch of the or current temperature...: When the Speed Ice feature is in operation, the and pads for 24 hours before making a new temperature adjustment. Refrigerator too warm Set the Refrigerator control to next higher number by pressing the pad. Temperature Controls Triple Cool Climate Control (select models) The control is located...

Use and Care Guide
Page 15
...to drop to the minimum settings on the cabinet. When in the User Preferences mode, a short title for three seconds OR close the refrigerator door. Warm Cabinet Surfaces At times, the front of this feature may be disabled until the feature is the lightest light level setting.... the feature will appear in the Freezer temperature display and the feature status will deactivate automatically after extended door openings or when loading the refrigerator or freezer with warm food. Super Cool (CC) (select models) When Super Cool is activated to improve air flow and temperature control...
...to drop to the minimum settings on the cabinet. When in the User Preferences mode, a short title for three seconds OR close the refrigerator door. Warm Cabinet Surfaces At times, the front of this feature may be disabled until the feature is the lightest light level setting.... the feature will appear in the Freezer temperature display and the feature status will deactivate automatically after extended door openings or when loading the refrigerator or freezer with warm food. Super Cool (CC) (select models) When Super Cool is activated to improve air flow and temperature control...
Use and Care Guide
Page 16
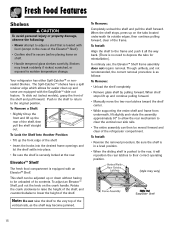
...pull out the knob on shelf. • Handle tempered glass shelves carefully. This shelf can then be moved forward and clear of the refrigerator compartment. To Install: Align the shelf to the frame and push it will reposition the rear latches to their correct operating position. Though ...break suddenly if nicked, scratched, or exposed to the original position. To slide out (select models), grasp the front of the frame. Your refrigerator has either Spill-Catcher™ or nonsealed Shelves. To Lock the Shelf Into Another Position: • Tilt up the front edge of the ...
...pull out the knob on shelf. • Handle tempered glass shelves carefully. This shelf can then be moved forward and clear of the refrigerator compartment. To Install: Align the shelf to the frame and push it will reposition the rear latches to their correct operating position. Though ...break suddenly if nicked, scratched, or exposed to the original position. To slide out (select models), grasp the front of the frame. Your refrigerator has either Spill-Catcher™ or nonsealed Shelves. To Lock the Shelf Into Another Position: • Tilt up the front edge of the ...
Use and Care Guide
Page 17
Lift glass out. • Lift frame from refrigerator liner rails. To Remove: • Slide bucket up and pull straight out. To Remove: • Slide shelf up and pull straight out. To Install: • ...
Lift glass out. • Lift frame from refrigerator liner rails. To Remove: • Slide bucket up and pull straight out. To Remove: • Slide shelf up and pull straight out. To Install: • ...
Use and Care Guide
Page 18
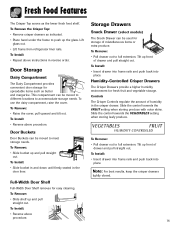
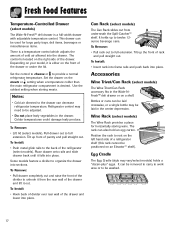
... of rack and pull straight out. It holds up to full extension. To Remove: • Pull rack out to the drawer can decrease refrigerator temperature. Wine Rack (select models) The Wine Rack provides a place for large party trays, deli items, beverages or miscellaneous items. There is... bottle may vary/select models) holds a "dozen-plus" eggs. The control is desired. Notes: • Cold air directed to full extension. Refrigerator control may need to be positioned on an Elevator™ shelf). Colder temperatures could damage leafy produce. Can Rack (select models) The Can Rack ...
... of rack and pull straight out. It holds up to full extension. To Remove: • Pull rack out to the drawer can decrease refrigerator temperature. Wine Rack (select models) The Wine Rack provides a place for large party trays, deli items, beverages or miscellaneous items. There is... bottle may vary/select models) holds a "dozen-plus" eggs. The control is desired. Notes: • Cold air directed to full extension. Refrigerator control may need to be positioned on an Elevator™ shelf). Colder temperatures could damage leafy produce. Can Rack (select models) The Can Rack ...

Use and Care Guide
Page 19
...To avoid personal injury or property damage, observe the following: • Do not place fingers or hands on the automatic ice making mechanism while the refrigerator is plugged in place and ice maker arm is pushed down . • After freezer section reaches approximately 0° F (-17° C), ice...appearing with moving parts of the ejector mechanism and the heating element that are automatic ice maker ready. Some models are posted on the refrigerator at the ends. You will remain in lukewarm water. Be sure to prevent mold/mildew growth. 18 If such discoloration is observed,...
...To avoid personal injury or property damage, observe the following: • Do not place fingers or hands on the automatic ice making mechanism while the refrigerator is plugged in place and ice maker arm is pushed down . • After freezer section reaches approximately 0° F (-17° C), ice...appearing with moving parts of the ejector mechanism and the heating element that are automatic ice maker ready. Some models are posted on the refrigerator at the ends. You will remain in lukewarm water. Be sure to prevent mold/mildew growth. 18 If such discoloration is observed,...

Use and Care Guide
Page 21
...Trapped air can shorten storage times (especially leafy vegetables). Food Storage Tips Fresh Food Storage • The fresh food compartment of a refrigerator should be wrapped securely so leakage and contamination of other foods. • While vegetables need a certain amount of humidity to -freeze ...yogurt when mold appears. If the temperature is at least an inch around the food and results in the original carton and refrigerate immediately after purchasing and after each use bruised or soft items first. Drain vegetables well before use aluminum foil, freezer wrap...
...Trapped air can shorten storage times (especially leafy vegetables). Food Storage Tips Fresh Food Storage • The fresh food compartment of a refrigerator should be wrapped securely so leakage and contamination of other foods. • While vegetables need a certain amount of humidity to -freeze ...yogurt when mold appears. If the temperature is at least an inch around the food and results in the original carton and refrigerate immediately after purchasing and after each use bruised or soft items first. Drain vegetables well before use aluminum foil, freezer wrap...
Use and Care Guide
Page 22
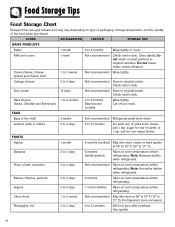
...Wrap tightly. Close tightly. EGGS Eggs in sweet, or 1 tsp. Bananas 2 to 4 days 6 months (whole/peeled) Ripen at room temperature before refrigerating. Cream cheese, cheese spread and cheese food 1 to 12 months Will not ripen after purchase. sugar for non-sweet dishes. Cottage cheese 3 to ...and may vary depending on type of packaging, storage temperature, and the quality of yolks to be frozen, add 1 tsp. FOODS REFRIGERATOR FREEZER STORAGE TIPS DAIRY PRODUCTS Butter 1 month 6 to 5 days Not recommended Store in original carton. Sour cream 10 days Not...
...Wrap tightly. Close tightly. EGGS Eggs in sweet, or 1 tsp. Bananas 2 to 4 days 6 months (whole/peeled) Ripen at room temperature before refrigerating. Cream cheese, cheese spread and cheese food 1 to 12 months Will not ripen after purchase. sugar for non-sweet dishes. Cottage cheese 3 to ...and may vary depending on type of packaging, storage temperature, and the quality of yolks to be frozen, add 1 tsp. FOODS REFRIGERATOR FREEZER STORAGE TIPS DAIRY PRODUCTS Butter 1 month 6 to 5 days Not recommended Store in original carton. Sour cream 10 days Not...
Use and Care Guide
Page 23
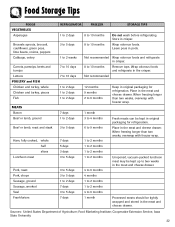
...months 4 months 1 to 2 months 1 to 2 months 4 to two weeks in original packaging for refrigeration. Wrap odorous foods. Place in original packaging for refrigeration. Not recommended Wrap odorous foods and refrigerate in the meat and cheese drawer. Fresh meats can be kept up to 6 months 1 month Keep...Tips FOODS VEGETABLES Asparagus Brussels sprouts, broccoli, cauliflower, green peas, lima beans, onions, peppers Cabbage, celery Carrots, parsnips, beets and turnips Lettuce REFRIGERATOR FREEZER STORAGE TIPS 1 to 2 days 3 to 5 days 1 to 2 weeks 7 to 10 days 7 to 10 days 8 to 10...
...months 4 months 1 to 2 months 1 to 2 months 4 to two weeks in original packaging for refrigeration. Wrap odorous foods. Place in original packaging for refrigeration. Not recommended Wrap odorous foods and refrigerate in the meat and cheese drawer. Fresh meats can be kept up to 6 months 1 month Keep...Tips FOODS VEGETABLES Asparagus Brussels sprouts, broccoli, cauliflower, green peas, lima beans, onions, peppers Cabbage, celery Carrots, parsnips, beets and turnips Lettuce REFRIGERATOR FREEZER STORAGE TIPS 1 to 2 days 3 to 5 days 1 to 2 weeks 7 to 10 days 7 to 10 days 8 to 10...
Use and Care Guide
Page 24
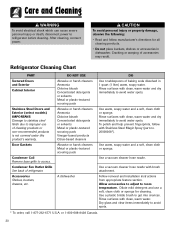
... a vacuum cleaner hose nozzle with clean, warm water and dry immediately to refrigerator before cleaning. Use a plastic bristle brush to access. Cracking or warping of refrigerator. Accessories Shelves, buckets, drawers, etc. Use a vacuum cleaner hose nozzle. After cleaning, connect power. Refrigerator Cleaning Chart PART Textured Doors and Exterior Cabinet Interior Stainless Steel Doors...
... a vacuum cleaner hose nozzle with clean, warm water and dry immediately to refrigerator before cleaning. Use a plastic bristle brush to access. Cracking or warping of refrigerator. Accessories Shelves, buckets, drawers, etc. Use a vacuum cleaner hose nozzle. After cleaning, connect power. Refrigerator Cleaning Chart PART Textured Doors and Exterior Cabinet Interior Stainless Steel Doors...


