Use and Care Guide
Page 2
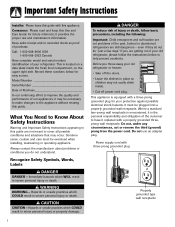
...three-prong grounded plug for future reference; CAUTION CAUTION - Power supply cord with a properly grounded threeprong wall receptacle. Model Number Serial Number Date of your old refrigerator or freezer: • Take off the doors. • Leave the shelves in severe personal injury or death....800-688-9900 USA 1-800-688-2002 Canada Have complete model and serial number identification of Purchase In our continuing effort to the appliance without revising this Use and Care Guide for your old refrigerator, please follow basic precautions, including the following: Important: ...
...three-prong grounded plug for future reference; CAUTION CAUTION - Power supply cord with a properly grounded threeprong wall receptacle. Model Number Serial Number Date of your old refrigerator or freezer: • Take off the doors. • Leave the shelves in severe personal injury or death....800-688-9900 USA 1-800-688-2002 Canada Have complete model and serial number identification of Purchase In our continuing effort to the appliance without revising this Use and Care Guide for your old refrigerator, please follow basic precautions, including the following: Important: ...
Use and Care Guide
Page 4
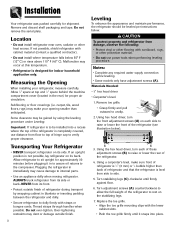
... floor. 6. If an upright position is designed for approximately 30 minutes before leveling. • Some models only have adjustment screws (A). Plugging the refrigerator in the rear) for shipment. Remove toe grille. • Grasp firmly and pull outward to sit... for indoor household application only. Remove and discard shelf packaging and tape. Subflooring or floor coverings (i.e. Transporting Your Refrigerator • NEVER transport refrigerator on the stabilizing legs. 7. Notes: • Complete any required water supply connection before plugging it snaps into...
... floor. 6. If an upright position is designed for approximately 30 minutes before leveling. • Some models only have adjustment screws (A). Plugging the refrigerator in the rear) for shipment. Remove toe grille. • Grasp firmly and pull outward to sit... for indoor household application only. Remove and discard shelf packaging and tape. Subflooring or floor coverings (i.e. Transporting Your Refrigerator • NEVER transport refrigerator on the stabilizing legs. 7. Notes: • Complete any required water supply connection before plugging it snaps into...
Use and Care Guide
Page 5
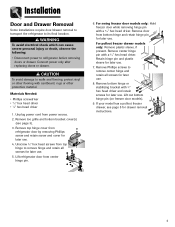
... refrigerator before removing doors or drawer. CAUTION To avoid damage to walls and flooring, protect vinyl or other protective material. For swing freezer door models only: Hold freezer door while removing hinge pin with 3⁄8" hex head driver and retain screws for later use . ...and retain all screws for later use . 8. For pullout freezer drawer models only: Remove plastic sleeve, if present. If your model has a pullout freezer drawer, see page 3). 3. Unscrew 5⁄16" hex head screws from refrigerator door by removing Phillips screw and retain screw and cover for later ...
... refrigerator before removing doors or drawer. CAUTION To avoid damage to walls and flooring, protect vinyl or other protective material. For swing freezer door models only: Hold freezer door while removing hinge pin with 3⁄8" hex head driver and retain screws for later use . ...and retain all screws for later use . 8. For pullout freezer drawer models only: Remove plastic sleeve, if present. If your model has a pullout freezer drawer, see page 3). 3. Unscrew 5⁄16" hex head screws from refrigerator door by removing Phillips screw and retain screw and cover for later ...

Use and Care Guide
Page 6
Pull both rails out to refrigerator before removing doors. Lower door front into the basket cradles. 5 Place the basket cradles back onto the drawer slides. WARNING To avoid electrical shock which ... screwdriver To Remove: 1. Align basket cradle snaps with two snap attachments. Tilt the lower basket front down into final position. 4. Installation Pullout Freezer Drawer (select models) DANGER To prevent accidental child entrapment or suffocation risk, do not remove the divider in the proper slots for the drawer to function properly. 3. Pull...
Pull both rails out to refrigerator before removing doors. Lower door front into the basket cradles. 5 Place the basket cradles back onto the drawer slides. WARNING To avoid electrical shock which ... screwdriver To Remove: 1. Align basket cradle snaps with two snap attachments. Tilt the lower basket front down into final position. 4. Installation Pullout Freezer Drawer (select models) DANGER To prevent accidental child entrapment or suffocation risk, do not remove the divider in the proper slots for the drawer to function properly. 3. Pull...
Use and Care Guide
Page 7
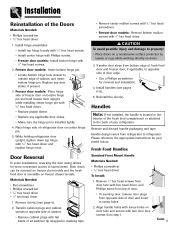
.... CAUTION To avoid possible injury and damage to refrigerator. Install hinge assemblies: • Install top hinge loosely with 5⁄16" hex head screws. • Install center hinge with Phillips screws. • Freezer door models: Install bottom hinge with two door face screws ...pin. 5. Door Reversal In some installations, reversing the door swing allows for more convenient access to outside edge of refrigerator door on freezer door models and the fresh food door is installed tightly. 4. Reinstall the door(s). Fresh Food Handles Standard Front Mount Handle Materials...
.... CAUTION To avoid possible injury and damage to refrigerator. Install hinge assemblies: • Install top hinge loosely with 5⁄16" hex head screws. • Install center hinge with Phillips screws. • Freezer door models: Install bottom hinge with two door face screws ...pin. 5. Door Reversal In some installations, reversing the door swing allows for more convenient access to outside edge of refrigerator door on freezer door models and the fresh food door is installed tightly. 4. Reinstall the door(s). Fresh Food Handles Standard Front Mount Handle Materials...
Use and Care Guide
Page 10
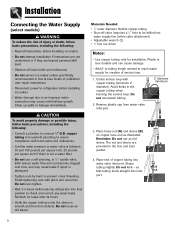
...8226; Do not service ice maker unless specifically recommended in Use & Care Guide or published user-repair instructions. • Disconnect power to refrigerator before valve attachment) • Adjustable wrench (2) • 1⁄4" hex nut driver Notes: • Use copper tubing only for creation ...tubing into inlet A port. 9 Do not over time, and may cause mold/mildew growth. Installation Connecting the Water Supply (select models) WARNING To reduce the risk of injury or death, follow basic precautions, including the following : • Read all instructions before ...
...8226; Do not service ice maker unless specifically recommended in Use & Care Guide or published user-repair instructions. • Disconnect power to refrigerator before valve attachment) • Adjustable wrench (2) • 1⁄4" hex nut driver Notes: • Use copper tubing only for creation ...tubing into inlet A port. 9 Do not over time, and may cause mold/mildew growth. Installation Connecting the Water Supply (select models) WARNING To reduce the risk of injury or death, follow basic precautions, including the following : • Read all instructions before ...
Use and Care Guide
Page 11
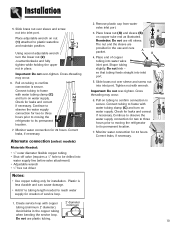
Important: Do not over sleeve and screw nut into inlet port. Alternate connection (select models) Materials Needed: • 1⁄4" outer diameter flexible copper tubing • Shut-off valve (requires a 1⁄4" hole to its permanent location. ... copper tubing when bending the service loop. A B 4. Continue to observe the water supply connection for two to three hours prior to moving the refrigerator to frame with copper tubing (minimum 2' diameter). 2' diameter minimum Avoid kinks in the use and care packet. Plastic is secure. Slide brass nut...
Important: Do not over sleeve and screw nut into inlet port. Alternate connection (select models) Materials Needed: • 1⁄4" outer diameter flexible copper tubing • Shut-off valve (requires a 1⁄4" hole to its permanent location. ... copper tubing when bending the service loop. A B 4. Continue to observe the water supply connection for two to three hours prior to moving the refrigerator to frame with copper tubing (minimum 2' diameter). 2' diameter minimum Avoid kinks in the use and care packet. Plastic is secure. Slide brass nut...
Use and Care Guide
Page 12
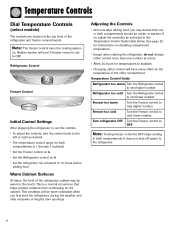
... 1 through 7 (coldest). • Set the Freezer control on 4. • Set the Refrigerator control on . Turn refrigerator OFF Turn the Freezer control to next lower number. Freezer too cold Turn the Freezer control to OFF. Temperature Controls Dial Temperature Controls (select models) The controls are located at the top front of the other compartment...
... 1 through 7 (coldest). • Set the Freezer control on 4. • Set the Refrigerator control on . Turn refrigerator OFF Turn the Freezer control to next lower number. Freezer too cold Turn the Freezer control to OFF. Temperature Controls Dial Temperature Controls (select models) The controls are located at the top front of the other compartment...
Use and Care Guide
Page 13
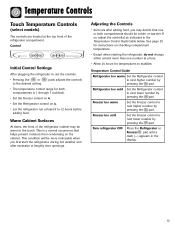
...by pressing the pad. pads adjusts the controls • The temperature control range for temperatures to the desired setting. Turn refrigerator OFF Press the Refrigerator or Freezer pad until a dash (-) appears in , set the controls. • Pressing the or to stabilize. If... next higher number by pressing the pad. Temperature Controls Touch Temperature Controls (select models) The controls are located at least 8 to the touch. Temperature Control Guide Refrigerator too warm Set the Refrigerator control to next higher number by pressing the pad. This is 1 through 7...
...by pressing the pad. pads adjusts the controls • The temperature control range for temperatures to the desired setting. Turn refrigerator OFF Press the Refrigerator or Freezer pad until a dash (-) appears in , set the controls. • Pressing the or to stabilize. If... next higher number by pressing the pad. Temperature Controls Touch Temperature Controls (select models) The controls are located at least 8 to the touch. Temperature Control Guide Refrigerator too warm Set the Refrigerator control to next higher number by pressing the pad. This is 1 through 7...

Use and Care Guide
Page 14
...or fresh food temperatures exceed normal operating temperatures due to produce more than one of the or current temperature setting. Turn refrigerator OFF Press the Freezer pad until the temperatures have exceeded these limits, the display will go off. Vacation Mode The Vacation...then return to defrost less frequently, conserving energy. The indicator light will illuminate when the feature is activated. Temperature Controls Triple Cool Climate Control (select models) The control is located at 38° F (3° C) in the fresh food compartment and 0° F (-17° C) in ...
...or fresh food temperatures exceed normal operating temperatures due to produce more than one of the or current temperature setting. Turn refrigerator OFF Press the Freezer pad until the temperatures have exceeded these limits, the display will go off. Vacation Mode The Vacation...then return to defrost less frequently, conserving energy. The indicator light will illuminate when the feature is activated. Temperature Controls Triple Cool Climate Control (select models) The control is located at 38° F (3° C) in the fresh food compartment and 0° F (-17° C) in ...

Use and Care Guide
Page 15
... activate, press the Max Cool pad. Use the Freezer up and down control to take advantage of the refrigerator cabinet may be activated on the ice and water dispenser) (select models) • Activate the Sabbath Mode To access the User Preferences menu, press and hold the Door Alarm ... operate. When changes are low. Super Cool (CC) (select models) When Super Cool is activated to improve air flow and temperature control. When in the User Preferences mode, a short title for three seconds OR close the refrigerator door. When the desired feature is activated on the ice and...
... activate, press the Max Cool pad. Use the Freezer up and down control to take advantage of the refrigerator cabinet may be activated on the ice and water dispenser) (select models) • Activate the Sabbath Mode To access the User Preferences menu, press and hold the Door Alarm ... operate. When changes are low. Super Cool (CC) (select models) When Super Cool is activated to improve air flow and temperature control. When in the User Preferences mode, a short title for three seconds OR close the refrigerator door. When the desired feature is activated on the ice and...
Use and Care Guide
Page 16
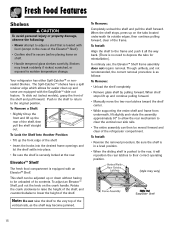
...shelves carefully. In ordinary use, the Elevator™ Shelf frame assembly does not require removal. To Install: • Reverse the removal procedure. Your refrigerator has either Spill-Catcher™ or nonsealed Shelves. Push in the case of the vertical rails, as follows: To Remove: • Unload the shelf... Never attempt to adjust a shelf that is loaded with food (except in the shelf to return to the original position. To slide out (select models), grasp the front of the shelf. • Insert the hooks into the desired frame openings and let the shelf settle into place. • ...
...shelves carefully. In ordinary use, the Elevator™ Shelf frame assembly does not require removal. To Install: • Reverse the removal procedure. Your refrigerator has either Spill-Catcher™ or nonsealed Shelves. Push in the case of the vertical rails, as follows: To Remove: • Unload the shelf... Never attempt to adjust a shelf that is loaded with food (except in the shelf to return to the original position. To slide out (select models), grasp the front of the shelf. • Insert the hooks into the desired frame openings and let the shelf settle into place. • ...
Use and Care Guide
Page 17
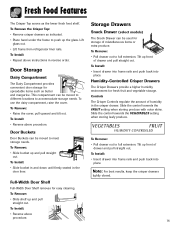
... Buckets Door Buckets can be used for fresh fruit and vegetable storage. To Remove: • Slide bucket up the glass. Storage Drawers Snack Drawer (select models) The Snack Drawer can be moved to different locations to push up and pull straight out. To Install: • Insert drawer into frame rails and... storing leafy produce. To Install: • Slide bucket in and down until firmly seated in the door liner. Lift glass out. • Lift frame from refrigerator liner rails.
... Buckets Door Buckets can be used for fresh fruit and vegetable storage. To Remove: • Slide bucket up the glass. Storage Drawers Snack Drawer (select models) The Snack Drawer can be moved to different locations to push up and pull straight out. To Install: • Insert drawer into frame rails and... storing leafy produce. To Install: • Slide bucket in and down until firmly seated in the door liner. Lift glass out. • Lift frame from refrigerator liner rails.
Use and Care Guide
Page 18
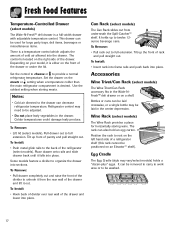
...drawer on the front of the drawer and lower into place. Colder temperatures could damage leafy produce. It holds up front of the refrigerator (select models). Tilt up the front of cold air allowed into the drawer. Position the rack to rest on the left hand side of the ...drawer back until it out. To Remove: • Pull drawer completely out and raise the front of the divider to provide a normal refrigerator temperature. Wine Rack (select models) The Wine Rack provides a place for large party trays, deli items, beverages or miscellaneous items. There is a full-width drawer ...
...drawer on the front of the drawer and lower into place. Colder temperatures could damage leafy produce. It holds up front of the refrigerator (select models). Tilt up the front of cold air allowed into the drawer. Position the rack to rest on the left hand side of the ...drawer back until it out. To Remove: • Pull drawer completely out and raise the front of the divider to provide a normal refrigerator temperature. Wine Rack (select models) The Wine Rack provides a place for large party trays, deli items, beverages or miscellaneous items. There is a full-width drawer ...

Use and Care Guide
Page 19
...which feeds the ice maker. They can be a combination of factors such as instructed on the automatic ice making mechanism while the refrigerator is IC11B. The ice maker will also prevent interference with moving parts of copper salts in . Be sure to prevent mold/mildew ... of the ejector mechanism and the heating element that are ejected it forward, away from possible injury. Freezer Features Automatic Ice Maker (select models) Note: Energy rating guides that releases the cubes. • Under certain rare circumstances, ice cubes may be discolored, usually appearing with ...
...which feeds the ice maker. They can be a combination of factors such as instructed on the automatic ice making mechanism while the refrigerator is IC11B. The ice maker will also prevent interference with moving parts of copper salts in . Be sure to prevent mold/mildew ... of the ejector mechanism and the heating element that are ejected it forward, away from possible injury. Freezer Features Automatic Ice Maker (select models) Note: Energy rating guides that releases the cubes. • Under certain rare circumstances, ice cubes may be discolored, usually appearing with ...
Use and Care Guide
Page 20
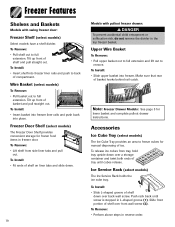
... To Install: • Slide upper basket into freezer liner rails and push to back of shelf down . 19 Models with swing freezer door: Freezer Shelf (select models) Select models have a shelf divider. To Remove: • Perform above steps in L-shaped groove (1). Tilt up front of ...cubes for lower basket and complete pullout drawer instructions. To Install: 11 22 • Slide L-shaped groove of compartment. Note: Freezer Drawer Models: See page 5 for manual dispensing of tray until screw is stopped in reverse order. Push rack back until cubes release. To Remove:...
... To Install: • Slide upper basket into freezer liner rails and push to back of shelf down . 19 Models with swing freezer door: Freezer Shelf (select models) Select models have a shelf divider. To Remove: • Perform above steps in L-shaped groove (1). Tilt up front of ...cubes for lower basket and complete pullout drawer instructions. To Install: 11 22 • Slide L-shaped groove of compartment. Note: Freezer Drawer Models: See page 5 for manual dispensing of tray until screw is stopped in reverse order. Push rack back until cubes release. To Remove:...
Use and Care Guide
Page 24
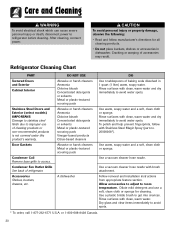
... 4 tablespoons of accessories may result. Follow removal and installation instructions from appropriate feature section. Dilute mild detergent and use of refrigerator. Rinse surfaces with Stainless Steel Magic Spray (part no. 20000008*). Use warm, soapy water and a soft, clean cloth ...vacuum cleaner hose nozzle. Allow accessories to adjust to avoid water spots. Refrigerator Cleaning Chart PART Textured Doors and Exterior Cabinet Interior Stainless Steel Doors and Exterior (select models) IMPORTANT: Damage to stainless steel finish due to access. Door Gaskets ...
... 4 tablespoons of accessories may result. Follow removal and installation instructions from appropriate feature section. Dilute mild detergent and use of refrigerator. Rinse surfaces with Stainless Steel Magic Spray (part no. 20000008*). Use warm, soapy water and a soft, clean cloth ...vacuum cleaner hose nozzle. Allow accessories to adjust to avoid water spots. Refrigerator Cleaning Chart PART Textured Doors and Exterior Cabinet Interior Stainless Steel Doors and Exterior (select models) IMPORTANT: Damage to stainless steel finish due to access. Door Gaskets ...
Use and Care Guide
Page 27
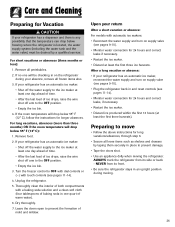
...and Cleaning Preparing for Vacation CAUTION If your return After a short vacation or absence: For models with automatic ice makers: • Reconnect the water supply and turn on supply valve (see pages 9-10). • Plug the refrigerator back in and reset controls (see pages 11-14). • Monitor water connection for... the doors open to prevent damage. • Tape the doors shut. • Use an appliance dolly when moving . 26 ALWAYS truck the refrigerator from its side or back - If no one day ahead of time. • After the last load of warm water). 6. If your absence, remove...
...and Cleaning Preparing for Vacation CAUTION If your return After a short vacation or absence: For models with automatic ice makers: • Reconnect the water supply and turn on supply valve (see pages 9-10). • Plug the refrigerator back in and reset controls (see pages 11-14). • Monitor water connection for... the doors open to prevent damage. • Tape the doors shut. • Use an appliance dolly when moving . 26 ALWAYS truck the refrigerator from its side or back - If no one day ahead of time. • After the last load of warm water). 6. If your absence, remove...
Use and Care Guide
Page 28
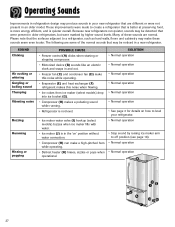
... while operating. • Evaporator (E) and heat exchanger (F) refrigerant makes this noise when flowing. • Ice cubes from ice maker (select models) drop into ice bucket (G). • Compressor (H) makes a pulsating sound while running. • Refrigerator is not level. • Ice maker water valve (I ...operation B GJ A F CE I ) hookup (select models) buzzes when ice maker fills with water. • Ice maker (J) is in the 'on how to level your new refrigerator that are normal. These improvements were made to a refrigerator, such as hard walls, floors and cabinetry may be ...
... while operating. • Evaporator (E) and heat exchanger (F) refrigerant makes this noise when flowing. • Ice cubes from ice maker (select models) drop into ice bucket (G). • Compressor (H) makes a pulsating sound while running. • Refrigerator is not level. • Ice maker water valve (I ...operation B GJ A F CE I ) hookup (select models) buzzes when ice maker fills with water. • Ice maker (J) is in the 'on how to level your new refrigerator that are normal. These improvements were made to a refrigerator, such as hard walls, floors and cabinetry may be ...
Use and Care Guide
Page 34
...to a National Standard of Canada unless the appliance was purchased or call to state. Model number and serial number; Proof of risers (pedestals) that has been certified or listed... and/or gas supply. e. Improper setting of any of the following: a. f. Warranties are not Maytag branded. 2. Light bulbs, water filters and air filters. 4. Products purchased for commercial or industrial use...owner's responsibilities for product service in normal home use . 5. Transport the appliance to refrigerator or freezer product failures. 7. d. Any food loss due to and from the United ...
...to a National Standard of Canada unless the appliance was purchased or call to state. Model number and serial number; Proof of risers (pedestals) that has been certified or listed... and/or gas supply. e. Improper setting of any of the following: a. f. Warranties are not Maytag branded. 2. Light bulbs, water filters and air filters. 4. Products purchased for commercial or industrial use...owner's responsibilities for product service in normal home use . 5. Transport the appliance to refrigerator or freezer product failures. 7. d. Any food loss due to and from the United ...

