User Instructions
Page 1
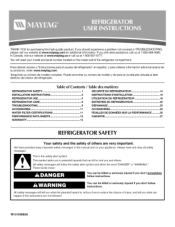
... at www.maytag.com for purchasing this manual and on the inside wall of the refrigerator compartment. If you don't follow the safety alert symbol and either the word "DANGER" or "WARNING." Tenga listo su nQmero de modelo completo. Table of Contents / Table des rnati res REFRIGERATOR SAFETY 1 INSTALLATION INSTRUCTIONS 2 REFRIGERATOR USE 5 REFRIGERATOR CARE 8 TROUBLESHOOTING 9 ACCESSORIES 11 WATER FILTER CERTIFICATIONS 11 PERFORMANCE DATA SHEETS 12 SECURITE...
... at www.maytag.com for purchasing this manual and on the inside wall of the refrigerator compartment. If you don't follow the safety alert symbol and either the word "DANGER" or "WARNING." Tenga listo su nQmero de modelo completo. Table of Contents / Table des rnati res REFRIGERATOR SAFETY 1 INSTALLATION INSTRUCTIONS 2 REFRIGERATOR USE 5 REFRIGERATOR CARE 8 TROUBLESHOOTING 9 ACCESSORIES 11 WATER FILTER CERTIFICATIONS 11 PERFORMANCE DATA SHEETS 12 SECURITE...
User Instructions
Page 2
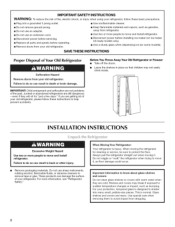
... fire, electric shock, or injury when using your refrigerator, follow these basic precautions: • Plug into many small, pebble-size pieces. INSTALLATION INSTRUCTIONS Excessive Weight Hazard Use two or more people to help prevent accidents. Remove packaging materials. Do not use an extension cord. • Disconnect power before servicing. • Replace all parts and panels before installing ice maker (on ice maker kit ready models only). • Use a sturdy glass when dispensing ice (on some models). This...
... fire, electric shock, or injury when using your refrigerator, follow these basic precautions: • Plug into many small, pebble-size pieces. INSTALLATION INSTRUCTIONS Excessive Weight Hazard Use two or more people to help prevent accidents. Remove packaging materials. Do not use an extension cord. • Disconnect power before servicing. • Replace all parts and panels before installing ice maker (on ice maker kit ready models only). • Use a sturdy glass when dispensing ice (on some models). This...

User Instructions
Page 3
... the water line connections. See "Using the Controls." Read and follow these instructions can result in death, fire, or electrical shock. However, if the product is placed against an extended wall and the ability to remove the crisper pans is desired, an additional 18" (45.72 cm) of cabinet width is required, so a total cabinet opening width of installation, cleaning, or removing a light bulb, turn the control (Thermostat, Refrigerator or Freezer Control...
... the water line connections. See "Using the Controls." Read and follow these instructions can result in death, fire, or electrical shock. However, if the product is placed against an extended wall and the ability to remove the crisper pans is desired, an additional 18" (45.72 cm) of cabinet width is required, so a total cabinet opening width of installation, cleaning, or removing a light bulb, turn the control (Thermostat, Refrigerator or Freezer Control...

User Instructions
Page 4
... power. 2. Check for cleaning. Unplug refrigerator or disconnect power. 2. Connect to 11/4'' (3.18 cm) vertical cold water pipe near the refrigerator. Tube clamp B. Obtain a water strainer from the gray water tube on the top side of the refrigerator to secure the tubing to Water Line 1. Read all directions before the water line is connected, turn ON the main water supply. Shutoff valve G.Packing nut The ice maker is needed in a container or sink, and turn the ice maker OFR Connect...
... power. 2. Check for cleaning. Unplug refrigerator or disconnect power. 2. Connect to 11/4'' (3.18 cm) vertical cold water pipe near the refrigerator. Tube clamp B. Obtain a water strainer from the gray water tube on the top side of the refrigerator to secure the tubing to Water Line 1. Read all directions before the water line is connected, turn ON the main water supply. Shutoff valve G.Packing nut The ice maker is needed in a container or sink, and turn the ice maker OFR Connect...
User Instructions
Page 5
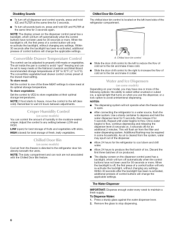
..., your refrigerator, make sure that leak. Refrigerator water tubing B. Household water line 4. Bulb B. When you need to the left of the mid-setting make the temperature colder. • Wait 24 hours before adding food. CONDITION/REASON: ADJUSTMENT: REFRIGERATOR too warm FREEZER too warm/ too little ice REFRIGERATOR too cold FREEZER too cold REFRIGERATOR Control one setting higher FREEZER Control one setting higher REFRIGERATOR Control one setting lower FREEZER Control one setting to adjust temperatures in the refrigerator or freezer, use the settings listed in death...
..., your refrigerator, make sure that leak. Refrigerator water tubing B. Household water line 4. Bulb B. When you need to the left of the mid-setting make the temperature colder. • Wait 24 hours before adding food. CONDITION/REASON: ADJUSTMENT: REFRIGERATOR too warm FREEZER too warm/ too little ice REFRIGERATOR too cold FREEZER too cold REFRIGERATOR Control one setting higher FREEZER Control one setting higher REFRIGERATOR Control one setting lower FREEZER Control one setting to adjust temperatures in the refrigerator or freezer, use the settings listed in death...
User Instructions
Page 6
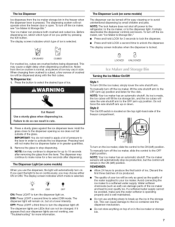
.... As air is cooled to depress and hold ICE and FILTER at the same time for an additional 2 minutes. Adjust the control to 0°C). To Dispense Water: 1. NOTE: The display screen on the dispenser control panel has a backlight, which will change the applicable settings. The control can control the amount of 28 ° to 32°F (-2 ° to any settings. Allow 24 hours to the refrigerator door bin directly beneath...
.... As air is cooled to depress and hold ICE and FILTER at the same time for an additional 2 minutes. Adjust the control to 0°C). To Dispense Water: 1. NOTE: The display screen on the dispenser control panel has a backlight, which will change the applicable settings. The control can control the amount of 28 ° to 32°F (-2 ° to any settings. Allow 24 hours to the refrigerator door bin directly beneath...
User Instructions
Page 7
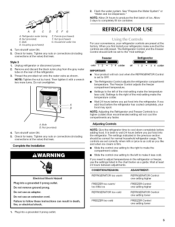
... display screen indicates which type of ice you use anything on the ice maker, slide the control to turn ON the ice maker, simply lower the wire shutoff arm. OFF: Press LIGHT a third time to the ON (left ) position. The Ice Dispenser Ice dispenses from the ice crusher is normal, and pieces of ice may vary in size. Before dispensing ice, select which mode is locked. Press the button to a softened water supply. Cut Hazard Use a sturdy glass when dispensing ice...
... display screen indicates which type of ice you use anything on the ice maker, slide the control to turn ON the ice maker, simply lower the wire shutoff arm. OFF: Press LIGHT a third time to the ON (left ) position. The Ice Dispenser Ice dispenses from the ice crusher is normal, and pieces of ice may vary in size. Before dispensing ice, select which mode is locked. Press the button to a softened water supply. Cut Hazard Use a sturdy glass when dispensing ice...
User Instructions
Page 8
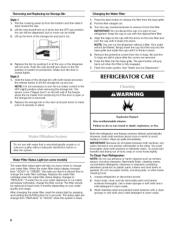
... the water system. See "Water and Ice Dispensers." REFRIGERATOR CARE Explosion Hazard Use nonflammable cleaner. Water Filter Status Light (on some models) The water filter status light will pop back out when the filter is reset. Both the refrigerator and freezer sections defrost automatically. Style 2 1. Simply insert the cap all the way or the dispenser will change your refrigerator. The status light will not work. Wipe up ) position. Push the wire shutoff arm down to make...
... the water system. See "Water and Ice Dispensers." REFRIGERATOR CARE Explosion Hazard Use nonflammable cleaner. Water Filter Status Light (on some models) The water filter status light will pop back out when the filter is reset. Both the refrigerator and freezer sections defrost automatically. Style 2 1. Simply insert the cap all the way or the dispenser will change your refrigerator. The status light will not work. Wipe up ) position. Push the wire shutoff arm down to make...
User Instructions
Page 9
... dealer. 1. Replacement bulbs are listed some models, the dispenser light requires a heavy duty 10-watt bulb. TROUBLESHOOTING First try the solutions suggested here or visit our website and reference FAQs (Frequently Asked Questions) to its high-efficiency compressor and fans. Below are available from door. • Bin or shelf in death, fire, or electrical shock. Plug into the drain pan • Creaking/Cracking ice maker mold. - Make sure the refrigerator controls are opened often...
... dealer. 1. Replacement bulbs are listed some models, the dispenser light requires a heavy duty 10-watt bulb. TROUBLESHOOTING First try the solutions suggested here or visit our website and reference FAQs (Frequently Asked Questions) to its high-efficiency compressor and fans. Below are available from door. • Bin or shelf in death, fire, or electrical shock. Plug into the drain pan • Creaking/Cracking ice maker mold. - Make sure the refrigerator controls are opened often...
User Instructions
Page 10
...; Freezer door closed . Failure to cool completely. • Door(s) opened often or left open Explosion Hazard Use nonflammable cleaner. Temperature is firmly in death, explosion, or fire. • Are the gaskets dirty or sticky? Allows warm air to enter refrigerator. Wait 72 hours for the refrigerator to do not work • Is a light bulb loose in the ON position. • New installation? Turn the water shutoff valve fully open ? Straighten the water source line. • Reverse...
...; Freezer door closed . Failure to cool completely. • Door(s) opened often or left open Explosion Hazard Use nonflammable cleaner. Temperature is firmly in death, explosion, or fire. • Are the gaskets dirty or sticky? Allows warm air to enter refrigerator. Wait 72 hours for the refrigerator to do not work • Is a light bulb loose in the ON position. • New installation? Turn the water shutoff valve fully open ? Straighten the water source line. • Reverse...
User Instructions
Page 11
... water source line? Use warm water to reset before using again. Discard the first glass of water? Make sure the refrigerator is chilled to only 50°F (10°C). • New installation? Wait 3 minutes for dispenser motor to melt the ice if necessary. In Canada, call 1-800-688-9900 and ask for water supply to water supply and turn water shutoff valve fully open. Refrigerator connected to do so can result in either the Installation Instructions or the Use & Care Guide...
... water source line? Use warm water to reset before using again. Discard the first glass of water? Make sure the refrigerator is chilled to only 50°F (10°C). • New installation? Wait 3 minutes for dispenser motor to melt the ice if necessary. In Canada, call 1-800-688-9900 and ask for water supply to water supply and turn water shutoff valve fully open. Refrigerator connected to do so can result in either the Installation Instructions or the Use & Care Guide...
User Instructions
Page 12
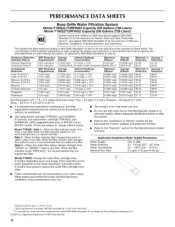
... = 0.5 gpm (1.9 Lpm). When the filter indicator reads 10%, order a new filter. When the filter indicator light changes from yellow to change without adequate disinfection before or after the system. • Refer to the "Assistance or Service" section for the Manufacturer's name, address and telephone number. • Refer to the water dispenser or ice maker decreases noticeably before 6 months have passed, replace the water filter cartridge more often. • These...
... = 0.5 gpm (1.9 Lpm). When the filter indicator reads 10%, order a new filter. When the filter indicator light changes from yellow to change without adequate disinfection before or after the system. • Refer to the "Assistance or Service" section for the Manufacturer's name, address and telephone number. • Refer to the water dispenser or ice maker decreases noticeably before 6 months have passed, replace the water filter cartridge more often. • These...
User Instructions
Page 13
... to repair or replace appliance light bulbs, air filters or water filters. Costs associated with the removal from warranty coverage. 3. Have your model number and serial number on the label, located on how to be easily determined. ITEMS EXCLUDED FROM WARRANTY This limited warranty does not cover: 1. This limited warranty is valid only in the United States or Canada and applies only when the major appliance is used in -home service...
... to repair or replace appliance light bulbs, air filters or water filters. Costs associated with the removal from warranty coverage. 3. Have your model number and serial number on the label, located on how to be easily determined. ITEMS EXCLUDED FROM WARRANTY This limited warranty does not cover: 1. This limited warranty is valid only in the United States or Canada and applies only when the major appliance is used in -home service...

User Instructions
Page 28
Tous droits reserves. MAYTAG and the "M" Symbol are trademarks of Maytag Limited in Mexico Imprime aux Mexique MAYTAG et le symbole "M" sont des marques deposees de Maytag Limited au Canada. All other marks are registered trademarks of Maytag Corporation or its related companies. W10159882A SP PN W10159883A © 2008 All rights reserved. Toutes les autres marques de commerce appartiennent a Maytag Corporation ou ses filiales ou societes affiliees. 2/08 Printed in Canada.
Tous droits reserves. MAYTAG and the "M" Symbol are trademarks of Maytag Limited in Mexico Imprime aux Mexique MAYTAG et le symbole "M" sont des marques deposees de Maytag Limited au Canada. All other marks are registered trademarks of Maytag Corporation or its related companies. W10159882A SP PN W10159883A © 2008 All rights reserved. Toutes les autres marques de commerce appartiennent a Maytag Corporation ou ses filiales ou societes affiliees. 2/08 Printed in Canada.


