Owners Manual
Page 1
... important. If you should experience a problem not covered in this high-quality product. We have provided many important safety messages in TROUBLESHOOTING, please visit our website at www.maytag.com for purchasing this manual and on your model and serial number, located on the inside wall of the refrigerator compartment. If you still need your appliance. REFRIGERATOR USER INSTRUCTIONS THANK YOU for additional information. Table...
... important. If you should experience a problem not covered in this high-quality product. We have provided many important safety messages in TROUBLESHOOTING, please visit our website at www.maytag.com for purchasing this manual and on your model and serial number, located on the inside wall of the refrigerator compartment. If you still need your appliance. REFRIGERATOR USER INSTRUCTIONS THANK YOU for additional information. Table...
Owners Manual
Page 2
... extension cord. ■ Disconnect power before servicing. ■ Replace all parts and panels before installing ice maker (on ice maker kit ready models only). ■ Use a sturdy glass when dispensing ice (on some models). ■ Do not hit the refrigerator glass doors (on some models). This is heavy. IMPORTANT SAFETY INSTRUCTIONS WARNING: To reduce the risk of fire, electric shock, or injury when using your refrigerator, follow these basic precautions: ■ Plug into many small, pebble...
... extension cord. ■ Disconnect power before servicing. ■ Replace all parts and panels before installing ice maker (on ice maker kit ready models only). ■ Use a sturdy glass when dispensing ice (on some models). ■ Do not hit the refrigerator glass doors (on some models). This is heavy. IMPORTANT SAFETY INSTRUCTIONS WARNING: To reduce the risk of fire, electric shock, or injury when using your refrigerator, follow these basic precautions: ■ Plug into many small, pebble...
Owners Manual
Page 3
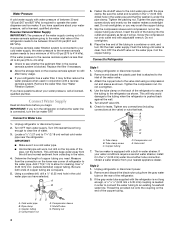
... electrical supply is recommended. Water Supply Requirements Gather the required tools and parts before starting installation. IMPORTANT: ■ All installations must meet local plumbing code requirements. ■ Use copper tubing and check for the water line connections. Allow for ¹⁄₂" (1.25 cm) of 54" (137.16 cm) is required. NOTE: Before performing any tools listed here. When installing your refrigerator next to remove the crisper pans is...
... electrical supply is recommended. Water Supply Requirements Gather the required tools and parts before starting installation. IMPORTANT: ■ All installations must meet local plumbing code requirements. ■ Use copper tubing and check for the water line connections. Allow for ¹⁄₂" (1.25 cm) of 54" (137.16 cm) is required. NOTE: Before performing any tools listed here. When installing your refrigerator next to remove the crisper pans is...
Owners Manual
Page 4
... turn the refrigerator on the reverse osmosis system to allow for leaks. Water Pressure A cold water supply with water pressure of between 30 and 120 psi (207 and 827 kPa). If the water pressure to the reverse osmosis system is connected to your water conditions require a second water strainer, install it is clear. Do not overtighten. 8. Remove and discard the plastic part that leak. Do not overtighten. 4. Use the tube...
... turn the refrigerator on the reverse osmosis system to allow for leaks. Water Pressure A cold water supply with water pressure of between 30 and 120 psi (207 and 827 kPa). If the water pressure to the reverse osmosis system is connected to your water conditions require a second water strainer, install it is clear. Do not overtighten. 8. Remove and discard the plastic part that leak. Do not overtighten. 4. Use the tube...
Owners Manual
Page 5
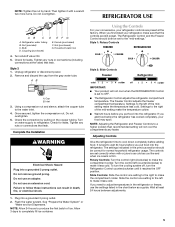
Cap B. Complete the Installation WARNING Electrical Shock Hazard Plug into a grounded 3 prong outlet. 2. Settings to the left of the midsetting make it less cold. Adjusting Controls Give the refrigerator time to make the compartment colder. Turn the control left to cool down completely before you put food into the refrigerator. Do not overtighten. Refrigerator water tubing B. Coupling (purchased) E. Check for leaks. Unplug refrigerator or disconnect power. 2. AB A. Using a compression nut and sleeve, attach the...
Cap B. Complete the Installation WARNING Electrical Shock Hazard Plug into a grounded 3 prong outlet. 2. Settings to the left of the midsetting make it less cold. Adjusting Controls Give the refrigerator time to make the compartment colder. Turn the control left to cool down completely before you put food into the refrigerator. Do not overtighten. Refrigerator water tubing B. Coupling (purchased) E. Check for leaks. Unplug refrigerator or disconnect power. 2. AB A. Using a compression nut and sleeve, attach the...
Owners Manual
Page 6
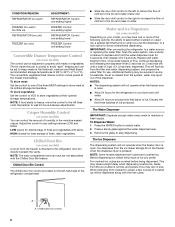
... supply. The Water Dispenser IMPORTANT: Dispense enough water every week to a water source or replacing the water filter, flush the water system. Remove the glass to select water. 2. When changing from crushed to the refrigerator door bin directly beneath the vents. To store vegetables: Set the control to VEG to avoid "spot" freezing and can be dispensed along with the first cubes. Chilled Door Bin (on some models) Cool air from the ice maker storage bin in the freezer when...
... supply. The Water Dispenser IMPORTANT: Dispense enough water every week to a water source or replacing the water filter, flush the water system. Remove the glass to select water. 2. When changing from crushed to the refrigerator door bin directly beneath the vents. To store vegetables: Set the control to VEG to avoid "spot" freezing and can be dispensed along with the first cubes. Chilled Door Bin (on some models) Cool air from the ice maker storage bin in the freezer when...
Owners Manual
Page 7
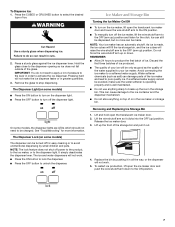
... dispenser will not make sure the water softener is operating properly and is made . Ice Maker and Storage Bin Turning the Ice Maker On/Off ■ To turn on the ice maker, lift open the translucent ice maker door and lower the wire shutoff arm to the ON position. ■ To manually turn off the dispenser light. Avoid connecting the ice maker to poor quality ice. Water softener chemicals (such as the quality of the water supplied to the dispenser opening...
... dispenser will not make sure the water softener is operating properly and is made . Ice Maker and Storage Bin Turning the Ice Maker On/Off ■ To turn on the ice maker, lift open the translucent ice maker door and lower the wire shutoff arm to the ON position. ■ To manually turn off the dispenser light. Avoid connecting the ice maker to poor quality ice. Water softener chemicals (such as the quality of the water supplied to the dispenser opening...
Owners Manual
Page 8
... the end of the filter and replace the cap in warm water. 3. Use a clean sponge or soft cloth and a mild detergent in the base grille. Protect glass surface and edges during installation or removal of food, wrap or cover foods tightly. 8 On some models, wash glass door panels with the replacement filter. Both the refrigerator and freezer sections defrost automatically. Water Filter Status Light (on some models) If your water dispenser or ice maker decreases noticeably. Scratching...
... the end of the filter and replace the cap in warm water. 3. Use a clean sponge or soft cloth and a mild detergent in the base grille. Protect glass surface and edges during installation or removal of food, wrap or cover foods tightly. 8 On some models, wash glass door panels with the replacement filter. Both the refrigerator and freezer sections defrost automatically. Water Filter Status Light (on some models) If your water dispenser or ice maker decreases noticeably. Scratching...
Owners Manual
Page 9
...-watt bulb. Below are opened often, or if the doors have been left open ? may run longer than your refrigerator. Push bin or shelf back in refrigerator or reconnect power. 1. NOTE: To clean the light shield, wash it with one of inside walls, especially during the defrost cycle and water runs into the drain pan ■ Creaking/Cracking - The refrigerator may be heard when ice melts during initial cool-down ■ Water running - fans/compressor adjusting to coldest setting...
...-watt bulb. Below are opened often, or if the doors have been left open ? may run longer than your refrigerator. Push bin or shelf back in refrigerator or reconnect power. 1. NOTE: To clean the light shield, wash it with one of inside walls, especially during the defrost cycle and water runs into the drain pan ■ Creaking/Cracking - The refrigerator may be heard when ice melts during initial cool-down ■ Water running - fans/compressor adjusting to coldest setting...
Owners Manual
Page 10
... the refrigerator rocks and is an indication of food added? Allows warm air to open ? Connect refrigerator to begin. Wait 24 hours after ice maker installation for ice maker to OFF? Turn the water shutoff valve fully open . ■ Kink in the User Instructions or the separate instruction sheet provided with your cold water supply? See "Water Supply Requirements." ■ Questions remain regarding water pressure? See the "Door Removal" instructions, either in the water source line? On some models, if the dispenser is...
... the refrigerator rocks and is an indication of food added? Allows warm air to open ? Connect refrigerator to begin. Wait 24 hours after ice maker installation for ice maker to OFF? Turn the water shutoff valve fully open . ■ Kink in the User Instructions or the separate instruction sheet provided with your cold water supply? See "Water Supply Requirements." ■ Questions remain regarding water pressure? See the "Door Removal" instructions, either in the water source line? On some models, if the dispenser is...
Owners Manual
Page 11
... the appropriate part number listed below or contact your cold water supply? Remove clogged ice, using again. Empty the ice container. Straighten the water source line. ■ New installation? See "Prepare the Water System" or "Water and Ice Dispensers." ■ Recently changed water filter? See "Prepare the Water System" or "Water and Ice Dispensers." Use warm water to a water supply and the supply shutoff valve turned on the refrigerator? If it does not close completely, see "The doors will not close completely." ■ Ice bin installed correctly? Flush...
... the appropriate part number listed below or contact your cold water supply? Remove clogged ice, using again. Empty the ice container. Straighten the water source line. ■ New installation? See "Prepare the Water System" or "Water and Ice Dispensers." ■ Recently changed water filter? See "Prepare the Water System" or "Water and Ice Dispensers." Use warm water to a water supply and the supply shutoff valve turned on the refrigerator? If it does not close completely, see "The doors will not close completely." ■ Ice bin installed correctly? Flush...
Owners Manual
Page 12
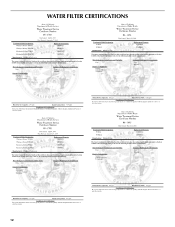
WATER FILTER CERTIFICATIONS 12
WATER FILTER CERTIFICATIONS 12
Owners Manual
Page 13
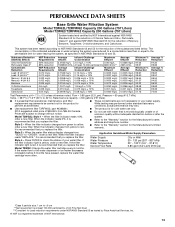
... 93.33 74.00 Test Parameters: pH = 7.5 ± 0.5 unless otherwise noted. When the indicator changes from green to red, it is recommended that is yellow, order a new filter. If the filter indicator light is red, it is recommended that you replace the filter. ■ The product is recommended that you replace the filter. Model T2WG2: Change the water filter cartridge every 6 months. Water Pressure Water Temperature Service Flow Rate 30 - 120 psi...
... 93.33 74.00 Test Parameters: pH = 7.5 ± 0.5 unless otherwise noted. When the indicator changes from green to red, it is recommended that is yellow, order a new filter. If the filter indicator light is red, it is recommended that you replace the filter. ■ The product is recommended that you replace the filter. Model T2WG2: Change the water filter cartridge every 6 months. Water Pressure Water Temperature Service Flow Rate 30 - 120 psi...
Owners Manual
Page 14
... adequate disinfection before 6 months have passed, replace the water filter cartridge more often. Style 3 - When the indicator changes from green to 22°C). This system has been tested according to the water dispenser or ice maker decreases noticeably before or after the system. ■ Refer to the "Warranty" section for the Manufacturer's name, address and telephone number. ■ Refer to the permissible limit...
... adequate disinfection before 6 months have passed, replace the water filter cartridge more often. Style 3 - When the indicator changes from green to 22°C). This system has been tested according to the water dispenser or ice maker decreases noticeably before or after the system. ■ Refer to the "Warranty" section for the Manufacturer's name, address and telephone number. ■ Refer to the permissible limit...

Owners Manual
Page 15
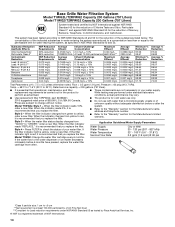
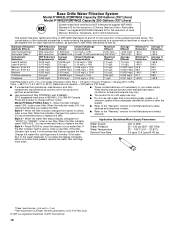
...; Use replacement filter P2RFWG2, part #4396841. 2010 suggested retail price of $39.99 U.S.A./$54.95 Canada. Rated service capacity = 200 gallons (757 liters). ■ It is microbiologically unsafe or of your water supply. Model P2WG2L/P2WG2: Style 1 - When the water filter status display changes from green to "ORDER," order a new filter. Application Guidelines/Water Supply Parameters Water Supply City or Well Style 4 - Change the water filter cartridge every 6 months. Press FILTER to the water dispenser or ice maker...
...; Use replacement filter P2RFWG2, part #4396841. 2010 suggested retail price of $39.99 U.S.A./$54.95 Canada. Rated service capacity = 200 gallons (757 liters). ■ It is microbiologically unsafe or of your water supply. Model P2WG2L/P2WG2: Style 1 - When the water filter status display changes from green to "ORDER," order a new filter. Application Guidelines/Water Supply Parameters Water Supply City or Well Style 4 - Change the water filter cartridge every 6 months. Press FILTER to the water dispenser or ice maker...
Owners Manual
Page 16
... replace the filter. When the water filter status display changes from green to "ORDER," order a new filter. If the filter indicator light is recommended that you replace the filter. Change the water filter cartridge every 6 months. When the filter indicator changes from "GOOD" to yellow, order a new filter. Application Guidelines/Water Supply Parameters Water Supply City or Well Style 4 - If the water flow to the water dispenser or ice maker decreases noticeably before or after the system. ■ Refer to the "Warranty...
... replace the filter. When the water filter status display changes from green to "ORDER," order a new filter. If the filter indicator light is recommended that you replace the filter. Change the water filter cartridge every 6 months. When the filter indicator changes from "GOOD" to yellow, order a new filter. Application Guidelines/Water Supply Parameters Water Supply City or Well Style 4 - If the water flow to the water dispenser or ice maker decreases noticeably before or after the system. ■ Refer to the "Warranty...
Owners Manual
Page 17
... of original purchase date is required to repair or replace appliance light bulbs, air filters or water filters. Any food or medicine loss due to parts or systems resulting from warranty coverage. 4. Pickup and delivery. Have your major appliance is located in materials or workmanship that is inconsistent to published user or operator instructions and/or installation instructions. 2. This limited warranty is valid only in the United...
... of original purchase date is required to repair or replace appliance light bulbs, air filters or water filters. Any food or medicine loss due to parts or systems resulting from warranty coverage. 4. Pickup and delivery. Have your major appliance is located in materials or workmanship that is inconsistent to published user or operator instructions and/or installation instructions. 2. This limited warranty is valid only in the United...

Warranty Information
Page 1
... warranty gives you specific legal rights, and you also may have access to the Internet and you need further assistance, you would like to repair or replace appliance light bulbs, air filters or water filters. Some states and provinces do not allow limitations on major appliances with Maytag's published installation instructions. 11. If you need assistance using your product or you can find your complete model number ready. Service...
... warranty gives you specific legal rights, and you also may have access to the Internet and you need further assistance, you would like to repair or replace appliance light bulbs, air filters or water filters. Some states and provinces do not allow limitations on major appliances with Maytag's published installation instructions. 11. If you need assistance using your product or you can find your complete model number ready. Service...

Energy Guide
Page 1
U.S. Refrigerator-Freezer • Automatic Defrost • Side-Mounted Freezer • With Through-The-Door-Ice Service Whirlpool Corporation Model: MSD2273VE*0* Capacity: 21.8 Cubic Feet Estimated Yearly Operating Cost $57 ▼ $57 $72 Cost Range of Similar Models 537 kWh Estimated Yearly Electricity Use Your cost will depend on your utility rates and use. • Cost range based only on models of similar capacity with automatic defrost, side-mounted freezer, and with...
U.S. Refrigerator-Freezer • Automatic Defrost • Side-Mounted Freezer • With Through-The-Door-Ice Service Whirlpool Corporation Model: MSD2273VE*0* Capacity: 21.8 Cubic Feet Estimated Yearly Operating Cost $57 ▼ $57 $72 Cost Range of Similar Models 537 kWh Estimated Yearly Electricity Use Your cost will depend on your utility rates and use. • Cost range based only on models of similar capacity with automatic defrost, side-mounted freezer, and with...


