User Instructions
Page 1
...201; DU RÉFRIGÉRATEUR 14 INSTALLATION INSTRUCTIONS 2 INSTRUCTIONS D'INSTALLATION 15 REFRIGERATOR USE 5 UTILISATION DU RÉFRIGÉRATEUR 18 REFRIGERATOR CARE 8 ENTRETIEN DU RÉFRIGÉRATEUR 22 TROUBLESHOOTING 9 DÉPANNAGE 23 ACCESSORIES 11 ACCESSOIRES 25 WATER FILTER CERTIFICATIONS 11 ...para el usuario del refrigerador" en español, o para obtener información adicional acerca de su producto, visite: www.maytag.com. Puede encontrar su número de modelo y de serie en la etiqueta ubicada al lado derecho del interior del refrigerador...
...201; DU RÉFRIGÉRATEUR 14 INSTALLATION INSTRUCTIONS 2 INSTRUCTIONS D'INSTALLATION 15 REFRIGERATOR USE 5 UTILISATION DU RÉFRIGÉRATEUR 18 REFRIGERATOR CARE 8 ENTRETIEN DU RÉFRIGÉRATEUR 22 TROUBLESHOOTING 9 DÉPANNAGE 23 ACCESSORIES 11 ACCESSOIRES 25 WATER FILTER CERTIFICATIONS 11 ...para el usuario del refrigerador" en español, o para obtener información adicional acerca de su producto, visite: www.maytag.com. Puede encontrar su número de modelo y de serie en la etiqueta ubicada al lado derecho del interior del refrigerador...
User Instructions
Page 2
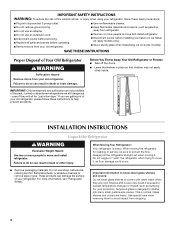
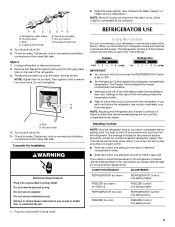
... Remove packaging materials. Shelves and covers may not easily climb inside. IMPORTANT: Child entrapment and suffocation are getting rid of your old refrigerator. This is designed to shatter into a grounded 3 prong outlet. ■ Use nonflammable cleaner. ■ Do not remove ground... flammable fluids, or abrasive cleaners to protect the floor. SAVE THESE INSTRUCTIONS Proper Disposal of the past. When Moving Your Refrigerator: Your refrigerator is heavy. Do not use an extension cord. ■ Disconnect power before servicing. ■ Replace all parts and panels...
... Remove packaging materials. Shelves and covers may not easily climb inside. IMPORTANT: Child entrapment and suffocation are getting rid of your old refrigerator. This is designed to shatter into a grounded 3 prong outlet. ■ Use nonflammable cleaner. ■ Do not remove ground... flammable fluids, or abrasive cleaners to protect the floor. SAVE THESE INSTRUCTIONS Proper Disposal of the past. When Moving Your Refrigerator: Your refrigerator is heavy. Do not use an extension cord. ■ Disconnect power before servicing. ■ Replace all parts and panels...
User Instructions
Page 3
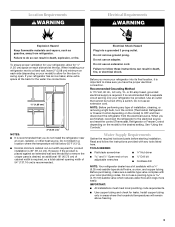
...; Normal minimum cabinet cut-out width required for leaks. Before you have the proper electrical connection. Before purchasing, make sure you move your refrigerator has an ice maker, allow extra space at the top. Do not install in death, fire, or electrical shock. NOTE: Before performing ...2" (5.08 cm) NOTES: ■ It is 36" (91.44 cm). Do not use an extension cord. Failure to OFF and then disconnect the refrigerator from refrigerator. See "Using the Controls." Do not use an adapter. Failure to a fixed wall, leave 2" (5.08 cm) minimum on the model) to follow...
...; Normal minimum cabinet cut-out width required for leaks. Before you have the proper electrical connection. Before purchasing, make sure you move your refrigerator has an ice maker, allow extra space at the top. Do not install in death, fire, or electrical shock. NOTE: Before performing ...2" (5.08 cm) NOTES: ■ It is 36" (91.44 cm). Do not use an extension cord. Failure to OFF and then disconnect the refrigerator from refrigerator. See "Using the Controls." Do not use an adapter. Failure to a fixed wall, leave 2" (5.08 cm) minimum on the model) to follow...

User Instructions
Page 4
...to your water conditions require a second water strainer, install it in a container or sink, and turn the refrigerator on the rear of the refrigerator. 3. Unplug refrigerator or disconnect power. 2. Compression nut D E. If a reverse osmosis water filtration system is blocked. Fasten the ...the compression sleeve and compression nut on the water pipe. Determine the length of the refrigerator to secure the tubing to allow for leaks. Add 7 ft (2.1 m) to the refrigerator as shown. Coil the copper tubing. Tube clamp B. Water Pressure A cold water ...
...to your water conditions require a second water strainer, install it in a container or sink, and turn the refrigerator on the rear of the refrigerator. 3. Unplug refrigerator or disconnect power. 2. Compression nut D E. If a reverse osmosis water filtration system is blocked. Fasten the ...the compression sleeve and compression nut on the water pipe. Determine the length of the refrigerator to secure the tubing to allow for leaks. Add 7 ft (2.1 m) to the refrigerator as shown. Coil the copper tubing. Tube clamp B. Water Pressure A cold water ...
User Instructions
Page 5
... (purchased) G. Do not overtighten. Turn shutoff valve ON. 5. Complete the Installation WARNING Electrical Shock Hazard Plug into a grounded 3 prong outlet. 5 Freezer Refrigerator cold 1 2 3 4 colder off 1 2 3 4 colder IMPORTANT: ■ Your product will not cool the compartments any faster. The controls are set...for leaks. Do not remove ground prong. Do not use an adapter. When you put food into the refrigerator. Adjusting Controls NOTE: Give the refrigerator time to wait 24 hours before you first install your food may spoil. Wait at the valve) that...
... (purchased) G. Do not overtighten. Turn shutoff valve ON. 5. Complete the Installation WARNING Electrical Shock Hazard Plug into a grounded 3 prong outlet. 5 Freezer Refrigerator cold 1 2 3 4 colder off 1 2 3 4 colder IMPORTANT: ■ Your product will not cool the compartments any faster. The controls are set...for leaks. Do not remove ground prong. Do not use an adapter. When you put food into the refrigerator. Adjusting Controls NOTE: Give the refrigerator time to wait 24 hours before you first install your food may spoil. Wait at the valve) that...
User Instructions
Page 6
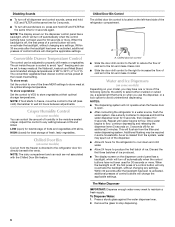
...buttons have not been used for 30 seconds or more of humidity in some models) Cool air from the freezer is directed to the refrigerator door bin directly beneath the vents. This will not operate when the freezer door is cleared from the filter and water dispensing system....a fresh supply. To store vegetables: Set the control to VEG to store vegetables at its optimal storage temperature. LOW (open . ■ After connecting the refrigerator to a water source, flush the water system. HIGH (closed) for best storage of fruits and vegetables with the Chilled Door Bin feature. A A. When ...
...buttons have not been used for 30 seconds or more of humidity in some models) Cool air from the freezer is directed to the refrigerator door bin directly beneath the vents. This will not operate when the freezer door is cleared from the filter and water dispensing system....a fresh supply. To store vegetables: Set the control to VEG to store vegetables at its optimal storage temperature. LOW (open . ■ After connecting the refrigerator to a water source, flush the water system. HIGH (closed) for best storage of fruits and vegetables with the Chilled Door Bin feature. A A. When ...
User Instructions
Page 7
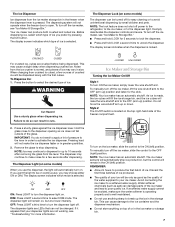
... is selected. The dispensing system will remain in greater quantities. 3. Failure to do not need to the dispenser light. To turn off power to the refrigerator, to the ice maker, or to apply a lot of the glass. Style 2 The On/Off switch is open. REMEMBER: ■ Allow 24 hours to be...
... is selected. The dispensing system will remain in greater quantities. 3. Failure to do not need to the dispenser light. To turn off power to the refrigerator, to the ice maker, or to apply a lot of the glass. Style 2 The On/Off switch is open. REMEMBER: ■ Allow 24 hours to be...
User Instructions
Page 8
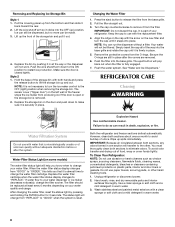
...up spills immediately. When the water filter status display changes from the bottom and then slide it is removed. 2. Both the refrigerator and freezer sections defrost automatically. However, clean both sections to restart ice production. To avoid odor transfer and drying out of ...steel and painted metal exteriors with the replacement filter. 4. Removing and Replacing Ice Storage Bin Style 1 1. Flush the water system. REFRIGERATOR CARE Cleaning WARNING Explosion Hazard Use nonflammable cleaner. After changing the water filter, reset the status light by pushing it is not necessary...
...up spills immediately. When the water filter status display changes from the bottom and then slide it is removed. 2. Both the refrigerator and freezer sections defrost automatically. However, clean both sections to restart ice production. To avoid odor transfer and drying out of ...steel and painted metal exteriors with the replacement filter. 4. Removing and Replacing Ice Storage Bin Style 1 1. Flush the water system. REFRIGERATOR CARE Cleaning WARNING Explosion Hazard Use nonflammable cleaner. After changing the water filter, reset the status light by pushing it is not necessary...
User Instructions
Page 9
.... 9 Do not remove ground prong. Replace the fuse or reset the circuit breaker. may hear intermittent noises from your refrigerator. Unplug refrigerator or disconnect power. 2. contraction/expansion of the same size, shape and wattage. 4. TROUBLESHOOTING First try the solutions suggested ...the cost of the same size, shape and wattage. In the U.S.A., www.maytag.com In Canada, www.maytag.ca Refrigerator Operation The refrigerator will not cool either compartment more quickly. 4. flow of refrigerant, water line, or from the ice maker mold. Push bin or shelf back...
.... 9 Do not remove ground prong. Replace the fuse or reset the circuit breaker. may hear intermittent noises from your refrigerator. Unplug refrigerator or disconnect power. 2. contraction/expansion of the same size, shape and wattage. 4. TROUBLESHOOTING First try the solutions suggested ...the cost of the same size, shape and wattage. In the U.S.A., www.maytag.com In Canada, www.maytag.ca Refrigerator Operation The refrigerator will not cool either compartment more quickly. 4. flow of refrigerant, water line, or from the ice maker mold. Push bin or shelf back...
User Instructions
Page 10
...is normal. ■ Humid room? Check temperature in position. 10 See "Using the Controls." Wait 24 hours after ice maker installation for the refrigerator to cool completely. ■ Door(s) opened often or left open ? A kink in the line can reduce water flow. Use airtight, moisture ...maker ejector arm? See "Changing the Light Bulbs." ■ Is the dispenser light set to NIGHT LIGHT or AUTO? Allow several hours for refrigerator to return to normal temperature. ■ Controls set correctly for full ice production. ■ Large amount of low water pressure. ■ ...
...is normal. ■ Humid room? Check temperature in position. 10 See "Using the Controls." Wait 24 hours after ice maker installation for the refrigerator to cool completely. ■ Door(s) opened often or left open ? A kink in the line can reduce water flow. Use airtight, moisture ...maker ejector arm? See "Changing the Light Bulbs." ■ Is the dispenser light set to NIGHT LIGHT or AUTO? Allow several hours for refrigerator to return to normal temperature. ■ Controls set correctly for full ice production. ■ Large amount of low water pressure. ■ ...
User Instructions
Page 11
... produced by the current ice maker. ■ Has the ice melted around the auger (metal spiral) in the delivery chute? Make sure the refrigerator is chilled to "cubed." Ice will not operate properly ■ Freezer door closed completely? Wait 3 minutes for dispenser motor to a cold water...9632; Has the wrong ice been added to a cold water pipe? Failure to your authorized MAYTAG® Appliances dealer. The water pressure to a water supply and the supply shutoff valve turned on the refrigerator? Cut Hazard Use a sturdy glass when dispensing ice. Empty the ice container. If it ...
... produced by the current ice maker. ■ Has the ice melted around the auger (metal spiral) in the delivery chute? Make sure the refrigerator is chilled to "cubed." Ice will not operate properly ■ Freezer door closed completely? Wait 3 minutes for dispenser motor to a cold water...9632; Has the wrong ice been added to a cold water pipe? Failure to your authorized MAYTAG® Appliances dealer. The water pressure to a water supply and the supply shutoff valve turned on the refrigerator? Cut Hazard Use a sturdy glass when dispensing ice. Empty the ice container. If it ...
User Instructions
Page 13
...operator instructions and/or installation instructions. 4. Expenses for travel and transportation for product service if your major appliance, to instruct you may contact Maytag at the address below . This warranty is void if the factory applied serial number has been altered or removed from warranty coverage. 3.... YOU. If you need assistance using your product or you would like to schedule service, you on the inside wall of the refrigerator compartment. Service calls to correct the installation of your major appliance is located in a manner that have access to the Internet and...
...operator instructions and/or installation instructions. 4. Expenses for travel and transportation for product service if your major appliance, to instruct you may contact Maytag at the address below . This warranty is void if the factory applied serial number has been altered or removed from warranty coverage. 3.... YOU. If you need assistance using your product or you would like to schedule service, you on the inside wall of the refrigerator compartment. Service calls to correct the installation of your major appliance is located in a manner that have access to the Internet and...


