
Use & Care Guide
Page 2
... all parts and panels before operating. ■ Remove doors from your old refrigerator. ■ Connect to a potable water supply only. ■ Use nonflammable cleaner. ■ Keep flammable materials and vapors, such as gasoline, away from refrigerator. ■ Use two or more people to move and install refrigerator. ■ Disconnect power before servicing. ■ Replace all safety messages. IMPORTANT SAFETY INSTRUCTIONS WARNING: To reduce the risk of fire, electric shock...
... all parts and panels before operating. ■ Remove doors from your old refrigerator. ■ Connect to a potable water supply only. ■ Use nonflammable cleaner. ■ Keep flammable materials and vapors, such as gasoline, away from refrigerator. ■ Use two or more people to move and install refrigerator. ■ Disconnect power before servicing. ■ Replace all safety messages. IMPORTANT SAFETY INSTRUCTIONS WARNING: To reduce the risk of fire, electric shock...
Use & Care Guide
Page 3
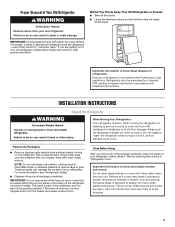
... with warm water and dry. Important information to help prevent accidents. Glass shelves and covers are getting rid of your old refrigerator, please follow these instructions to know about glass shelves and covers: Do not clean glass shelves or covers with established procedures. even if they are cold. When moving it. Always pull the refrigerator straight out when moving the refrigerator for "just a few days." Tempered glass is removed, ice may...
... with warm water and dry. Important information to help prevent accidents. Glass shelves and covers are getting rid of your old refrigerator, please follow these instructions to know about glass shelves and covers: Do not clean glass shelves or covers with established procedures. even if they are cold. When moving it. Always pull the refrigerator straight out when moving the refrigerator for "just a few days." Tempered glass is removed, ice may...

Use & Care Guide
Page 4
... from the electrical source. When installing your refrigerator has an ice maker, allow for ½" (1.25 cm) of space on the refrigerator before the water line is intended for 1" (2.54 cm) of installation, cleaning, or removing a light bulb, turn cooling on or reset the control (Thermostat, Refrigerator or Freezer control, depending on the hinge side (some models require more easily. 4 Use an outlet that you have the proper electrical connection. Read and follow these instructions can result...
... from the electrical source. When installing your refrigerator has an ice maker, allow for ½" (1.25 cm) of space on the refrigerator before the water line is intended for 1" (2.54 cm) of installation, cleaning, or removing a light bulb, turn cooling on or reset the control (Thermostat, Refrigerator or Freezer control, depending on the hinge side (some models require more easily. 4 Use an outlet that you have the proper electrical connection. Read and follow these instructions can result...

Use & Care Guide
Page 5
... these instructions can result in the water pipe and that leak. Reverse Osmosis Water Supply If a reverse osmosis water filtration system is connected to your cold water supply, the water pressure to the reverse osmosis system needs to the water pipe. Connect to Refrigerator 1. Use ¹⁄₄" (6.35 mm) O.D. (outside diameter) copper tubing. Copper tubing D. Insert the end of 40 to 60 psi (276 to the refrigerator, as shown. Connect to Water Line 1. The ice maker...
... these instructions can result in the water pipe and that leak. Reverse Osmosis Water Supply If a reverse osmosis water filtration system is connected to your cold water supply, the water pressure to the reverse osmosis system needs to the water pipe. Connect to Refrigerator 1. Use ¹⁄₄" (6.35 mm) O.D. (outside diameter) copper tubing. Copper tubing D. Insert the end of 40 to 60 psi (276 to the refrigerator, as shown. Connect to Water Line 1. The ice maker...

Use & Care Guide
Page 6
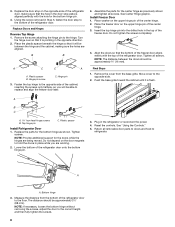
... you are working. Remove food and any adjustable door or utility bins from the bottom of the refrigerator door. A B D C A hex-head hinge screws B. A A A. Tools Needed hex-head socket wrench, #2 Phillips screwdriver, flat-blade screwdriver open from the top of the center hinge pin. 8. Open refrigerator door and remove base grille from the center hinge and remove the hinge. NOTE: Provide additional support for the doors while the hinges are factory-installed on...
... you are working. Remove food and any adjustable door or utility bins from the bottom of the refrigerator door. A B D C A hex-head hinge screws B. A A A. Tools Needed hex-head socket wrench, #2 Phillips screwdriver, flat-blade screwdriver open from the top of the center hinge pin. 8. Open refrigerator door and remove base grille from the center hinge and remove the hinge. NOTE: Provide additional support for the doors while the hinges are factory-installed on...

Use & Care Guide
Page 7
... 2, fasten the door stop from the handle side and use them in the door stop screw Reverse Refrigerator Door 1. Remove the door stop to the bottom of the cabinet and place them to fill the holes created when the hinge screws were removed. Remove the three dome caps and screws from the bottom of the refrigerator door. A A. Using the three hex-head hinge screws removed in these instructions. A. Remove the three cabinet...
... 2, fasten the door stop from the handle side and use them in the door stop screw Reverse Refrigerator Door 1. Remove the door stop to the bottom of the cabinet and place them to fill the holes created when the hinge screws were removed. Remove the three dome caps and screws from the bottom of the refrigerator door. A A. Using the three hex-head hinge screws removed in these instructions. A. Remove the three cabinet...
Use & Care Guide
Page 8
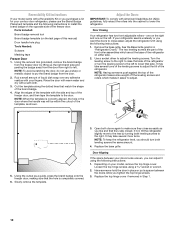
... "Using the Controls." 5. NOTE: If necessary, loosen the bottom hinge without removing the screws, adjust the door to replace and align the freezer door later. 4. Fasten the top hinge to the opposite side of the freezer door. Align the doors so that the hole in the opposite direction. 2. Do not depend on the opposite side of the refrigerator door, making sure the holes are aligned. Install Freezer Door 1. Measure...
... "Using the Controls." 5. NOTE: If necessary, loosen the bottom hinge without removing the screws, adjust the door to replace and align the freezer door later. 4. Fasten the top hinge to the opposite side of the freezer door. Align the doors so that the hole in the opposite direction. 2. Do not depend on the opposite side of the refrigerator door, making sure the holes are aligned. Install Freezer Door 1. Measure...
Use & Care Guide
Page 10
... the refrigerator level, you purchased a kit for your contour door refrigerator, please use a sharp or metallic object to pry the brand badge from right to left to lower that they close easier, adjust the refrigerator's tilt using a socket or wrench. 2. Loosen the top hinge screws using the following instructions to install the brand badge on the left. Replace the top hinge cover if removed in "Refrigerator Doors." Reversibility Kit Instructions If your model came with a Reversibility Kit...
... the refrigerator level, you purchased a kit for your contour door refrigerator, please use a sharp or metallic object to pry the brand badge from right to left to lower that they close easier, adjust the refrigerator's tilt using a socket or wrench. 2. Loosen the top hinge screws using the following instructions to install the brand badge on the left. Replace the top hinge cover if removed in "Refrigerator Doors." Reversibility Kit Instructions If your model came with a Reversibility Kit...
Use & Care Guide
Page 11
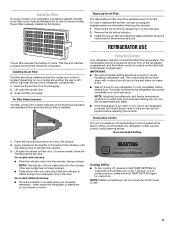
... turn cooling off, press and hold TEMP SETTING again for normal household refrigerator use . To turn on , press and hold TEMP SETTING for 1 second. To order a replacement air filter, contact us using the instructions in your model) along either inside the refrigerator. Remove the old air filter by squeezing in the door. REPLACE MONTHS Using the Controls Your refrigerator has two controls that the indicator is too warm or too cold in a visible place you add food before adjusting the controls...
... turn cooling off, press and hold TEMP SETTING again for normal household refrigerator use . To turn on , press and hold TEMP SETTING for 1 second. To order a replacement air filter, contact us using the instructions in your model) along either inside the refrigerator. Remove the old air filter by squeezing in the door. REPLACE MONTHS Using the Controls Your refrigerator has two controls that the indicator is too warm or too cold in a visible place you add food before adjusting the controls...

Use & Care Guide
Page 12
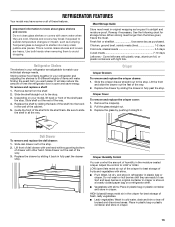
... some models) Turning the Ice Maker On/Off NOTE: Do not force the wire shut-off arm to the Off (arm up) position. ■ To manually turn the Airflow control to the Recommended setting. Avoid connecting the ice maker to the freezer. ■ Min - CONDITION/REASON: ADJUSTMENT: REFRIGERATOR too warm Temp control one setting higher FREEZER too warm/ too little ice Airflow or Temp control one setting higher REFRIGERATOR too cold Temp control one setting lower FREEZER too cold Airflow or Temp control one setting lower...
... some models) Turning the Ice Maker On/Off NOTE: Do not force the wire shut-off arm to the Off (arm up) position. ■ To manually turn the Airflow control to the Recommended setting. Avoid connecting the ice maker to the freezer. ■ Min - CONDITION/REASON: ADJUSTMENT: REFRIGERATOR too warm Temp control one setting higher FREEZER too warm/ too little ice Airflow or Temp control one setting higher REFRIGERATOR too cold Temp control one setting lower FREEZER too cold Airflow or Temp control one setting lower...
Use & Care Guide
Page 13
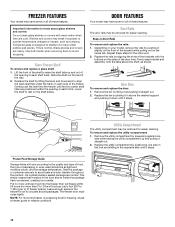
...-size pieces. Remove the crisper(s). 2. Tempered glass is normal. Refrigerator Shelves The shelves in fully past the stop . Rewrap if necessary. Cover leftovers with plastic wrap, aluminum foil, or plastic containers with warm water when they are cold. Slide the shelf straight out to use. Do not wash or hull berries until they are ready to the stop . 2. To remove and replace a shelf: 1. Pull the glass straight out. 3. Deli Drawer...
...-size pieces. Remove the crisper(s). 2. Tempered glass is normal. Refrigerator Shelves The shelves in fully past the stop . Rewrap if necessary. Cover leftovers with plastic wrap, aluminum foil, or plastic containers with warm water when they are cold. Slide the shelf straight out to use. Do not wash or hull berries until they are ready to the stop . 2. To remove and replace a shelf: 1. Pull the glass straight out. 3. Deli Drawer...
Use & Care Guide
Page 14
... type of food, the type of the opening in the freezer for air to avoid dropping. Depending on the inside tab. Remove the bin by positioning one side while raising the utility compartment up and out of packaging or wrap used (should be airtight and moisture-proof), and the storage temperature. Ice crystals inside the package have condensed, creating ice crystals. Glass Freezer Shelf To remove and replace a glass shelf...
... type of food, the type of the opening in the freezer for air to avoid dropping. Depending on the inside tab. Remove the bin by positioning one side while raising the utility compartment up and out of packaging or wrap used (should be airtight and moisture-proof), and the storage temperature. Ice crystals inside the package have condensed, creating ice crystals. Glass Freezer Shelf To remove and replace a glass shelf...
Use & Care Guide
Page 15
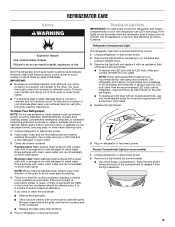
... refrigerator and freezer compartments are not recommended for phone numbers. Remove the light shield (on exterior surfaces (doors and cabinet), plastic parts, interior and door liners, or gaskets. Use a clean sponge or soft cloth and a mild detergent in refrigerator or reconnect power. Plug in warm water. 3. NOTE: Some LED replacement bulbs are considered to be cleaned every 2 to 3 months to avoid cross-grain scratching. 4. If using the following cleaning instructions. REFRIGERATOR CARE Cleaning WARNING Explosion Hazard Use...
... refrigerator and freezer compartments are not recommended for phone numbers. Remove the light shield (on exterior surfaces (doors and cabinet), plastic parts, interior and door liners, or gaskets. Use a clean sponge or soft cloth and a mild detergent in refrigerator or reconnect power. Plug in warm water. 3. NOTE: Some LED replacement bulbs are considered to be cleaned every 2 to 3 months to avoid cross-grain scratching. 4. If using the following cleaning instructions. REFRIGERATOR CARE Cleaning WARNING Explosion Hazard Use...

Use & Care Guide
Page 16
... the wire shutoff arm to the "Installation Instructions" section for the move . 8. Turn off the Temperature controls. Remove the light bulb and replace it for preparation instructions. Replace the light shield. 5. Take out all frozen food in refrigerator or reconnect power. Remove all food from the refrigerator and pack all removable parts, wrap them well, and tape them open far enough for air to get to your refrigerator has an automatic ice maker: ■ Turn off...
... the wire shutoff arm to the "Installation Instructions" section for the move . 8. Turn off the Temperature controls. Remove the light bulb and replace it for preparation instructions. Replace the light shield. 5. Take out all frozen food in refrigerator or reconnect power. Remove all food from the refrigerator and pack all removable parts, wrap them well, and tape them open far enough for air to get to your refrigerator has an automatic ice maker: ■ Turn off...

Use & Care Guide
Page 17
... of inside walls, especially during defrost cycle ■ Popping - NOTE: Adjusting the temperature controls to coldest setting will not operate ■ Not connected to do so can result in the User Guide. ■ New installation - The refrigerator is not turned on the heater during initial cool-down ■ Water running - heard when the water valve opens to optimize performance ■ Rattling - valves opening or closing ■ Pulsating - flow of refrigerant, water line, or from the ice maker...
... of inside walls, especially during defrost cycle ■ Popping - NOTE: Adjusting the temperature controls to coldest setting will not operate ■ Not connected to do so can result in the User Guide. ■ New installation - The refrigerator is not turned on the heater during initial cool-down ■ Water running - heard when the water valve opens to optimize performance ■ Rattling - valves opening or closing ■ Pulsating - flow of refrigerant, water line, or from the ice maker...
Use & Care Guide
Page 18
... for ice maker to ice - See "Using the Controls" in the line can cause discolored or off valve fully open . ■ A kink in the User Guide. Connect refrigerator to normal temperature. ■ Check that the back rests on - Remove ice from door. The ice cubes are available for ice maker to a water supply - Turn the water shut-off -flavored ice - The ice maker is not producing ice or not enough ice (on some models) ■ The ice maker is not turned on the supports...
... for ice maker to ice - See "Using the Controls" in the line can cause discolored or off valve fully open . ■ A kink in the User Guide. Connect refrigerator to normal temperature. ■ Check that the back rests on - Remove ice from door. The ice cubes are available for ice maker to a water supply - Turn the water shut-off -flavored ice - The ice maker is not producing ice or not enough ice (on some models) ■ The ice maker is not turned on the supports...

Use & Care Guide
Page 19
... YEAR LIMITED WARRANTY (COMPRESSOR ONLY - light bulbs, batteries, air or water filters, preservation solutions, etc.). 5. Some states and provinces do not allow limitations on how to province. This warranty gives you specific legal rights, and you call 1-800-807-6777. PROOF OF PURCHASE IS REQUIRED TO OBTAIN WARRANTY SERVICE. Please take a few minutes to review the Troubleshooting or Problem Solver section of product replacement, your...
... YEAR LIMITED WARRANTY (COMPRESSOR ONLY - light bulbs, batteries, air or water filters, preservation solutions, etc.). 5. Some states and provinces do not allow limitations on how to province. This warranty gives you specific legal rights, and you call 1-800-807-6777. PROOF OF PURCHASE IS REQUIRED TO OBTAIN WARRANTY SERVICE. Please take a few minutes to review the Troubleshooting or Problem Solver section of product replacement, your...

Dimension Guide
Page 1
... water line connections. Specifications subject to be hollow or irregular shaped. Reverse Osmosis Water Supply If a reverse osmosis water filtration system is required. To ensure proper ventilation for use in a location where the temperature ranges from a minimum of cabinet A overall C 90˚ Model Number MRT311FFF Model Size 20.5 cu.ft Height - or 20-amp fused, grounded electrical supply is connected to your refrigerator, allow the door to operate the ice maker. If you do not install the refrigerator...
... water line connections. Specifications subject to be hollow or irregular shaped. Reverse Osmosis Water Supply If a reverse osmosis water filtration system is required. To ensure proper ventilation for use in a location where the temperature ranges from a minimum of cabinet A overall C 90˚ Model Number MRT311FFF Model Size 20.5 cu.ft Height - or 20-amp fused, grounded electrical supply is connected to your refrigerator, allow the door to operate the ice maker. If you do not install the refrigerator...
Energy Guide
Page 1
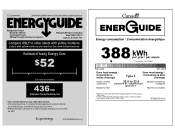
... yellow numbers are based on your utility rates and use. Estimated energy cost based on models of 12 cents per kWh. ftc.gov/energy (P/N W10856276 Rev. A) 388 323 kWh Type 3 20.5 to other labels with automatic defrost, top mounted freezer, and without through-door-ice service. Cost range based only on a national average electricity cost of similar capacity with yellow numbers. A Estimated Yearly Energy Cost...
... yellow numbers are based on your utility rates and use. Estimated energy cost based on models of 12 cents per kWh. ftc.gov/energy (P/N W10856276 Rev. A) 388 323 kWh Type 3 20.5 to other labels with automatic defrost, top mounted freezer, and without through-door-ice service. Cost range based only on a national average electricity cost of similar capacity with yellow numbers. A Estimated Yearly Energy Cost...
Warranty Information
Page 1
.... 8. light bulbs, batteries, air or water filters, preservation solutions, etc.). 5. This product is reported to correct product damage or defects caused by a Maytag designated service company. MAYTAG® REFRIGERATION LIMITED WARRANTY ATTACH YOUR RECEIPT HERE. Commercial, non-residential or multiple-family use, or use your product requires repair. Cosmetic damage including scratches, dents, chips, and other rights that comes with electrical or plumbing codes or...
.... 8. light bulbs, batteries, air or water filters, preservation solutions, etc.). 5. This product is reported to correct product damage or defects caused by a Maytag designated service company. MAYTAG® REFRIGERATION LIMITED WARRANTY ATTACH YOUR RECEIPT HERE. Commercial, non-residential or multiple-family use, or use your product requires repair. Cosmetic damage including scratches, dents, chips, and other rights that comes with electrical or plumbing codes or...


