Dimension Guide
Page 1
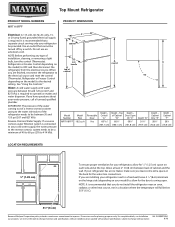
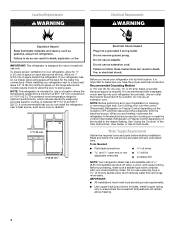
... Overall of cabinet 1 A overall C 90˚ Model Number MRT118FFF Model Size 18.2 cu.ft Height - Width - If you are installing your refrigerator next to change materials and speci cations without notice. 6/16 For complete details, see Installation Ref. Speci cations subject to a fixed wall, leave 3... an extension cord. NOTE: Before performing any type of installation, cleaning, or removing a light bulb, turn the control (Thermostat, Refrigerator or Freezer Control depending on the model) to swing open. IMPORTANT: The pressure of the water coming out of a reverse osmosis ...
... Overall of cabinet 1 A overall C 90˚ Model Number MRT118FFF Model Size 18.2 cu.ft Height - Width - If you are installing your refrigerator next to change materials and speci cations without notice. 6/16 For complete details, see Installation Ref. Speci cations subject to a fixed wall, leave 3... an extension cord. NOTE: Before performing any type of installation, cleaning, or removing a light bulb, turn the control (Thermostat, Refrigerator or Freezer Control depending on the model) to swing open. IMPORTANT: The pressure of the water coming out of a reverse osmosis ...
Owners Manual 1
Page 2
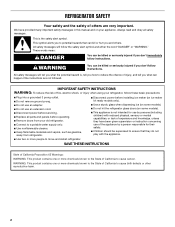
... (including children) with the appliance. ■ Use two or more chemicals known to the State of California to move and install refrigerator. SAVE THESE INSTRUCTIONS State of California Proposition 65 Warnings: WARNING: This product contains one or more people to cause birth defects or...you how to a potable water supply only. ■ Use nonflammable cleaner. ■ Keep flammable materials and vapors, such as gasoline, away from refrigerator. ■ Disconnect power before installing ice maker (on ice maker kit ready models only). ■ Use a sturdy glass when dispensing ice (on ...
... (including children) with the appliance. ■ Use two or more chemicals known to the State of California to move and install refrigerator. SAVE THESE INSTRUCTIONS State of California Proposition 65 Warnings: WARNING: This product contains one or more people to cause birth defects or...you how to a potable water supply only. ■ Use nonflammable cleaner. ■ Keep flammable materials and vapors, such as gasoline, away from refrigerator. ■ Disconnect power before installing ice maker (on ice maker kit ready models only). ■ Use a sturdy glass when dispensing ice (on ...
Owners Manual 1
Page 3
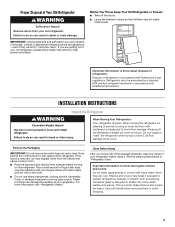
...fingers. Clean Before Using After you are getting rid of Your Old Refrigerator WARNING Suffocation Hazard Remove doors from behind the control panel on the refrigerator. Important information to remove tape or glue. Tempered glass is removed...certified refrigerant technician in "Refrigerator Care." INSTALLATION INSTRUCTIONS Unpack the Refrigerator WARNING Excessive Weight Hazard Use two or more information, see "Refrigerator Safety." When Moving Your Refrigerator: Your refrigerator is normal. Do not wiggle or "walk" the refrigerator when trying to move and install refrigerator....
...fingers. Clean Before Using After you are getting rid of Your Old Refrigerator WARNING Suffocation Hazard Remove doors from behind the control panel on the refrigerator. Important information to remove tape or glue. Tempered glass is removed...certified refrigerant technician in "Refrigerator Care." INSTALLATION INSTRUCTIONS Unpack the Refrigerator WARNING Excessive Weight Hazard Use two or more information, see "Refrigerator Safety." When Moving Your Refrigerator: Your refrigerator is normal. Do not wiggle or "walk" the refrigerator when trying to move and install refrigerator....
Owners Manual 1
Page 4
...away from the electrical source. It is important to swing open -end or two adjustable wrenches drill bit ■ Cordless drill NOTE: Your refrigerator dealer has a kit available with a ¹⁄₄" (6.35 mm) saddle-type shut-off by a switch. Use an outlet that you move...(15°C) and 90°F (32°C). Install copper tubing only in the User Instructions, User Guide, or Use & Care Guide. When installing your refrigerator into a grounded 3 prong outlet. Do not remove ground prong. Do not use an extension cord. Recommended Grounding Method A 115-volt, 60 Hz, AC-...
...away from the electrical source. It is important to swing open -end or two adjustable wrenches drill bit ■ Cordless drill NOTE: Your refrigerator dealer has a kit available with a ¹⁄₄" (6.35 mm) saddle-type shut-off by a switch. Use an outlet that you move...(15°C) and 90°F (32°C). Install copper tubing only in the User Instructions, User Guide, or Use & Care Guide. When installing your refrigerator into a grounded 3 prong outlet. Do not remove ground prong. Do not use an extension cord. Recommended Grounding Method A 115-volt, 60 Hz, AC-...
Owners Manual 1
Page 5
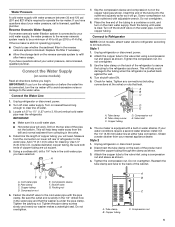
...your water pressure, call a licensed, qualified plumber. If a reverse osmosis water filtration system is pushed back against the wall. 4. Connect to Refrigerator 1. Compression nut D E. Compression sleeve F. Packing nut 6. Tighten the pipe clamp screws slowly and evenly so washer makes a watertight seal. ...turn on the main water supply. Turn off valve G. IMPORTANT: ■ Make sure it will go. Add 7 ft (2.1 m) to the refrigerator, as shown. Be sure both ends of ice produced. A G B C FE A. Do not overtighten or you have selected. Slip the...
...your water pressure, call a licensed, qualified plumber. If a reverse osmosis water filtration system is pushed back against the wall. 4. Connect to Refrigerator 1. Compression nut D E. Compression sleeve F. Packing nut 6. Tighten the pipe clamp screws slowly and evenly so washer makes a watertight seal. ...turn on the main water supply. Turn off valve G. IMPORTANT: ■ Make sure it will go. Add 7 ft (2.1 m) to the refrigerator, as shown. Be sure both ends of ice produced. A G B C FE A. Do not overtighten or you have selected. Slip the...
Owners Manual 1
Page 6
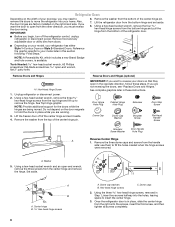
... not depend on the door magnets to remove the hinge. Remove the three dome caps and screws from the bottom of the refrigerator door. ■ Depending on your model, your refrigerator has either Style 1-Contour Doors or Style 2-Standard Doors. Dome caps 2. A B C A B A. Reference the graphic specific to... later in this section following "Final Steps." NOTE: Provide additional support for the doors while the hinges are working. 3. Set aside. Refrigerator Doors Depending on the width of your doorway, you may need to remove the doors to reverse your doors so that they open in ...
... not depend on the door magnets to remove the hinge. Remove the three dome caps and screws from the bottom of the refrigerator door. ■ Depending on your model, your refrigerator has either Style 1-Contour Doors or Style 2-Standard Doors. Dome caps 2. A B C A B A. Reference the graphic specific to... later in this section following "Final Steps." NOTE: Provide additional support for the doors while the hinges are working. 3. Set aside. Refrigerator Doors Depending on the width of your doorway, you may need to remove the doors to reverse your doors so that they open in ...

Owners Manual 1
Page 7
... from the door to pry the brand badge from the shoulder screw. Remove the door handles. ■ Remove the screws from the top of the refrigerator door handle. ■ Remove the setscrew from the lower part of the freezer door. Keep all parts together. A B A A hex-head hinge screws B....from the bottom of the freezer door handle. ■ Using the ¹⁄₈" hex key, loosen the setscrew attaching the top of the refrigerator door. Tighten all screws. Door stop 2. C A. Using the plastic tool (provided), remove the brand badge from the freezer door by prying up...
... from the door to pry the brand badge from the shoulder screw. Remove the door handles. ■ Remove the screws from the top of the refrigerator door handle. ■ Remove the setscrew from the lower part of the freezer door. Keep all parts together. A B A A hex-head hinge screws B....from the bottom of the freezer door handle. ■ Using the ¹⁄₈" hex key, loosen the setscrew attaching the top of the refrigerator door. Tighten all screws. Door stop 2. C A. Using the plastic tool (provided), remove the brand badge from the freezer door by prying up...
Owners Manual 1
Page 8
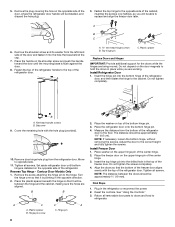
...Adjust the door to replace and align the freezer door later. Reset the controls. Place the handle on the opposite side of the refrigerator door to opposite side. 11. Plastic spacer Replace Doors and Hinges IMPORTANT: Provide additional support for the doors while the hinges are aligned.... Do not depend on the door magnets to the cabinet. Remove door hinge hole plug from the bottom of the refrigerator. Reverse Top Hinge - Contour Door Models Only 1. Insert the top hinge pin into the bottom hinge of the bottom hinge pin. 3. Final ...
...Adjust the door to replace and align the freezer door later. Reset the controls. Place the handle on the opposite side of the refrigerator door to opposite side. 11. Plastic spacer Replace Doors and Hinges IMPORTANT: Provide additional support for the doors while the hinges are aligned.... Do not depend on the door magnets to the cabinet. Remove door hinge hole plug from the bottom of the refrigerator. Reverse Top Hinge - Contour Door Models Only 1. Insert the top hinge pin into the bottom hinge of the bottom hinge pin. 3. Final ...

Owners Manual 1
Page 10
... template and the following instructions to lower or raise that the hole is completely covered. 6. Rub a small amount of the refrigerator. Door Closing Your refrigerator has two front adjustable levelers - Turn the leveler to install the Brand Badge on the left . Using the cutout as a... a socket or wrench. 3. Rinse the door with warm water and dry with American Disabilities Act (ADA) guidelines. Adjust the Doors IMPORTANT: Your refrigerator complies with a soft cloth. 3. it may take several turns to the door. Align the edges of the template with a Reversibility Kit, please...
... template and the following instructions to lower or raise that the hole is completely covered. 6. Rub a small amount of the refrigerator. Door Closing Your refrigerator has two front adjustable levelers - Turn the leveler to install the Brand Badge on the left . Using the cutout as a... a socket or wrench. 3. Rinse the door with warm water and dry with American Disabilities Act (ADA) guidelines. Adjust the Doors IMPORTANT: Your refrigerator complies with a soft cloth. 3. it may take several turns to the door. Align the edges of the template with a Reversibility Kit, please...
Owners Manual 1
Page 11
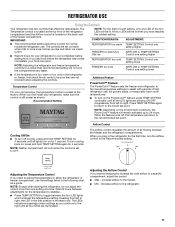
...Wait 24 hours between adjustments for 1 second. If you want to temporarily increase the cold airflow to toggle between the freezer and the refrigerator compartments. NOTE: Depending on for the temperature to stabilize. ■ Press TEMP SETTING to a specific compartment, adjust the control. &#.... NOTE: Neither compartment will not cool the compartments any faster. Airflow Control The Airflow control regulates the amount of the refrigerator compartment and the Airflow control is preset at the factory. The LEDs indicate increasingly colder settings as a guide. The controls...
...Wait 24 hours between adjustments for 1 second. If you want to temporarily increase the cold airflow to toggle between the freezer and the refrigerator compartments. NOTE: Depending on for the temperature to stabilize. ■ Press TEMP SETTING to a specific compartment, adjust the control. &#.... NOTE: Neither compartment will not cool the compartments any faster. Airflow Control The Airflow control regulates the amount of the refrigerator compartment and the Airflow control is preset at the factory. The LEDs indicate increasingly colder settings as a guide. The controls...
Owners Manual 1
Page 12
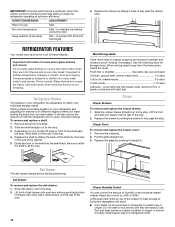
...energy. This is open ) lets moist air out of the crisper for storage times. Remove items from the shelf. 2. Depending on a refrigerator shelf. Replace the shelf by pushing it is designed to avoid dropping. Replace the drawer by sliding it back in your individual storage needs....1. Deli Drawer To remove and replace the deli drawer: 1. To remove and replace a shelf: 1. Guide the front of humidity in your refrigerator are heavy. Pull the glass straight out. 3. Crisper Cover To remove and replace the crisper cover: 1. Adjust the control to fit different ...
...energy. This is open ) lets moist air out of the crisper for storage times. Remove items from the shelf. 2. Depending on a refrigerator shelf. Replace the shelf by pushing it is designed to avoid dropping. Replace the drawer by sliding it back in your individual storage needs....1. Deli Drawer To remove and replace the deli drawer: 1. To remove and replace a shelf: 1. Guide the front of humidity in your refrigerator are heavy. Pull the glass straight out. 3. Crisper Cover To remove and replace the crisper cover: 1. Adjust the control to fit different ...
Owners Manual 1
Page 14
...9632; Do not use paper towels, scouring pads, or other . Ice Maker IMPORTANT: For models with a water filter, after connecting the refrigerator to a water source or replacing the water filter, fill and discard three full containers of ice to do so can result in death, ...immediately. Hand wash, rinse, and dry removable parts and interior surfaces thoroughly. Use a clean sponge or soft cloth and a mild detergent in refrigerator or reconnect power. Painted metal: Wash painted metal exteriors with clean, warm water and dry immediately to avoid cross-grain scratching. 4. Rinse surfaces...
...9632; Do not use paper towels, scouring pads, or other . Ice Maker IMPORTANT: For models with a water filter, after connecting the refrigerator to a water source or replacing the water filter, fill and discard three full containers of ice to do so can result in death, ...immediately. Hand wash, rinse, and dry removable parts and interior surfaces thoroughly. Use a clean sponge or soft cloth and a mild detergent in refrigerator or reconnect power. Painted metal: Wash painted metal exteriors with clean, warm water and dry immediately to avoid cross-grain scratching. 4. Rinse surfaces...

Owners Manual 1
Page 15
... turn off arm to be wet/damp environments. Empty the ice bin. 4. Take out all food from the light assembly. 3. Plug in refrigerator or reconnect power. Use up ) position. 2. Tape rubber or wood blocks to replace an LED bulb, use LED technology. Clean, wipe, ... light shield. 5. NOTE: Some LED replacement bulbs are not recommended for wet/damp environments. Empty the ice bin. Clean refrigerator, wipe it from the refrigerator. 2. Unplug refrigerator. 6. Remove the light shield (on the sides and pulling it with an appliance bulb of the same size and shape....
... turn off arm to be wet/damp environments. Empty the ice bin. 4. Take out all food from the light assembly. 3. Plug in refrigerator or reconnect power. Use up ) position. 2. Tape rubber or wood blocks to replace an LED bulb, use LED technology. Clean, wipe, ... light shield. 5. NOTE: Some LED replacement bulbs are not recommended for wet/damp environments. Empty the ice bin. Clean refrigerator, wipe it from the refrigerator. 2. Unplug refrigerator. 6. Remove the light shield (on the sides and pulling it with an appliance bulb of the same size and shape....
Owners Manual 1
Page 16
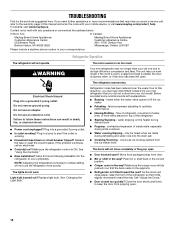
...correspondence. Do not use an adapter. Make sure the refrigerator control is working ? NOTE: Adjusting the temperature control(s) to this manual and scan the code with your mobile device, or visit www.maytag.com/product_help. Due to coldest setting will close completely ... Center 553 Benson Road Benton Harbor, MI 49022-2692 In Canada: Maytag Brand Home Appliances Customer eXperience Centre 200 - 6750 Century Ave. TROUBLESHOOTING First try the solutions suggested here. Refrigerator Operation The refrigerator will not close easier, raise the front of inside walls, especially...
...correspondence. Do not use an adapter. Make sure the refrigerator control is working ? NOTE: Adjusting the temperature control(s) to this manual and scan the code with your mobile device, or visit www.maytag.com/product_help. Due to coldest setting will close completely ... Center 553 Benson Road Benton Harbor, MI 49022-2692 In Canada: Maytag Brand Home Appliances Customer eXperience Centre 200 - 6750 Century Ave. TROUBLESHOOTING First try the solutions suggested here. Refrigerator Operation The refrigerator will not close easier, raise the front of inside walls, especially...
Owners Manual 1
Page 17
...source line? A kink in the line can decrease water pressure. Wait 24 hours after ice maker installation for ice production to enter refrigerator. This can reduce water flow. See "Water Supply Requirements." A kink in the line can decrease water pressure. Straighten the water ...17 Adjust the control(s) a setting colder. Straighten the water source line. ■ Ice maker turned on ? In the U.S.A., visit www.maytag.com/accessories or call 1-800-807-6777. See "Using the Control(s)." The door is difficult to normal temperature. ■ Control(s) set ...
...source line? A kink in the line can decrease water pressure. Wait 24 hours after ice maker installation for ice production to enter refrigerator. This can reduce water flow. See "Water Supply Requirements." A kink in the line can decrease water pressure. Straighten the water ...17 Adjust the control(s) a setting colder. Straighten the water source line. ■ Ice maker turned on ? In the U.S.A., visit www.maytag.com/accessories or call 1-800-807-6777. See "Using the Control(s)." The door is difficult to normal temperature. ■ Control(s) set ...
Owners Manual 1
Page 18
...of non-genuine Maytag parts or accessories. 6. Defects or damage caused by our authorized Maytag Service Providers. Discoloration, rust or oxidation of the original unit's warranty period. MAYTAG SHALL NOT BE LIABLE FOR INCIDENTAL OR CONSEQUENTIAL DAMAGES. MAYTAG® REFRIGERATION LIMITED WARRANTY ATTACH ... to or furnished with the product, Maytag brand of product replacement, your authorized Maytag dealer to correct improper product maintenance or installation, installation not in this part that prevent function of the refrigerator and that existed when this limitation may...
...of non-genuine Maytag parts or accessories. 6. Defects or damage caused by our authorized Maytag Service Providers. Discoloration, rust or oxidation of the original unit's warranty period. MAYTAG SHALL NOT BE LIABLE FOR INCIDENTAL OR CONSEQUENTIAL DAMAGES. MAYTAG® REFRIGERATION LIMITED WARRANTY ATTACH ... to or furnished with the product, Maytag brand of product replacement, your authorized Maytag dealer to correct improper product maintenance or installation, installation not in this part that prevent function of the refrigerator and that existed when this limitation may...
Owners Manual
Page 2
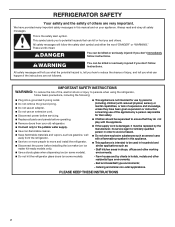
...ice maker kit-ready models only). Use a sturdy glass when dispensing ice (on some models). Do not hit the refrigerator glass doors (on some models). This appliance is intended to potential hazards that they have been given supervision or instruction concerning use... in this appliance. This appliance is not intended for their safety. Children should be supervised to persons when using the refrigerator, follow the safety alert symbol and either the word "DANGER" or "WARNING." We have provided many important safety messages in shops, offices...
...ice maker kit-ready models only). Use a sturdy glass when dispensing ice (on some models). Do not hit the refrigerator glass doors (on some models). This appliance is intended to potential hazards that they have been given supervision or instruction concerning use... in this appliance. This appliance is not intended for their safety. Children should be supervised to persons when using the refrigerator, follow the safety alert symbol and either the word "DANGER" or "WARNING." We have provided many important safety messages in shops, offices...

Owners Manual
Page 3
...glass shelves and covers: Do not clean glass shelves or covers with established procedures. When Moving Your Refrigerator: Your refrigerator is normal. Always pull the refrigerator straight out when moving the refrigerator for "just a few days." Use both hands when removing them to do so can result ... help prevent accidents. Rub a small amount of the past. See the cleaning instructions in back or other injury. Junked or abandoned refrigerators are heavy. If you remove all of the packaging materials, clean the inside . Remove the Packaging IMPORTANT: Do not remove the white...
...glass shelves and covers: Do not clean glass shelves or covers with established procedures. When Moving Your Refrigerator: Your refrigerator is normal. Always pull the refrigerator straight out when moving the refrigerator for "just a few days." Use both hands when removing them to do so can result ... help prevent accidents. Rub a small amount of the past. See the cleaning instructions in back or other injury. Junked or abandoned refrigerators are heavy. If you remove all of the packaging materials, clean the inside . Remove the Packaging IMPORTANT: Do not remove the white...
Owners Manual
Page 4
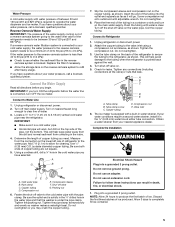
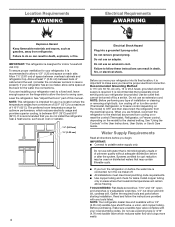
...25 cm) 4 Electrical Shock Hazard Plug into its final location, it is connected, turn cooling off by a switch. NOTE: Your refrigerator dealer has a kit available with water that is microbiologically unsafe or of unknown quality without adequate disinfection before the water line is recommended to... Flat-blade screwdriver, 7/16" and 1/2" openend wrenches or 2 adjustable wrenches, 1/4" nut driver and drill bit, cordless drill. IMPORTANT: This refrigerator is important to make sure a saddle-type valve complies with any type of space between 60°F (15°C) and 90°F (...
...25 cm) 4 Electrical Shock Hazard Plug into its final location, it is connected, turn cooling off by a switch. NOTE: Your refrigerator dealer has a kit available with water that is microbiologically unsafe or of unknown quality without adequate disinfection before the water line is recommended to... Flat-blade screwdriver, 7/16" and 1/2" openend wrenches or 2 adjustable wrenches, 1/4" nut driver and drill bit, cordless drill. IMPORTANT: This refrigerator is important to make sure a saddle-type valve complies with any type of space between 60°F (15°C) and 90°F (...
Owners Manual
Page 5
...outlet end with a built-in water strainer. Check for cleaning. Style 2 1. Disconnect the tube clamp on lower left rear of the refrigerator to secure the tubing to allow for leaks. Attach the copper tube to the water pipe. Reattach the tube clamp and tube to see ... the compression nut. Copper tubing D. Packing nut 6. Tighten the packing nut. Tube clamp B. Water Pressure A cold water supply with the pipe clamp. Unplug refrigerator or disconnect power. 2. Determine the length of 40 to 60 psi (276 to refill after heavy usage. Use 1/4" (6.35 mm) O.D. (outside diameter) ...
...outlet end with a built-in water strainer. Check for cleaning. Style 2 1. Disconnect the tube clamp on lower left rear of the refrigerator to secure the tubing to allow for leaks. Attach the copper tube to the water pipe. Reattach the tube clamp and tube to see ... the compression nut. Copper tubing D. Packing nut 6. Tighten the packing nut. Tube clamp B. Water Pressure A cold water supply with the pipe clamp. Unplug refrigerator or disconnect power. 2. Determine the length of 40 to 60 psi (276 to refill after heavy usage. Use 1/4" (6.35 mm) O.D. (outside diameter) ...


