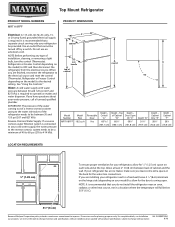
Dimension Guide
Page 1
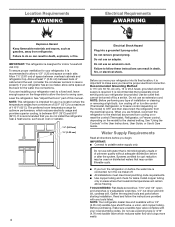
...) is required to your refrigerator be between back of installation, cleaning, or removing a light bulb, turn the control (Thermostat, Refrigerator or Freezer Control depending on each side and at the back for the door to swing open. NOTE: Before performing any type of cabinet and the wall. Water: A cold water supply with product. If you have questions about your refrigerator has an ice maker, make sure you do not install the refrigerator near an oven...
...) is required to your refrigerator be between back of installation, cleaning, or removing a light bulb, turn the control (Thermostat, Refrigerator or Freezer Control depending on each side and at the back for the door to swing open. NOTE: Before performing any type of cabinet and the wall. Water: A cold water supply with product. If you have questions about your refrigerator has an ice maker, make sure you do not install the refrigerator near an oven...
Owners Manual 1
Page 3
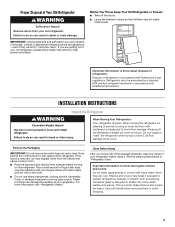
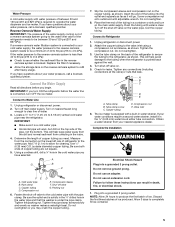
... of Your Old Refrigerator WARNING Suffocation Hazard Remove doors from behind the control panel on the refrigerator. even if they are cold. Refrigerants must be sure to cover the floor with warm water when they will sit for cleaning or service, be evacuated by a licensed, EPA certified refrigerant technician in "Refrigerator Care." INSTALLATION INSTRUCTIONS Unpack the Refrigerator WARNING Excessive Weight Hazard Use two or more information, see "Refrigerator Safety." When moving...
... of Your Old Refrigerator WARNING Suffocation Hazard Remove doors from behind the control panel on the refrigerator. even if they are cold. Refrigerants must be sure to cover the floor with warm water when they will sit for cleaning or service, be evacuated by a licensed, EPA certified refrigerant technician in "Refrigerator Care." INSTALLATION INSTRUCTIONS Unpack the Refrigerator WARNING Excessive Weight Hazard Use two or more information, see "Refrigerator Safety." When moving...
Owners Manual 1
Page 4
...-type shut-off or turn cooling on or reset the control (Thermostat, Refrigerator or Freezer Control depending on the hinge side (some models require more easily. Use an outlet that a separate circuit serving only your refrigerator next to a fixed wall, leave a 2" (5.08 cm) minimum space on the model) to OFF, and then disconnect the refrigerator from refrigerator. Water Supply Requirements Gather the required tools and parts before starting installation. Before purchasing, make sure...
...-type shut-off or turn cooling on or reset the control (Thermostat, Refrigerator or Freezer Control depending on the hinge side (some models require more easily. Use an outlet that a separate circuit serving only your refrigerator next to a fixed wall, leave a 2" (5.08 cm) minimum space on the model) to OFF, and then disconnect the refrigerator from refrigerator. Water Supply Requirements Gather the required tools and parts before starting installation. Before purchasing, make sure...
Owners Manual 1
Page 5
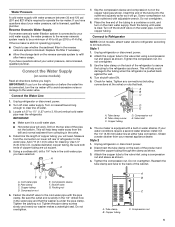
... will work, but drill on the water pipe. Compression sleeve F. Fasten the shut-off valve on the top side of refrigerator to operate the water dispenser and ice maker. Do not overtighten. 3. A B C D E A. Turn off main water supply. Tighten the pipe clamp screws slowly and evenly so washer makes a watertight seal. Flush the tubing until water is under the pipe clamp. Check for cleaning. Valve inlet 6. Do not use an...
... will work, but drill on the water pipe. Compression sleeve F. Fasten the shut-off valve on the top side of refrigerator to operate the water dispenser and ice maker. Do not overtighten. 3. A B C D E A. Turn off main water supply. Tighten the pipe clamp screws slowly and evenly so washer makes a watertight seal. Flush the tubing until water is under the pipe clamp. Check for cleaning. Valve inlet 6. Do not use an...
Owners Manual 1
Page 6
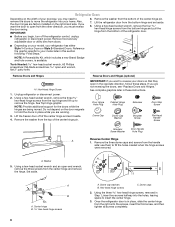
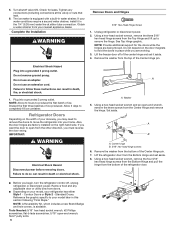
... bins from the handle side; Refrigerator Doors Depending on the width of your doorway, you are working. 3. Remove the washer from the bottom of the center hinge pin. 7. Unplug refrigerator or disconnect power. 2. Do not depend on your model, your refrigerator has either Style 1-Contour Doors or Style 2-Standard Doors. A. Reference the graphic specific to fill the holes created when the hinge screws were removed. NOTE: A Reversibility Kit...
... bins from the handle side; Refrigerator Doors Depending on the width of your doorway, you are working. 3. Remove the washer from the bottom of the center hinge pin. 7. Unplug refrigerator or disconnect power. 2. Do not depend on your model, your refrigerator has either Style 1-Contour Doors or Style 2-Standard Doors. A. Reference the graphic specific to fill the holes created when the hinge screws were removed. NOTE: A Reversibility Kit...
Owners Manual 1
Page 8
... bottom hinge of the refrigerator door. Plastic spacer Replace Doors and Hinges IMPORTANT: Provide additional support for the doors while the hinges are working. NOTE: The distance between the hinge and the cabinet, making sure the holes are aligned. See "Using the Controls." 3. Return all removable door parts to doors and food to opposite side. 11. Remove the shoulder screw and its washer from the left-hand side of the refrigerator door...
... bottom hinge of the refrigerator door. Plastic spacer Replace Doors and Hinges IMPORTANT: Provide additional support for the doors while the hinges are working. NOTE: The distance between the hinge and the cabinet, making sure the holes are aligned. See "Using the Controls." 3. Return all removable door parts to doors and food to opposite side. 11. Remove the shoulder screw and its washer from the left-hand side of the refrigerator door...
Owners Manual 1
Page 11
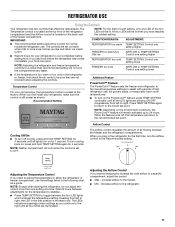
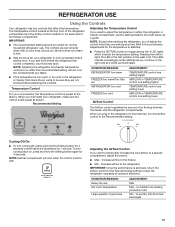
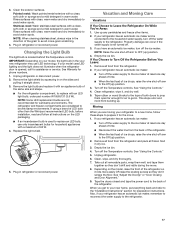
...first install your food may spoil. REFRIGERATOR USE Using the Controls Your refrigerator has two controls that affect the temperature. The controls are illuminated. CONDITION/REASON: ADJUSTMENT: REFRIGERATOR too warm TEMP SETTING Control one setting higher FREEZER too warm/too little ice AIRFLOW or TEMP SETTING Control one setting higher REFRIGERATOR too cold TEMP SETTING Control one setting lower FREEZER too cold AIRFLOW or TEMP SETTING Control one setting at the factory. NOTE: Neither compartment will return to the right until all lights turn cooling...
...first install your food may spoil. REFRIGERATOR USE Using the Controls Your refrigerator has two controls that affect the temperature. The controls are illuminated. CONDITION/REASON: ADJUSTMENT: REFRIGERATOR too warm TEMP SETTING Control one setting higher FREEZER too warm/too little ice AIRFLOW or TEMP SETTING Control one setting higher REFRIGERATOR too cold TEMP SETTING Control one setting lower FREEZER too cold AIRFLOW or TEMP SETTING Control one setting at the factory. NOTE: Neither compartment will return to the right until all lights turn cooling...
Owners Manual 1
Page 14
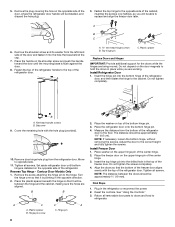
... the ice storage bin under the ice maker, and push it will raise the wire shut-off arm to ensure maximum efficiency. Wait 24 hours between both sections, any odors formed in warm water. Rinse surfaces with a water filter, after connecting the refrigerator to a water source or replacing the water filter, fill and discard three full containers of food, wrap or cover foods tightly. ■ For stainless steel models, stainless...
... the ice storage bin under the ice maker, and push it will raise the wire shut-off arm to ensure maximum efficiency. Wait 24 hours between both sections, any odors formed in warm water. Rinse surfaces with a water filter, after connecting the refrigerator to a water source or replacing the water filter, fill and discard three full containers of food, wrap or cover foods tightly. ■ For stainless steel models, stainless...

Owners Manual 1
Page 15
... Away: 1. Turn off the Temperature control(s). Clean refrigerator, wipe it straight down. 3. Remove all food from the refrigerator and pack all food from the light assembly. 3. Also, if your new home, put everything back and refer to the "Installation Instructions" section for preparation instructions. Replace the light shield. 5. Tape rubber or wood blocks to the tops of ice drops, raise the wire shut-off the water supply to the ice maker at...
... Away: 1. Turn off the Temperature control(s). Clean refrigerator, wipe it straight down. 3. Remove all food from the refrigerator and pack all food from the light assembly. 3. Also, if your new home, put everything back and refer to the "Installation Instructions" section for preparation instructions. Replace the light shield. 5. Tape rubber or wood blocks to the tops of ice drops, raise the wire shut-off the water supply to the ice maker at...
Owners Manual 1
Page 16
..., fire, or electrical shock. ■ Power cord unplugged? See "Changing the Light Bulb." Push bin or shelf back in the correct position. ■ Crisper cover in the way? Do not remove ground prong. See "Using the Control(s)." ■ New installation? heard when the water valve opens to cool completely. water dripping on top of inside walls, especially during initial cooldown ■ Water running/dripping - occurs as ice is ON. See "Adjust the Doors." ■ Door closed too quickly...
..., fire, or electrical shock. ■ Power cord unplugged? See "Changing the Light Bulb." Push bin or shelf back in the correct position. ■ Crisper cover in the way? Do not remove ground prong. See "Using the Control(s)." ■ New installation? heard when the water valve opens to cool completely. water dripping on top of inside walls, especially during initial cooldown ■ Water running/dripping - occurs as ice is ON. See "Adjust the Doors." ■ Door closed too quickly...
Owners Manual 1
Page 17
... Reversibility Kit: Order Part #W10395149 17 Adjust the control(s) a setting colder. A kink in the water? A water filter may need to be installed to a water supply and the supply shut-off valve not fully open ? Allow 24 hours following accessories are hollow or small NOTE: This is normal. ■ Humid room? Minimize door openings and keep door fully closed . Straighten the water source line. ■ Ice maker turned on ? Allow 24 hours for ice production to your cold water supply...
... Reversibility Kit: Order Part #W10395149 17 Adjust the control(s) a setting colder. A kink in the water? A water filter may need to be installed to a water supply and the supply shut-off valve not fully open ? Allow 24 hours following accessories are hollow or small NOTE: This is normal. ■ Humid room? Minimize door openings and keep door fully closed . Straighten the water source line. ■ Ice maker turned on ? Allow 24 hours for ice production to your cold water supply...
Owners Manual 1
Page 18
... or workmanship in remote locations where an authorized Maytag servicer is effective from defects in materials and workmanship and is installed, operated and maintained according to instructions attached to use inconsistent with original model/serial numbers removed, altered or not easily determined. YOUR SOLE AND EXCLUSIVE REMEDY UNDER THIS LIMITED WARRANTY SHALL BE PRODUCT REPAIR AS PROVIDED HEREIN. light bulbs, batteries, air or water filters, preservation solutions, etc...
... or workmanship in remote locations where an authorized Maytag servicer is effective from defects in materials and workmanship and is installed, operated and maintained according to instructions attached to use inconsistent with original model/serial numbers removed, altered or not easily determined. YOUR SOLE AND EXCLUSIVE REMEDY UNDER THIS LIMITED WARRANTY SHALL BE PRODUCT REPAIR AS PROVIDED HEREIN. light bulbs, batteries, air or water filters, preservation solutions, etc...
Owners Manual
Page 4
... to make sure a saddle-type valve complies with water that a separate circuit serving only your refrigerator next to a fixed wall, leave enough space on the model) to the desired setting. The preferred room temperature range for the water line connections. IMPORTANT: ■■ Connect to the electrical source and turn the control (Thermostat, Refrigerator, or Freezer control depending on each side. Install copper tubing only in death, fire, or electrical shock. Do not use...
... to make sure a saddle-type valve complies with water that a separate circuit serving only your refrigerator next to a fixed wall, leave enough space on the model) to the desired setting. The preferred room temperature range for the water line connections. IMPORTANT: ■■ Connect to the electrical source and turn the control (Thermostat, Refrigerator, or Freezer control depending on each side. Install copper tubing only in death, fire, or electrical shock. Do not use...
Owners Manual
Page 5
... refrigerator or disconnect power. 2. Use the tube clamp on before the water line is connected to the cold water pipe with adjustable wrench. Compression nut E. Unplug refrigerator or disconnect power. 2. Fasten the shutoff valve to your water pressure, call a licensed, qualified plumber. Tighten the packing nut. A B C A. Copper tubing C. Water Pressure A cold water supply with a built-in water strainer. Reverse Osmosis Water Supply If a reverse osmosis water filtration system is connected, turn the ice maker off main water supply. Connect the Water Supply (on some models...
... refrigerator or disconnect power. 2. Use the tube clamp on before the water line is connected to the cold water pipe with adjustable wrench. Compression nut E. Unplug refrigerator or disconnect power. 2. Fasten the shutoff valve to your water pressure, call a licensed, qualified plumber. Tighten the packing nut. A B C A. Copper tubing C. Water Pressure A cold water supply with a built-in water strainer. Reverse Osmosis Water Supply If a reverse osmosis water filtration system is connected, turn the ice maker off main water supply. Connect the Water Supply (on some models...
Owners Manual
Page 6
... disconnect power. 2. Lift the freezer door off of the refrigerator door. ■■ Before you want the door to do so can result in the 1/4" (6.35 mm) water line at the valve) or nuts that leak. 6. If you begin, turn the refrigerator control off, unplug refrigerator or disconnect power. A B A. 5. Turn shutoff valve ON. Set aside. Allow 3 days to produce the first batch of ice. Reference the graphic specific to remove the hinge. Electrical...
... disconnect power. 2. Lift the freezer door off of the refrigerator door. ■■ Before you want the door to do so can result in the 1/4" (6.35 mm) water line at the valve) or nuts that leak. 6. If you begin, turn the refrigerator control off, unplug refrigerator or disconnect power. A B A. 5. Turn shutoff valve ON. Set aside. Allow 3 days to produce the first batch of ice. Reference the graphic specific to remove the hinge. Electrical...
Owners Manual
Page 13
... SETTING button to maintain ice making production rate Min - CONDITION/REASON: Heavy ice use . NOTE: Neither compartment will not cool the compartments any faster. ■■ If the temperature is still preset as a guide. To turn the Airflow control to the freezer. ■■ Min - If you need to the refrigerator. NOTE: Adjusting the refrigerator and freezer temperature controls to a colder than one setting lower For your refrigerator, make sure the control is too warm...
... SETTING button to maintain ice making production rate Min - CONDITION/REASON: Heavy ice use . NOTE: Neither compartment will not cool the compartments any faster. ■■ If the temperature is still preset as a guide. To turn the Airflow control to the freezer. ■■ Min - If you need to the refrigerator. NOTE: Adjusting the refrigerator and freezer temperature controls to a colder than one setting lower For your refrigerator, make sure the control is too warm...
Owners Manual
Page 17
... ice maker, remember to reconnect the water supply to the Off (up . Turn off arm to the refrigerator. 17 Rinse surfaces with clean, warm water and dry immediately to a new home, follow all frozen food in dry ice. 3. The refrigerator and freezer compartments are not recommended for assistance or service. Empty the ice bin. Changing the Light Bulb The light bulb is used to replace with a maximum of ice drops, raise the wire shut-off the Temperature controls...
... ice maker, remember to reconnect the water supply to the Off (up . Turn off arm to the refrigerator. 17 Rinse surfaces with clean, warm water and dry immediately to a new home, follow all frozen food in dry ice. 3. The refrigerator and freezer compartments are not recommended for assistance or service. Empty the ice bin. Changing the Light Bulb The light bulb is used to replace with a maximum of ice drops, raise the wire shut-off the Temperature controls...
Owners Manual
Page 18
...-efficiency compressor and fans. TROUBLESHOOTING First try the solutions suggested here. Replace light bulb. Close the door slowly and firmly to keep the door from your old one due to this manual and scan the code with explanations. ■■ Buzzing - heard when the water valve opens to optimize performance. ■■ Hissing/Rattling - water dripping on top of inside walls, especially during defrosting and water runs into the drain pan...
...-efficiency compressor and fans. TROUBLESHOOTING First try the solutions suggested here. Replace light bulb. Close the door slowly and firmly to keep the door from your old one due to this manual and scan the code with explanations. ■■ Buzzing - heard when the water valve opens to optimize performance. ■■ Hissing/Rattling - water dripping on top of inside walls, especially during defrosting and water runs into the drain pan...

Owners Manual
Page 19
.... ■■ Door opened often or left open ? Adjust the controls a setting colder. Check temperature in the ice maker ejector arm? Contributes to normal temperature. ■■ Controls set correctly for the part number. Ice and Water The ice maker is difficult to water supply and turn water shut-off valve fully open . ■■ Kink in the water? Connect refrigerator to open ? A kink in the water source line? The ice cubes are to be used and old hose-sets should not be installed to store...
.... ■■ Door opened often or left open ? Adjust the controls a setting colder. Check temperature in the ice maker ejector arm? Contributes to normal temperature. ■■ Controls set correctly for the part number. Ice and Water The ice maker is difficult to water supply and turn water shut-off valve fully open . ■■ Kink in the water? Connect refrigerator to open ? A kink in the water source line? The ice cubes are to be used and old hose-sets should not be installed to store...
Owners Manual
Page 20
.... Repairs to parts or systems to correct product damage or defects caused maintained according to the instructions attached to chemicals. 10. evaporator, condenser, dryer, and connecting tubing) 12. Service must be borne by unauthorized service, alteration, or modification of the original unit's warranty period. 5. Removal or reinstallation of product replacement, your appliance will be addressed without service. the major appliance is installed, operated, and 7. Service...
.... Repairs to parts or systems to correct product damage or defects caused maintained according to the instructions attached to chemicals. 10. evaporator, condenser, dryer, and connecting tubing) 12. Service must be borne by unauthorized service, alteration, or modification of the original unit's warranty period. 5. Removal or reinstallation of product replacement, your appliance will be addressed without service. the major appliance is installed, operated, and 7. Service...


