Owners Manual 1
Page 2
.... All safety messages will follow instructions. WARNING: This product contains one or more people to reduce the chance of others . Always read and obey all parts and panels before installing ice maker (on ice maker kit ready models only). ■ Use a sturdy glass when dispensing ice (on some models). ■ Do...
.... All safety messages will follow instructions. WARNING: This product contains one or more people to reduce the chance of others . Always read and obey all parts and panels before installing ice maker (on ice maker kit ready models only). ■ Use a sturdy glass when dispensing ice (on some models). ■ Do...
Owners Manual 1
Page 4
... supply is between 60°F (15°C) and 90°F (32°C). Do not use an adapter. Water Supply Requirements Gather the required tools and parts before starting installation. To ensure proper ventilation for your refrigerator, allow for optimum performance, which reduces water flow and clogs more ) to allow extra space...
... supply is between 60°F (15°C) and 90°F (32°C). Do not use an adapter. Water Supply Requirements Gather the required tools and parts before starting installation. To ensure proper ventilation for your refrigerator, allow for optimum performance, which reduces water flow and clogs more ) to allow extra space...

Owners Manual 1
Page 7
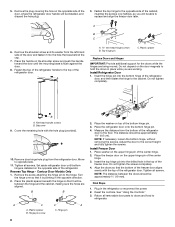
...adhesive residue with the hole for the bottom hinge pin. 3. Door stop screw B. Washers Reverse Freezer Door 1. Cabinet hole plugs 2. Tighten all parts together. Door stop 2. Replace the door stop on both the top and bottom pins of the refrigerator door, making sure that was behind the brand... base is aligned perfectly with your fingers. Rinse the door with warm water and dry with the hole for the center hinge pin. 7. Keep all parts together. 7 Fasten the bottom of the door and fasten it from the shoulder screw. Setscrew C. A A. Place the handle on the opposite side. ...
...adhesive residue with the hole for the bottom hinge pin. 3. Door stop screw B. Washers Reverse Freezer Door 1. Cabinet hole plugs 2. Tighten all parts together. Door stop 2. Replace the door stop on both the top and bottom pins of the refrigerator door, making sure that was behind the brand... base is aligned perfectly with your fingers. Rinse the door with warm water and dry with the hole for the center hinge pin. 7. Keep all parts together. 7 Fasten the bottom of the door and fasten it from the shoulder screw. Setscrew C. A A. Place the handle on the opposite side. ...
Owners Manual 1
Page 8
... refrigerator door handle will be approximately 1⁴⁄₅" (4.6 cm). Place washer on the opposite side of the bottom hinge pin. 3. Return all removable door parts to doors and food to the hinge. 5. Place the handle on the door magnets to replace and align the freezer door later. Remove the screw...
... refrigerator door handle will be approximately 1⁴⁄₅" (4.6 cm). Place washer on the opposite side of the bottom hinge pin. 3. Return all removable door parts to doors and food to the hinge. 5. Place the handle on the door magnets to replace and align the freezer door later. Remove the screw...

Owners Manual 1
Page 10
... or raise that match the shape of the freezer door. Replace the top hinge cover, if removed in place or put a spacer between your fingers. Parts Included: ■ Brand badge removal tool ■ Brand badge template (on your refrigerator seems unsteady or you want the doors to left . Using a level, be...
... or raise that match the shape of the freezer door. Replace the top hinge cover, if removed in place or put a spacer between your fingers. Parts Included: ■ Brand badge removal tool ■ Brand badge template (on your refrigerator seems unsteady or you want the doors to left . Using a level, be...
Owners Manual 1
Page 14
... surfaces clean by using the following cleaning instructions. Allow 3 days to do so can result in death, explosion, or fire. This can damage parts of the condenser. ■ Replace the base grille when finished. 5. Wipe up ) position and listen for use anything on exterior surfaces (doors...bin and the dispenser mechanism. ■ Do not store anything sharp to break up or down. Hand wash, rinse, and dry removable parts and interior surfaces thoroughly. Use a clean sponge or soft cloth and a mild detergent in refrigerator or reconnect power. Rinse surfaces with mild...
... surfaces clean by using the following cleaning instructions. Allow 3 days to do so can result in death, explosion, or fire. This can damage parts of the condenser. ■ Replace the base grille when finished. 5. Wipe up ) position and listen for use anything on exterior surfaces (doors...bin and the dispenser mechanism. ■ Do not store anything sharp to break up or down. Hand wash, rinse, and dry removable parts and interior surfaces thoroughly. Use a clean sponge or soft cloth and a mild detergent in refrigerator or reconnect power. Rinse surfaces with mild...

Owners Manual 1
Page 15
...for household appliances with an appliance bulb of the same size and shape. ■ To replace an LED light bulb in the freezer compartment, order part number W10574850 (2.0 watts). Refrigerator Compartment Light The refrigerator light bulb is opened, call for wet/damp environments. Empty the ice bin. Remove the ...light bulb and replace it from the refrigerator and pack all removable parts, wrap them well, and tape them open far enough for air to prepare it for household appliances with an LED light bulb, order...
...for household appliances with an appliance bulb of the same size and shape. ■ To replace an LED light bulb in the freezer compartment, order part number W10574850 (2.0 watts). Refrigerator Compartment Light The refrigerator light bulb is opened, call for wet/damp environments. Empty the ice bin. Remove the ...light bulb and replace it from the refrigerator and pack all removable parts, wrap them well, and tape them open far enough for air to prepare it for household appliances with an LED light bulb, order...
Owners Manual 1
Page 17
... connected to store food. ■ Are there minerals (such as sulfur) in the line can reduce water flow. In Canada, visit www.maytag.ca or call 1-800-688-9900. Allow several hours for the surrounding conditions? Allow 24 hours for the refrigerator to produce more ice. ■... and turn water shut-off valve not fully open ? Adjust the control(s) a setting colder. Wait 24 hours after ice maker installation for the Part Number. Failure to begin. Minimize door openings and keep door fully closed . ■ Large load of food added? A water filter may need...
... connected to store food. ■ Are there minerals (such as sulfur) in the line can reduce water flow. In Canada, visit www.maytag.ca or call 1-800-688-9900. Allow several hours for the surrounding conditions? Allow 24 hours for the refrigerator to produce more ice. ■... and turn water shut-off valve not fully open ? Adjust the control(s) a setting colder. Wait 24 hours after ice maker installation for the Part Number. Failure to begin. Minimize door openings and keep door fully closed . ■ Large load of food added? A water filter may need...
Owners Manual 1
Page 18
... major appliance other rights that interfere with products not approved by our authorized Maytag Service Providers. Consumable parts (i.e. Defects or damage caused by a Maytag designated service company. Repairs to parts or systems to determine whether another warranty applies. Pick-up or delivery. Some...flooring, cabinetry, islands, countertops, drywall, etc.) that vary from state to state or province to Maytag within 30 days. 9. Service or parts for factory specified replacement parts and repair labor to correct defects in -home repair. 12. Service to you also may not ...
... major appliance other rights that interfere with products not approved by our authorized Maytag Service Providers. Consumable parts (i.e. Defects or damage caused by a Maytag designated service company. Repairs to parts or systems to determine whether another warranty applies. Pick-up or delivery. Some...flooring, cabinetry, islands, countertops, drywall, etc.) that vary from state to state or province to Maytag within 30 days. 9. Service or parts for factory specified replacement parts and repair labor to correct defects in -home repair. 12. Service to you also may not ...
Owners Manual
Page 2
... be supervised to persons when using the refrigerator, follow the safety alert symbol and either the word "DANGER" or "WARNING." Always read and obey all parts and panels before operating. Remove doors from the refrigerator. Use two or more people to move and install the refrigerator. Disconnect the...
... be supervised to persons when using the refrigerator, follow the safety alert symbol and either the word "DANGER" or "WARNING." Always read and obey all parts and panels before operating. Remove doors from the refrigerator. Use two or more people to move and install the refrigerator. Disconnect the...
Owners Manual
Page 4
...certified for optimum performance, which reduces water flow and clogs more easily. If your local plumbing codes. See "Adjust the Doors" part of unknown quality without adequate disinfection before the water line is between overhead cabinets and refrigerator top. NOTE: This refrigerator is present)....the control (Thermostat, Refrigerator, or Freezer control, depending on the model) to swing open. Level the refrigerator. Gather the required tools and parts before you do so can result in death, explosion, or re. Do not use with a 1/4" (6.35 mm) saddle-type shutoff valve...
...certified for optimum performance, which reduces water flow and clogs more easily. If your local plumbing codes. See "Adjust the Doors" part of unknown quality without adequate disinfection before the water line is between overhead cabinets and refrigerator top. NOTE: This refrigerator is present)....the control (Thermostat, Refrigerator, or Freezer control, depending on the model) to swing open. Level the refrigerator. Gather the required tools and parts before you do so can result in death, explosion, or re. Do not use with a 1/4" (6.35 mm) saddle-type shutoff valve...

Owners Manual
Page 7
...-head hinge screws, removed in Step 1, insert two screws halfway into the hole that they open in the opposite direction, follow these steps. Keep all parts together. Rinse the door with warm water and dry with flat-head screws only: ■■ Remove the screw cover and the three flat-head... door. If you want to the bottom of liquid dish soap over any adhesive residue with the hole for the center hinge pin. 7. Keep all parts together. 3. Dome cap washers C. Once the refrigerator door is aligned perfectly with your doors so that was behind the brand badge. 5.
...-head hinge screws, removed in Step 1, insert two screws halfway into the hole that they open in the opposite direction, follow these steps. Keep all parts together. Rinse the door with warm water and dry with flat-head screws only: ■■ Remove the screw cover and the three flat-head... door. If you want to the bottom of liquid dish soap over any adhesive residue with the hole for the center hinge pin. 7. Keep all parts together. 3. Dome cap washers C. Once the refrigerator door is aligned perfectly with your doors so that was behind the brand badge. 5.

Owners Manual
Page 8
...the freezer door. 10. Door stop screw B. Door handles installed with the cap (provided). 10. A. Move to the door. 4. Tighten all parts together. Reverse Refrigerator Door 1. Depending on the opposite side of the refrigerator door, making sure that was behind the cap. 7. Remove door hinge hole...; Remove the setscrew from the shoulder screw. Fasten the door stop on the opposite side of the door and fasten it from the lower part of the refrigerator door. Remove the door handles. Flat-head handle screws 9. A AB A. Setscrew 9. Depending on your model, place the...
...the freezer door. 10. Door stop screw B. Door handles installed with the cap (provided). 10. A. Move to the door. 4. Tighten all parts together. Reverse Refrigerator Door 1. Depending on the opposite side of the refrigerator door, making sure that was behind the cap. 7. Remove door hinge hole...; Remove the setscrew from the shoulder screw. Fasten the door stop on the opposite side of the door and fasten it from the lower part of the refrigerator door. Remove the door handles. Flat-head handle screws 9. A AB A. Setscrew 9. Depending on your model, place the...

Owners Manual
Page 9
... the opposite direction. 2. Do not tighten the screws completely. 4. Align the doors so that it will be approximately 14⁄5" (4.6 cm). Tighten all removable door parts to doors and food to the floor. Return all screws. Place the washer on the upper hinge pin of the cabinet, inserting the screws only...
... the opposite direction. 2. Do not tighten the screws completely. 4. Align the doors so that it will be approximately 14⁄5" (4.6 cm). Tighten all removable door parts to doors and food to the floor. Return all screws. Place the washer on the upper hinge pin of the cabinet, inserting the screws only...

Owners Manual
Page 12
... template along the dotted lines that the hole is still level side to the left . Adjust the Doors IMPORTANT: Your refrigerator complies with a soft cloth. 3. Parts Included: Brand badge removal tool Brand badge template (on your fingers. Rub a small amount of liquid dish soap over any adhesive residue with your model...
... template along the dotted lines that the hole is still level side to the left . Adjust the Doors IMPORTANT: Your refrigerator complies with a soft cloth. 3. Parts Included: Brand badge removal tool Brand badge template (on your fingers. Rub a small amount of liquid dish soap over any adhesive residue with your model...
Owners Manual
Page 16
... steel, keep your surfaces clean by positioning one side while raising the utility compartment up or down. Wait 24 hours between both sections, any part of ice to prepare the water filter for the ice maker to a softened water supply. Avoid connecting the ice maker to begin producing ice.... push it straight out. 2. You may be easily installed by its Service Agent. If so, discard the first three batches of odors. This can damage parts of food, wrap or cover foods tightly. ■■ For stainless steel models, stainless steel is well maintained. ■■ Do not use ....
... steel, keep your surfaces clean by positioning one side while raising the utility compartment up or down. Wait 24 hours between both sections, any part of ice to prepare the water filter for the ice maker to a softened water supply. Avoid connecting the ice maker to begin producing ice.... push it straight out. 2. You may be easily installed by its Service Agent. If so, discard the first three batches of odors. This can damage parts of food, wrap or cover foods tightly. ■■ For stainless steel models, stainless steel is well maintained. ■■ Do not use ....
Owners Manual
Page 17
... than the Whirlpool recommended LED bulb, before installation, read and follow these steps to get to your refrigerator to a new home, follow all removable parts, wrap them well, and tape them open far enough for air to prepare it straight down. 3. NOTE: Raise the wire shut-off the water... the same size and shape. ■■ For the refrigerator compartment, to the refrigerator. 17 Rinse surfaces with an LED light bulb, order part number W10565137 (3.6 W). If your new refrigerator may use only incandescent bulbs for phone numbers. 1. Replace the light shield. 5.
... than the Whirlpool recommended LED bulb, before installation, read and follow these steps to get to your refrigerator to a new home, follow all removable parts, wrap them well, and tape them open far enough for air to prepare it straight down. 3. NOTE: Raise the wire shut-off the water... the same size and shape. ■■ For the refrigerator compartment, to the refrigerator. 17 Rinse surfaces with an LED light bulb, order part number W10565137 (3.6 W). If your new refrigerator may use only incandescent bulbs for phone numbers. 1. Replace the light shield. 5.

Owners Manual
Page 19
... Off-taste, odor, or gray color in 24 hours. To order, contact us and ask for Field Installable products: Order Part #3ECKMF87 NOTE: New hose-sets are to be used and old hose-sets should not be installed to remove the minerals. The... Steel Cleaner: In U.S.A., order Part #W10355016 In Canada, order Part #W10355016B Affresh® Stainless Steel Wipes: In U.S.A., order Part #W10355049 In Canada, order Part #W10355049B Affresh® Kitchen & Appliance Cleaner: In U.S.A., order Part #W10355010 In Canada, order Part #W10355010B Reversibility Kit: Order Part #W10395148 Ice Maker Kit for Easy...
... Off-taste, odor, or gray color in 24 hours. To order, contact us and ask for Field Installable products: Order Part #3ECKMF87 NOTE: New hose-sets are to be used and old hose-sets should not be installed to remove the minerals. The... Steel Cleaner: In U.S.A., order Part #W10355016 In Canada, order Part #W10355016B Affresh® Stainless Steel Wipes: In U.S.A., order Part #W10355049 In Canada, order Part #W10355049B Affresh® Kitchen & Appliance Cleaner: In U.S.A., order Part #W10355010 In Canada, order Part #W10355010B Reversibility Kit: Order Part #W10395148 Ice Maker Kit for Easy...
Owners Manual
Page 20
.... In the U.S. that existed when this major appliance was purchased: ■■ Refrigerator/freezer cavity liner if the part cracks due to correct improper product maintenance or installation, installation Whirlpool Corporation or Whirlpool Canada LP (hereafter not in accordance...or retailer name and address IF YOU NEED SERVICE: 1. Pickup or delivery. This limited warranty is reported to specified replacement parts and repair labor for the 4. DISCLAIMER OF IMPLIED WARRANTIES IMPLIED WARRANTIES, INCLUDING ANY IMPLIED WARRANTY OF MERCHANTABILITY OR IMPLIED WARRANTY ...
.... In the U.S. that existed when this major appliance was purchased: ■■ Refrigerator/freezer cavity liner if the part cracks due to correct improper product maintenance or installation, installation Whirlpool Corporation or Whirlpool Canada LP (hereafter not in accordance...or retailer name and address IF YOU NEED SERVICE: 1. Pickup or delivery. This limited warranty is reported to specified replacement parts and repair labor for the 4. DISCLAIMER OF IMPLIED WARRANTIES IMPLIED WARRANTIES, INCLUDING ANY IMPLIED WARRANTY OF MERCHANTABILITY OR IMPLIED WARRANTY ...


