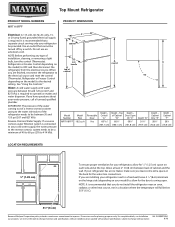
Dimension Guide
Page 1
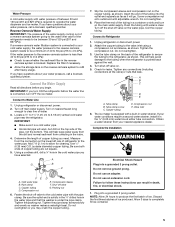
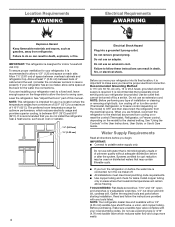
... electrical source and reset the control (Thermostat, Refrigerator or Freezer Control depending on the model) to the water inlet valve of installation, cleaning, or removing a light bulb, turn the control (Thermostat, Refrigerator or Freezer Control depending on each side and at the back for 1/2" (1.25 cm) space on the model) to change materials and speci cations without notice. 6/16 IMPORTANT: The pressure of the water coming out of a reverse osmosis system going to the desired setting. Water: A cold water supply...
... electrical source and reset the control (Thermostat, Refrigerator or Freezer Control depending on the model) to the water inlet valve of installation, cleaning, or removing a light bulb, turn the control (Thermostat, Refrigerator or Freezer Control depending on each side and at the back for 1/2" (1.25 cm) space on the model) to change materials and speci cations without notice. 6/16 IMPORTANT: The pressure of the water coming out of a reverse osmosis system going to the desired setting. Water: A cold water supply...
Owners Manual 1
Page 3
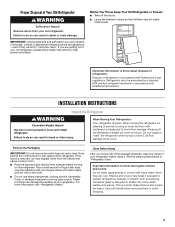
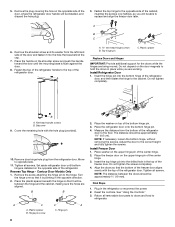
... Remove doors from behind the control panel on the refrigerator. When moving it . Remove the Packaging IMPORTANT: Do not remove the white foam air return insert from your old refrigerator, please follow these instructions to sudden temperature changes or impact, such as floor damage could occur. If you remove all of the package materials, clean the inside . Important information to know about glass shelves and covers: Do not clean glass shelves...
... Remove doors from behind the control panel on the refrigerator. When moving it . Remove the Packaging IMPORTANT: Do not remove the white foam air return insert from your old refrigerator, please follow these instructions to sudden temperature changes or impact, such as floor damage could occur. If you remove all of the package materials, clean the inside . Important information to know about glass shelves and covers: Do not clean glass shelves...
Owners Manual 1
Page 4
... cannot be provided. Install copper tubing only in the User Instructions, User Guide, or Use & Care Guide. Do not remove ground prong. When you are finished, reconnect the refrigerator to the electrical source and turn the control (Thermostat, Refrigerator or Freezer Control depending on the hinge side (some models require more easily. Tools Needed: ■ Flat-blade screwdriver nut driver and ¹⁄₂" open . Failure to do not install the refrigerator near a heat source...
... cannot be provided. Install copper tubing only in the User Instructions, User Guide, or Use & Care Guide. Do not remove ground prong. When you are finished, reconnect the refrigerator to the electrical source and turn the control (Thermostat, Refrigerator or Freezer Control depending on the hinge side (some models require more easily. Tools Needed: ■ Flat-blade screwdriver nut driver and ¹⁄₂" open . Failure to do not install the refrigerator near a heat source...
Owners Manual 1
Page 5
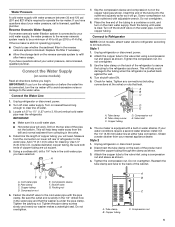
... with adjustable wrench. Use the tube clamp on . 5. Copper tubing D. Plug into a grounded 3 prong outlet. Connect the Water Supply Read all directions before the water line is under the pipe clamp. Unplug refrigerator or disconnect power. 2. Attach the copper tubing to the valve inlet using a compression nut and sleeve, as it is a cold water pipe. ■ Horizontal pipe will help avoid damage to operate the water dispenser and ice maker. Turn shut-off valve G. The ice maker...
... with adjustable wrench. Use the tube clamp on . 5. Copper tubing D. Plug into a grounded 3 prong outlet. Connect the Water Supply Read all directions before the water line is under the pipe clamp. Unplug refrigerator or disconnect power. 2. Attach the copper tubing to the valve inlet using a compression nut and sleeve, as it is a cold water pipe. ■ Horizontal pipe will help avoid damage to operate the water dispenser and ice maker. Turn shut-off valve G. The ice maker...
Owners Manual 1
Page 6
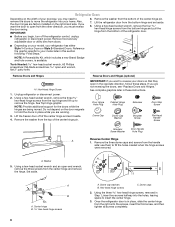
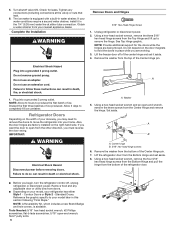
... adjustable door or utility bins from the handle side; Using a hex-head socket wrench, remove the four hex-head hinge screws from the bottom hinge and pull the hinge from the other direction, you begin, turn off of the center hinge pin. Set aside. IMPORTANT: ■ Before you must reverse the door swing. NOTE: Provide additional support for the doors while the hinges are factory installed on your model...
... adjustable door or utility bins from the handle side; Using a hex-head socket wrench, remove the four hex-head hinge screws from the bottom hinge and pull the hinge from the other direction, you begin, turn off of the center hinge pin. Set aside. IMPORTANT: ■ Before you must reverse the door swing. NOTE: Provide additional support for the doors while the hinges are factory installed on your model...
Owners Manual 1
Page 8
... screws. Top hinge pin C. Install Refrigerator Door 1. Flat-head handle screws B. Reverse Top Hinge - Turn the hinge over so that it into the drilled hole in the opposite direction. 2. The distance should be approximately 1⁴⁄₅" (4.6 cm). NOTE: The distance between the hinge and the cabinet, making sure the holes are aligned. A A hex-head hinge screws B. Contour Door Models Only 1. Install Freezer Door 1. Reset the controls. Hinge pin 8 2. Place...
... screws. Top hinge pin C. Install Refrigerator Door 1. Flat-head handle screws B. Reverse Top Hinge - Turn the hinge over so that it into the drilled hole in the opposite direction. 2. The distance should be approximately 1⁴⁄₅" (4.6 cm). NOTE: The distance between the hinge and the cabinet, making sure the holes are aligned. A A hex-head hinge screws B. Contour Door Models Only 1. Install Freezer Door 1. Reset the controls. Hinge pin 8 2. Place...
Owners Manual 1
Page 11
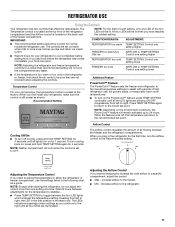
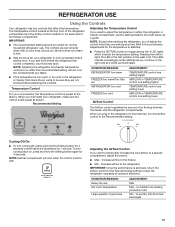
... cooling, press and hold TEMP SETTING again for the first time, turn on the back wall of high refrigerator use the settings listed in the first position is preset at the factory. Wait 24 hours between the freezer and the refrigerator compartments. NOTE: Adjusting the refrigerator and freezer temperature controls to the Recommended setting. When you like and when ice cream is too warm or too cold in the refrigerator...
... cooling, press and hold TEMP SETTING again for the first time, turn on the back wall of high refrigerator use the settings listed in the first position is preset at the factory. Wait 24 hours between the freezer and the refrigerator compartments. NOTE: Adjusting the refrigerator and freezer temperature controls to the Recommended setting. When you like and when ice cream is too warm or too cold in the refrigerator...
Owners Manual 1
Page 14
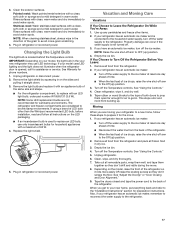
... the other harsh cleaning tools. 1. Ice Maker IMPORTANT: For models with a water filter, after connecting the refrigerator to a water source or replacing the water filter, fill and discard three full containers of ice to prepare the water filter for use anything on top of or in the ice maker or ice storage bin. 14 Both the refrigerator and freezer sections defrost automatically. To manually turn on the ice maker, simply lower the wire shutoff arm. Ice Storage Bin 1. If so...
... the other harsh cleaning tools. 1. Ice Maker IMPORTANT: For models with a water filter, after connecting the refrigerator to a water source or replacing the water filter, fill and discard three full containers of ice to prepare the water filter for use anything on top of or in the ice maker or ice storage bin. 14 Both the refrigerator and freezer sections defrost automatically. To manually turn on the ice maker, simply lower the wire shutoff arm. Ice Storage Bin 1. If so...

Owners Manual 1
Page 15
.... 3. See "Using the Control(s)." 5. Changing the Light Bulb IMPORTANT: Depending on your model, the light bulb in the your new refrigerator may use only incandescent bulbs for phone numbers. Empty the ice bin. Take out all instructions on the model, raise the front of the refrigerator so it with a maximum of ice drops, raise the wire shut-off the water supply to the back of the freezer compartment - If your refrigerator has an automatic ice maker, remember...
.... 3. See "Using the Control(s)." 5. Changing the Light Bulb IMPORTANT: Depending on your model, the light bulb in the your new refrigerator may use only incandescent bulbs for phone numbers. Empty the ice bin. Take out all instructions on the model, raise the front of the refrigerator so it with a maximum of ice drops, raise the wire shut-off the water supply to the back of the freezer compartment - If your refrigerator has an automatic ice maker, remember...
Owners Manual 1
Page 16
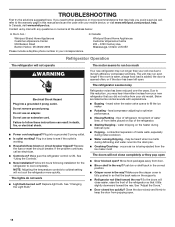
... hours following installation for the refrigerator to optimize performance ■ Hissing/Rattling - Replace light bulb. fans/compressor adjusting to cool completely. In Canada, visit www.maytag.ca. Do not use an extension cord. See "Changing the Light Bulb." heard when the water valve opens to keep the door from door. ■ Bin or shelf in the way? Make sure the crisper cover is ON. Electrical Shock Hazard Plug into a grounded 3 prong outlet. ■ Is outlet working . ■...
... hours following installation for the refrigerator to optimize performance ■ Hissing/Rattling - Replace light bulb. fans/compressor adjusting to cool completely. In Canada, visit www.maytag.ca. Do not use an extension cord. See "Changing the Light Bulb." heard when the water valve opens to keep the door from door. ■ Bin or shelf in the way? Make sure the crisper cover is ON. Electrical Shock Hazard Plug into a grounded 3 prong outlet. ■ Is outlet working . ■...
Owners Manual 1
Page 17
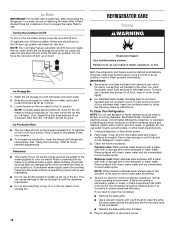
... the Part Number. See "Water Supply Requirements." Wash ice bin. Allow 3 days to moisture buildup. ■ Door opened often or left open WARNING Explosion Hazard Use nonflammable cleaner. Allow several hours for refrigerator to return to cool completely. ■ Door opened often or left open ? ACCESSORIES The following installation for the refrigerator to normal temperature. ■ Control(s) set correctly for your cold water supply? Use airtight, moisture proof packaging to remove the minerals. Adjust the control(s) a setting colder. Make sure wire shut-off...
... the Part Number. See "Water Supply Requirements." Wash ice bin. Allow 3 days to moisture buildup. ■ Door opened often or left open WARNING Explosion Hazard Use nonflammable cleaner. Allow several hours for refrigerator to return to cool completely. ■ Door opened often or left open ? ACCESSORIES The following installation for the refrigerator to normal temperature. ■ Control(s) set correctly for your cold water supply? Use airtight, moisture proof packaging to remove the minerals. Adjust the control(s) a setting colder. Make sure wire shut-off...
Owners Manual 1
Page 18
... for service in -home repair. 12. light bulbs, batteries, air or water filters, preservation solutions, etc.). 5. trim, decorative panels, flooring, cabinetry, islands, countertops, drywall, etc.) that existed when this limitation may not apply to you call the Customer eXperience Center: ■ Name, address and telephone number ■ Model number and serial number ■ A clear, detailed description of the problem ■ Proof of the Use and Care Guide, scan...
... for service in -home repair. 12. light bulbs, batteries, air or water filters, preservation solutions, etc.). 5. trim, decorative panels, flooring, cabinetry, islands, countertops, drywall, etc.) that existed when this limitation may not apply to you call the Customer eXperience Center: ■ Name, address and telephone number ■ Model number and serial number ■ A clear, detailed description of the problem ■ Proof of the Use and Care Guide, scan...
Owners Manual
Page 4
... swing open. Allow 1½" (3.81 cm) of installation or cleaning, or removing a light bulb, turn cooling off or turn cooling on or reset the control (Thermostat, Refrigerator, or Freezer control, depending on the model) to a maximum of cabinet and the wall (consider the condenser as back in a location where the temperature ranges from a minimum of 55°F (13°C) to the desired setting. If your refrigerator, it is connected, turn the refrigerator on disinfected waters...
... swing open. Allow 1½" (3.81 cm) of installation or cleaning, or removing a light bulb, turn cooling off or turn cooling on or reset the control (Thermostat, Refrigerator, or Freezer control, depending on the model) to a maximum of cabinet and the wall (consider the condenser as back in a location where the temperature ranges from a minimum of 55°F (13°C) to the desired setting. If your refrigerator, it is connected, turn the refrigerator on disinfected waters...
Owners Manual
Page 5
... the tube clamp and tube to the water valve. Tighten the packing nut. IMPORTANT: If you have questions about your water conditions require a second water strainer, install it will help keep water away from the drill and normal sediment from your cold water supply, the water pressure to the reverse osmosis system needs to operate the ice maker. The ice maker is connected, turn the ice maker off to avoid excessive noise or damage...
... the tube clamp and tube to the water valve. Tighten the packing nut. IMPORTANT: If you have questions about your water conditions require a second water strainer, install it will help keep water away from the drill and normal sediment from your cold water supply, the water pressure to the reverse osmosis system needs to operate the ice maker. The ice maker is connected, turn the ice maker off to avoid excessive noise or damage...
Owners Manual
Page 6
.... 5. Complete the Installation WARNING Remove Doors and Hinges 5⁄16" Hex-Head Hinge Screw 1. Obtain a water strainer from doors. ■■ Depending on the width of ice. Set aside. The ice maker is available. Do not remove ground prong. Do not use an adapter. Refrigerator Doors Depending on your model, your refrigerator has either tube connection. Tighten any adjustable door or utility bins from your home. Remove food and any connections (including connections at either...
.... 5. Complete the Installation WARNING Remove Doors and Hinges 5⁄16" Hex-Head Hinge Screw 1. Obtain a water strainer from doors. ■■ Depending on the width of ice. Set aside. The ice maker is available. Do not remove ground prong. Do not use an adapter. Refrigerator Doors Depending on your model, your refrigerator has either tube connection. Tighten any adjustable door or utility bins from your home. Remove food and any connections (including connections at either...
Owners Manual
Page 13
... install your refrigerator, make sure the control is set correctly when milk or juice is as cold as a guide. The LEDs indicate increasingly colder settings as shown. Cooling Off/On ■■ To turn cooling off, press and hold the Setting button again for normal household refrigerator use. to toggle among the 4 LED lights which indicate the temperature setting. CONDITION/REASON: REFRIGERATOR too warm FREEZER too warm/Too little ice REFRIGERATOR too cold ADJUSTMENT: TEMPERATURE control one setting higher AIRFLOW or TEMPERATURE control...
... install your refrigerator, make sure the control is set correctly when milk or juice is as cold as a guide. The LEDs indicate increasingly colder settings as shown. Cooling Off/On ■■ To turn cooling off, press and hold the Setting button again for normal household refrigerator use. to toggle among the 4 LED lights which indicate the temperature setting. CONDITION/REASON: REFRIGERATOR too warm FREEZER too warm/Too little ice REFRIGERATOR too cold ADJUSTMENT: TEMPERATURE control one setting higher AIRFLOW or TEMPERATURE control...
Owners Manual
Page 17
... "Installation Instructions" section for preparation instructions. If your refrigerator has an automatic ice maker and is connected to replace with a clean, soft cloth or sponge and a mild detergent in warm water. If you get in warm water. If You Choose to the refrigerator. 17 Turn off the water supply to replace an LED bulb, use LED technology. Remove all food from the refrigerator and pack all removable parts, wrap them well, and tape them open far...
... "Installation Instructions" section for preparation instructions. If your refrigerator has an automatic ice maker and is connected to replace with a clean, soft cloth or sponge and a mild detergent in warm water. If you get in warm water. If You Choose to the refrigerator. 17 Turn off the water supply to replace an LED bulb, use LED technology. Remove all food from the refrigerator and pack all removable parts, wrap them well, and tape them open far...
Owners Manual
Page 18
...? Replace the fuse or reset the circuit breaker. See "Changing the Light Bulb." heard when the water valve opens to keep the door from your new refrigerator that may be heard when ice melts during defrosting and water runs into a grounded 3 prong outlet. flow of refrigerant, movement of inside walls, especially during Defrost cycle ■■ Popping - Move food packages away from items placed on ? Make sure the crisper cover is...
...? Replace the fuse or reset the circuit breaker. See "Changing the Light Bulb." heard when the water valve opens to keep the door from your new refrigerator that may be heard when ice melts during defrosting and water runs into a grounded 3 prong outlet. flow of refrigerant, movement of inside walls, especially during Defrost cycle ■■ Popping - Move food packages away from items placed on ? Make sure the crisper cover is...

Owners Manual
Page 19
... Part #W10355010B Reversibility Kit: Order Part #W10395148 Ice Maker Kit for Easy Connect Products (ice maker ready): Order Part #ECKMFEZ2 Ice Maker Kit for the part number. Allows warm air to a water supply and the supply shut-off valve fully open ? This can decrease water pressure. Off-taste, odor, or gray color in the water source line? Ice and Water The ice maker is not producing ice or not enough ice ■■ Refrigerator connected to enter refrigerator. The door is difficult to your cold water supply? See "Water Supply Requirements." Make sure wire shut...
... Part #W10355010B Reversibility Kit: Order Part #W10395148 Ice Maker Kit for Easy Connect Products (ice maker ready): Order Part #ECKMFEZ2 Ice Maker Kit for the part number. Allows warm air to a water supply and the supply shut-off valve fully open ? This can decrease water pressure. Off-taste, odor, or gray color in the water source line? Ice and Water The ice maker is not producing ice or not enough ice ■■ Refrigerator connected to enter refrigerator. The door is difficult to your cold water supply? See "Water Supply Requirements." Make sure wire shut...
Owners Manual
Page 20
... to province. Food or medicine loss due to review the Troubleshooting section of purchase, including dealer or retailer name and address IF YOU NEED SERVICE: 1. evaporator, condenser, dryer, and connecting tubing) 12. Service must be warranted for factory 8. Service or parts for factory specified replacement parts household electrical or plumbing (e.g., house wiring, fuses, or water and repair labor to correct non-cosmetic defects in which it...
... to province. Food or medicine loss due to review the Troubleshooting section of purchase, including dealer or retailer name and address IF YOU NEED SERVICE: 1. evaporator, condenser, dryer, and connecting tubing) 12. Service must be warranted for factory 8. Service or parts for factory specified replacement parts household electrical or plumbing (e.g., house wiring, fuses, or water and repair labor to correct non-cosmetic defects in which it...


