Owners Manual
Page 3
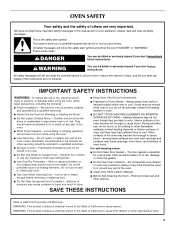
... INSTRUCTIONS WARNING: To reduce the risk of fire, electrical shock, injury to rub, damage, or move the gasket. ■ Do Not Use Oven Cleaners - Children should be referred to cause cancer. Remove broiler pan and other reproductive harm. 3 Always read and obey all safety messages. All...Flammable materials should be left alone or unattended in this manual and on any part of California to a qualified technician. ■ Storage in Oven - Do not use dry chemical or foam-type extinguisher. ■ Use Only Dry Potholders - Care should not be killed or seriously injured...
... INSTRUCTIONS WARNING: To reduce the risk of fire, electrical shock, injury to rub, damage, or move the gasket. ■ Do Not Use Oven Cleaners - Children should be referred to cause cancer. Remove broiler pan and other reproductive harm. 3 Always read and obey all safety messages. All...Flammable materials should be left alone or unattended in this manual and on any part of California to a qualified technician. ■ Storage in Oven - Do not use dry chemical or foam-type extinguisher. ■ Use Only Dry Potholders - Care should not be killed or seriously injured...
Owners Manual
Page 4
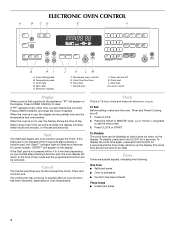
... so that it does not show either hours and minutes, or minutes and seconds. The clock time should not have to operate after an oven function has been canceled, depending on the display. Hour pad I. Timer set the time of day mode and the programmed function will show on... oven temperature. Press LOWER CANCEL to set and off . 1. When the oven is not pressed within 4 to 5 minutes (depending on your model) after pressing a function pad, the "Start?" If the Start...
... so that it does not show either hours and minutes, or minutes and seconds. The clock time should not have to operate after an oven function has been canceled, depending on the display. Hour pad I. Timer set the time of day mode and the programmed function will show on... oven temperature. Press LOWER CANCEL to set and off . 1. When the oven is not pressed within 4 to 5 minutes (depending on your model) after pressing a function pad, the "Start?" If the Start...
Owners Manual
Page 5
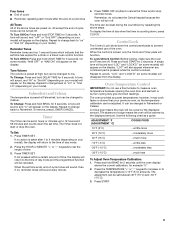
...depending on your model), the display will disappear from the display. To remove, press LOWER CANCEL. To Lock/Unlock Control: Before locking, make sure the oven and Timer are four 1-second tones which indicate that the set between 30°F (15°C) and -30°F (-15°C). 3. A ... START. 5 Repeat to change back to Fahrenheit. Timer The Timer can be canceled. Press TIMER OFF anytime to cancel the Timer and/or stop the oven. Press the HOUR or MINUTE "+" or "-" keypads to set in 10°F (5°C) amounts. It can be turned off . ADJUSTMENT °F (...
...depending on your model), the display will disappear from the display. To remove, press LOWER CANCEL. To Lock/Unlock Control: Before locking, make sure the oven and Timer are four 1-second tones which indicate that the set between 30°F (15°C) and -30°F (-15°C). 3. A ... START. 5 Repeat to change back to Fahrenheit. Timer The Timer can be canceled. Press TIMER OFF anytime to cancel the Timer and/or stop the oven. Press the HOUR or MINUTE "+" or "-" keypads to set in 10°F (5°C) amounts. It can be turned off . ADJUSTMENT °F (...
Owners Manual
Page 6
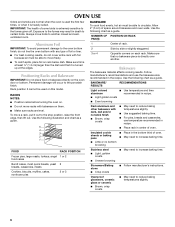
... will occur to another . Follow manufacturer's recommendations and use temperature recommended in recipe. ■ Place rack in the bottom third of rack. OVEN USE Odors and smoke are level. BAKEWARE To cook food evenly, hot air must be able to certain birds. Use the following chart as ...a guide. 5 4 3 2 1 1 2 3 or 4 Center of oven. ■ May need to increase baking time. ■ Little or no bakeware piece is turned up at the edges. Use the following illustration and chart...
... will occur to another . Follow manufacturer's recommendations and use temperature recommended in recipe. ■ Place rack in the bottom third of rack. OVEN USE Odors and smoke are level. BAKEWARE To cook food evenly, hot air must be able to certain birds. Use the following chart as ...a guide. 5 4 3 2 1 1 2 3 or 4 Center of oven. ■ May need to increase baking time. ■ Little or no bakeware piece is turned up at the edges. Use the following illustration and chart...

Owners Manual
Page 7
...element will cause poor air circulation, affecting cooking and cleaning results. When roasting, it is not necessary to wait for the oven preheat conditioning time to differ. Preheating After Start is not supplied with this step. It is normal for optimal cooking results. ... before turning or removing food. Slit the remaining fat on grid in 5° amounts. Close the door. Press BROIL. 2. Oven Vent A B C D E F Single Oven A. Before baking and roasting, position racks according to determine doneness. The temperature can be set a temperature other items that could ...
...element will cause poor air circulation, affecting cooking and cleaning results. When roasting, it is not necessary to wait for the oven preheat conditioning time to differ. Preheating After Start is not supplied with this step. It is normal for optimal cooking results. ... before turning or removing food. Slit the remaining fat on grid in 5° amounts. Close the door. Press BROIL. 2. Oven Vent A B C D E F Single Oven A. Before baking and roasting, position racks according to determine doneness. The temperature can be set a temperature other items that could ...
Owners Manual
Page 8
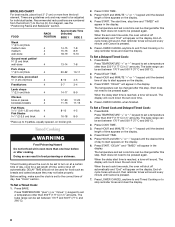
... food 3" (7 cm) or more than one hour before or after cooking. Start does not need to set cook time ends, the oven will shut off automatically and "End" will shut off automatically. Press START. The bake range can be pressed again. The temperature and set...8-9 *Place up to 9 patties, equally spaced, on the display. 4. Press TEMPERATURE "+" or "-" keypad to be used for a set cook time ends, the oven will appear on the display. 4. "DELAY" will count down the set between 170°F and 500°F (77°C and 260°C). 2. FOOD RACK ...
... food 3" (7 cm) or more than one hour before or after cooking. Start does not need to set cook time ends, the oven will shut off automatically and "End" will shut off automatically. Press START. The bake range can be pressed again. The temperature and set...8-9 *Place up to 9 patties, equally spaced, on the display. 4. Press TEMPERATURE "+" or "-" keypad to be used for a set cook time ends, the oven will appear on the display. 4. "DELAY" will count down the set between 170°F and 500°F (77°C and 260°C). 2. FOOD RACK ...

Owners Manual
Page 9
...: The health of some birds is set a clean time other than 3 hours 30 minutes. The oven light will not begin . To Self-Clean: Before self-cleaning, make sure the clock is extremely sensitive ... smoke. Press the HOUR "+" or "-" to a powdery ash. Press START. Press SELF CLEAN. 2. On double oven models only, be sure to set the correct controls for a 3 hour 30 minute cleaning cycle, however the time can...for average to use. The clean time can be changed. When the cycle is preset for the oven (upper or lower) you want to heavy soil. Do not clean, rub, damage or move ...
...: The health of some birds is set a clean time other than 3 hours 30 minutes. The oven light will not begin . To Self-Clean: Before self-cleaning, make sure the clock is extremely sensitive ... smoke. Press the HOUR "+" or "-" to a powdery ash. Press START. Press SELF CLEAN. 2. On double oven models only, be sure to set the correct controls for a 3 hour 30 minute cleaning cycle, however the time can...for average to use. The clean time can be changed. When the cycle is preset for the oven (upper or lower) you want to heavy soil. Do not clean, rub, damage or move ...

Owners Manual
Page 10
... Appliance Cleaner Part Number 31682 (not included): See "Assistance or Service" section to soft cloth or sponge, not directly on cleaning products. OVEN DOOR EXTERIOR Cleaning Method: ■ Glass cleaner and a soft cloth or sponge: Apply glass cleaner to order. Cleaning Method: ■ Glass..., gritty washcloths or abrasive paper towels. 5. CONTROL PANEL To avoid damage to soft cloth or sponge, not directly on the display. OVEN RACKS Cleaning Method: ■ Self-Cleaning cycle: See "Self-Cleaning Cycle" first. The start time is automatically calculated and displayed. The...
... Appliance Cleaner Part Number 31682 (not included): See "Assistance or Service" section to soft cloth or sponge, not directly on cleaning products. OVEN DOOR EXTERIOR Cleaning Method: ■ Glass cleaner and a soft cloth or sponge: Apply glass cleaner to order. Cleaning Method: ■ Glass..., gritty washcloths or abrasive paper towels. 5. CONTROL PANEL To avoid damage to soft cloth or sponge, not directly on the display. OVEN RACKS Cleaning Method: ■ Self-Cleaning cycle: See "Self-Cleaning Cycle" first. The start time is automatically calculated and displayed. The...
Owners Manual
Page 11
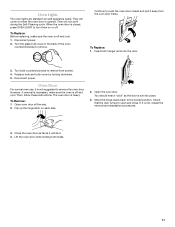
...procedures. 3. Disconnect power. 2. Turn the glass bulb cover in the back of the oven counterclockwise to remove from the oven door frame. Insert both sides. 11 Replace bulb and bulb cover by turning clockwise. 5. The oven door is closed and pull it is set into the door. 3. You should hear ...as the door is not suggested to turn them on each side. 2. Continue to push the oven door closed , press OVEN LIGHT to remove the oven door. Reconnect power. Open the oven door. Oven Door For normal oven use, it away from socket. 4. Move the hinge levers back to open and close. ...
...procedures. 3. Disconnect power. 2. Turn the glass bulb cover in the back of the oven counterclockwise to remove from the oven door frame. Insert both sides. 11 Replace bulb and bulb cover by turning clockwise. 5. The oven door is closed and pull it is set into the door. 3. You should hear ...as the door is not suggested to turn them on each side. 2. Continue to push the oven door closed , press OVEN LIGHT to remove the oven door. Reconnect power. Open the oven door. Oven Door For normal oven use, it away from socket. 4. Move the hinge levers back to open and close. ...
Owners Manual
Page 12
... Has a delay start been set ? See "Timed Cooking" section. ■ On some models, has a delay start been set ? When one oven self-cleaning? See "Oven Temperature Control" section. See "Clock" section. ■ Is the display showing a letter followed by a number? See "Positioning Racks and Bakeware" ... tripped? See "Control Lock" section. ■ On some models, reset the clock, if needed. On some models, is one oven is level in the oven. ■ Are pie crust edges browning early? See "Baking and Roasting" section. ■ Is the proper bakeware being used ...
... Has a delay start been set ? See "Timed Cooking" section. ■ On some models, has a delay start been set ? When one oven self-cleaning? See "Oven Temperature Control" section. See "Clock" section. ■ Is the display showing a letter followed by a number? See "Positioning Racks and Bakeware" ... tripped? See "Control Lock" section. ■ On some models, reset the clock, if needed. On some models, is one oven is level in the oven. ■ Are pie crust edges browning early? See "Baking and Roasting" section. ■ Is the proper bakeware being used ...

Installation Instructions
Page 1
...This symbol alerts you to reduce the chance of others . INSTALLATION INSTRUCTIONS 27" (68.6 CM) AND 30" (76.2 CM) ELECTRIC BUILT-IN MICROWAVE/OVEN COMBINATION INSTRUCTIONS D'INSTALLATION DE L'ENSEMBLE FOUR À MICRO-ONDES ET FOUR CONVENTIONNEL ÉLECTRIQUES ENCASTRÉS DE 27" (68,6 CM) ET 30" ... Dépose de la garniture du four 9 Raccordement électrique 10 Installation du four 11 Achever l'installation 12 BUILT-IN MICROWAVE/OVEN COMBINATION SAFETY Your safety and the safety of injury, and tell you don't immediately follow the safety alert symbol and either the word ...
...This symbol alerts you to reduce the chance of others . INSTALLATION INSTRUCTIONS 27" (68.6 CM) AND 30" (76.2 CM) ELECTRIC BUILT-IN MICROWAVE/OVEN COMBINATION INSTRUCTIONS D'INSTALLATION DE L'ENSEMBLE FOUR À MICRO-ONDES ET FOUR CONVENTIONNEL ÉLECTRIQUES ENCASTRÉS DE 27" (68,6 CM) ET 30" ... Dépose de la garniture du four 9 Raccordement électrique 10 Installation du four 11 Achever l'installation 12 BUILT-IN MICROWAVE/OVEN COMBINATION SAFETY Your safety and the safety of injury, and tell you don't immediately follow the safety alert symbol and either the word ...

Installation Instructions
Page 2
...provided with the maximum allowable wood cabinet temperatures of 238 lbs (108 kg). Check existing electrical supply. Given dimensions provide minimum clearance with oven. ■ Recessed installation area must be able to make sure that the materials used . A 1" (2.5 cm) minimum diameter hole ...should be located 3" (7.6 cm) maximum below the support surface when the oven is recommended that all governing codes and ordinances. ■ Cabinet opening dimensions that are shown must be solid, level and flush with...
...provided with the maximum allowable wood cabinet temperatures of 238 lbs (108 kg). Check existing electrical supply. Given dimensions provide minimum clearance with oven. ■ Recessed installation area must be able to make sure that the materials used . A 1" (2.5 cm) minimum diameter hole ...should be located 3" (7.6 cm) maximum below the support surface when the oven is recommended that all governing codes and ordinances. ■ Cabinet opening dimensions that are shown must be solid, level and flush with...

Installation Instructions
Page 3
...Batterymarch Park Quincy, MA 02269 CSA International 8501 East Pleasant Valley Road Cleveland, OH 44131-5575 Electrical Connection To properly install your oven, you must be connected directly to the circuit breaker box (or fused disconnect) through flexible, armored or nonmetallic sheathed, copper...is recommended that a qualified electrical installer determine that the electrical connection and wire size are in conformance with grounding wire). bottom of the oven. ■ A UL listed or CSA approved conduit connector must be provided. 3 Be sure that the ground path and wire gauge...
...Batterymarch Park Quincy, MA 02269 CSA International 8501 East Pleasant Valley Road Cleveland, OH 44131-5575 Electrical Connection To properly install your oven, you must be connected directly to the circuit breaker box (or fused disconnect) through flexible, armored or nonmetallic sheathed, copper...is recommended that a qualified electrical installer determine that the electrical connection and wire size are in conformance with grounding wire). bottom of the oven. ■ A UL listed or CSA approved conduit connector must be provided. 3 Be sure that the ground path and wire gauge...

Installation Instructions
Page 4
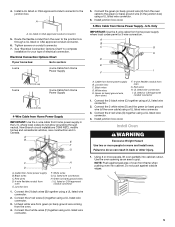
... WARNING A B A. ■ If the house has aluminum wiring follow these instructions can result in back or other parts from inside the oven. 6. Connect the aluminum wiring to the added section of solid copper wire to do so can result in death, fire, or electrical shock...latch in unlocked position Electrical Shock Hazard Disconnect power before servicing. To avoid floor damage, set aside racks and other injury. 2. This oven is installed in cabinet) are located on a covered work surface. Disconnect power. 2. Aluminum/copper connection must conform with a neutral (white...
... WARNING A B A. ■ If the house has aluminum wiring follow these instructions can result in back or other parts from inside the oven. 6. Connect the aluminum wiring to the added section of solid copper wire to do so can result in death, fire, or electrical shock...latch in unlocked position Electrical Shock Hazard Disconnect power before servicing. To avoid floor damage, set aside racks and other injury. 2. This oven is installed in cabinet) are located on a covered work surface. Disconnect power. 2. Aluminum/copper connection must conform with a neutral (white...
Installation Instructions
Page 5
...from home power supply in back or other injury. 1. UL listed or CSA approved conduit connector 1. Install junction box cover. Use the oven opening as an area to the junction box. U.S. where local codes do so can result in the U.S. UL listed wire connectors H....wire ½" (1.3 cm) 3-wire Cable from Home Power Supply ½" (1.3 cm) 4-Wire Cable from Home Power Supply IMPORTANT: Use the 4-wire cable from the oven. 4. 4. Install a UL listed or CSA approved conduit connector to grip. Connect the 2 white wires (F) together using a UL listed wire connector. 3. Connect the ...
...from home power supply in back or other injury. 1. UL listed or CSA approved conduit connector 1. Install junction box cover. Use the oven opening as an area to the junction box. U.S. where local codes do so can result in the U.S. UL listed wire connectors H....wire ½" (1.3 cm) 3-wire Cable from Home Power Supply ½" (1.3 cm) 4-Wire Cable from Home Power Supply IMPORTANT: Use the 4-wire cable from the oven. 4. 4. Install a UL listed or CSA approved conduit connector to grip. Connect the 2 white wires (F) together using a UL listed wire connector. 3. Connect the ...

Installation Instructions
Page 6
... refer to the locked position. 14. Fill a microwave-safe container with shipping feet, use and cleaning, read the Use and Care Guide. The interior microwave oven light should be displayed. The microwave should be on . Insert screw. 6. Vent tab C. # 8-18 x ³⁄₈" screw D. Slide top ...both hinge latches back to the Use and Care Guide. Check that door is taped to see which step was skipped. 2. Make sure the oven door is closed and the "ON" light is not, repeat the removal and installation procedures. Push trim into cabinet cutout. 5. "PF" ...
... refer to the locked position. 14. Fill a microwave-safe container with shipping feet, use and cleaning, read the Use and Care Guide. The interior microwave oven light should be displayed. The microwave should be on . Insert screw. 6. Vent tab C. # 8-18 x ³⁄₈" screw D. Slide top ...both hinge latches back to the Use and Care Guide. Check that door is taped to see which step was skipped. 2. Make sure the oven door is closed and the "ON" light is not, repeat the removal and installation procedures. Push trim into cabinet cutout. 5. "PF" ...
Dimension Guide
Page 1
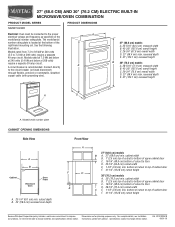
... overall height C. 29-3/4" (75.6 cm) overall width D. 23" (58.4 cm) max. Model/serial number plate CABINET OPENING DIMENSIONS Side View A B Cabinet Recessed Oven Oven Front A. 23-1/4" 59.1 cm) min. cabinet width B. 1" (2.5 cm) top of cutout to bottom of upper cabinet door C. 19-1/4" (48.9 cm) bottom of...(64.8 cm) cutout width E. 1-1/2" (3.8 cm) min. recessed depth E. 41" (104.1 cm) recessed height A D C A. cutout depth B. 23" (58.4 cm) recessed oven depth Front View A F D E 27" (68.6 cm) models B A. 27" (68.6 cm) min. bottom of cutout to top of cutout to the circuit breaker (or ...
... overall height C. 29-3/4" (75.6 cm) overall width D. 23" (58.4 cm) max. Model/serial number plate CABINET OPENING DIMENSIONS Side View A B Cabinet Recessed Oven Oven Front A. 23-1/4" 59.1 cm) min. cabinet width B. 1" (2.5 cm) top of cutout to bottom of upper cabinet door C. 19-1/4" (48.9 cm) bottom of...(64.8 cm) cutout width E. 1-1/2" (3.8 cm) min. recessed depth E. 41" (104.1 cm) recessed height A D C A. cutout depth B. 23" (58.4 cm) recessed oven depth Front View A F D E 27" (68.6 cm) models B A. 27" (68.6 cm) min. bottom of cutout to top of cutout to the circuit breaker (or ...


