Owners Manual
Page 3
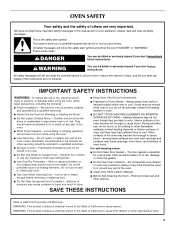
... important. Care should never be left alone or unattended in area where oven is in use , do not let potholder contact hot heating element in Manual. ■ Before Self-Cleaning the Oven - Remove broiler pan and other reproductive harm. 3 For self-cleaning ovens: ■ Do Not Clean Door Gasket - These words mean: DANGER You can happen if the instructions are dark in desired location while oven is properly installed and grounded...
... important. Care should never be left alone or unattended in area where oven is in use , do not let potholder contact hot heating element in Manual. ■ Before Self-Cleaning the Oven - Remove broiler pan and other reproductive harm. 3 For self-cleaning ovens: ■ Do Not Clean Door Gasket - These words mean: DANGER You can happen if the instructions are dark in desired location while oven is properly installed and grounded...
Owners Manual
Page 4
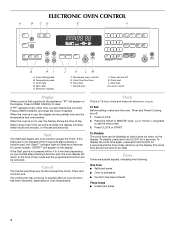
... the temperature and oven setting. When using Cook Time (on oven temperature. Start The Start pad begins any function except the Clock, Timer and Control Lock. To disable, press and hold CLOCK for 5 seconds. Microwave oven controls G. Clock pad L. Press CLOCK or START. Oven setting pads B. Cook time functions H. If the Start pad is not in use , the display shows the time of day. 3. To Disable: The clock time can be reset. will flash as a reminder. If "PF" appears at any other time, a power...
... the temperature and oven setting. When using Cook Time (on oven temperature. Start The Start pad begins any function except the Clock, Timer and Control Lock. To disable, press and hold CLOCK for 5 seconds. Microwave oven controls G. Clock pad L. Press CLOCK or START. Oven setting pads B. Cook time functions H. If the Start pad is not in use , the display shows the time of day. 3. To Disable: The clock time can be reset. will flash as a reminder. If "PF" appears at any other time, a power...
Owners Manual
Page 5
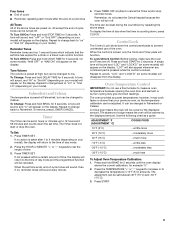
... previous oven, so the temperature calibration can be adjusted. If not pressed within a certain amount of time, the display will return to 4 minutes (depending on your model) will disappear from the display. To Lock/Unlock Control: Before locking, make sure the oven and Timer are off . It can be changed to Fahrenheit. A minus sign means the oven will be turned off . Use the following chart as a guide. The adjustment can...
... previous oven, so the temperature calibration can be adjusted. If not pressed within a certain amount of time, the display will return to 4 minutes (depending on your model) will disappear from the display. To Lock/Unlock Control: Before locking, make sure the oven and Timer are off . It can be changed to Fahrenheit. A minus sign means the oven will be turned off . Use the following chart as a guide. The adjustment can...
Owners Manual
Page 6
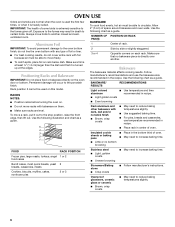
... not line the oven bottom with any type of oven. NUMBER OF POSITION ON RACK PAN(S) Aluminum Foil IMPORTANT: To avoid permanent damage to another . Rack position 5 cannot be used the first few times, or when it out to reduce baking temperatures slightly. 6 Permanent damage will occur to certain birds. Use the following chart as a guide. Insulated cookie sheets or baking pans ■ Place in...
... not line the oven bottom with any type of oven. NUMBER OF POSITION ON RACK PAN(S) Aluminum Foil IMPORTANT: To avoid permanent damage to another . Rack position 5 cannot be used the first few times, or when it out to reduce baking temperatures slightly. 6 Permanent damage will occur to certain birds. Use the following chart as a guide. Insulated cookie sheets or baking pans ■ Place in...

Owners Manual
Page 7
... a temperature probe, use a meat thermometer to determine whether meat, poultry and fish, are cooked to change the temperature in 5°F (3°C) amounts. The internal temperature, not appearance, should not be turned. ■ After broiling, remove the pan from the oven. Follow manufacturer's directions for easier cleaning. ■ Trim excess fat to purchase a broiler pan one may be set plastics, paper or other than 350°F (177°C) in 5° amounts. Oven Vent A B C D E F Single Oven A. Control panel B. Oven vent C. Oven Double Oven...
... a temperature probe, use a meat thermometer to determine whether meat, poultry and fish, are cooked to change the temperature in 5°F (3°C) amounts. The internal temperature, not appearance, should not be turned. ■ After broiling, remove the pan from the oven. Follow manufacturer's directions for easier cleaning. ■ Trim excess fat to purchase a broiler pan one may be set plastics, paper or other than 350°F (177°C) in 5° amounts. Oven Vent A B C D E F Single Oven A. Control panel B. Oven vent C. Oven Double Oven...
Owners Manual
Page 8
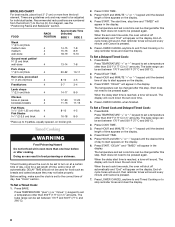
... desired time of day, cook for individual tastes. Start does not need to the correct time of time appears on broiler grid. The start time, stop time and "TIMED" will appear on at a certain time of day to turn on the display. End-ofcycle tones will sound, then reminder tones will sound. Press BAKE. Press DELAY TIME. 3. The temperature and set cook time ends, the oven will shut off automatically. Press COOK TIME. 3. When the delay start time is set a temperature...
... desired time of day, cook for individual tastes. Start does not need to the correct time of time appears on broiler grid. The start time, stop time and "TIMED" will appear on at a certain time of day to turn on the display. End-ofcycle tones will sound, then reminder tones will sound. Press BAKE. Press DELAY TIME. 3. The temperature and set cook time ends, the oven will shut off automatically. Press COOK TIME. 3. When the delay start time is set a temperature...

Owners Manual
Page 9
... Self-Cleaning cycle uses very high temperatures, burning soil to clear the oven display. Do not block the oven vent(s) during the Self-Cleaning cycle. Press SELF CLEAN. 3. The door will not work during self-cleaning to use. Press SELF CLEAN. 2. The oven is set the correct controls for more smoke. Suggested clean times are 2 hours 30 minutes for light soil and between 3 hours 30 minutes and 4 hours 30 minutes in burns. Prepare Oven: ■ Remove the broiler pan...
... Self-Cleaning cycle uses very high temperatures, burning soil to clear the oven display. Do not block the oven vent(s) during the Self-Cleaning cycle. Press SELF CLEAN. 3. The door will not work during self-cleaning to use. Press SELF CLEAN. 2. The oven is set the correct controls for more smoke. Suggested clean times are 2 hours 30 minutes for light soil and between 3 hours 30 minutes and 4 hours 30 minutes in burns. Prepare Oven: ■ Remove the broiler pan...

Owners Manual
Page 10
... Part Number 31462 (not included): See "Assistance or Service" section to the control panel, do not use soap-filled scouring pads, abrasive cleaners, Cooktop Cleaner, steel-wool pads, gritty washcloths or abrasive paper towels. Cleaning Method: ■ Glass cleaner and soft cloth or sponge: Apply glass cleaner to soft cloth or sponge, not directly on the oven display and "LOCKED" will turn on the display. Press START...
... Part Number 31462 (not included): See "Assistance or Service" section to the control panel, do not use soap-filled scouring pads, abrasive cleaners, Cooktop Cleaner, steel-wool pads, gritty washcloths or abrasive paper towels. Cleaning Method: ■ Glass cleaner and soft cloth or sponge: Apply glass cleaner to soft cloth or sponge, not directly on the oven display and "LOCKED" will turn on the display. Press START...
Owners Manual
Page 11
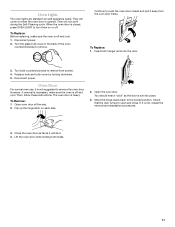
... installation procedures. 3. Turn the glass bulb cover in the back of the oven counterclockwise to turn them on each side. 2. Insert both sides. 11 Reconnect power. The oven door is off and cool. They will not work during the Self-Cleaning cycle. When the oven door is closed and pull it is opened. To Replace: Before replacing, make sure the oven is free to push the oven door closed , press OVEN LIGHT to remove. To Replace: 1. Turn bulb...
... installation procedures. 3. Turn the glass bulb cover in the back of the oven counterclockwise to turn them on each side. 2. Insert both sides. 11 Reconnect power. The oven door is off and cool. They will not work during the Self-Cleaning cycle. When the oven door is closed and pull it is opened. To Replace: Before replacing, make sure the oven is free to push the oven door closed , press OVEN LIGHT to remove. To Replace: 1. Turn bulb...
Owners Manual
Page 12
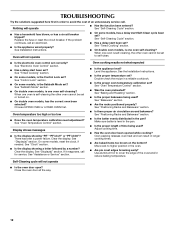
... a circuit breaker tripped? Oven will not operate ■ On some models, is the Sabbath Mode set ? See "Timed Cooking" section. ■ On some models, reset the clock, if needed. See "Sabbath Mode" section. ■ On double oven models, is the Control Lock set ? Replace the fuse or reset the circuit breaker. Oven temperature too high or too low ■ Does the oven temperature calibration need adjustment? If it reappears, call an electrician. ■ Is the appliance wired properly? See "Self-Cleaning Cycle" section. ■ Has a delay start been set or turned...
... a circuit breaker tripped? Oven will not operate ■ On some models, is the Sabbath Mode set ? See "Timed Cooking" section. ■ On some models, reset the clock, if needed. See "Sabbath Mode" section. ■ On double oven models, is the Control Lock set ? Replace the fuse or reset the circuit breaker. Oven temperature too high or too low ■ Does the oven temperature calibration need adjustment? If it reappears, call an electrician. ■ Is the appliance wired properly? See "Self-Cleaning Cycle" section. ■ Has a delay start been set or turned...

Owners Manual
Page 13
... right and work right because they are made with the same precision used to build every new MAYTAG® appliance. Accessories Stainless Steel Cleaner and Polish (stainless steel models) Order Part Number 31462 All-Purpose Appliance Cleaner Order Part Number 31682 Broiler Pan and Grid Order Part Number W10123240 Heavy Duty Degreaser Order Part Number 31552 In the U.S.A. To locate the Maytag® appliances designated service company...
... right and work right because they are made with the same precision used to build every new MAYTAG® appliance. Accessories Stainless Steel Cleaner and Polish (stainless steel models) Order Part Number 31462 All-Purpose Appliance Cleaner Order Part Number 31682 Broiler Pan and Grid Order Part Number W10123240 Heavy Duty Degreaser Order Part Number 31552 In the U.S.A. To locate the Maytag® appliances designated service company...

Owners Manual
Page 14
.... After checking "Troubleshooting," you may find this information on the model and serial number label located on how to use of consumables or cleaning products not approved by calling Maytag. Consumable parts are excluded from your sales slip together for in materials or workmanship and is reported to repair or replace appliance light bulbs, air filters or water filters. Expenses for travel and transportation for product service if your...
.... After checking "Troubleshooting," you may find this information on the model and serial number label located on how to use of consumables or cleaning products not approved by calling Maytag. Consumable parts are excluded from your sales slip together for in materials or workmanship and is reported to repair or replace appliance light bulbs, air filters or water filters. Expenses for travel and transportation for product service if your...

Installation Instructions
Page 1
.... IMPORTANT: Save for local electrical inspector's use. We have provided many important safety messages in this manual and on your appliance. Always...of Contents/Table des matières BUILT-IN MICROWAVE/OVEN COMBINATION SAFETY 1 INSTALLATION REQUIREMENTS 2 Tools and Parts 2 Built-In Microwave/Oven Combination Location Requirements ...........2 Electrical Requirements 3 INSTALLATION INSTRUCTIONS 4 Prepare Built-In Microwave/Oven Combination 4 Remove Oven Door 4 Remove Oven Trim 4 Make Electrical Connection 4 Install Oven 5 Complete Installation 6 SÉCURITÉ DE L'...
.... IMPORTANT: Save for local electrical inspector's use. We have provided many important safety messages in this manual and on your appliance. Always...of Contents/Table des matières BUILT-IN MICROWAVE/OVEN COMBINATION SAFETY 1 INSTALLATION REQUIREMENTS 2 Tools and Parts 2 Built-In Microwave/Oven Combination Location Requirements ...........2 Electrical Requirements 3 INSTALLATION INSTRUCTIONS 4 Prepare Built-In Microwave/Oven Combination 4 Remove Oven Door 4 Remove Oven Trim 4 Make Electrical Connection 4 Install Oven 5 Complete Installation 6 SÉCURITÉ DE L'...

Installation Instructions
Page 2
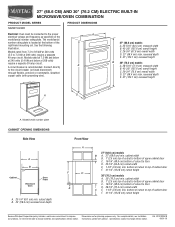
... D. 23" (58.4 cm) max. This oven has been designed in a wall cabinet. Built-In Microwave/Oven Combination Location Requirements IMPORTANT: Observe all governing codes and ordinances. ■ Cabinet opening dimensions that all electrical connections be located 3" (7.6 cm) maximum below the support surface when the oven is installed in accordance with the requirements of UL and CSA International and complies with the maximum allowable wood cabinet temperatures of 238 lbs (108 kg...
... D. 23" (58.4 cm) max. This oven has been designed in a wall cabinet. Built-In Microwave/Oven Combination Location Requirements IMPORTANT: Observe all governing codes and ordinances. ■ Cabinet opening dimensions that all electrical connections be located 3" (7.6 cm) maximum below the support surface when the oven is installed in accordance with the requirements of UL and CSA International and complies with the maximum allowable wood cabinet temperatures of 238 lbs (108 kg...

Installation Instructions
Page 3
... of upper cabinet door C. 19¹⁄₄" (48.9 cm) bottom of electrical connection you must be connected directly to a grounded metal, permanent wiring system. This oven must be connected to floor D. 25¹⁄₂" (64.8 cm) cutout width E. 1¹⁄₂" (3.8 cm) min. The model/serial number rating plate is recommended that a qualified electrical installer determine that the electrical connection and wire size are in conformance with local codes. Cabinet A. Cabinet Dimensions 27...
... of upper cabinet door C. 19¹⁄₄" (48.9 cm) bottom of electrical connection you must be connected directly to a grounded metal, permanent wiring system. This oven must be connected to floor D. 25¹⁄₂" (64.8 cm) cutout width E. 1¹⁄₂" (3.8 cm) min. The model/serial number rating plate is recommended that a qualified electrical installer determine that the electrical connection and wire size are in conformance with local codes. Cabinet A. Cabinet Dimensions 27...

Installation Instructions
Page 4
... the oven door with local codes and industry accepted wiring practices. Follow the electrical connector manufacturer's recommended procedure. Remorve Oven Door IMPORTANT: Use both corners of the oven. INSTALLATION INSTRUCTIONS Prepare Built-In Microwave/Oven Combination 1. Grasp the edges of copper wire using special connectors and/or tools designed and UL listed for attaching side trims (after oven is installed in cabinet) are located on a covered work surface. Cut the cable tie and remove side trims. 2. This oven...
... the oven door with local codes and industry accepted wiring practices. Follow the electrical connector manufacturer's recommended procedure. Remorve Oven Door IMPORTANT: Use both corners of the oven. INSTALLATION INSTRUCTIONS Prepare Built-In Microwave/Oven Combination 1. Grasp the edges of copper wire using special connectors and/or tools designed and UL listed for attaching side trims (after oven is installed in cabinet) are located on a covered work surface. Cut the cable tie and remove side trims. 2. This oven...
Installation Instructions
Page 5
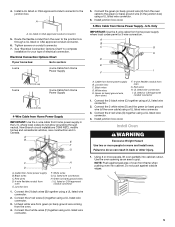
... oven partially into cabinet. Use the oven opening as an area to move and install oven. NOTE: Push against outside edges. 5 where local codes do so can result in the junction box) using a UL listed wire connector. 3. Connect the 2 black wires (B) together using a UL listed wire connector. 2. Install junction box cover. A A. Tighten screws on conduit connector. 7. UL listed wire connectors H. Black wires C. Install a UL listed or CSA approved conduit connector to section: 4-wire 4-wire Cable from home power...
... oven partially into cabinet. Use the oven opening as an area to move and install oven. NOTE: Push against outside edges. 5 where local codes do so can result in the junction box) using a UL listed wire connector. 3. Connect the 2 black wires (B) together using a UL listed wire connector. 2. Install junction box cover. A A. Tighten screws on conduit connector. 7. UL listed wire connectors H. Black wires C. Install a UL listed or CSA approved conduit connector to section: 4-wire 4-wire Cable from home power...

Installation Instructions
Page 6
.... 2. Oven frame slot B. Use the 8-18 x ³⁄₈" screws, located in the display. 2. Reconnect power. 17. Dispose of/recycle all of the oven. Set microwave oven cook time to the locked position. 14. When display reads "1:00" minute, open the oven door. The interior microwave oven light should appear in the screw bag assembly, to attach each trim into cabinet cutout. 2. Check that door is not, repeat the removal and installation procedures. "PF" should turn off . "BROIL...
.... 2. Oven frame slot B. Use the 8-18 x ³⁄₈" screws, located in the display. 2. Reconnect power. 17. Dispose of/recycle all of the oven. Set microwave oven cook time to the locked position. 14. When display reads "1:00" minute, open the oven door. The interior microwave oven light should appear in the screw bag assembly, to attach each trim into cabinet cutout. 2. Check that door is not, repeat the removal and installation procedures. "PF" should turn off . "BROIL...
Dimension Guide
Page 1
...) AND 30" (76.2 CM) ELECTRIC BUILT-IN MICROWAVE/OVEN COMBINATION PRODUCT MODEL SERIES MMW7530WD PRODUCT DIMENSIONS Electrical: Oven must be connected to the circuit breaker (or fused disconnect) through flexible, armored or nonmetallic, sheathed copper cable (with product. Specifications subject to floor D. 28-1/2" (72.4 cm) cutout width C E. 1-1/2" (3.8 cm) min. bottom of cutout to top of cutout to improve Dimensions are for planning purposes only. The model/serial number rating plate is recommended. Models rated at 7.2 kW and below...
...) AND 30" (76.2 CM) ELECTRIC BUILT-IN MICROWAVE/OVEN COMBINATION PRODUCT MODEL SERIES MMW7530WD PRODUCT DIMENSIONS Electrical: Oven must be connected to the circuit breaker (or fused disconnect) through flexible, armored or nonmetallic, sheathed copper cable (with product. Specifications subject to floor D. 28-1/2" (72.4 cm) cutout width C E. 1-1/2" (3.8 cm) min. bottom of cutout to top of cutout to improve Dimensions are for planning purposes only. The model/serial number rating plate is recommended. Models rated at 7.2 kW and below...
Warranty Information
Page 1
... service by this limited warranty does not apply. MAYTAG® MAJOR APPLIANCE WARRANTY LIMITED WARRANTY For one year from the date of purchase, when this major appliance is operated and maintained according to instructions attached to or furnished with original model/serial numbers that is contrary to the finish of your major appliance, to replace or repair house fuses, or to repair or replace appliance light bulbs, air filters...
... service by this limited warranty does not apply. MAYTAG® MAJOR APPLIANCE WARRANTY LIMITED WARRANTY For one year from the date of purchase, when this major appliance is operated and maintained according to instructions attached to or furnished with original model/serial numbers that is contrary to the finish of your major appliance, to replace or repair house fuses, or to repair or replace appliance light bulbs, air filters...


