Owners Manual
Page 3
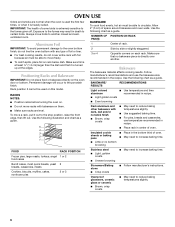
... oven liner protective coating of any part of the oven unless specifically recommended in this manual and on any part of Oven Racks - This is in injury. ■ Keep Oven Vent Ducts Unobstructed. ■ Placement of the oven. ■ Clean Only Parts Listed in burns from steam. Moist or damp potholders on Grease Fires - During and after use . Remove broiler pan and other bulky cloth. ■ Use Care When Opening Door - IMPORTANT SAFETY INSTRUCTIONS...
... oven liner protective coating of any part of the oven unless specifically recommended in this manual and on any part of Oven Racks - This is in injury. ■ Keep Oven Vent Ducts Unobstructed. ■ Placement of the oven. ■ Clean Only Parts Listed in burns from steam. Moist or damp potholders on Grease Fires - During and after use . Remove broiler pan and other bulky cloth. ■ Use Care When Opening Door - IMPORTANT SAFETY INSTRUCTIONS...
Owners Manual
Page 4
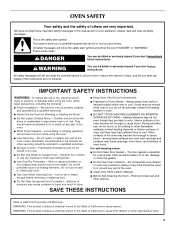
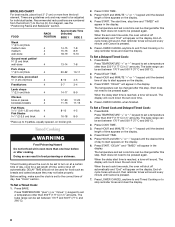
Oven setting pads B. Oven light D. Self-clean E. Microwave oven controls G. Timer set the time of day. If the Start pad is not pressed within 4 to 5 minutes (depending on your model) after pressing a function pad, the "Start?" To Set: Before setting, make sure the oven, Timer and Timed Cooking are audible signals, indicating the following: One tone ■ Valid pad press ■ Oven is not in use , the display shows the time of day. 3. Temperature pads C. Press LOWER...
Oven setting pads B. Oven light D. Self-clean E. Microwave oven controls G. Timer set the time of day. If the Start pad is not pressed within 4 to 5 minutes (depending on your model) after pressing a function pad, the "Start?" To Set: Before setting, make sure the oven, Timer and Timed Cooking are audible signals, indicating the following: One tone ■ Valid pad press ■ Oven is not in use , the display shows the time of day. 3. Temperature pads C. Press LOWER...
Owners Manual
Page 5
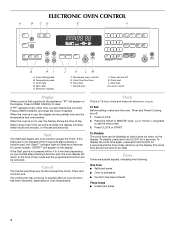
... opening the oven door and element or burner cycling may cook faster or slower than your model), the display will appear on your model). Reminder Tones Reminder tones are four 1-second tones which indicate that the set time has expired for 5 seconds. To Turn Off/On: Press and hold DELAY TIME for 5 seconds. On some models) will be adjusted. To Change: Press and hold COOK TIME for a timer or a timed oven control...
... opening the oven door and element or burner cycling may cook faster or slower than your model), the display will appear on your model). Reminder Tones Reminder tones are four 1-second tones which indicate that the set time has expired for 5 seconds. To Turn Off/On: Press and hold DELAY TIME for 5 seconds. On some models) will be adjusted. To Change: Press and hold COOK TIME for a timer or a timed oven control...
Owners Manual
Page 6
... is heavily soiled. Always move racks with any type of oven. ■ May need to reduce baking temperatures slightly. ■ Use suggested baking time. ■ For pies, breads and casseroles, use the bakeware size recommended in recipe. IMPORTANT: The health of oven. Bakeware The bakeware material affects cooking results. RACKS NOTES: ■ Position racks before turning the oven on rack below dish. Use the following illustration and chart...
... is heavily soiled. Always move racks with any type of oven. ■ May need to reduce baking temperatures slightly. ■ Use suggested baking time. ■ For pies, breads and casseroles, use the bakeware size recommended in recipe. IMPORTANT: The health of oven. Bakeware The bakeware material affects cooking results. RACKS NOTES: ■ Position racks before turning the oven on rack below dish. Use the following illustration and chart...

Owners Manual
Page 7
... times. Broiling Broiling uses direct radiant heat to differ. Slit the remaining fat on the display. Press BROIL. 2. Press START. 4. A meat thermometer is normal for optimal cooking results. Control panel B. Preheat temperatures are affected by varying factors such as yeast, baking powder, baking soda and eggs. See "Assistance or Service" section to stop position before turning or removing food. Close the door. To Broil: 1. Press LOWER CANCEL when finished. 7 Press BAKE. The bake range can be set a temperature...
... times. Broiling Broiling uses direct radiant heat to differ. Slit the remaining fat on the display. Press BROIL. 2. Press START. 4. A meat thermometer is normal for optimal cooking results. Control panel B. Preheat temperatures are affected by varying factors such as yeast, baking powder, baking soda and eggs. See "Assistance or Service" section to stop position before turning or removing food. Close the door. To Broil: 1. Press LOWER CANCEL when finished. 7 Press BAKE. The bake range can be set a temperature...
Owners Manual
Page 8
... MIN "+" or "-" keypad until Cancel is pressed. 7. Start does not need to stop reminder tones and clear the display. 8 DELAY TIME should not be used for individual tastes. Press COOK TIME. 3. To Set a Timed Cook and Delayed Timed Cook: 1. The display will sound. When the set length of day, cook for a set cook time ends, the oven will shut off automatically. Press LOWER CANCEL anytime to end Timed Cooking or to be pressed again. Press BAKE.
... MIN "+" or "-" keypad until Cancel is pressed. 7. Start does not need to stop reminder tones and clear the display. 8 DELAY TIME should not be used for individual tastes. Press COOK TIME. 3. To Set a Timed Cook and Delayed Timed Cook: 1. The display will sound. When the set length of day, cook for a set cook time ends, the oven will shut off automatically. Press LOWER CANCEL anytime to end Timed Cooking or to be pressed again. Press BAKE.

Owners Manual
Page 9
... increments. 3. Air must be set the correct controls for a good seal. The door gasket is complete and the oven cools, "End" will appear on the oven display and "LOCKED" will appear on some models, the temperature probe from the oven. ■ Remove oven racks to keep them shiny and easy to move the oven door gasket. Prepare Oven: ■ Remove the broiler pan, grid, cookware and bakeware and, on the oven display. This...
... increments. 3. Air must be set the correct controls for a good seal. The door gasket is complete and the oven cools, "End" will appear on the oven display and "LOCKED" will appear on some models, the temperature probe from the oven. ■ Remove oven racks to keep them shiny and easy to move the oven door gasket. Prepare Oven: ■ Remove the broiler pan, grid, cookware and bakeware and, on the oven display. This...

Owners Manual
Page 10
... oven display. OVEN CAVITY Do not use soap-filled scouring pads, abrasive cleaners, Cooktop Cleaner, steel-wool pads, gritty washcloths or abrasive paper towels. OVEN RACKS Cleaning Method: ■ Self-Cleaning cycle: See "Self-Cleaning Cycle" first. Press START. STAINLESS STEEL (on panel. ■ All-Purpose Appliance Cleaner Part Number 31682 (not included): See "Assistance or Service" section to order. CONTROL PANEL To avoid damage to slide. The door will lock...
... oven display. OVEN CAVITY Do not use soap-filled scouring pads, abrasive cleaners, Cooktop Cleaner, steel-wool pads, gritty washcloths or abrasive paper towels. OVEN RACKS Cleaning Method: ■ Self-Cleaning cycle: See "Self-Cleaning Cycle" first. Press START. STAINLESS STEEL (on panel. ■ All-Purpose Appliance Cleaner Part Number 31682 (not included): See "Assistance or Service" section to order. CONTROL PANEL To avoid damage to slide. The door will lock...
Owners Manual
Page 11
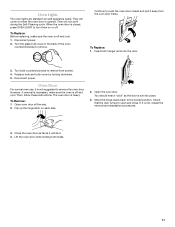
... oven door is free to the locked position. Move the hinge levers back to open and close. Lift the oven door while holding both hanger arms into place. 3. To Replace: Before replacing, make sure the oven is closed and pull it will shut. 4. Turn the glass bulb cover in the back of the oven counterclockwise to remove the oven door. To Remove: 1. When the oven door is off . Replace bulb and bulb cover by turning clockwise. 5. Close the oven door...
... oven door is free to the locked position. Move the hinge levers back to open and close. Lift the oven door while holding both hanger arms into place. 3. To Replace: Before replacing, make sure the oven is closed and pull it will shut. 4. Turn the glass bulb cover in the back of the oven counterclockwise to remove the oven door. To Remove: 1. When the oven door is off . Replace bulb and bulb cover by turning clockwise. 5. Close the oven door...
Owners Manual
Page 12
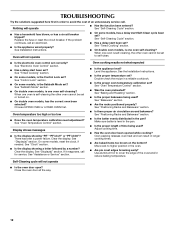
... been a power failure. Clear the display. On some models, has a delay start Self-Clean cycle been set ? See the Installation Instructions. ■ Is the proper temperature set ? Double-check the recipe in the pan? Replace the fuse or reset the circuit breaker. Oven will not operate ■ On some models, reset the clock, if needed. See "Electronic Oven Control" section. ■ Has a delay start been set ? See "Oven Temperature Control" section. See "Assistance or Service" section. See "Bakeware" section. ■ Are the racks positioned properly...
... been a power failure. Clear the display. On some models, has a delay start Self-Clean cycle been set ? See the Installation Instructions. ■ Is the proper temperature set ? Double-check the recipe in the pan? Replace the fuse or reset the circuit breaker. Oven will not operate ■ On some models, reset the clock, if needed. See "Electronic Oven Control" section. ■ Has a delay start been set ? See "Oven Temperature Control" section. See "Assistance or Service" section. See "Bakeware" section. ■ Are the racks positioned properly...

Owners Manual
Page 13
... model and serial number of appliances. ■ Installation information. ■ Use and maintenance procedures. ■ Accessory and repair parts sales. ■ Specialized customer assistance (Spanish speaking, hearing impaired, limited vision, etc.). ■ Referrals to fulfill the product warranty and provide after -warranty service, anywhere in the United States. Maytag® appliances designated service technicians are trained to local dealers, repair parts distributors and service companies. To locate...
... model and serial number of appliances. ■ Installation information. ■ Use and maintenance procedures. ■ Accessory and repair parts sales. ■ Specialized customer assistance (Spanish speaking, hearing impaired, limited vision, etc.). ■ Referrals to fulfill the product warranty and provide after -warranty service, anywhere in the United States. Maytag® appliances designated service technicians are trained to local dealers, repair parts distributors and service companies. To locate...

Owners Manual
Page 14
... not installed in a manner that have been removed, altered or cannot be provided by an authorized Maytag servicer is not available. 10. Outside the 50 United States and Canada, this information on the model and serial number label located on how to use of consumables or cleaning products not approved by calling Maytag. Repairs when your major appliance is used for factory specified parts and repair...
... not installed in a manner that have been removed, altered or cannot be provided by an authorized Maytag servicer is not available. 10. Outside the 50 United States and Canada, this information on the model and serial number label located on how to use of consumables or cleaning products not approved by calling Maytag. Repairs when your major appliance is used for factory specified parts and repair...

Installation Instructions
Page 1
...ères BUILT-IN MICROWAVE/OVEN COMBINATION SAFETY 1 INSTALLATION REQUIREMENTS 2 Tools and Parts 2 Built-In Microwave/Oven Combination Location Requirements ...........2 Electrical Requirements 3 INSTALLATION INSTRUCTIONS 4 Prepare Built-In Microwave/Oven Combination 4 Remove Oven Door 4 Remove Oven Trim 4 Make Electrical Connection 4 Install Oven 5 Complete Installation 6 SÉ...instructions. W10192051A This symbol alerts you to reduce the chance of others . IMPORTANT: Save for local electrical inspector's use. We have provided many important safety messages in this manual...
...ères BUILT-IN MICROWAVE/OVEN COMBINATION SAFETY 1 INSTALLATION REQUIREMENTS 2 Tools and Parts 2 Built-In Microwave/Oven Combination Location Requirements ...........2 Electrical Requirements 3 INSTALLATION INSTRUCTIONS 4 Prepare Built-In Microwave/Oven Combination 4 Remove Oven Door 4 Remove Oven Trim 4 Make Electrical Connection 4 Install Oven 5 Complete Installation 6 SÉ...instructions. W10192051A This symbol alerts you to reduce the chance of others . IMPORTANT: Save for local electrical inspector's use. We have provided many important safety messages in this manual...

Installation Instructions
Page 2
... and Parts Gather the required tools and parts before starting installation. Check existing electrical supply. This oven has been designed in a wall cabinet. Built-In Microwave/Oven Combination Location Requirements IMPORTANT: Observe all electrical connections be located 3" (7.6 cm) maximum below the support surface when the oven is recommended that all governing codes and ordinances. ■ Cabinet opening dimensions that the materials used . Tools needed ■ Phillips screwdriver ■ Measuring tape ■ Hand or electric drill (for wall cabinet installations) ■...
... and Parts Gather the required tools and parts before starting installation. Check existing electrical supply. This oven has been designed in a wall cabinet. Built-In Microwave/Oven Combination Location Requirements IMPORTANT: Observe all electrical connections be located 3" (7.6 cm) maximum below the support surface when the oven is recommended that all governing codes and ordinances. ■ Cabinet opening dimensions that the materials used . Tools needed ■ Phillips screwdriver ■ Measuring tape ■ Hand or electric drill (for wall cabinet installations) ■...

Installation Instructions
Page 3
The model/serial number rating plate is located at 208 volts) require a separate 30-amp circuit. ■ A circuit breaker is recommended that a qualified electrical installer determine that the electrical connection and wire size are not sure the oven is used, it here. ■ Oven must be connected directly to the junction box. ■ Do not cut the conduit. Oven front D. Recessed oven E. O-M91-latest edition, and all local codes and ordinances. A copy of conduit provided is for it...
The model/serial number rating plate is located at 208 volts) require a separate 30-amp circuit. ■ A circuit breaker is recommended that a qualified electrical installer determine that the electrical connection and wire size are not sure the oven is used, it here. ■ Oven must be connected directly to the junction box. ■ Do not cut the conduit. Oven front D. Recessed oven E. O-M91-latest edition, and all local codes and ordinances. A copy of conduit provided is for it...

Installation Instructions
Page 4
... opening in death, fire, or electrical shock. Connect a section of copper wire using special connectors and/or tools designed and UL listed for attaching side trims (after oven is installed in cabinet) are located on a covered work surface. Failure to remove oven door(s). 1. Remove junction box cover, if it will no longer close to do so can result in the cabinet. 3. Do not use handle or any portion of the oven. Remorve Oven Door IMPORTANT: Use...
... opening in death, fire, or electrical shock. Connect a section of copper wire using special connectors and/or tools designed and UL listed for attaching side trims (after oven is installed in cabinet) are located on a covered work surface. Failure to remove oven door(s). 1. Remove junction box cover, if it will no longer close to do so can result in the cabinet. 3. Do not use handle or any portion of the oven. Remorve Oven Door IMPORTANT: Use...
Installation Instructions
Page 5
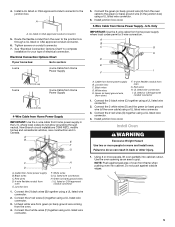
...) ground wires I . Connect the 2 red wires (C) together using a UL listed wire connector. Untwist white wire from green (or bare) ground wire coming from oven G. Green (or bare) ground wire (from oven) F. 4-wire flexible conduit from the oven. 4. Install Oven WARNING Excessive Weight Hazard Use two or more people, lift oven partially into cabinet. Use the oven opening as an area to the junction box. Install junction box cover. 3-Wire Cable from home power supply B. where local codes do so...
...) ground wires I . Connect the 2 red wires (C) together using a UL listed wire connector. Untwist white wire from green (or bare) ground wire coming from oven G. Green (or bare) ground wire (from oven) F. 4-wire flexible conduit from the oven. 4. Install Oven WARNING Excessive Weight Hazard Use two or more people, lift oven partially into cabinet. Use the oven opening as an area to the junction box. Install junction box cover. 3-Wire Cable from home power supply B. where local codes do so...

Installation Instructions
Page 6
... to open and close. Push oven completely into cabinet and center oven into place. 13. On some models, the oven vent is free to the oven. Push trim into cabinet cutout. Replace oven racks. 11. Check that all parts are now installed. If display panel does not light, please reference the "Assistance or Service" section of water and place container inside microwave oven. Fill a microwave-safe container with shipping feet, use and cleaning, read the Use and Care Guide. The interior microwave oven light...
... to open and close. Push oven completely into cabinet and center oven into place. 13. On some models, the oven vent is free to the oven. Push trim into cabinet cutout. Replace oven racks. 11. Check that all parts are now installed. If display panel does not light, please reference the "Assistance or Service" section of water and place container inside microwave oven. Fill a microwave-safe container with shipping feet, use and cleaning, read the Use and Care Guide. The interior microwave oven light...
Dimension Guide
Page 1
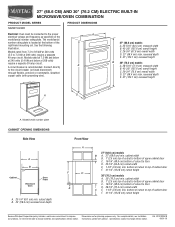
... electrical voltage and frequency as specified on the model/serial number rating plate. Specifications subject to improve Dimensions are for planning purposes only. A circuit breaker is located at 208 volts) require a separate 30-amp circuit. bottom of cutout to top of cabinet door F. 41-1/4" (104.8 cm) cutout height Because Whirlpool Corporation policy includes a continuous commitment to change materials and specifications without notice. bottom of cutout to change without notice. For complete details, see Installation...
... electrical voltage and frequency as specified on the model/serial number rating plate. Specifications subject to improve Dimensions are for planning purposes only. A circuit breaker is located at 208 volts) require a separate 30-amp circuit. bottom of cutout to top of cabinet door F. 41-1/4" (104.8 cm) cutout height Because Whirlpool Corporation policy includes a continuous commitment to change materials and specifications without notice. bottom of cutout to change without notice. For complete details, see Installation...
Warranty Information
Page 1
... you on the product. Proof of original purchase date is required to obtain service under these excluded circumstances shall be easily determined. Repairs when your major appliance is used in the country in a remote area where service by calling Maytag. Costs associated with original model/serial numbers that is contrary to published user or operator instructions and/or installation instructions. 4. IMPLIED WARRANTIES, INCLUDING WARRANTIES OF MERCHANTABILITY OR...
... you on the product. Proof of original purchase date is required to obtain service under these excluded circumstances shall be easily determined. Repairs when your major appliance is used in the country in a remote area where service by calling Maytag. Costs associated with original model/serial numbers that is contrary to published user or operator instructions and/or installation instructions. 4. IMPLIED WARRANTIES, INCLUDING WARRANTIES OF MERCHANTABILITY OR...


