Use and Care Guide
Page 2
... INSTRUCTIONS Installer: Please leave this guide with microwave energy When skin is pierced, steam escapes evenly. 4. Do not deep fat fry in oven. Pressure may occur Common sense, cauhon, and care must be hazardous to handle. 2 Do not cook or reheat eggs _n...p m. Fat could overheat and be exercised when installing, maintaining, or operating microwave Always contact your model number and phone number) or call: Maytag ServlcesLLc Attn CAIR '_Center RO. Pierce yolk with an unbroken yolk using microwave energy. Do not use paper towels which COULD result in severe personal injury...
... INSTRUCTIONS Installer: Please leave this guide with microwave energy When skin is pierced, steam escapes evenly. 4. Do not deep fat fry in oven. Pressure may occur Common sense, cauhon, and care must be hazardous to handle. 2 Do not cook or reheat eggs _n...p m. Fat could overheat and be exercised when installing, maintaining, or operating microwave Always contact your model number and phone number) or call: Maytag ServlcesLLc Attn CAIR '_Center RO. Pierce yolk with an unbroken yolk using microwave energy. Do not use paper towels which COULD result in severe personal injury...
Use and Care Guide
Page 7
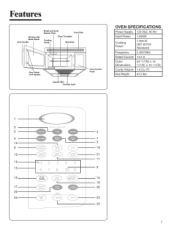
Features Window with Metal Shield Door Handle Model and Serial Number Plate Vent Grille Cooking Guide Glass Turntable Wire Rack Door Safety Lock System Cooktop Light Panel OVEN SPECIFICATIONS Power Supply Input Power CPoowokeirng Frequency Rated Current 120 VAC, 60 Hz 1,650W 1,000 W (IEC 60705 Standard) 2,450 MHz 14.5 A Outer Dimensions Cavity Volume Net Weight 29 7/8"(W) x 16 1/2"(H) X 15 1/4"(D) t.6 Cu. Ft. 45.9 Ibs. ,J 1 5 2 --4 6 7 14 3 8 19 12 -- 21 11 1 1 9 --16 18 -- 25 -- 23 22 7
Features Window with Metal Shield Door Handle Model and Serial Number Plate Vent Grille Cooking Guide Glass Turntable Wire Rack Door Safety Lock System Cooktop Light Panel OVEN SPECIFICATIONS Power Supply Input Power CPoowokeirng Frequency Rated Current 120 VAC, 60 Hz 1,650W 1,000 W (IEC 60705 Standard) 2,450 MHz 14.5 A Outer Dimensions Cavity Volume Net Weight 29 7/8"(W) x 16 1/2"(H) X 15 1/4"(D) t.6 Cu. Ft. 45.9 Ibs. ,J 1 5 2 --4 6 7 14 3 8 19 12 -- 21 11 1 1 9 --16 18 -- 25 -- 23 22 7
Use and Care Guide
Page 20
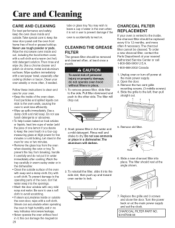
... or two minutes. ,, Remove the glass tray from the oven when cleaning the oven or tray.To prevent the tray from breaking, handle it carefully and do not put it is not in water immediately after cooking chicken or bacon. Wipe spatters immediately with very mild soap... a new charcoal filter, contact the Parts Department at the main power supply. 2. Remove the two vent grille mounting screws. (3 middle screws) 4. Wipe the microwave oven inside and out, including the hood bottom cover, with a soft cloth. Clean your oven. ,, Keep the inside , the charcoal filter should be replaced every...
... or two minutes. ,, Remove the glass tray from the oven when cleaning the oven or tray.To prevent the tray from breaking, handle it carefully and do not put it is not in water immediately after cooking chicken or bacon. Wipe spatters immediately with very mild soap... a new charcoal filter, contact the Parts Department at the main power supply. 2. Remove the two vent grille mounting screws. (3 middle screws) 4. Wipe the microwave oven inside and out, including the hood bottom cover, with a soft cloth. Clean your oven. ,, Keep the inside , the charcoal filter should be replaced every...
Installation Instructions
Page 13
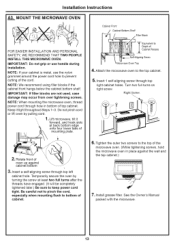
...the cord. Insert a self-aligning screw through top right cabinet holes. Lift microwave, tilt it tight throughout Steps 1-3. NOTE: If your cabinet is metal, use handle during installation. NOTE: When mounting the microwave oven, thread power cord through hole in place against cabinetbottom 3. Turn two full... IMPORTANT: If filler blocks are not used, case damage may occur from over tightening screws. See the Owner's Manual packed with the microwave. 13 Keep it \ forward, and hook slots at least two full turns after the threads have engaged. (It will be completely ...
...the cord. Insert a self-aligning screw through top right cabinet holes. Lift microwave, tilt it tight throughout Steps 1-3. NOTE: If your cabinet is metal, use handle during installation. NOTE: When mounting the microwave oven, thread power cord through hole in place against cabinetbottom 3. Turn two full... IMPORTANT: If filler blocks are not used, case damage may occur from over tightening screws. See the Owner's Manual packed with the microwave. 13 Keep it \ forward, and hook slots at least two full turns after the threads have engaged. (It will be completely ...
Installation Instructions
Page 15
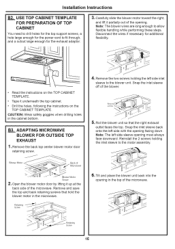
...8226; Read the instructions on the TOP CABINET TEMPLATE. screws Remove_ 5, Roll the blower unit so that hold the blower motor in the microwave. Carefully slide the blower motor toward the right, and lift it partially out of the blower. CAUTION: Wear safety goggles when drilling holes... to drill holes for the top support screws, a hole large enough for the power cord to allow flexible handling while performing these steps. Installation Instructions B2. Blower Back of Microwave Blower Motor Screw 2, Open the blower motor door by lifting it underneath the top cabinet. • Drill ...
...8226; Read the instructions on the TOP CABINET TEMPLATE. screws Remove_ 5, Roll the blower unit so that hold the blower motor in the microwave. Carefully slide the blower motor toward the right, and lift it partially out of the blower. CAUTION: Wear safety goggles when drilling holes... to drill holes for the top support screws, a hole large enough for the power cord to allow flexible handling while performing these steps. Installation Instructions B2. Blower Back of Microwave Blower Motor Screw 2, Open the blower motor door by lifting it underneath the top cabinet. • Drill ...

Installation Instructions
Page 16
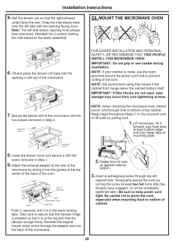
..., thread power cord through top left cabinet hole. Lift microwave, tilt it into the guides at the top center of the back of cabinet. 16 Make sure tape securing damper is metal, use handle during installation. IMPORTANT: Do not grip or use the nylon grommet around the power cord ...bottom __ 3. Be careful not to pinch the cord, especially when mounting flush to keep power cord tight. Attach the exhaust adaptor to the microwave with the top of oven up . Close the blower cover and secure it tight throughout Steps 1-3. Damper FOR EASIER INSTALLATION SAFETY, WE RECOMMEND INSTALL...
..., thread power cord through top left cabinet hole. Lift microwave, tilt it into the guides at the top center of the back of cabinet. 16 Make sure tape securing damper is metal, use handle during installation. IMPORTANT: Do not grip or use the nylon grommet around the power cord ...bottom __ 3. Be careful not to pinch the cord, especially when mounting flush to keep power cord tight. Attach the exhaust adaptor to the microwave with the top of oven up . Close the blower cover and secure it tight throughout Steps 1-3. Damper FOR EASIER INSTALLATION SAFETY, WE RECOMMEND INSTALL...

Installation Instructions
Page 19
... toggle wings into the holes on the CAUTION: Wear safety goggles when drilling holes in the microwave. Pull the plate away from the wall to allow flexible handling while performing these steps. ADAPTING MICROWAVE BLOWER FOR OUTSIDE BACK EXHAUST 1. CAUTION: Be careful to drill holes for the top support.... Remove the two screws holding the left side inlet sleeve to coincide bottom line of the Mounting plate with Horizontal line of the microwave. Remove the back top center blower motor door retaining screw. on the wall to fit through. Disconnect the wires if necessary for ...
... toggle wings into the holes on the CAUTION: Wear safety goggles when drilling holes in the microwave. Pull the plate away from the wall to allow flexible handling while performing these steps. ADAPTING MICROWAVE BLOWER FOR OUTSIDE BACK EXHAUST 1. CAUTION: Be careful to drill holes for the top support.... Remove the two screws holding the left side inlet sleeve to coincide bottom line of the Mounting plate with Horizontal line of the microwave. Remove the back top center blower motor door retaining screw. on the wall to fit through. Disconnect the wires if necessary for ...
Installation Instructions
Page 20
...: Do not grip or use the nylon grommet around the power cord hole to the microwave with the screw removed in the lower locking tabs. Close the blower cover and secure it is metal, use handle during installation. Attach the exhaust adaptor to keep power cord tight. MOUNT THE... MICROWAVE OVEN 6, Tilt and place the blower unit back into the guides at back bottom edge onto four...
...: Do not grip or use the nylon grommet around the power cord hole to the microwave with the screw removed in the lower locking tabs. Close the blower cover and secure it is metal, use handle during installation. Attach the exhaust adaptor to keep power cord tight. MOUNT THE... MICROWAVE OVEN 6, Tilt and place the blower unit back into the guides at back bottom edge onto four...


