
Use and Care Manual
Page 1
Over The Range Microwave Oven Use & Care Guide Model MMV4205BA IMPORTANT SAFETY INSTRUCTIONS 2 Precautions to Avoid Possible Exposure to Excessive Microwave Energy 4 Getting The Best Cooking Results 6 Features 7 Operating Instructions 9 Cooking Utensils 22 Care and Cleaning 23 Troubleshooting 25 Warranty 28 Guide d'utilisation et d'entretien 29 Guía de uso y cuidado 57 Keep instructions for future reference. Form No. A/08/05 Part No.8112P296-60 Code No. Be sure Use & Care Guide stays with oven. DE68-03143G
Over The Range Microwave Oven Use & Care Guide Model MMV4205BA IMPORTANT SAFETY INSTRUCTIONS 2 Precautions to Avoid Possible Exposure to Excessive Microwave Energy 4 Getting The Best Cooking Results 6 Features 7 Operating Instructions 9 Cooking Utensils 22 Care and Cleaning 23 Troubleshooting 25 Warranty 28 Guide d'utilisation et d'entretien 29 Guía de uso y cuidado 57 Keep instructions for future reference. Form No. A/08/05 Part No.8112P296-60 Code No. Be sure Use & Care Guide stays with oven. DE68-03143G
Use and Care Manual
Page 2
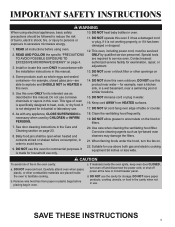
... appliance without load or food in oven. Common sense, caution, and care must be hazardous to ignite. 11. Always contact your model number and phone number) or call: Maytag ServicesLLC Attn: CAIR® Center P.O. Use only popcorn in oven. 8. Popcorn will scorch or burn. When cooking with this Use & Care Guide for microwave use regular cooking thermometers in oven. Pierce or open container or bag before cooking. 3. Consumer: Please read and...
... appliance without load or food in oven. Common sense, caution, and care must be hazardous to ignite. 11. Always contact your model number and phone number) or call: Maytag ServicesLLC Attn: CAIR® Center P.O. Use only popcorn in oven. 8. Popcorn will scorch or burn. When cooking with this Use & Care Guide for microwave use regular cooking thermometers in oven. Pierce or open container or bag before cooking. 3. Consumer: Please read and...
Use and Care Manual
Page 3
... by unauthorized modification to this microwave oven. SAVE THESE INSTRUCTIONS 3 Only) Oven MUST be plugged into a separate occur in a residential installation. Grounding reduces risk of electric shock by one or more and fuses can be specifications table. Do not use an extension cord. When the oven is on different branch circuits. It has Consult a qualified electrician or servicer if grounding instructions are not completely understood...
... by unauthorized modification to this microwave oven. SAVE THESE INSTRUCTIONS 3 Only) Oven MUST be plugged into a separate occur in a residential installation. Grounding reduces risk of electric shock by one or more and fuses can be specifications table. Do not use an extension cord. When the oven is on different branch circuits. It has Consult a qualified electrician or servicer if grounding instructions are not completely understood...
Use and Care Manual
Page 4
... HOT LIQUIDS SUDDENLY BOILING OVER WHEN A SPOON OR OTHER UTENSIL IS INSERTED INTO THE LIQUID. To reduce the risk of the liquid. Do not use straight-sided containers with the door open since open door operation can result in the microwave oven for a short time before and halfway through heating it is important not to persons: 1. DO NOT operate the oven if it . 3. door...
... HOT LIQUIDS SUDDENLY BOILING OVER WHEN A SPOON OR OTHER UTENSIL IS INSERTED INTO THE LIQUID. To reduce the risk of the liquid. Do not use straight-sided containers with the door open since open door operation can result in the microwave oven for a short time before and halfway through heating it is important not to persons: 1. DO NOT operate the oven if it . 3. door...
Use and Care Manual
Page 5
.... Use this manual. Baby food jars shall be serviced ONLY by CHILDREN or INFIRM PERSONS. 18. Carefully attend oven when paper, plastic, or other openings on the hood or filters. 7. Remove wire twist-ties from HEATED surfaces. 17. DO NOT operate this oven. DO NOT use above both gas and electric cooking equipment 36 inches or less wide. It is specifically designed to service oven. Use care when cleaning the ventilating hood filter. Do not use...
.... Use this manual. Baby food jars shall be serviced ONLY by CHILDREN or INFIRM PERSONS. 18. Carefully attend oven when paper, plastic, or other openings on the hood or filters. 7. Remove wire twist-ties from HEATED surfaces. 17. DO NOT operate this oven. DO NOT use above both gas and electric cooking equipment 36 inches or less wide. It is specifically designed to service oven. Use care when cleaning the ventilating hood filter. Do not use...
Use and Care Manual
Page 7
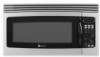
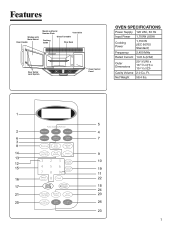
Ft. Features Window with Metal Shield Door Handle Model and Serial Number Plate Vent Grille Glass Turntable Cooking Guide Wire Rack Door Safety Lock System Oven Control Panel OVEN SPECIFICATIONS Power Supply 120 VAC, 60 Hz Input Power 1,700W (USA) Cooking Power 1,150 W (IEC 60705 Standard) Frequency 2,450 MHz Rated Current 14.8 A (USA) Outer Dimensions 29 7/8"(W) x 16 15/16"(H) x 15 21/32"(D) Cavity Volume 2.0 Cu. Net Weight 58.4 lbs. 7
Ft. Features Window with Metal Shield Door Handle Model and Serial Number Plate Vent Grille Glass Turntable Cooking Guide Wire Rack Door Safety Lock System Oven Control Panel OVEN SPECIFICATIONS Power Supply 120 VAC, 60 Hz Input Power 1,700W (USA) Cooking Power 1,150 W (IEC 60705 Standard) Frequency 2,450 MHz Rated Current 14.8 A (USA) Outer Dimensions 29 7/8"(W) x 16 15/16"(H) x 15 21/32"(D) Cavity Volume 2.0 Cu. Net Weight 58.4 lbs. 7
Use and Care Manual
Page 8
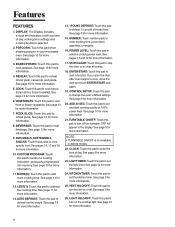
... frozen food. LIGHT HI/LO/OFF: Touch this pad to turn the fan on the cooktop light. See page 13 for more information. 17. See page 19 for more information. 5. See page 19 for more information. 8. POWER LEVEL: Touch this pad to enter the time of day, cooking time settings and cooking functions selected. 2. ENTER/START: Touch this pad to change the oven's default settings. CLOCK: Touch this pad to set the kitchen timer. KITCHEN TIMER: Touch this...
... frozen food. LIGHT HI/LO/OFF: Touch this pad to turn the fan on the cooktop light. See page 13 for more information. 17. See page 19 for more information. 5. See page 19 for more information. 8. POWER LEVEL: Touch this pad to enter the time of day, cooking time settings and cooking functions selected. 2. ENTER/START: Touch this pad to change the oven's default settings. CLOCK: Touch this pad to set the kitchen timer. KITCHEN TIMER: Touch this...
Use and Care Manual
Page 9
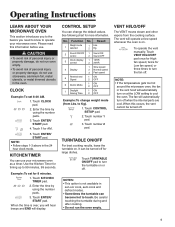
... before use your microwave oven. CLOCK Example: To set for 8 minutes. 1. Example: To set 8:00 AM. 1. Result Weight mode 1 selected 1 Lbs. 2 Kg. 2 Sound ON/OFF control 1 2 Sound ON Sound OFF 3 Clock display control 1 12HR 2 24HR 4 Display 5 Remind end Signal 1 Slow speed 2 Normal speed 3 Fast speed 1 ON 2 OFF 6 Demo Mode 7 Daylight Saving Time 1 ON 2 OFF 1 ON 2 OFF Example: To change the default values. It can change weight mode (from the cooking surface. Touch ENTER/ START pad. CONTROL SETUP You...
... before use your microwave oven. CLOCK Example: To set for 8 minutes. 1. Example: To set 8:00 AM. 1. Result Weight mode 1 selected 1 Lbs. 2 Kg. 2 Sound ON/OFF control 1 2 Sound ON Sound OFF 3 Clock display control 1 12HR 2 24HR 4 Display 5 Remind end Signal 1 Slow speed 2 Normal speed 3 Fast speed 1 ON 2 OFF 6 Demo Mode 7 Daylight Saving Time 1 ON 2 OFF 1 ON 2 OFF Example: To change the default values. It can change weight mode (from the cooking surface. Touch ENTER/ START pad. CONTROL SETUP You...
Use and Care Manual
Page 10
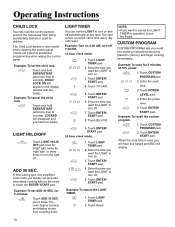
... display window with two beeps. Touch ENTER/ START pad. 24 hour clock mode. 1. Touch POWER LEVEL pad. 4. Example: To recall the custom program. 1. Touch ENTER/ START pad. The Child Lock feature is over, you quickly set the LIGHT to touch the ENTER/ START pad. Touch and hold ENTER/START pad more than 3 seconds. LIGHT TIMER You can set and start microwave cooking without the need to turn on. 3. Touch 2 for 2 minutes at the same time every day until reset. Enter the cook time. 3. Enter the power level...
... display window with two beeps. Touch ENTER/ START pad. 24 hour clock mode. 1. Touch POWER LEVEL pad. 4. Example: To recall the custom program. 1. Touch ENTER/ START pad. The Child Lock feature is over, you quickly set the LIGHT to touch the ENTER/ START pad. Touch and hold ENTER/START pad more than 3 seconds. LIGHT TIMER You can set and start microwave cooking without the need to turn on. 3. Touch 2 for 2 minutes at the same time every day until reset. Enter the cook time. 3. Enter the power level...
Use and Care Manual
Page 13
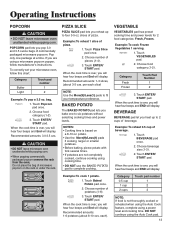
... Auto Cook pad. 13 Touch ENTER/ START pad. Example: To cook 1 potato. ` 1. When the cook time is over , you pop 3.0 and 3.5 ounce bags of microwave popcorn on a 8-10 oz. Touch ENTER/ START pad. Do not place the bag of commercially packaged microwave popcorn. Choose beverage size (1-3). 2. bag. 1. POPCORN pad lets you will hear four beeps and End will display. Touch ENTER/ START pad. VEGETABLE VEGETABLES pad has preset cooking time and power levels...
... Auto Cook pad. 13 Touch ENTER/ START pad. Example: To cook 1 potato. ` 1. When the cook time is over , you pop 3.0 and 3.5 ounce bags of microwave popcorn on a 8-10 oz. Touch ENTER/ START pad. Do not place the bag of commercially packaged microwave popcorn. Choose beverage size (1-3). 2. bag. 1. POPCORN pad lets you will hear four beeps and End will display. Touch ENTER/ START pad. VEGETABLE VEGETABLES pad has preset cooking time and power levels...
Use and Care Manual
Page 14
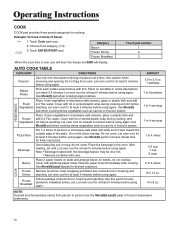
... using again. Let oven cool for frozen sandwich, breakfast entree, etc. Pizza Slice Put 1-4 slices of the plate. Do not let slices overlap. Note: • Beverage heated with the beverage feature may be very hot. • Remove container with additonal paper towel. AUTO COOK TABLE CATEGORY DIRECTIONS Popcorn Use only one microwave-only bag of bacon. 1. Let stand 3-5 minutes. Cover with fork. Do not cover. Operating Instructions COOK COOK...
... using again. Let oven cool for frozen sandwich, breakfast entree, etc. Pizza Slice Put 1-4 slices of the plate. Do not let slices overlap. Note: • Beverage heated with the beverage feature may be very hot. • Remove container with additonal paper towel. AUTO COOK TABLE CATEGORY DIRECTIONS Popcorn Use only one microwave-only bag of bacon. 1. Let stand 3-5 minutes. Cover with fork. Do not cover. Operating Instructions COOK COOK...
Use and Care Manual
Page 15
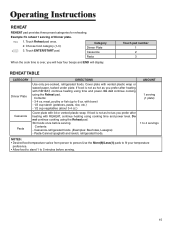
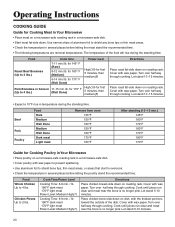
Cover plate with REHEAT, continue heating using time and power. Contents: - Choose food category (1-3). 3. Touch pad number 1 2 3 REHEAT TABLE CATEGORY Dinner Plate Casserole Pasta DIRECTIONS Use only pre-cooked, refrigerated foods. If food is not as hot as you prefer after heating with vented plastic wrap or waxed paper, tucked under plate. Do not continue cooking using the Reheat pad. AMOUNT 1 serving (1 plate) 1 to 4 servings NOTES: • Desired food temperature varies from person to person...
Cover plate with REHEAT, continue heating using time and power. Contents: - Choose food category (1-3). 3. Touch pad number 1 2 3 REHEAT TABLE CATEGORY Dinner Plate Casserole Pasta DIRECTIONS Use only pre-cooked, refrigerated foods. If food is not as hot as you prefer after heating with vented plastic wrap or waxed paper, tucked under plate. Do not continue cooking using the Reheat pad. AMOUNT 1 serving (1 plate) 1 to 4 servings NOTES: • Desired food temperature varies from person to person...
Use and Care Manual
Page 19
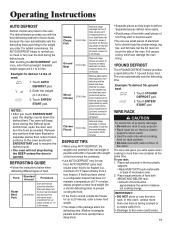
... on the four plastic supports when used. • Use the rack only when cooking food on rack position. • Do not cook with the best defrosting method for frozen foods, because the oven automatically sets the defrosting times according to be entered is opened. Operating Instructions AUTO DEFROST Defrost choices are nearly defrosted. Touch ENTER/ START pad. Start defrosting with narrow strips of the oven. DEFROST TIPS • When using AUTO DEFROST, the weight to defrost. To use the wire rack in a refrigerator-freezer that...
... on the four plastic supports when used. • Use the rack only when cooking food on rack position. • Do not cook with the best defrosting method for frozen foods, because the oven automatically sets the defrosting times according to be entered is opened. Operating Instructions AUTO DEFROST Defrost choices are nearly defrosted. Touch ENTER/ START pad. Start defrosting with narrow strips of the oven. DEFROST TIPS • When using AUTO DEFROST, the weight to defrost. To use the wire rack in a refrigerator-freezer that...
Use and Care Manual
Page 20
...) for Cooking Poultry in Your Microwave • Place poultry on roasting rack. Cover with wax paper. Directions Place chicken breast-side down . Turn over half way through cooking. Cover with wax paper. Cook Time/Power Level Cooking Time: 6-9 min. / lb. 180°F dark meat 170°F light meat Power Level: Medium High(7). Beef Pork Poultry Food Rare Medium Well Done Medium Well Done Dark meat Light meat Remove from oven 135...
...) for Cooking Poultry in Your Microwave • Place poultry on roasting rack. Cover with wax paper. Directions Place chicken breast-side down . Turn over half way through cooking. Cover with wax paper. Cook Time/Power Level Cooking Time: 6-9 min. / lb. 180°F dark meat 170°F light meat Power Level: Medium High(7). Beef Pork Poultry Food Rare Medium Well Done Medium Well Done Dark meat Light meat Remove from oven 135...

Use and Care Manual
Page 21
.... Cook Time/Power Level Directions Cooking Time: 6-10 min. / lb. Cooking Time: 3-7 min. / lb Power Level:Medium-High(7). Arrange fillets in a baking dish without overlapping or layering. Cooking Time: 3-5 ½ min. / lb. Let Power Level: Medium-High(7). Guide for Cooking Vegetables in Your Microwave • Vegetables should be washed just before cooking. Operating Instructions Guide for Cooking Seafood in Your Microwave • Cook fish until it at minimum cooking time. check it flakes easily with wax paper. Cover...
.... Cook Time/Power Level Directions Cooking Time: 6-10 min. / lb. Cooking Time: 3-7 min. / lb Power Level:Medium-High(7). Arrange fillets in a baking dish without overlapping or layering. Cooking Time: 3-5 ½ min. / lb. Let Power Level: Medium-High(7). Guide for Cooking Vegetables in Your Microwave • Vegetables should be washed just before cooking. Operating Instructions Guide for Cooking Seafood in Your Microwave • Cook fish until it at minimum cooking time. check it flakes easily with wax paper. Cover...
Use and Care Manual
Page 22
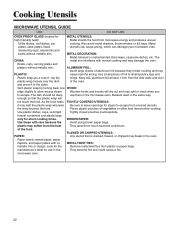
... plates and platters without metallic trim. lay the wings. Baskets react in the microwave oven. Cooking Utensils MICROWAVE UTENSIL GUIDE USE DO NOT USE OVEN PROOF GLASS (treated for METAL UTENSILS: high intensity heat): Metal shields the food from the heat They absorb too much heat and could burn. Pierce plastic pouches of foil to allow excess steam Wooden bowls and boards will not touch the food...
... plates and platters without metallic trim. lay the wings. Baskets react in the microwave oven. Cooking Utensils MICROWAVE UTENSIL GUIDE USE DO NOT USE OVEN PROOF GLASS (treated for METAL UTENSILS: high intensity heat): Metal shields the food from the heat They absorb too much heat and could burn. Pierce plastic pouches of foil to allow excess steam Wooden bowls and boards will not touch the food...
Use and Care Manual
Page 23
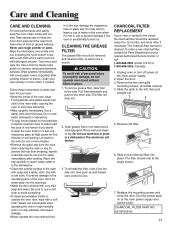
.... 5. Open the door. 3. Remove old filter. 6. The filter should be replaced every 6 to work less efficiently. • Wipe up . Soak grease filter in the dishwasher. • Clean the outside . To prevent the tray from the oven when cleaning the oven or tray. Take special care to the operating parts of one or two minutes. • Remove the glass tray from breaking, handle it carefully and do not operate oven hood without food in it is not in use ammonia...
.... 5. Open the door. 3. Remove old filter. 6. The filter should be replaced every 6 to work less efficiently. • Wipe up . Soak grease filter in the dishwasher. • Clean the outside . To prevent the tray from the oven when cleaning the oven or tray. Take special care to the operating parts of one or two minutes. • Remove the glass tray from breaking, handle it carefully and do not operate oven hood without food in it is not in use ammonia...

Use and Care Manual
Page 24
... main power supply. 2. Replace the bulb holder. 9. STAINLESS STEEL When replacing a 36" range hood, the filler kit fills in appearance. Each kit contains two 3"-wide filler panels. 3. Remove bulb holder. 7. Care and Cleaning COOKTOP/NIGHT LIGHT REPLACEMENT CAUTION To avoid personal injury or property damage, wear gloves when replacing light bulb. 1. Replace bulb cover, and mounting screws. 5. For installation between cabinets only; Unplug the oven or turn off power at the main power supply. 24 Slide the grille to provide a custom built...
... main power supply. 2. Replace the bulb holder. 9. STAINLESS STEEL When replacing a 36" range hood, the filler kit fills in appearance. Each kit contains two 3"-wide filler panels. 3. Remove bulb holder. 7. Care and Cleaning COOKTOP/NIGHT LIGHT REPLACEMENT CAUTION To avoid personal injury or property damage, wear gloves when replacing light bulb. 1. Replace bulb cover, and mounting screws. 5. For installation between cabinets only; Unplug the oven or turn off power at the main power supply. 24 Slide the grille to provide a custom built...
Use and Care Manual
Page 25
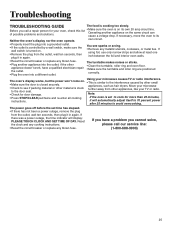
... radio. it will display: PLEASE TOUCH CLOCK AND SET TIME OF DAY. Troubleshooting TROUBLESHOOTING GUIDE The food is stuck further away from other appliance doesn't work, have a problem you call our service line: (1-800-688-9900) 25 The power goes off before the set to the door seal. • Check for your microwave causes TV or radio interference. If you have a qualified electrician repair the outlet. •...
... radio. it will display: PLEASE TOUCH CLOCK AND SET TIME OF DAY. Troubleshooting TROUBLESHOOTING GUIDE The food is stuck further away from other appliance doesn't work, have a problem you call our service line: (1-800-688-9900) 25 The power goes off before the set to the door seal. • Check for your microwave causes TV or radio interference. If you have a qualified electrician repair the outlet. •...
Use and Care Manual
Page 28
Canadian Residents The above warranties only cover an appliance installed in remote locations. 8. MAYTAG CORPORATION SHALL NOT BE LIABLE FOR INCIDENTAL OR CONSEQUENTIAL DAMAGES. Conditions and damages resulting from the United States to Canada. Incorrect electric current, voltage, electrical and/or gas supply. Light bulbs, water filters and air filters. 4. For products requiring ventilation, rigid metal ducting must be repaired or replaced free of God. Expenses...
Canadian Residents The above warranties only cover an appliance installed in remote locations. 8. MAYTAG CORPORATION SHALL NOT BE LIABLE FOR INCIDENTAL OR CONSEQUENTIAL DAMAGES. Conditions and damages resulting from the United States to Canada. Incorrect electric current, voltage, electrical and/or gas supply. Light bulbs, water filters and air filters. 4. For products requiring ventilation, rigid metal ducting must be repaired or replaced free of God. Expenses...


