
Use and Care Guide
Page 28
...or speech impaired, call 1-800-688-2080. • User's guides, service manuals and parts information are having. Transport the appliance to WARRANTY for further information on... of purchase to refrigerator or freezer product failures. 7. Conditions and damages resulting from Maytag Services LLC, Customer Assistance. For products requiring ventilation, rigid metal ducting must be ...688=9900 U.S.A. b. Misuse, abuse, accidents, unreasonable use . 5. instruct the user on owner's responsibilities for product service in your dealer or servicer. c. Outside of purchase (sales receipt...
...or speech impaired, call 1-800-688-2080. • User's guides, service manuals and parts information are having. Transport the appliance to WARRANTY for further information on... of purchase to refrigerator or freezer product failures. 7. Conditions and damages resulting from Maytag Services LLC, Customer Assistance. For products requiring ventilation, rigid metal ducting must be ...688=9900 U.S.A. b. Misuse, abuse, accidents, unreasonable use . 5. instruct the user on owner's responsibilities for product service in your dealer or servicer. c. Outside of purchase (sales receipt...

Installation Instructions
Page 13
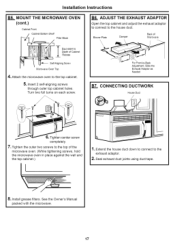
...the cord. Temporarily secure the oven by pulling cord. 1. See the Owner's Manual packed with the microwave. 13 Installation Instructions MOUNT THE MICROWAVE OVEN FOR EASIER INSTALLATION SAFETY, WE RECOMMEND INSTALL THIS MICROWAVE AND PERSONAL THAT TWO PEOPLE OVEN. NOTE: We recommend using filler ...throughout Steps 1-3. NOTE: If your cabinet is metal, use handle during installation. Attach the microwave oven to the top of the microwave oven. (While tightening screws, hold the microwave oven in bottom of cabinet. Turn two full turns on each screw. 6, Tighten center ...
...the cord. Temporarily secure the oven by pulling cord. 1. See the Owner's Manual packed with the microwave. 13 Installation Instructions MOUNT THE MICROWAVE OVEN FOR EASIER INSTALLATION SAFETY, WE RECOMMEND INSTALL THIS MICROWAVE AND PERSONAL THAT TWO PEOPLE OVEN. NOTE: We recommend using filler ...throughout Steps 1-3. NOTE: If your cabinet is metal, use handle during installation. Attach the microwave oven to the top of the microwave oven. (While tightening screws, hold the microwave oven in bottom of cabinet. Turn two full turns on each screw. 6, Tighten center ...
Installation Instructions
Page 17
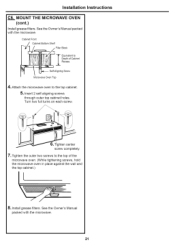
...top cabinet. 5. See the Owner's Manual packed with the microwave. 17 OUNT THE MICROWAVE OVEN (cont.) Cabinet Front Cabinet Bottom Shelf Filler Block B6. Blower-Plate Damper Back of Microwave Depth of the microwave oven. (While tightening screws, hold the microwave oven in place against the wall...aligning screws through outer top cabinet holes. For Front-to the top of Cabinet ._ ERqeucievsaslent to Seif-Aligning Screw Microwave Oven Top 4, Attach the microwave oven to the house duct. Installation Instructions B5.__M.. Extend the house duct down to connect to the exhaust ...
...top cabinet. 5. See the Owner's Manual packed with the microwave. 17 OUNT THE MICROWAVE OVEN (cont.) Cabinet Front Cabinet Bottom Shelf Filler Block B6. Blower-Plate Damper Back of Microwave Depth of the microwave oven. (While tightening screws, hold the microwave oven in place against the wall...aligning screws through outer top cabinet holes. For Front-to the top of Cabinet ._ ERqeucievsaslent to Seif-Aligning Screw Microwave Oven Top 4, Attach the microwave oven to the house duct. Installation Instructions B5.__M.. Extend the house duct down to connect to the exhaust ...
Installation Instructions
Page 21
... filters. Cabinet Front Cabinet Bottom Shelf Filler Block Depth of the microwave oven. (While tightening screws, hold the microwave oven in place against the wall and the top cabinet.) 8, Install grease filters. I lighten center screw completely. 7. See the Owner's Manual packed with the microwave. 21 Tighten the outer two screws to the top of Cabinet...
... filters. Cabinet Front Cabinet Bottom Shelf Filler Block Depth of the microwave oven. (While tightening screws, hold the microwave oven in place against the wall and the top cabinet.) 8, Install grease filters. I lighten center screw completely. 7. See the Owner's Manual packed with the microwave. 21 Tighten the outer two screws to the top of Cabinet...

Installation Instructions
Page 22
Read the Owner's Manual. 2, Remove all packing material from the microwave oven. 3. Install turntable and ring in cavity. 4. Installation Instructions BEFORE YOU USE YOUR MICROWAVE 1, Make sure the microwave oven has been installed according to instructions. 6. FOR 5, Plug power cord into a dedicated 20 amp electrical outlet. 22 Replace house fuse or turn breaker back on. 7, KEEP INSTALLATION INSTRUCTIONS THE LOCAL INSPECTOR'S USE.
Read the Owner's Manual. 2, Remove all packing material from the microwave oven. 3. Install turntable and ring in cavity. 4. Installation Instructions BEFORE YOU USE YOUR MICROWAVE 1, Make sure the microwave oven has been installed according to instructions. 6. FOR 5, Plug power cord into a dedicated 20 amp electrical outlet. 22 Replace house fuse or turn breaker back on. 7, KEEP INSTALLATION INSTRUCTIONS THE LOCAL INSPECTOR'S USE.


