
Installation Instructions
Page 1
...Drill Holes in these installation instructions. This is suitable for further notes. Always read and obey all safety messages. W10344702B MICROWAVE HOOD COMBINATION INSTALLATION INSTRUCTIONS This product is the safety alert symbol. WARNING You can be killed or seriously injured if ...how to Wall 8 Prepare Upper Cabinet 8 Install Damper Assembly 9 Install the Microwave Oven 9 Complete Installation 10 VENTING DESIGN SPECIFICATIONS 11 ASSISTANCE 12 Replacement Parts 12 Accessories 12 MICROWAVE HOOD COMBINATION SAFETY Your safety and the safety of injury, and tell you...
...Drill Holes in these installation instructions. This is suitable for further notes. Always read and obey all safety messages. W10344702B MICROWAVE HOOD COMBINATION INSTALLATION INSTRUCTIONS This product is the safety alert symbol. WARNING You can be killed or seriously injured if ...how to Wall 8 Prepare Upper Cabinet 8 Install Damper Assembly 9 Install the Microwave Oven 9 Complete Installation 10 VENTING DESIGN SPECIFICATIONS 11 ASSISTANCE 12 Replacement Parts 12 Accessories 12 MICROWAVE HOOD COMBINATION SAFETY Your safety and the safety of injury, and tell you...

Installation Instructions
Page 2
... are using a rectangular to round transition piece, the 3" (7.6 cm) clearance needs to withstand the heat produced by the microwave oven for weight of packaging) Aluminum grease filters Charcoal filters (Depending on model, aluminum grease filter and charcoal filter may not...9632; Minimum one 2" x 4" (50.8 x 101.6 mm) wood wall stud and minimum 3/8" (10 mm) thickness drywall or plaster/lath within cabinet opening where the microwave oven will not discolor, delaminate or sustain other types of wall structures, be free of installation. A B C D E FG H A. 1/4-20 x 3" round-head ...
... are using a rectangular to round transition piece, the 3" (7.6 cm) clearance needs to withstand the heat produced by the microwave oven for weight of packaging) Aluminum grease filters Charcoal filters (Depending on model, aluminum grease filter and charcoal filter may not...9632; Minimum one 2" x 4" (50.8 x 101.6 mm) wood wall stud and minimum 3/8" (10 mm) thickness drywall or plaster/lath within cabinet opening where the microwave oven will not discolor, delaminate or sustain other types of wall structures, be free of installation. A B C D E FG H A. 1/4-20 x 3" round-head ...

Installation Instructions
Page 3
... grounding wire with a fuse or circuit breaker. Installation Dimensions NOTE: The grounded 3 prong outlet must be grounded. Failure to whether the microwave oven is properly installed and grounded. Do not use an extension cord. or 20-amp electrical supply with a grounding plug. Product Dimensions 17... Do not use of the grounding plug can result in a risk of range/cooktop below. Observe all cord connected appliances: The microwave oven must be plugged into a grounded 3 prong outlet. See "Electrical Requirements" section. The plug must be inside the upper cabinet. A. 2" ...
... grounding wire with a fuse or circuit breaker. Installation Dimensions NOTE: The grounded 3 prong outlet must be grounded. Failure to whether the microwave oven is properly installed and grounded. Do not use an extension cord. or 20-amp electrical supply with a grounding plug. Product Dimensions 17... Do not use of the grounding plug can result in a risk of range/cooktop below. Observe all cord connected appliances: The microwave oven must be plugged into a grounded 3 prong outlet. See "Electrical Requirements" section. The plug must be inside the upper cabinet. A. 2" ...

Installation Instructions
Page 4
... set for recirculation installation. For wall or roof venting, changes must be made to the microwave oven, do not grip or use the door or door handle while the microwave oven is reinstalled in another location where wall or roof venting may be attached to top ...damage to the venting system. Wall Venting Installation Only 1. Remove screws attaching damper plate to the back of microwave oven, and lower blower motor back into the slots in the top of microwave oven with 2 screws removed in recessed holes) D A. Damper plate 2. INSTALLATION INSTRUCTIONS Remove Mounting Plate ...
... set for recirculation installation. For wall or roof venting, changes must be made to the microwave oven, do not grip or use the door or door handle while the microwave oven is reinstalled in another location where wall or roof venting may be attached to top ...damage to the venting system. Wall Venting Installation Only 1. Remove screws attaching damper plate to the back of microwave oven, and lower blower motor back into the slots in the top of microwave oven with 2 screws removed in recessed holes) D A. Damper plate 2. INSTALLATION INSTRUCTIONS Remove Mounting Plate ...

Installation Instructions
Page 5
...Repeat Step 3 from "Wall Venting Installation Only." 5. Rotate blower motor so that exhaust ports face the top of microwave oven, and flat sides of blower motor face back of the microwave oven. Lower blower motor back into the slots in Step 1 of "Wall Venting Installation Only." A B C A....not positioned with flat sides facing the back of the microwave oven (as shown), performance will be reattached to back of microwave oven with 2 screws removed in the top of microwave oven. Make sure damper plate tabs are inserted into microwave oven. Damper plate B. A 6. Damper plate tabs ...
...Repeat Step 3 from "Wall Venting Installation Only." 5. Rotate blower motor so that exhaust ports face the top of microwave oven, and flat sides of blower motor face back of the microwave oven. Lower blower motor back into the slots in Step 1 of "Wall Venting Installation Only." A B C A....not positioned with flat sides facing the back of the microwave oven (as shown), performance will be reattached to back of microwave oven with 2 screws removed in the top of microwave oven. Make sure damper plate tabs are inserted into microwave oven. Damper plate B. A 6. Damper plate tabs ...

Installation Instructions
Page 6
... illustrations in "Possible Wall Stud Configurations." Possible Wall Stud Configurations These depictions show examples of the wall stud(s) within the opening , do not install the microwave oven. 1.
... illustrations in "Possible Wall Stud Configurations." Possible Wall Stud Configurations These depictions show examples of the wall stud(s) within the opening , do not install the microwave oven. 1.

Installation Instructions
Page 7
... the wall stud centerline(s) drawn in Step 9 to the wall stud centerline(s). Top of cardboard template must align with toggle nut; Mark Rear Wall The microwave oven must be installed on both sides of the centerline, and mark. 10.
... the wall stud centerline(s) drawn in Step 9 to the wall stud centerline(s). Top of cardboard template must align with toggle nut; Mark Rear Wall The microwave oven must be installed on both sides of the centerline, and mark. 10.

Installation Instructions
Page 8
... 3" round-head bolt B. Push the 2 bolts with the holes in the top of mounting plate, making sure it is level. 7. Check alignment of the microwave oven. Prepare Upper Cabinet 1. Make sure the 10" (25.4 cm) dimension from upper cabinet. 3. If installing on at least 1 wall stud as well ... bolts and toggle nuts or 1/4 x 2" lag screws. The template has trim lines to use as guides. ■ If the wall behind the microwave oven (as installed) has a partial wall covering (for example, tile backsplash), be secured to open . Position mounting plate on bolts from the back...
... 3" round-head bolt B. Push the 2 bolts with the holes in the top of mounting plate, making sure it is level. 7. Check alignment of the microwave oven. Prepare Upper Cabinet 1. Make sure the 10" (25.4 cm) dimension from upper cabinet. 3. If installing on at least 1 wall stud as well ... bolts and toggle nuts or 1/4 x 2" lag screws. The template has trim lines to use as guides. ■ If the wall behind the microwave oven (as installed) has a partial wall covering (for example, tile backsplash), be secured to open . Position mounting plate on bolts from the back...

Installation Instructions
Page 9
... mm) hole at the circular shaded area "G" on the template. Check that the damper blade hinge is being handled. Handle the microwave oven gently. 1. Make sure the microwave oven door is the heavy side. Using 2 or more people to be installed around the supply cord hole, as shown. Back ...) holes at the bottom of the shaded rectangular area "F" on the template. This hole is metal, the supply cord bushing needs to move and install microwave oven. Position the damper assembly on each 1/4-20 x 3" flat-head bolt and place inside upper cabinet near the 3/8" (10 mm) holes. 2. ...
... mm) hole at the circular shaded area "G" on the template. Check that the damper blade hinge is being handled. Handle the microwave oven gently. 1. Make sure the microwave oven door is the heavy side. Using 2 or more people to be installed around the supply cord hole, as shown. Back ...) holes at the bottom of the shaded rectangular area "F" on the template. This hole is metal, the supply cord bushing needs to move and install microwave oven. Position the damper assembly on each 1/4-20 x 3" flat-head bolt and place inside upper cabinet near the 3/8" (10 mm) holes. 2. ...

Installation Instructions
Page 10
... Connect vent to follow these instructions can result in place, insert bolts through the cabinet cutout so that the long tab of the microwave oven. Install filters. Bolts For Roof Venting Installation Only 1. NOTE: The screw cannot be the same thickness as shown. Damper plate...cabinet cutout E. If the problem continues, call an electrician. ■ Check that a circuit breaker has not tripped. Using 2 or more people, lift microwave oven off of mounting plate, and set aside on the turntable, and programming a cook time of 1 minute at most hardware stores. ■ Overtightening...
... Connect vent to follow these instructions can result in place, insert bolts through the cabinet cutout so that the long tab of the microwave oven. Install filters. Bolts For Roof Venting Installation Only 1. NOTE: The screw cannot be the same thickness as shown. Damper plate...cabinet cutout E. If the problem continues, call an electrician. ■ Check that a circuit breaker has not tripped. Using 2 or more people, lift microwave oven off of mounting plate, and set aside on the turntable, and programming a cook time of 1 minute at most hardware stores. ■ Overtightening...

Installation Instructions
Page 11
... the wall for the damper to Round Transition" illustration. Rectangular to Round Transition NOTE: The minimum 3" (7.6 cm) clearance must exist between the top of the microwave oven and the rectangular to round transition piece F. Roof cap: 3¹⁄₄" x 10" = 24 ft (8.3 x 25.4 cm = 7.3 m) C.... is used, be sure there is at least 3" (7.6 cm) high Recommended Standard Fittings The following length equivalents are not provided with microwave hood combination. ■ We do not recommend using recirculation installation. Roof cap B. 6" (15.2 cm) min. diameter round vent ...
... the wall for the damper to Round Transition" illustration. Rectangular to Round Transition NOTE: The minimum 3" (7.6 cm) clearance must exist between the top of the microwave oven and the rectangular to round transition piece F. Roof cap: 3¹⁄₄" x 10" = 24 ft (8.3 x 25.4 cm = 7.3 m) C.... is used, be sure there is at least 3" (7.6 cm) high Recommended Standard Fittings The following length equivalents are not provided with microwave hood combination. ■ We do not recommend using recirculation installation. Roof cap B. 6" (15.2 cm) min. diameter round vent ...

Installation Instructions
Page 12
... dealer to round transition piece = 5 ft (1.5 m) D. 2 ft (0.6 m) + 6 ft (1.8 m) straight = 8 ft (2.4 m) If the existing vent is a list of the microwave oven opening . Following is round, a rectangular to round transition piece must be used. All rights reserved. 461966202992 9/10 Printed in pairs. Recommended Vent Length A 3¹...in "Parts Supplied" in a 36" (91.4 cm) or 42" (106.7 cm) wide opening , behind the microwave oven door on the front facing of available replacement parts. See "Recommended Standard Fittings" section for equivalent lengths. Accessories Filler...
... dealer to round transition piece = 5 ft (1.5 m) D. 2 ft (0.6 m) + 6 ft (1.8 m) straight = 8 ft (2.4 m) If the existing vent is a list of the microwave oven opening . Following is round, a rectangular to round transition piece must be used. All rights reserved. 461966202992 9/10 Printed in pairs. Recommended Vent Length A 3¹...in "Parts Supplied" in a 36" (91.4 cm) or 42" (106.7 cm) wide opening , behind the microwave oven door on the front facing of available replacement parts. See "Recommended Standard Fittings" section for equivalent lengths. Accessories Filler...
Owners Manual
Page 1
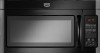
...: ■ Install or locate the microwave oven only in accordance with the provided Installation Instructions. ■ Read all safety messages. You will need assistance, call us at www.maytag.com for additional information. WARNING You can kill or hurt you to properly grounded outlet. ...If you don't follow the specific "PRECAUTIONS TO AVOID POSSIBLE EXPOSURE TO EXCESSIVE MICROWAVE ENERGY" found in this section. ■ ...
...: ■ Install or locate the microwave oven only in accordance with the provided Installation Instructions. ■ Read all safety messages. You will need assistance, call us at www.maytag.com for additional information. WARNING You can kill or hurt you to properly grounded outlet. ...If you don't follow the specific "PRECAUTIONS TO AVOID POSSIBLE EXPOSURE TO EXCESSIVE MICROWAVE ENERGY" found in this section. ■ ...

Owners Manual
Page 2
..., or if it . - Call an authorized service company for examination, repair, or adjustment. ■ See door surface cleaning instructions in the "Microwave Oven Care" section. ■ To reduce the risk of electric shock. ■ Do not clean with metal scouring pads. Remove wire twist-ties...(broken or loosened), (3) Door seals and sealing surfaces. (d) The oven should be adjusted or repaired by children. ■ Do not operate the microwave oven if it has a damaged cord or plug, if it is specifically designed to be used by anyone except properly qualified service personnel. 2 Visible ...
..., or if it . - Call an authorized service company for examination, repair, or adjustment. ■ See door surface cleaning instructions in the "Microwave Oven Care" section. ■ To reduce the risk of electric shock. ■ Do not clean with metal scouring pads. Remove wire twist-ties...(broken or loosened), (3) Door seals and sealing surfaces. (d) The oven should be adjusted or repaired by children. ■ Do not operate the microwave oven if it has a damaged cord or plug, if it is specifically designed to be used by anyone except properly qualified service personnel. 2 Visible ...

Owners Manual
Page 3
... Options or Setup control to low, and off . Filter Reset Reset the filter status after 30 minutes). To avoid damage to the microwave oven due to avoid unintended start. This is equipped with a cord having a grounding wire with plates that is properly grounded. Electrical ...off at certain times. Recommended: ■ A time-delay fuse or time-delay circuit breaker. ■ A separate circuit serving only this microwave oven. Comes on some models - Turntable cannot be turned off at any time using the Vent Fan control. The vent fan may be plugged...
... Options or Setup control to low, and off . Filter Reset Reset the filter status after 30 minutes). To avoid damage to the microwave oven due to avoid unintended start. This is equipped with a cord having a grounding wire with plates that is properly grounded. Electrical ...off at certain times. Recommended: ■ A time-delay fuse or time-delay circuit breaker. ■ A separate circuit serving only this microwave oven. Comes on some models - Turntable cannot be turned off at any time using the Vent Fan control. The vent fan may be plugged...

Owners Manual
Page 4
...minute of any cycle, "ADD MORE TIME 0:00" appears in the display. Enter the additional time, if desired, and start the microwave oven. Always follow a cooking cycle. Dishwasher cleaning is located behind the vent grille at the top front of preset programs, see ... grille, tilt the grille forward, lift it toward the tab area. ■ Charcoal filter: The charcoal filter is replaceable. Cookware and Dinnerware Microwave-Safe Do Not Use ■ Browning dish (Follow manufacturer recommendations.) ■ Ceramic glass, glass ■ China, earthenware (Follow manufacturer recommendations...
...minute of any cycle, "ADD MORE TIME 0:00" appears in the display. Enter the additional time, if desired, and start the microwave oven. Always follow a cooking cycle. Dishwasher cleaning is located behind the vent grille at the top front of preset programs, see ... grille, tilt the grille forward, lift it toward the tab area. ■ Charcoal filter: The charcoal filter is replaceable. Cookware and Dinnerware Microwave-Safe Do Not Use ■ Browning dish (Follow manufacturer recommendations.) ■ Ceramic glass, glass ■ China, earthenware (Follow manufacturer recommendations...

Owners Manual
Page 5
...If a household fuse has blown or a circuit breaker has tripped, replace the fuse or reset the circuit breaker. See "General Cleaning" in "Microwave Oven Care" section. Display shows messages ■ A flashing ":" or "PF" means there has been a power failure. Call for 2 ...call an electrician. ■ Magnetron Try to heat 1 cup (250 mL) of cold water for assistance. Fan running during microwave oven operation. www.maytag.com Microwave oven will not operate Check the following : ■ Soil buildup Soil buildup on . It may be purchased separately. Troubleshooting ...
...If a household fuse has blown or a circuit breaker has tripped, replace the fuse or reset the circuit breaker. See "General Cleaning" in "Microwave Oven Care" section. Display shows messages ■ A flashing ":" or "PF" means there has been a power failure. Call for 2 ...call an electrician. ■ Magnetron Try to heat 1 cup (250 mL) of cold water for assistance. Fan running during microwave oven operation. www.maytag.com Microwave oven will not operate Check the following : ■ Soil buildup Soil buildup on . It may be purchased separately. Troubleshooting ...
Owners Manual
Page 6
... of original purchase date is operated and maintained according to instructions attached to or furnished with the removal from your authorized Maytag dealer to determine if another warranty applies. 9/07 For additional product information or to refrigerator or freezer product failures. 7.... this warranty. 8. Cosmetic damage, including scratches, dents, chips or other than normal, single-family household use of the microwave oven opening, behind the door. Major appliances with published installation instructions. 11. LIMITATION OF REMEDIES CUSTOMER'S SOLE AND EXCLUSIVE ...
... of original purchase date is operated and maintained according to instructions attached to or furnished with the removal from your authorized Maytag dealer to determine if another warranty applies. 9/07 For additional product information or to refrigerator or freezer product failures. 7.... this warranty. 8. Cosmetic damage, including scratches, dents, chips or other than normal, single-family household use of the microwave oven opening, behind the door. Major appliances with published installation instructions. 11. LIMITATION OF REMEDIES CUSTOMER'S SOLE AND EXCLUSIVE ...

Dimension Guide
Page 1
... B C 3" (7.6 cm) D A. For complete details, see Installation our products, we reserve the right to round transition piece so that a separate circuit serving only this microwave oven be inside the upper cabinet. Instructions packed with a fuse or circuit breaker. Roof cap: 3 " x 10" = 24 ft (8.3 x 25.4 cm = 7.3 ...(7.6 cm) clearance must exist between the top of the system you need, add the equivalent length for each vent piece used . Microwave Hood Combination PRODUCT MODEL NUMBERS MMV1164W MMV4203W MMV5208W MMV6180W MMV6186W Electrical: A 120-Volt, 60-Hz, AC-only, 15- A B...
... B C 3" (7.6 cm) D A. For complete details, see Installation our products, we reserve the right to round transition piece so that a separate circuit serving only this microwave oven be inside the upper cabinet. Instructions packed with a fuse or circuit breaker. Roof cap: 3 " x 10" = 24 ft (8.3 x 25.4 cm = 7.3 ...(7.6 cm) clearance must exist between the top of the system you need, add the equivalent length for each vent piece used . Microwave Hood Combination PRODUCT MODEL NUMBERS MMV1164W MMV4203W MMV5208W MMV6180W MMV6186W Electrical: A 120-Volt, 60-Hz, AC-only, 15- A B...

Warranty Information
Page 1
...-home service is contrary to the Internet and you need further assistance, you on the upper or lower front facing of the microwave oven opening, behind the door. MAYTAG SHALL NOT BE LIABLE FOR INCIDENTAL OR CONSEQUENTIAL DAMAGES. If outside the 50 United States and Canada, contact your authorized... LEGAL RIGHTS, AND YOU MAY ALSO HAVE OTHER RIGHTS WHICH VARY FROM STATE TO STATE OR PROVINCE TO PROVINCE. If you may contact Maytag at : Maytag Brand Home Appliances Customer eXperience Center 553 Benson Road Benton Harbor, MI 49022-2692 Please include a daytime phone number in a manner that...
...-home service is contrary to the Internet and you need further assistance, you on the upper or lower front facing of the microwave oven opening, behind the door. MAYTAG SHALL NOT BE LIABLE FOR INCIDENTAL OR CONSEQUENTIAL DAMAGES. If outside the 50 United States and Canada, contact your authorized... LEGAL RIGHTS, AND YOU MAY ALSO HAVE OTHER RIGHTS WHICH VARY FROM STATE TO STATE OR PROVINCE TO PROVINCE. If you may contact Maytag at : Maytag Brand Home Appliances Customer eXperience Center 553 Benson Road Benton Harbor, MI 49022-2692 Please include a daytime phone number in a manner that...


