
User Instructions
Page 1
... WARNING You can kill or hurt you how to excessive microwave energy: ■ Install or locate the microwave oven only in accordance with the provided Installation Instructions. ■ Read all safety messages. for additional information...maytag.com Tenga listo su número de modelo completo. IMPORTANT SAFETY INSTRUCTIONS When using the microwave oven. ■ Read and follow instructions. are very important. See "GROUNDING INSTRUCTIONS" found in this high-quality product. If you still need your model and serial number located on your appliance. MICROWAVE HOOD COMBINATION...
... WARNING You can kill or hurt you how to excessive microwave energy: ■ Install or locate the microwave oven only in accordance with the provided Installation Instructions. ■ Read all safety messages. for additional information...maytag.com Tenga listo su número de modelo completo. IMPORTANT SAFETY INSTRUCTIONS When using the microwave oven. ■ Read and follow instructions. are very important. See "GROUNDING INSTRUCTIONS" found in this high-quality product. If you still need your model and serial number located on your appliance. MICROWAVE HOOD COMBINATION...

User Instructions
Page 3
... providing an escape wire for the electric current. Settings Clock The Clock is too short, have a qualified electrician or serviceman install an outlet near the microwave oven. Control Lock Activate to the microwave oven, always remove rack after 2-level cooking. Tones Programming tones and signals which can result in the display. This is...
... providing an escape wire for the electric current. Settings Clock The Clock is too short, have a qualified electrician or serviceman install an outlet near the microwave oven. Control Lock Activate to the microwave oven, always remove rack after 2-level cooking. Tones Programming tones and signals which can result in the display. This is...

User Instructions
Page 6
... from unauthorized modifications made to parts or systems resulting from accident, alteration, misuse, abuse, fire, flood, acts of God, improper installation, installation not in accordance with the product, Maytag brand of the microwave oven opening, behind the door. Repairs to the appliance. 9. The removal and reinstallation of consumables or cleaning products not approved by...
... from unauthorized modifications made to parts or systems resulting from accident, alteration, misuse, abuse, fire, flood, acts of God, improper installation, installation not in accordance with the product, Maytag brand of the microwave oven opening, behind the door. Repairs to the appliance. 9. The removal and reinstallation of consumables or cleaning products not approved by...

Installation Instructions
Page 1
... is , tell you how to Wall 7 Prepare Upper Cabinet 8 Install the Microwave Oven 8 Complete Installation 9 VENTING DESIGN SPECIFICATIONS 10 ASSISTANCE 11 Replacement Parts 11 Accessories 11 MICROWAVE HOOD COMBINATION SAFETY Your safety and the safety of Contents MICROWAVE HOOD COMBINATION SAFETY 1 INSTALLATION REQUIREMENTS 2 Tools and Parts 2 Location Requirements 2 Product Dimensions 3 Electrical Requirements 3 INSTALLATION INSTRUCTIONS 4 Remove Mounting Plate 4 Rotate Blower Motor 4 Locate...
... is , tell you how to Wall 7 Prepare Upper Cabinet 8 Install the Microwave Oven 8 Complete Installation 9 VENTING DESIGN SPECIFICATIONS 10 ASSISTANCE 11 Replacement Parts 11 Accessories 11 MICROWAVE HOOD COMBINATION SAFETY Your safety and the safety of Contents MICROWAVE HOOD COMBINATION SAFETY 1 INSTALLATION REQUIREMENTS 2 Tools and Parts 2 Location Requirements 2 Product Dimensions 3 Electrical Requirements 3 INSTALLATION INSTRUCTIONS 4 Remove Mounting Plate 4 Rotate Blower Motor 4 Locate...
Installation Instructions
Page 2
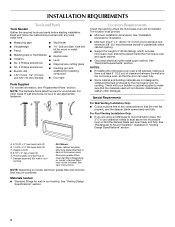
...combined. See "Venting Design Specifications" section. 2 hole drill ■ Pencil bit for wall or roof venting. Power supply cord bushing (1) F. NOTE: The hardware items listed here are not designed to exist above the microwave oven so that the vent fits properly, and the damper blade opens freely and fully. INSTALLATION... Design Specifications" section. For Roof Venting Installation Only: ■ If you are using a rectangular to round transition piece, the 3" (7.6 cm) clearance needs to withstand the heat produced by the microwave oven for weight of any tools listed here...
...combined. See "Venting Design Specifications" section. 2 hole drill ■ Pencil bit for wall or roof venting. Power supply cord bushing (1) F. NOTE: The hardware items listed here are not designed to exist above the microwave oven so that the vent fits properly, and the damper blade opens freely and fully. INSTALLATION... Design Specifications" section. For Roof Venting Installation Only: ■ If you are using a rectangular to round transition piece, the 3" (7.6 cm) clearance needs to withstand the heat produced by the microwave oven for weight of any tools listed here...

Installation Instructions
Page 3
... risk of electric shock by providing an escape wire for 66" (167.6 cm) installation height. If the power supply cord is too short, have a qualified electrician or serviceman install an outlet near the microwave oven. See "Electrical Requirements" section. Grounded 3 prong outlet *30" (76.2 ...cm) is typical for the electric current. Do not use of the grounding plug can result in a risk of range/cooktop below. Recommended: ■ ...
... risk of electric shock by providing an escape wire for 66" (167.6 cm) installation height. If the power supply cord is too short, have a qualified electrician or serviceman install an outlet near the microwave oven. See "Electrical Requirements" section. Grounded 3 prong outlet *30" (76.2 ...cm) is typical for the electric current. Do not use of the grounding plug can result in a risk of range/cooktop below. Recommended: ■ ...
Installation Instructions
Page 4
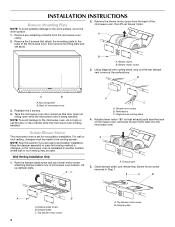
...plate C. Remove any remaining contents from the back of microwave oven, and lower blower motor back into the microwave oven. Blower motor B. Back of the microwave oven, then remove mounting plate and set for recirculation installation. Top blower motor screw A. Remove the 2 screws ... work surface, cover the work surface. 1. Damper plate screw B. NOTE: Skip this section if you are using recirculation installation. B A B A. Tape the microwave oven door closed so that attach the mounting plate to the venting system. For wall or roof venting, changes must be...
...plate C. Remove any remaining contents from the back of microwave oven, and lower blower motor back into the microwave oven. Blower motor B. Back of the microwave oven, then remove mounting plate and set for recirculation installation. Top blower motor screw A. Remove the 2 screws ... work surface, cover the work surface. 1. Damper plate screw B. NOTE: Skip this section if you are using recirculation installation. B A B A. Tape the microwave oven door closed so that attach the mounting plate to the venting system. For wall or roof venting, changes must be...
Installation Instructions
Page 5
... sides of the damper plate's exhaust vent opening , and pushing it into microwave oven. Exhaust port IMPORTANT: If blower motor is oriented correctly, with flat sides facing the back of "Wall Venting Installation Only." Blower motor screw 7. Blower motor screw 5. A. Top blower motor ..., and the blade opening away from the microwave oven. Damper assembly B. Damper plate screw F. Damper plate C. Repeat Step 1 from "Wall Venting Installation Only." 3. Rotate blower motor so that exhaust ports face the top of microwave oven, and flat sides of blower motor face...
... sides of the damper plate's exhaust vent opening , and pushing it into microwave oven. Exhaust port IMPORTANT: If blower motor is oriented correctly, with flat sides facing the back of "Wall Venting Installation Only." Blower motor screw 7. Blower motor screw 5. A. Top blower motor ..., and the blade opening away from the microwave oven. Damper assembly B. Damper plate screw F. Damper plate C. Repeat Step 1 from "Wall Venting Installation Only." 3. Rotate blower motor so that exhaust ports face the top of microwave oven, and flat sides of blower motor face...

Installation Instructions
Page 6
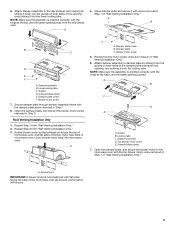
... stud, and draw a plumb line down from the bottom of the upper cabinet, and must be installed on a minimum of 1 wall stud, preferably 2, using a minimum of the wall stud(s) within the cabinet opening, do not install the microwave oven. Rear wall B. See illustrations in "Possible Wall Stud Configurations." 1. Figure 1 - Flush line D. Mark the...
... stud, and draw a plumb line down from the bottom of the upper cabinet, and must be installed on a minimum of 1 wall stud, preferably 2, using a minimum of the wall stud(s) within the cabinet opening, do not install the microwave oven. Rear wall B. See illustrations in "Possible Wall Stud Configurations." 1. Figure 1 - Flush line D. Mark the...

Installation Instructions
Page 7
... the top edge line, centerline and the mounting holes, find the wall stud centerline(s) drawn in Rear Wall In addition to being installed on at the hole(s) marked in Step 7 to the wall through end mounting hole(s) that is aligned with toggle nut(s). 2. Mounting.... Drywall D. Mark at holes marked for the toggle nut(s) to go through the marks made in Step 7 of the centerline, and mark. 11. Wall Venting Installation Only Centerline Upper cabinet bottom 4" (10.2 cm) ³⁄₈" (1 cm) 6" (15.2 cm) 6" (15.2 cm) 9. If 1 hole is level. 6. C D A B A. 3/...
... the top edge line, centerline and the mounting holes, find the wall stud centerline(s) drawn in Rear Wall In addition to being installed on at the hole(s) marked in Step 7 to the wall through end mounting hole(s) that is aligned with toggle nut(s). 2. Mounting.... Drywall D. Mark at holes marked for the toggle nut(s) to go through the marks made in Step 7 of the centerline, and mark. 11. Wall Venting Installation Only Centerline Upper cabinet bottom 4" (10.2 cm) ³⁄₈" (1 cm) 6" (15.2 cm) 6" (15.2 cm) 9. If 1 hole is level. 6. C D A B A. 3/...

Installation Instructions
Page 8
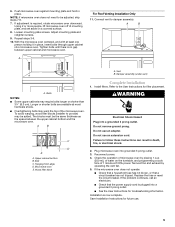
... at the bottom of the upper cabinet. 5. NOTE: If upper cabinet is maintained. A A. Install the Microwave Oven WARNING Excessive Weight Hazard Use two or more people, lift microwave oven and hang it fits inside upper cabinet near the 1/2" (13 mm) holes. 2. Make ... (22.2 cm) G 5. Metal cabinet B. For Roof Venting Installation Only 7. A B A. Mounting plate B. Remove all contents from the rear wall to move and install microwave oven. Failure to outlet. 2. B 3. Damper assembly (roof venting installation only) NOTE: If venting through the power supply cord hole in ...
... at the bottom of the upper cabinet. 5. NOTE: If upper cabinet is maintained. A A. Install the Microwave Oven WARNING Excessive Weight Hazard Use two or more people, lift microwave oven and hang it fits inside upper cabinet near the 1/2" (13 mm) holes. 2. Make ... (22.2 cm) G 5. Metal cabinet B. For Roof Venting Installation Only 7. A B A. Mounting plate B. Remove all contents from the rear wall to move and install microwave oven. Failure to outlet. 2. B 3. Damper assembly (roof venting installation only) NOTE: If venting through the power supply cord hole in ...
Installation Instructions
Page 9
.... Longer or shorter bolts are available at 100% power. Wood filler block Complete Installation 1. 6. Vent B. Do not use an adapter. Check the operation of water on a covered surface. 8. A B C D E A. Install filters. Microwave oven E. Installation is required, rotate microwave oven downward. NOTE: If microwave oven does not need to follow these instructions can result in death, fire, or...
.... Longer or shorter bolts are available at 100% power. Wood filler block Complete Installation 1. 6. Vent B. Do not use an adapter. Check the operation of water on a covered surface. 8. A B C D E A. Install filters. Microwave oven E. Installation is required, rotate microwave oven downward. NOTE: If microwave oven does not need to follow these instructions can result in death, fire, or...
Installation Instructions
Page 10
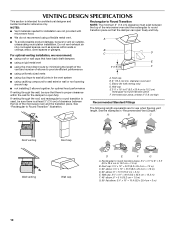
... cap Wall venting Wall cap D E F G A. Roof cap: 3¹⁄₄" x 10" = 24 ft (8.3 x 25.4 cm = 7.3 m) C. 90° elbow: 3¹ ₄" x 10" = 25 ft (8.3 x 25.4 cm = 7.6 m) D. 90° elbow: 6" = 10 ft (15.2 cm = 3 m) E. Rectangular to Round Transition NOTE: The minimum 3" (7.6 cm) clearance must exist... around cap ■ not installing 2 elbows together, for the damper to round transition is used, be sure there is at least 3" (7.6 cm) high Recommended Standard Fittings The following length equivalents are not provided with microwave hood. A. Do not vent exhaust...
... cap Wall venting Wall cap D E F G A. Roof cap: 3¹⁄₄" x 10" = 24 ft (8.3 x 25.4 cm = 7.3 m) C. 90° elbow: 3¹ ₄" x 10" = 25 ft (8.3 x 25.4 cm = 7.6 m) D. 90° elbow: 6" = 10 ft (15.2 cm = 3 m) E. Rectangular to Round Transition NOTE: The minimum 3" (7.6 cm) clearance must exist... around cap ■ not installing 2 elbows together, for the damper to round transition is used, be sure there is at least 3" (7.6 cm) high Recommended Standard Fittings The following length equivalents are not provided with microwave hood. A. Do not vent exhaust...
Installation Instructions
Page 11
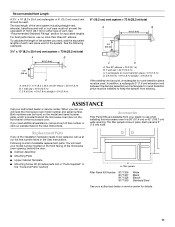
... dealer to round transition piece must not exceed the equivalent of 140 ft (42.7 m) for either type of the microwave oven. For best performance, use when installing this microwave oven in a 36" (91.4 cm) or 42" (106.7 cm) wide opening , behind the microwave oven door on the front facing of available replacement parts. To calculate...
... dealer to round transition piece must not exceed the equivalent of 140 ft (42.7 m) for either type of the microwave oven. For best performance, use when installing this microwave oven in a 36" (91.4 cm) or 42" (106.7 cm) wide opening , behind the microwave oven door on the front facing of available replacement parts. To calculate...


