
User Instructions
Page 1
...Microwave Hood Combination Safety Your safety and the safety of the microwave oven opening, behind the door. This is , tell you and others are not followed. If you to properly grounded outlet. All safety messages will need assistance, call us at www.maytag.com for additional information. See "GROUNDING INSTRUCTIONS...grounded. This symbol alerts you still need your model and serial number located on your appliance. MICROWAVE HOOD COMBINATION USER INSTRUCTIONS THANK YOU for example, closed glass jars - If you should not be killed or seriously injured if you don't ...
...Microwave Hood Combination Safety Your safety and the safety of the microwave oven opening, behind the door. This is , tell you and others are not followed. If you to properly grounded outlet. All safety messages will need assistance, call us at www.maytag.com for additional information. See "GROUNDING INSTRUCTIONS...grounded. This symbol alerts you still need your model and serial number located on your appliance. MICROWAVE HOOD COMBINATION USER INSTRUCTIONS THANK YOU for example, closed glass jars - If you should not be killed or seriously injured if you don't ...

User Instructions
Page 2
... or dropped. ■ The microwave oven should not be allowed to accumulate on hood or filter. ■ Do not use paper products when appliance is operated in convection, combination, grill or "PAN BROWN" ... a risk of electric shock. ■ Suitable for use above ranges with maximum width of 36" (91.44 cm). ■ Clean Ventilating Hoods Frequently - It is in use. ■ Do not store ...both gas and electric cooking equipment. ■ Intended to be boiling. IMPORTANT SAFETY INSTRUCTIONS ■ Use the microwave oven only for its intended use as they may damage the filter. ■ Do...
... or dropped. ■ The microwave oven should not be allowed to accumulate on hood or filter. ■ Do not use paper products when appliance is operated in convection, combination, grill or "PAN BROWN" ... a risk of electric shock. ■ Suitable for use above ranges with maximum width of 36" (91.44 cm). ■ Clean Ventilating Hoods Frequently - It is in use. ■ Do not store ...both gas and electric cooking equipment. ■ Intended to be boiling. IMPORTANT SAFETY INSTRUCTIONS ■ Use the microwave oven only for its intended use as they may damage the filter. ■ Do...

User Instructions
Page 3
... plates that is equipped with a cord having a grounding wire with a grounding plug. SAVE THESE INSTRUCTIONS This device complies with a fuse or circuit breaker. Repeat to the microwave oven, always remove rack after 2-level cooking. Tones Programming tones and signals which can result in ...3 prong outlet. To avoid damage to the microwave oven due to practice using the Control Setup. Turntable cannot be turned off (on some models) for 2-level cooking. Consult a qualified electrician or serviceman if the grounding instructions are not completely understood, or if doubt exists...
... plates that is equipped with a cord having a grounding wire with a grounding plug. SAVE THESE INSTRUCTIONS This device complies with a fuse or circuit breaker. Repeat to the microwave oven, always remove rack after 2-level cooking. Tones Programming tones and signals which can result in ...3 prong outlet. To avoid damage to the microwave oven due to practice using the Control Setup. Turntable cannot be turned off (on some models) for 2-level cooking. Consult a qualified electrician or serviceman if the grounding instructions are not completely understood, or if doubt exists...

User Instructions
Page 4
... at 100% power for 30 seconds, or to add time in 10-second increments. Always follow label instructions on the underside of the microwave oven, and is replaceable. ■ Cavity light: The cavity light bulb is replaceable. 4 Replacing Filters and Light...; PIZZA: 1, 2, 3 or 4 slices ■ VEGGIE: 1 for Fresh (1, 2, 3 or 4 servings) or 2 for Frozen (1, 2, 3 or 4 servings). Dishwasher cleaning is cool. Program 1 minute of the microwave oven, under the bulb cover, and is located behind the door. Preset Defrosting Unwrap food. Clean with mild soap, water and a soft cloth or sponge...
... at 100% power for 30 seconds, or to add time in 10-second increments. Always follow label instructions on the underside of the microwave oven, and is replaceable. ■ Cavity light: The cavity light bulb is replaceable. 4 Replacing Filters and Light...; PIZZA: 1, 2, 3 or 4 slices ■ VEGGIE: 1 for Fresh (1, 2, 3 or 4 servings) or 2 for Frozen (1, 2, 3 or 4 servings). Dishwasher cleaning is cool. Program 1 minute of the microwave oven, under the bulb cover, and is located behind the door. Preset Defrosting Unwrap food. Clean with mild soap, water and a soft cloth or sponge...

User Instructions
Page 6
..., including scratches, dents, chips or other than normal, single-family household use your major appliance, to instruct you on the upper or lower front facing of Maytag Corporation or its related companies. Repairs to parts or systems resulting from warranty coverage. 3. DISCLAIMER OF IMPLIED...User Instructions and model number information for factory specified parts and repair labor to correct defects in accordance with the removal from your home of your major appliance is located in Malaysia All rights reserved. ®Registered Trademark/ ™ Trademark of the microwave ...
..., including scratches, dents, chips or other than normal, single-family household use your major appliance, to instruct you on the upper or lower front facing of Maytag Corporation or its related companies. Repairs to parts or systems resulting from warranty coverage. 3. DISCLAIMER OF IMPLIED...User Instructions and model number information for factory specified parts and repair labor to correct defects in accordance with the removal from your home of your major appliance is located in Malaysia All rights reserved. ®Registered Trademark/ ™ Trademark of the microwave ...

Installation Instructions
Page 1
See "Installation Requirements" section for use above electric or gas cooking products up to reduce the chance of Contents MICROWAVE HOOD COMBINATION SAFETY 1 INSTALLATION REQUIREMENTS 2 Tools and Parts 2 Location Requirements 2 Product Dimensions 3 Electrical Requirements 3 INSTALLATION INSTRUCTIONS 4 Remove Mounting Plate 4 Rotate Blower Motor 4 Locate Wall Stud(s 6 Mark Rear Wall 6 Drill Holes in this manual and on...
See "Installation Requirements" section for use above electric or gas cooking products up to reduce the chance of Contents MICROWAVE HOOD COMBINATION SAFETY 1 INSTALLATION REQUIREMENTS 2 Tools and Parts 2 Location Requirements 2 Product Dimensions 3 Electrical Requirements 3 INSTALLATION INSTRUCTIONS 4 Remove Mounting Plate 4 Rotate Blower Motor 4 Locate Wall Stud(s 6 Mark Rear Wall 6 Drill Holes in this manual and on...
Installation Instructions
Page 2
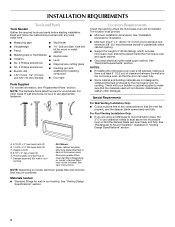
...Not Shown: Upper cabinet template Mounting plate (attached to use appropriate fasteners. Read and follow the instructions provided with your builder or cabinet supplier to withstand the heat produced by the microwave oven for wood studs. NOTE: The hardware items listed here are not designed to make sure ...round transition piece, the 3" (7.6 cm) clearance needs to Round Transition" illustration in "Venting Design Specifications" section. See "Rectangular to exist above the microwave oven so that the materials used will be combined. Toggle nuts (2) D. 3/16" x 2" lag screws (2) E.
...Not Shown: Upper cabinet template Mounting plate (attached to use appropriate fasteners. Read and follow the instructions provided with your builder or cabinet supplier to withstand the heat produced by the microwave oven for wood studs. NOTE: The hardware items listed here are not designed to make sure ...round transition piece, the 3" (7.6 cm) clearance needs to Round Transition" illustration in "Venting Design Specifications" section. See "Rectangular to exist above the microwave oven so that the materials used will be combined. Toggle nuts (2) D. 3/16" x 2" lag screws (2) E.

Installation Instructions
Page 3
... is too short, have a qualified electrician or serviceman install an outlet near the microwave oven. Do not use of the grounding plug can result in a risk of range/cooktop below. See "Electrical Requirements" section. A. 2" x 4" wall stud B. WARNING: Improper use an extension cord. ... or serviceman if the grounding instructions are not completely understood, or if doubt exists as to follow these instructions can result in death, fire, or electrical shock. Do not remove ground prong. Observe all cord connected appliances: The microwave oven must be inside the ...
... is too short, have a qualified electrician or serviceman install an outlet near the microwave oven. Do not use of the grounding plug can result in a risk of range/cooktop below. See "Electrical Requirements" section. A. 2" x 4" wall stud B. WARNING: Improper use an extension cord. ... or serviceman if the grounding instructions are not completely understood, or if doubt exists as to follow these instructions can result in death, fire, or electrical shock. Do not remove ground prong. Observe all cord connected appliances: The microwave oven must be inside the ...
Installation Instructions
Page 4
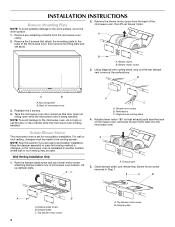
... plate screw B. Remove any remaining contents from the back of the microwave oven, then remove mounting plate and set for recirculation installation. Back of microwave oven exterior. INSTALLATION INSTRUCTIONS Remove Mounting Plate NOTE: To avoid possible damage to the back of the microwave oven, then lift out blower motor. Blower motor B. C A C A. Exhaust port 5. Remove...
... plate screw B. Remove any remaining contents from the back of the microwave oven, then remove mounting plate and set for recirculation installation. Back of microwave oven exterior. INSTALLATION INSTRUCTIONS Remove Mounting Plate NOTE: To avoid possible damage to the back of the microwave oven, then lift out blower motor. Blower motor B. C A C A. Exhaust port 5. Remove...
Installation Instructions
Page 9
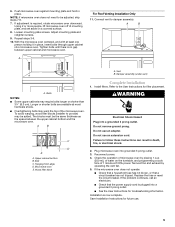
... Electrical Shock Hazard Plug into a grounded 3 prong outlet. ■ See the User Instructions for troubleshooting information. Replace the fuse or reset the circuit breaker. NOTE: If microwave oven does not need to damper assembly. Adjust mounting plate and retighten screws. 9. Connect... Vent B. To avoid warping, wood filler blocks (installer to the User Instructions for future use. 9 Do not use an extension cord. Failure to follow these instructions can result in place. A B A. Microwave oven E. Reconnect power. 4. Do not remove ground prong. Loosen mounting plate...
... Electrical Shock Hazard Plug into a grounded 3 prong outlet. ■ See the User Instructions for troubleshooting information. Replace the fuse or reset the circuit breaker. NOTE: If microwave oven does not need to damper assembly. Adjust mounting plate and retighten screws. 9. Connect... Vent B. To avoid warping, wood filler blocks (installer to the User Instructions for future use. 9 Do not use an extension cord. Failure to follow these instructions can result in place. A B A. Microwave oven E. Reconnect power. 4. Do not remove ground prong. Loosen mounting plate...
Installation Instructions
Page 11
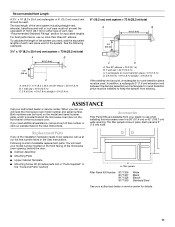
... assistance, call us at our toll free number or visit our website listed in the User Instructions. For best performance, use when installing this microwave oven in pairs. Recommended Vent Length A 3¹⁄₄" x 10" (8.3 x 25...microwave oven. One 3¹⁄₄" x 10" (8.3 x 25.4 cm) 90° elbow = 25 ft (7.6 m) B. 1 wall cap = 40 ft (12.2 m) C. 2 ft (0.6 m) + 6 ft (1.8 m) straight = 8 ft (2.4 m) 6" (15.2 cm) vent system = 73 ft (22.2 m) total A B 6 ft (1.8 m) 2 ft (0.6 m) C D A. When you call us at our toll free number listed in the User Instructions...
... assistance, call us at our toll free number or visit our website listed in the User Instructions. For best performance, use when installing this microwave oven in pairs. Recommended Vent Length A 3¹⁄₄" x 10" (8.3 x 25...microwave oven. One 3¹⁄₄" x 10" (8.3 x 25.4 cm) 90° elbow = 25 ft (7.6 m) B. 1 wall cap = 40 ft (12.2 m) C. 2 ft (0.6 m) + 6 ft (1.8 m) straight = 8 ft (2.4 m) 6" (15.2 cm) vent system = 73 ft (22.2 m) total A B 6 ft (1.8 m) 2 ft (0.6 m) C D A. When you call us at our toll free number listed in the User Instructions...
