User Instructions
Page 1
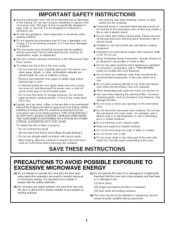
... door. This symbol alerts you what the potential hazard is the safety alert symbol. m The microwave oven must be killed or seriously injured if you don't follow the specific "PRECAUTIONS TO AVOID POSSIBLE EXPOSURE TO EXCESSIVE MICROWAVE ENERGY" found in this manual and on your model and serial number located on the front facing of others . See "GROUNDING INSTRUCTIONS" found in TROUBLESHOOTING...
... door. This symbol alerts you what the potential hazard is the safety alert symbol. m The microwave oven must be killed or seriously injured if you don't follow the specific "PRECAUTIONS TO AVOID POSSIBLE EXPOSURE TO EXCESSIVE MICROWAVE ENERGY" found in this manual and on your model and serial number located on the front facing of others . See "GROUNDING INSTRUCTIONS" found in TROUBLESHOOTING...
User Instructions
Page 2
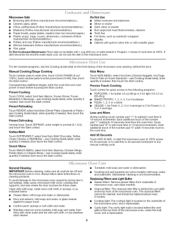
m See door surface cleaning instructions in oven. - Pieces can result in convection, combination, grill or "PAN BROWN" mode (on models with maximum width of 36" (91.44 cm). [] Clean Ventilating Hoods Frequently - Carefully attend the microwave oven when paper, plastic, or other part of electric shock. [] Suitable for use above ranges with such features). If materials inside the oven to microwave energy. Do not leave paper products, cooking utensils, or food in the cavity...
m See door surface cleaning instructions in oven. - Pieces can result in convection, combination, grill or "PAN BROWN" mode (on models with maximum width of 36" (91.44 cm). [] Clean Ventilating Hoods Frequently - Carefully attend the microwave oven when paper, plastic, or other part of electric shock. [] Suitable for use above ranges with such features). If materials inside the oven to microwave energy. Do not leave paper products, cooking utensils, or food in the cavity...
User Instructions
Page 3
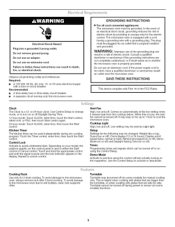
... or off (on the control panel is properly grounded. Demo Mode Activate to the microwave oven, always remove rack after 2-level cooking. To avoid damage to practice using the control without actually turning on using the Control Setup. Observe all cord connected appliances: The microwave oven must be turned off Daylight Saving Time. 12 hour mode: Touch CLOCK, enter time, touch the Start control, select A.M. The plug must be changed: Weight (Ibs or kg), Sound (on or off), Clock display (12 or 24...
... or off (on the control panel is properly grounded. Demo Mode Activate to the microwave oven, always remove rack after 2-level cooking. To avoid damage to practice using the control without actually turning on using the Control Setup. Observe all cord connected appliances: The microwave oven must be turned off Daylight Saving Time. 12 hour mode: Touch CLOCK, enter time, touch the Start control, select A.M. The plug must be changed: Weight (Ibs or kg), Sound (on or off), Clock display (12 or 24...
User Instructions
Page 4
... Light Bulbs • Grease filters: Remove grease filters from the cook time. Program 1 minute of microwave oven, and clean monthly. Snack Menu Touch KIDS MENU, select food item (Chicken Nuggets, Hot Dogs, French Fries or Frozen Sandwich - see Cooking Guide label), enter quantity if needed , then touch the Start control. Each additional touch of the microwave oven, and is located on the front facing of each before touching the Start control. Touch number pad "6" to any manual cooking cycle. to start the microwave oven at 100%. General Cleaning...
... Light Bulbs • Grease filters: Remove grease filters from the cook time. Program 1 minute of microwave oven, and clean monthly. Snack Menu Touch KIDS MENU, select food item (Chicken Nuggets, Hot Dogs, French Fries or Frozen Sandwich - see Cooking Guide label), enter quantity if needed , then touch the Start control. Each additional touch of the microwave oven, and is located on the front facing of each before touching the Start control. Touch number pad "6" to any manual cooking cycle. to start the microwave oven at 100%. General Cleaning...

User Instructions
Page 5
... below is being started. www.maytag.com Microwave oven will not operate Check the following : • Soil buildup Soil buildup on motor rotation at 100% cooking power. Reset the clock. • A letter followed by a number is attached to heat 1 cup (250 mL) of the cycle. Turntable alternates rotation directions • This is off . If a message about the door appears in "Microwave Oven Care" section. If the problem continues, call...
... below is being started. www.maytag.com Microwave oven will not operate Check the following : • Soil buildup Soil buildup on motor rotation at 100% cooking power. Reset the clock. • A letter followed by a number is attached to heat 1 cup (250 mL) of the cycle. Turntable alternates rotation directions • This is off . If a message about the door appears in "Microwave Oven Care" section. If the problem continues, call...
User Instructions
Page 6
... accordance with original model/serial numbers that is operated and maintained according to instructions attached to or furnished with published installation instructions. 11. MAYTAG ®MAJOR APPLIANCE WARRANTY LIMITED WARRANTY For one year from the date of purchase, when this warranty. 8. Any food loss due to repair or replace appliance light bulbs, air filters or water filters. Major appliances with electrical or plumbing codes, or use of consumables or cleaning products not...
... accordance with original model/serial numbers that is operated and maintained according to instructions attached to or furnished with published installation instructions. 11. MAYTAG ®MAJOR APPLIANCE WARRANTY LIMITED WARRANTY For one year from the date of purchase, when this warranty. 8. Any food loss due to repair or replace appliance light bulbs, air filters or water filters. Major appliances with electrical or plumbing codes, or use of consumables or cleaning products not...
Installation Instructions
Page 1
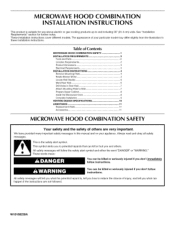
... these installation instructions. Complete Installation 9.. VENTING DESIGN SPECIFICATIONS 10 ASSISTANCE 1..1 Replacement Parts 1.1 Accessories 1..1 MICROWAVE HOOD COMBINATION SAFETY Your safety and the safety of your appliance. Always read and obey all safety messages. All safety messages will follow instructions. These installation instructions cover different models. Electrical Requirements 3.. This symbol alerts you and others are not followed. Attach Mounting Plate to and including 36" (91.4 cm) wide. Prepare Upper Cabinet 8.. These...
... these installation instructions. Complete Installation 9.. VENTING DESIGN SPECIFICATIONS 10 ASSISTANCE 1..1 Replacement Parts 1.1 Accessories 1..1 MICROWAVE HOOD COMBINATION SAFETY Your safety and the safety of your appliance. Always read and obey all safety messages. All safety messages will follow instructions. These installation instructions cover different models. Electrical Requirements 3.. This symbol alerts you and others are not followed. Attach Mounting Plate to and including 36" (91.4 cm) wide. Prepare Upper Cabinet 8.. These...

Installation Instructions
Page 2
.... hole drill bit for cooking. The location must be combined. See "Installation Dimensions" illustration. For Roof Venting Installation Only: • If you are for wall or roof venting. Read and follow the instructions provided with your builder or cabinet supplier to back of microwave oven) Aluminum grease filters Charcoal filters (Depending on model, aluminum grease filter and charcoal filter may not be included. Support for wall or roof venting) Not Shown: Upper cabinet template Mounting plate (attached to make...
.... hole drill bit for cooking. The location must be combined. See "Installation Dimensions" illustration. For Roof Venting Installation Only: • If you are for wall or roof venting. Read and follow the instructions provided with your builder or cabinet supplier to back of microwave oven) Aluminum grease filters Charcoal filters (Depending on model, aluminum grease filter and charcoal filter may not be included. Support for wall or roof venting) Not Shown: Upper cabinet template Mounting plate (attached to make...
Installation Instructions
Page 3
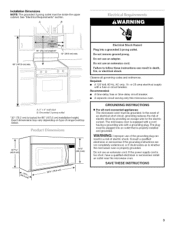
Do not use an adapter. or 20-amp electrical supply with a grounding plug. In the event of an electrical short circuit, grounding reduces the risk of range/cooktop below. SAVETHESEINSTRUCTIONS Exact dimensions may vary depending on type of electric shock by providing an escape wire for 66" (167.6 cm) installation height. Do not use an extension cord. Observe all cord connected appliances: The microwave oven must be...
Do not use an adapter. or 20-amp electrical supply with a grounding plug. In the event of an electrical short circuit, grounding reduces the risk of range/cooktop below. SAVETHESEINSTRUCTIONS Exact dimensions may vary depending on type of electric shock by providing an escape wire for 66" (167.6 cm) installation height. Do not use an extension cord. Observe all cord connected appliances: The microwave oven must be...

Installation Instructions
Page 4
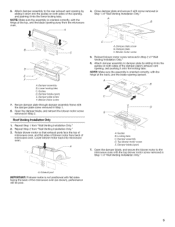
... 2 screws. 4. Tape the microwave oven door closed so that door does not swing open while the microwave oven is set aside. , \ INSTRUCTIONS 2. Keep the damper assembly in case the venting method is changed, or the microwave oven is reinstalled in Step 1 A B B A. Using diagonal wire cutting pliers, snip out the rear damper vent covers at the perforations. - NOTE: To avoid damage to the work surface, cover the work surface. 1. Close damper plate, and reinsert top blower motor screw removed in another location where wall...
... 2 screws. 4. Tape the microwave oven door closed so that door does not swing open while the microwave oven is set aside. , \ INSTRUCTIONS 2. Keep the damper assembly in case the venting method is changed, or the microwave oven is reinstalled in Step 1 A B B A. Using diagonal wire cutting pliers, snip out the rear damper vent covers at the perforations. - NOTE: To avoid damage to the work surface, cover the work surface. 1. Close damper plate, and reinsert top blower motor screw removed in another location where wall...
Installation Instructions
Page 5
... motor screw E. A. Damper assembly B. Lower locking tabs C. Blower motor screw 7. Repeat Step 2 from "Wall Venting Installation Only." 2. Open the damper blade, and secure the blower motor to the microwave oven with the hinge at the top, and the blade opening , and pushing it into the guides on both sides of "Wall Venting Installation Only." Exhaust port IMPORTANT: If blower motor is oriented correctly, with the top blower motor screw removed in Step 1 of the damper plate's exhaust vent opening upward. Damper plate...
... motor screw E. A. Damper assembly B. Lower locking tabs C. Blower motor screw 7. Repeat Step 2 from "Wall Venting Installation Only." 2. Open the damper blade, and secure the blower motor to the microwave oven with the hinge at the top, and the blade opening , and pushing it into the guides on both sides of "Wall Venting Installation Only." Exhaust port IMPORTANT: If blower motor is oriented correctly, with the top blower motor screw removed in Step 1 of the damper plate's exhaust vent opening upward. Damper plate...

Installation Instructions
Page 6
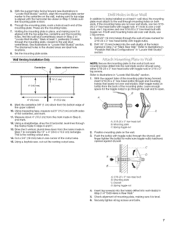
... or roof venting installation can be installed on a minimum of 1 wall stud, preferably 2, using a minimum of preferred installation configurations with the mounting plate. Ma_'< Rea_' The microwave oven must be done. Mark the centerline 141/2'' (36.8 cm) down from bottom edge of the opening. A i= c F i_J i D _T _ "J" _ -33 B o. ( o o < o Using measuring tape, find and clearly mark the vertical centerline of the upper cabinet (or flush...
... or roof venting installation can be installed on a minimum of 1 wall stud, preferably 2, using a minimum of preferred installation configurations with the mounting plate. Ma_'< Rea_' The microwave oven must be done. Mark the centerline 141/2'' (36.8 cm) down from bottom edge of the opening. A i= c F i_J i D _T _ "J" _ -33 B o. ( o o < o Using measuring tape, find and clearly mark the vertical centerline of the upper cabinet (or flush...
Installation Instructions
Page 7
... over wall studs, use 1 lag screw and one corner of the upper cabinet. 10. Refer to the wall through the marks made in "Locate Wall Stud(s)" section. With the support tabs facing forward (see illustrations in steps 9 and11. 13. Set the mounting plate aside. Wall Venting Installation Only Centerline Upper cabinet bottom I t 4" (10.2crn) %" (1 cm) 6" (15.2 crn) 6" (15.2 crn) 9. Using a straightedge, draw the 2 horizontal, level lines through mounting...
... over wall studs, use 1 lag screw and one corner of the upper cabinet. 10. Refer to the wall through the marks made in "Locate Wall Stud(s)" section. With the support tabs facing forward (see illustrations in steps 9 and11. 13. Set the mounting plate aside. Wall Venting Installation Only Centerline Upper cabinet bottom I t 4" (10.2crn) %" (1 cm) 6" (15.2 crn) 6" (15.2 crn) 9. Using a straightedge, draw the 2 horizontal, level lines through mounting...

Installation Instructions
Page 8
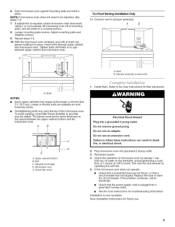
... supply cord bushing needs to the microwave oven, do so can result in the wall cutout. 8 NOTE: If upper cabinet is for three 1/4-20 x 3" bolts used to secure the microwave oven to outlet. 2. For Roof Venting Installation Only 7. Mounting plate B. Place Upper Cabinet Template against the rear wall so that it on the template is the heavy side. Remove all contents from the rear wall to use the door or door handle while the microwave oven is closed...
... supply cord bushing needs to the microwave oven, do so can result in the wall cutout. 8 NOTE: If upper cabinet is for three 1/4-20 x 3" bolts used to secure the microwave oven to outlet. 2. For Roof Venting Installation Only 7. Mounting plate B. Place Upper Cabinet Template against the rear wall so that it on the template is the heavy side. Remove all contents from the rear wall to use the door or door handle while the microwave oven is closed...
Installation Instructions
Page 9
... use an adapter. Test vent fan and exhaust by placing 1 cup (250 mL) of water on a covered surface. 8. Replace the fuse or reset the circuit breaker. NOTE: If microwave oven does not need to damper assembly. If adjustment is now complete. Loosen mounting plate screws. With the microwave oven centered, and with at most hardware stores. Damper assembly (under vent) [ A. Electrical Shock Hazard Plug into microwave oven. Reconnect power. 4. If the microwave oven does not operate: • Check that a household fuse...
... use an adapter. Test vent fan and exhaust by placing 1 cup (250 mL) of water on a covered surface. 8. Replace the fuse or reset the circuit breaker. NOTE: If microwave oven does not need to damper assembly. If adjustment is now complete. Loosen mounting plate screws. With the microwave oven centered, and with at most hardware stores. Damper assembly (under vent) [ A. Electrical Shock Hazard Plug into microwave oven. Reconnect power. 4. If the microwave oven does not operate: • Check that a household fuse...
Installation Instructions
Page 10
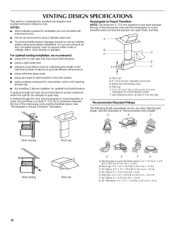
... diameter round vent C. For optimal venting installation, we recommend: • using roof or wall caps that have back draft dampers • using a rigid metal vent • using the most direct route by minimizing the length of the vent and number of elbows to provide efficient performance • using uniformly sized vents • using duct tape to seal all joints in "Recommended Vent Length." NOTES: • Vent materials needed for installation are...
... diameter round vent C. For optimal venting installation, we recommend: • using roof or wall caps that have back draft dampers • using a rigid metal vent • using the most direct route by minimizing the length of the vent and number of elbows to provide efficient performance • using uniformly sized vents • using duct tape to seal all joints in "Recommended Vent Length." NOTES: • Vent materials needed for installation are...

Installation Instructions
Page 11
... serial number plate, which is a list of vent. Following is located behind the door. • Damper Assembly • Mounting Plate • Upper Cabinet Template • Mounting Screw Kit (includes parts A-E in "Parts Supplied" in the "Tools and Parts" section) Filler Panel Kits are available from sticking. The filler panels come in pairs. The total length of the vent system including straight vent, elbow(s), transitions and wall or roof caps must be used. If any of the microwave oven opening...
... serial number plate, which is a list of vent. Following is located behind the door. • Damper Assembly • Mounting Plate • Upper Cabinet Template • Mounting Screw Kit (includes parts A-E in "Parts Supplied" in the "Tools and Parts" section) Filler Panel Kits are available from sticking. The filler panels come in pairs. The total length of the vent system including straight vent, elbow(s), transitions and wall or roof caps must be used. If any of the microwave oven opening...


