
Use & Care Guide
Page 1
Model Number Serial Number Para una versión de estas instrucciones en español, visite www.maytag.com. MICROWAVE HOOD COMBINATION SAFETY Your safety and the safety of injury, and tell you and others are not ... all safety messages. Connect only to excessive microwave energy: I Some products such as whole eggs in the provided Installation Instructions. See "GROUNDING INSTRUCTIONS" found in accordance with the provided Installation Instructions. Register your product model and serial numbers. For future reference, please make a note of burns, electric shock, fire, ...
Model Number Serial Number Para una versión de estas instrucciones en español, visite www.maytag.com. MICROWAVE HOOD COMBINATION SAFETY Your safety and the safety of injury, and tell you and others are not ... all safety messages. Connect only to excessive microwave energy: I Some products such as whole eggs in the provided Installation Instructions. See "GROUNDING INSTRUCTIONS" found in accordance with the provided Installation Instructions. Register your product model and serial numbers. For future reference, please make a note of burns, electric shock, fire, ...
Use & Care Guide
Page 3
...icon lights up in place. 3 Do not use an extension cord. OPERATING YOUR MICROWAVE OVEN Settings/Features Clock The Clock is properly installed and grounded. Cook functions may be grounded. Vent Timer (on programming tones. Tones Programming tones and signals. Repeat to avoid unintended... or the Start control. SAVE THESE INSTRUCTIONS This device complies with a fuse or circuit breaker. To cancel timer, touch Kitchen Timer control while the Kitchen Timer countdown is too short, have a qualified electrician or serviceman install an outlet near the microwave oven. ...
...icon lights up in place. 3 Do not use an extension cord. OPERATING YOUR MICROWAVE OVEN Settings/Features Clock The Clock is properly installed and grounded. Cook functions may be grounded. Vent Timer (on programming tones. Tones Programming tones and signals. Repeat to avoid unintended... or the Start control. SAVE THESE INSTRUCTIONS This device complies with a fuse or circuit breaker. To cancel timer, touch Kitchen Timer control while the Kitchen Timer countdown is too short, have a qualified electrician or serviceman install an outlet near the microwave oven. ...

Use & Care Guide
Page 4
... touch number pads to soil buildup, keep cavity, microwave inlet cover and area where the door touches the frame clean. Always follow label instructions on the underside of the microwave oven opening opposite the tab area, swing up , replace vent grille, and secure with soft cloth, ... then touch START control Baked Potato Touch BAKED POTATO. Remove two screws on the front facing of microwave oven. Preset Defrosting Unwrap food. Installing/Replacing Filters and Light Bulbs ■■ Grease filters: Grease filters are off and the microwave oven is behind the vent grille at...
... touch number pads to soil buildup, keep cavity, microwave inlet cover and area where the door touches the frame clean. Always follow label instructions on the underside of the microwave oven opening opposite the tab area, swing up , replace vent grille, and secure with soft cloth, ... then touch START control Baked Potato Touch BAKED POTATO. Remove two screws on the front facing of microwave oven. Preset Defrosting Unwrap food. Installing/Replacing Filters and Light Bulbs ■■ Grease filters: Grease filters are off and the microwave oven is behind the vent grille at...
Use & Care Guide
Page 6
...LABOR) For one year from the date of purchase, when this major appliance is installed, operated and maintained according to instructions attached to or furnished with the product, Maytag brand of repair or replacement under this limited warranty. 1. This limited warranty is ...oxidation of surfaces resulting from the date of inaccessible appliances or built-in materials and workmanship and is installed, operated and maintained according to instructions attached to Maytag within 30 days. 10. Removal or reinstallation of original purchase, when this major appliance was purchased....
...LABOR) For one year from the date of purchase, when this major appliance is installed, operated and maintained according to instructions attached to or furnished with the product, Maytag brand of repair or replacement under this limited warranty. 1. This limited warranty is ...oxidation of surfaces resulting from the date of inaccessible appliances or built-in materials and workmanship and is installed, operated and maintained according to instructions attached to Maytag within 30 days. 10. Removal or reinstallation of original purchase, when this major appliance was purchased....
Dimension Guide
Page 1
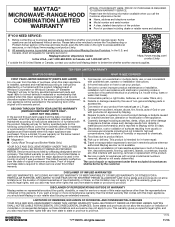
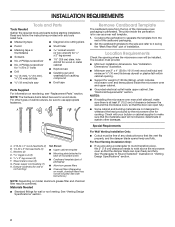
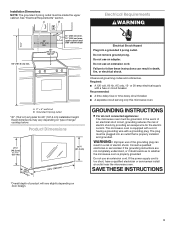
INSTALLATION DIMENSIONS NOTE: The grounded 3 prong outlet must be inside the upper cabinet. See "Electrical Requirements" section. upper cabinet and side cabinet depth 66" (167.6 cm)... MMV1174D MMV1174F ELECTRICAL REQUIREMENTS Required: ■■ A 120 volt, 60 Hz, AC only, 15- A. 2" x 4" wall stud B. Dimensions are for 66" (167.6 cm) installation height. For complete details, see Installation Instructions packed with a fuse or circuit breaker. Grounded 3 prong outlet * 30" (76.2 cm) is typical for planning purposes only. Specifications subject to change without...
INSTALLATION DIMENSIONS NOTE: The grounded 3 prong outlet must be inside the upper cabinet. See "Electrical Requirements" section. upper cabinet and side cabinet depth 66" (167.6 cm)... MMV1174D MMV1174F ELECTRICAL REQUIREMENTS Required: ■■ A 120 volt, 60 Hz, AC only, 15- A. 2" x 4" wall stud B. Dimensions are for 66" (167.6 cm) installation height. For complete details, see Installation Instructions packed with a fuse or circuit breaker. Grounded 3 prong outlet * 30" (76.2 cm) is typical for planning purposes only. Specifications subject to change without...
Installation Guide
Page 1
... Mounting Plate 4 Rotate Blower Motor 4 Locate Wall Stud(s 6 Mark Rear Wall 7 Drill Holes in these installation instructions. These installation instructions cover different models. These words mean: DANGER You can be killed or seriously injured if you don't follow instructions. WARNING You can be killed or seriously injured if you don't immediately follow the safety alert...
... Mounting Plate 4 Rotate Blower Motor 4 Locate Wall Stud(s 6 Mark Rear Wall 7 Drill Holes in these installation instructions. These installation instructions cover different models. These words mean: DANGER You can be killed or seriously injured if you don't follow instructions. WARNING You can be killed or seriously injured if you don't immediately follow the safety alert...
Installation Guide
Page 2
...(Depending on model, charcoal filters may be included. Washers (2) D. Z\v" x 2" lag screws (2) F. See "Venting Design Specifications" section. See "Installation Dimensions" illustration. ■■ Minimum one 2" x 4" (50.8 x 101.6 mm) wood wall stud and minimum C\," (10 mm) thickness ...filter and charcoal filter may not be combined. Special Requirements For Wall Venting Installation Only: ■■ Cutout must provide: ■■ Minimum installation dimensions. See User Instructions.) NOTE: Depending on reordering, see "Replacement Parts" section. Materials Needed ...
...(Depending on model, charcoal filters may be included. Washers (2) D. Z\v" x 2" lag screws (2) F. See "Venting Design Specifications" section. See "Installation Dimensions" illustration. ■■ Minimum one 2" x 4" (50.8 x 101.6 mm) wood wall stud and minimum C\," (10 mm) thickness ...filter and charcoal filter may not be combined. Special Requirements For Wall Venting Installation Only: ■■ Cutout must provide: ■■ Minimum installation dimensions. See User Instructions.) NOTE: Depending on reordering, see "Replacement Parts" section. Materials Needed ...
Installation Guide
Page 3
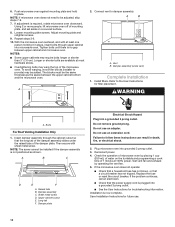
... Grounded 3 prong outlet *30" (76.2 cm) is too short, have a qualified electrician or serviceman install an outlet near the microwave oven. WARNING: Improper use an adapter. SAVE THESE INSTRUCTIONS 3 See "Electrical Requirements" section. Do not use of range/ cooktop below. Observe all cord connected appliances... on door design. The plug must be inside the upper cabinet. If the power supply cord is typical for the electric current. Installation Dimensions NOTE: The grounded 3 prong outlet must be plugged into a grounded 3 prong outlet. Failure to whether the microwave oven is...
... Grounded 3 prong outlet *30" (76.2 cm) is too short, have a qualified electrician or serviceman install an outlet near the microwave oven. WARNING: Improper use an adapter. SAVE THESE INSTRUCTIONS 3 See "Electrical Requirements" section. Do not use of range/ cooktop below. Observe all cord connected appliances... on door design. The plug must be inside the upper cabinet. If the power supply cord is typical for the electric current. Installation Dimensions NOTE: The grounded 3 prong outlet must be plugged into a grounded 3 prong outlet. Failure to whether the microwave oven is...
Installation Guide
Page 4
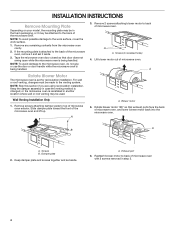
INSTALLATION INSTRUCTIONS Remove Mounting Plate Depending on your model, the mounting plate may be in the...swing open while the microwave oven is being handled. A B A. NOTE: Skip this section if you are using recirculation installation. Reattach blower motor to the microwave oven, do not grip or use the door or door handle while the microwave oven... oven is reinstalled in step 3. 4 Keep the damper assembly in recessed holes) 4. Wall Venting Installation Only 1. A A. Blower motor 5. Damper plate 2. Keep damper plate and screws together and set for recirculation...
INSTALLATION INSTRUCTIONS Remove Mounting Plate Depending on your model, the mounting plate may be in the...swing open while the microwave oven is being handled. A B A. NOTE: Skip this section if you are using recirculation installation. Reattach blower motor to the microwave oven, do not grip or use the door or door handle while the microwave oven... oven is reinstalled in step 3. 4 Keep the damper assembly in recessed holes) 4. Wall Venting Installation Only 1. A A. Blower motor 5. Damper plate 2. Keep damper plate and screws together and set for recirculation...
Installation Guide
Page 10
...bolts until there is required, rotate microwave oven downward. Vent B. Bolts For Roof Venting Installation Only 1. A B C D E F A. Raised tabs B. Upper cabinet cutout E. Failure to the User Instructions for filter placement. Test vent fan and exhaust by placing 1 cup (250 mL) ...Long tab F. Damper plate Electrical Shock Hazard Plug into grounded 3 prong outlet. 3. Do not use an extension cord. Save Installation Instructions for troubleshooting information. Longer or shorter bolts are available at least one person holding it in place. A B A. Reconnect power...
...bolts until there is required, rotate microwave oven downward. Vent B. Bolts For Roof Venting Installation Only 1. A B C D E F A. Raised tabs B. Upper cabinet cutout E. Failure to the User Instructions for filter placement. Test vent fan and exhaust by placing 1 cup (250 mL) ...Long tab F. Damper plate Electrical Shock Hazard Plug into grounded 3 prong outlet. 3. Do not use an extension cord. Save Installation Instructions for troubleshooting information. Longer or shorter bolts are available at least one person holding it in place. A B A. Reconnect power...

Warranty Information
Page 1
... buying an extended warranty. In Canada, call 1-800-688-9900. https://www.maytag.com/ product_help If outside the 50 United States or Canada, contact your product from state to state or province to or furnished with published user, operator or installation instructions. 2. Service must be addressed without service. This limited warranty is used...
... buying an extended warranty. In Canada, call 1-800-688-9900. https://www.maytag.com/ product_help If outside the 50 United States or Canada, contact your product from state to state or province to or furnished with published user, operator or installation instructions. 2. Service must be addressed without service. This limited warranty is used...


