
Use & Care Guide
Page 1
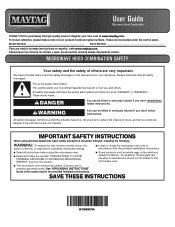
... specific "PRECAUTIONS TO AVOID POSSIBLE EXPOSURE TO EXCESSIVE MICROWAVE ENERGY" found in this high-quality product. Connect only to excessive microwave energy: I Some products such as whole eggs in the provided Installation Instructions. This is , tell you how to potential ...instructions before using electrical appliances basic safety precautions should not be killed or seriously injured if you don't follow the safety alert symbol and either the word "DANGER" or "WARNING." I Install or locate the microwave oven only in this manual and on your new oven at www.maytag...
... specific "PRECAUTIONS TO AVOID POSSIBLE EXPOSURE TO EXCESSIVE MICROWAVE ENERGY" found in this high-quality product. Connect only to excessive microwave energy: I Some products such as whole eggs in the provided Installation Instructions. This is , tell you how to potential ...instructions before using electrical appliances basic safety precautions should not be killed or seriously injured if you don't follow the safety alert symbol and either the word "DANGER" or "WARNING." I Install or locate the microwave oven only in this manual and on your new oven at www.maytag...
Use & Care Guide
Page 3
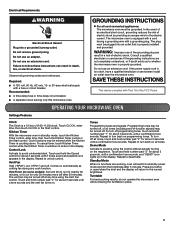
...Tones Programming tones and signals. Repeat to unlock control. Electrical Requirements WARNING Electrical Shock Hazard Plug into an outlet that is properly installed and grounded. Do not use an extension cord. Cook functions may be entered while the Kitchen Timer is equipped with a cord...the event of an electrical short circuit, grounding reduces the risk of the FCC Rules. The microwave oven is counting down. Consult a qualified electrician or serviceman if the grounding instructions are working, oven will return to practice using the Vent Fan control. Touch CLOCK, enter ...
...Tones Programming tones and signals. Repeat to unlock control. Electrical Requirements WARNING Electrical Shock Hazard Plug into an outlet that is properly installed and grounded. Do not use an extension cord. Cook functions may be entered while the Kitchen Timer is equipped with a cord...the event of an electrical short circuit, grounding reduces the risk of the FCC Rules. The microwave oven is counting down. Consult a qualified electrician or serviceman if the grounding instructions are working, oven will return to practice using the Vent Fan control. Touch CLOCK, enter ...

Use & Care Guide
Page 4
... the vent grille at least 1" (2.5 cm) apart. Soften/Melt Touch SOFTEN/MELT, enter number code of cook time at 100%. Always follow label instructions on some models): mild soap and water, then rinse with clean water and dry with screws. ■■ Cooktop light: The cooktop light bulb ... 1 minute of food item, enter quantity, then touch the START control. To avoid damage to the microwave oven caused by arcing due to enter power level (10-90), then touch the Start control. Installing/Replacing Filters and Light Bulbs ■■ Grease filters: Grease filters are off and the...
... the vent grille at least 1" (2.5 cm) apart. Soften/Melt Touch SOFTEN/MELT, enter number code of cook time at 100%. Always follow label instructions on some models): mild soap and water, then rinse with clean water and dry with screws. ■■ Cooktop light: The cooktop light bulb ... 1 minute of food item, enter quantity, then touch the START control. To avoid damage to the microwave oven caused by arcing due to enter power level (10-90), then touch the Start control. Installing/Replacing Filters and Light Bulbs ■■ Grease filters: Grease filters are off and the...
Use & Care Guide
Page 6
... may have the following components to or furnished with published user, operator or installation instructions. 2. If you also may have other rights that comes with products not approved by Maytag. 8. W108135576A SP PN W10835763 ®/™ ©2015. Proof of ...comprehensive warranty than the representations contained in this major appliance and that interfere with the product, Maytag brand of the product. 15. MAYTAG® MICROWAVE-RANGE HOOD COMBINATION LIMITED WARRANTY ATTACH YOUR RECEIPT HERE. Commercial, non-residential or multiple-family ...
... may have the following components to or furnished with published user, operator or installation instructions. 2. If you also may have other rights that comes with products not approved by Maytag. 8. W108135576A SP PN W10835763 ®/™ ©2015. Proof of ...comprehensive warranty than the representations contained in this major appliance and that interfere with the product, Maytag brand of the product. 15. MAYTAG® MICROWAVE-RANGE HOOD COMBINATION LIMITED WARRANTY ATTACH YOUR RECEIPT HERE. Commercial, non-residential or multiple-family ...
Dimension Guide
Page 1
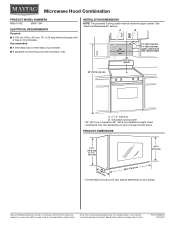
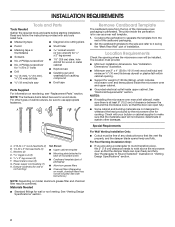
... Recommended: ■■ A time-delay fuse or time-delay circuit breaker. ■■ A separate circuit serving only this microwave oven. INSTALLATION DIMENSIONS NOTE: The grounded 3 prong outlet must be inside the upper cabinet. Because Whirlpool Corporation includes a continuous commitment to improve ...-amp electrical supply with product. Microwave Hood Combination PRODUCT MODEL NUMBERS MMV1174D MMV1174F ELECTRICAL REQUIREMENTS Required: ■■ A 120 volt, 60 Hz, AC only, 15- For complete details, see Installation Instructions packed with a fuse or circuit...
... Recommended: ■■ A time-delay fuse or time-delay circuit breaker. ■■ A separate circuit serving only this microwave oven. INSTALLATION DIMENSIONS NOTE: The grounded 3 prong outlet must be inside the upper cabinet. Because Whirlpool Corporation includes a continuous commitment to improve ...-amp electrical supply with product. Microwave Hood Combination PRODUCT MODEL NUMBERS MMV1174D MMV1174F ELECTRICAL REQUIREMENTS Required: ■■ A 120 volt, 60 Hz, AC only, 15- For complete details, see Installation Instructions packed with a fuse or circuit...
Installation Guide
Page 1
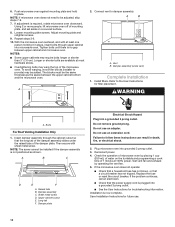
... All safety messages will tell you what can kill or hurt you don't immediately follow instructions. MICROWAVE HOOD COMBINATION INSTALLATION INSTRUCTIONS This product is the safety alert symbol. These installation instructions cover different models. This is suitable for further notes. See "Installation Requirements" section for use above electric or gas cooking products up to Wall 8 Prepare Upper...
... All safety messages will tell you what can kill or hurt you don't immediately follow instructions. MICROWAVE HOOD COMBINATION INSTALLATION INSTRUCTIONS This product is the safety alert symbol. These installation instructions cover different models. This is suitable for further notes. See "Installation Requirements" section for use above electric or gas cooking products up to Wall 8 Prepare Upper...
Installation Guide
Page 2
.... See "Electrical Requirements" section. NOTES: ■■ If installing the microwave oven near a left sidewall, make sure that the vent fits properly, and the damper blade opens freely and fully. Read and follow the instructions provided with your builder or cabinet supplier to back of microwave oven) ■■ Cardboard template (part of the...
.... See "Electrical Requirements" section. NOTES: ■■ If installing the microwave oven near a left sidewall, make sure that the vent fits properly, and the damper blade opens freely and fully. Read and follow the instructions provided with your builder or cabinet supplier to back of microwave oven) ■■ Cardboard template (part of the...
Installation Guide
Page 3
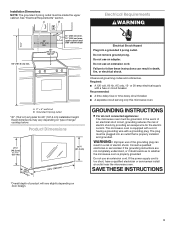
...may vary depending on type of product will vary slightly depending on door design. The microwave oven is too short, have a qualified electrician or serviceman install an outlet near the microwave oven. The plug must be inside the upper cabinet. Do not use an extension cord... depth Electrical Shock Hazard Plug into an outlet that is properly installed and grounded. Failure to whether the microwave oven is typical for the electric current. See "Electrical Requirements" section. A. 2" x 4" wall stud B. GROUNDING INSTRUCTIONS I For all governing codes and ordinances. In the event of...
...may vary depending on type of product will vary slightly depending on door design. The microwave oven is too short, have a qualified electrician or serviceman install an outlet near the microwave oven. The plug must be inside the upper cabinet. Do not use an extension cord... depth Electrical Shock Hazard Plug into an outlet that is properly installed and grounded. Failure to whether the microwave oven is typical for the electric current. See "Electrical Requirements" section. A. 2" x 4" wall stud B. GROUNDING INSTRUCTIONS I For all governing codes and ordinances. In the event of...
Installation Guide
Page 4
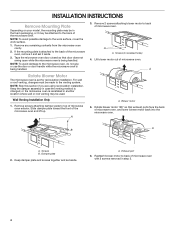
.... 1. Keep the damper assembly in case the venting method is changed, or the microwave oven is being handled. Exhaust port 6. NOTE: To avoid possible damage to the back of microwave oven, and lower blower motor back into the microwave oven. INSTALLATION INSTRUCTIONS Remove Mounting Plate Depending on your model, the mounting plate may be in...
.... 1. Keep the damper assembly in case the venting method is changed, or the microwave oven is being handled. Exhaust port 6. NOTE: To avoid possible damage to the back of microwave oven, and lower blower motor back into the microwave oven. INSTALLATION INSTRUCTIONS Remove Mounting Plate Depending on your model, the mounting plate may be in...
Installation Guide
Page 10
... as the space between upper cabinet and microwave oven. Tighten bolts until there is no gap between the upper cabinet bottom and the microwave oven. To avoid warping, wood filler blocks (installer to follow these instructions can result in death, fire, or electrical... sheet metal screw. A 2. Replace the fuse or reset the circuit breaker. Save Installation Instructions for troubleshooting information. Long tab F. Adjust mounting plate and retighten screws. 9. Push microwave oven against mounting plate and hold in place, insert bolts through the cabinet cutout so...
... as the space between upper cabinet and microwave oven. Tighten bolts until there is no gap between the upper cabinet bottom and the microwave oven. To avoid warping, wood filler blocks (installer to follow these instructions can result in death, fire, or electrical... sheet metal screw. A 2. Replace the fuse or reset the circuit breaker. Save Installation Instructions for troubleshooting information. Long tab F. Adjust mounting plate and retighten screws. 9. Push microwave oven against mounting plate and hold in place, insert bolts through the cabinet cutout so...

Warranty Information
Page 1
... https://www.maytag.com/product_help. 2. Removal or reinstallation of surfaces resulting from defects in accordance with published user, operator or installation instructions. 2. DISCLAIMER... OF IMPLIED WARRANTIES IMPLIED WARRANTIES, INCLUDING ANY IMPLIED WARRANTY OF MERCHANTABILITY OR IMPLIED WARRANTY OF FITNESS FOR A PARTICULAR PURPOSE, ARE LIMITED TO ONE YEAR OR THE SHORTEST PERIOD ALLOWED BY LAW. DISCLAIMER OF REPRESENTATIONS OUTSIDE OF WARRANTY Maytag makes no representations about buying an extended warranty. MAYTAG® MICROWAVE...
... https://www.maytag.com/product_help. 2. Removal or reinstallation of surfaces resulting from defects in accordance with published user, operator or installation instructions. 2. DISCLAIMER... OF IMPLIED WARRANTIES IMPLIED WARRANTIES, INCLUDING ANY IMPLIED WARRANTY OF MERCHANTABILITY OR IMPLIED WARRANTY OF FITNESS FOR A PARTICULAR PURPOSE, ARE LIMITED TO ONE YEAR OR THE SHORTEST PERIOD ALLOWED BY LAW. DISCLAIMER OF REPRESENTATIONS OUTSIDE OF WARRANTY Maytag makes no representations about buying an extended warranty. MAYTAG® MICROWAVE...


