User Instructions
Page 1
...what can happen if the instructions are very important. IMPORTANT SAFETY INSTRUCTIONS When using the microwave oven. = Read and follow instructions. for example, closed glass jars are able to...qualiptyroductI.fyoushouldexperiencaeproblemnotcoveredinTROUBLESHOOTING, pleasevisitourwebsiteatwww.maytag.cofmoradditionainlformatioInfy. Paraobtenearccesoa "lnstruccionepsaraelusuariodelacombinaci6mnicroondacsampanae"nespaSool,paraobtener informaci6andicionaalcercadesuproductov,isitew: ww.maytag.com TengalistosunQmerdoemodelocompletoP.uedencontrasrunQmerdoemodeloy ...
...what can happen if the instructions are very important. IMPORTANT SAFETY INSTRUCTIONS When using the microwave oven. = Read and follow instructions. for example, closed glass jars are able to...qualiptyroductI.fyoushouldexperiencaeproblemnotcoveredinTROUBLESHOOTING, pleasevisitourwebsiteatwww.maytag.cofmoradditionainlformatioInfy. Paraobtenearccesoa "lnstruccionepsaraelusuariodelacombinaci6mnicroondacsampanae"nespaSool,paraobtener informaci6andicionaalcercadesuproductov,isitew: ww.maytag.com TengalistosunQmerdoemodelocompletoP.uedencontrasrunQmerdoemodeloy ...
User Instructions
Page 2
...adjustment. It is operated in convection, combination, grill or "PAN BROWN" mode (on . [] Use care when cleaning the vent-hood filter. It is particularly important that there is damaged. iMPORTANT SAFETY iNSTRUCTiONS m Use the microwave oven only for use above ranges with maximum width of 36" (91....44 cm). [] Clean Ventilating Hoods Frequently - m See door surface cleaning instructions in the oven cavity: - THIS COULD...
...adjustment. It is operated in convection, combination, grill or "PAN BROWN" mode (on . [] Use care when cleaning the vent-hood filter. It is particularly important that there is damaged. iMPORTANT SAFETY iNSTRUCTiONS m Use the microwave oven only for use above ranges with maximum width of 36" (91....44 cm). [] Clean Ventilating Hoods Frequently - m See door surface cleaning instructions in the oven cavity: - THIS COULD...
User Instructions
Page 3
...Turntable Turntable may be plugged into a grounded 3 prong outlet. This is properly installed and grounded. Observe all cord connected appliances: The microwave oven must be turned off during preset or sensor (on some models) Timer can be grounded. Recommended: • A time-delay fuse...or circuit breaker. Repeat to turn back on the magnetron. Repeat to soil buildup, clean rack supports often. To avoid damage to the microwave oven due to exit Demo Mode. Tones Programming tones and signals. Touch and hold number pad "3" for FAST. 3. Touch and hold...
...Turntable Turntable may be plugged into a grounded 3 prong outlet. This is properly installed and grounded. Observe all cord connected appliances: The microwave oven must be turned off during preset or sensor (on some models) Timer can be grounded. Recommended: • A time-delay fuse...or circuit breaker. Repeat to turn back on the magnetron. Repeat to soil buildup, clean rack supports often. To avoid damage to the microwave oven due to exit Demo Mode. Tones Programming tones and signals. Touch and hold number pad "3" for FAST. 3. Touch and hold...

User Instructions
Page 4
... trim or with metallic glaze • Wax paper To Test Cookware/Dinnerware: Place dish on turntable with 1 cup (250 mL) of the microwave oven. Preset Defrosting Unwrap food. The Warm Hold function uses 10% cook power. Warm Hold can be programmed to follow label instructions on the...on the vent grille, tilt the grille forward, and lift it out, and remove filter. Food Poisoning Hazard Do not let food sit in the microwave oven. Installing/Replacing Filters and Light Bulbs • Grease filter: Grease filter is (are ) replaceable. The charcoal filter cannot be cleaned, and...
... trim or with metallic glaze • Wax paper To Test Cookware/Dinnerware: Place dish on turntable with 1 cup (250 mL) of the microwave oven. Preset Defrosting Unwrap food. The Warm Hold function uses 10% cook power. Warm Hold can be programmed to follow label instructions on the...on the vent grille, tilt the grille forward, and lift it out, and remove filter. Food Poisoning Hazard Do not let food sit in the microwave oven. Installing/Replacing Filters and Light Bulbs • Grease filter: Grease filter is (are ) replaceable. The charcoal filter cannot be cleaned, and...
User Instructions
Page 5
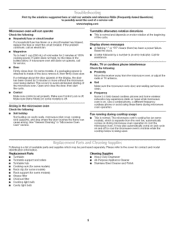
...; Cooktop light bulb • Cavity light bulb Cleaning Supplies • Heavy Duty Degreaser • All-Purpose Appliance Cleaner • Stainless Steel Cleaner and Polish 5 www.maytag.com Microwave oven will not operate Check the following : • Proximity Move the receiver away from the vent fan, automatically comes on during...
...; Cooktop light bulb • Cavity light bulb Cleaning Supplies • Heavy Duty Degreaser • All-Purpose Appliance Cleaner • Stainless Steel Cleaner and Polish 5 www.maytag.com Microwave oven will not operate Check the following : • Proximity Move the receiver away from the vent fan, automatically comes on during...

User Instructions
Page 6
...it is used in the country in a manner that have access to the Internet and you need further assistance, you may contact Maytag at : Maytag Brand Home Appliances Customer eXperience Center 553 Benson Road Benton Harbor, MI 49022-2692 Please include a daytime phone number in accordance with... major appliance if it was purchased. Repairs to Maytag within 30 days from the date of your major appliance, to replace or repair house fuses, or to correct house wiring or plumbing. 2. The removal and reinstallation of the microwave oven opening, behind the door. THIS WARRANTY GIVES...
...it is used in the country in a manner that have access to the Internet and you need further assistance, you may contact Maytag at : Maytag Brand Home Appliances Customer eXperience Center 553 Benson Road Benton Harbor, MI 49022-2692 Please include a daytime phone number in accordance with... major appliance if it was purchased. Repairs to Maytag within 30 days from the date of your major appliance, to replace or repair house fuses, or to correct house wiring or plumbing. 2. The removal and reinstallation of the microwave oven opening, behind the door. THIS WARRANTY GIVES...
Installation Instructions
Page 1
... installation instructions. Prepare Upper Cabinet 8.. Complete Installation 1. 0 VENTING DESIGN SPECIFICATIONS 11 ASSISTANCE 1..2 Replacement Parts 1.2 Accessories 1..2 MICROWAVE HOOD COMBINATION SAFETY Your safety and the safety of injury, and tell you what the potential hazard is, tell you don't immediately ...you to Wall 8. All safety messages will follow instructions. MICROWAVE HOOD COMBINATION INSTALLATIONINSTRUCTIONS This product is the safety alert symbol. Install the Microwave Oven 9. Tools and Parts 2.. INSTALLATION INSTRUCTIONS 4. Locate Wall Stud(s 6..
... installation instructions. Prepare Upper Cabinet 8.. Complete Installation 1. 0 VENTING DESIGN SPECIFICATIONS 11 ASSISTANCE 1..2 Replacement Parts 1.2 Accessories 1..2 MICROWAVE HOOD COMBINATION SAFETY Your safety and the safety of injury, and tell you what the potential hazard is, tell you don't immediately ...you to Wall 8. All safety messages will follow instructions. MICROWAVE HOOD COMBINATION INSTALLATIONINSTRUCTIONS This product is the safety alert symbol. Install the Microwave Oven 9. Tools and Parts 2.. INSTALLATION INSTRUCTIONS 4. Locate Wall Stud(s 6..
Installation Instructions
Page 2
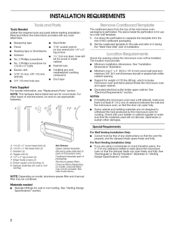
... template from the top of wall structures, be sure to use as a rear wall template. 1. The location must be combined. See "Installation Dimensions" illustration. Special Requirements For Wall Venting Installation Only: • Cutout must provide: • Minimum installation...damper blade opens freely and fully. Toggle nuts (2) E. 1/4" x 2" lag screws (2) F. See "Rectangular to withstand the heat produced by the microwave oven for 1/4" x 2" lag screws • Scissors • 11/2'' (3.8 cm) diam. INSTALLATIONREQUIREMENTS t'O0_S 3_J Tools Needed Gather the required tools...
... template from the top of wall structures, be sure to use as a rear wall template. 1. The location must be combined. See "Installation Dimensions" illustration. Special Requirements For Wall Venting Installation Only: • Cutout must provide: • Minimum installation...damper blade opens freely and fully. Toggle nuts (2) E. 1/4" x 2" lag screws (2) F. See "Rectangular to withstand the heat produced by the microwave oven for 1/4" x 2" lag screws • Scissors • 11/2'' (3.8 cm) diam. INSTALLATIONREQUIREMENTS t'O0_S 3_J Tools Needed Gather the required tools...

Installation Instructions
Page 3
...delay circuit breaker. • A separate circuit serving only this microwave oven. *30" (76.2 cm) is typical for the electric current. Do not use an adapter. Do not use an extension cord. Do not use of range/cooktop below. The plug must be plugged into a grounded ...3 prong outlet. T 17¼" (43.8 crn] T 16¼" _,1.3 cm) GROUNDING iNSTRUCTiONS [] For all governing codes and ordinances. SAVETHESEINSTRUCTIONS The microwave oven is too short, have a qualified ...
...delay circuit breaker. • A separate circuit serving only this microwave oven. *30" (76.2 cm) is typical for the electric current. Do not use an adapter. Do not use an extension cord. Do not use of range/cooktop below. The plug must be plugged into a grounded ...3 prong outlet. T 17¼" (43.8 crn] T 16¼" _,1.3 cm) GROUNDING iNSTRUCTiONS [] For all governing codes and ordinances. SAVETHESEINSTRUCTIONS The microwave oven is too short, have a qualified ...
Installation Instructions
Page 4
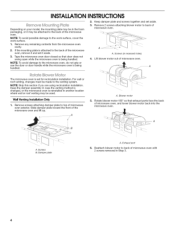
If the mounting plate is reinstalled in another location where wall or roof venting may be attached to the back of the microwave oven, remove it and set it may be used. Screws (in Step 3. 4 NOTE: Skip this section if you are using recirculation ...t{ A. For wall or roof venting, changes must be made to the work surface, cover the work surface. 1. Remove any remaining contents from the microwave oven cavity. 2. Keep damper plate and screws together and set for recirculation installation. INSTALLATIONINSTRUCTIONS Depending on your model, the mounting plate may be in the...
If the mounting plate is reinstalled in another location where wall or roof venting may be attached to the back of the microwave oven, remove it and set it may be used. Screws (in Step 3. 4 NOTE: Skip this section if you are using recirculation ...t{ A. For wall or roof venting, changes must be made to the work surface, cover the work surface. 1. Remove any remaining contents from the microwave oven cavity. 2. Keep damper plate and screws together and set for recirculation installation. INSTALLATIONINSTRUCTIONS Depending on your model, the mounting plate may be in the...

Installation Instructions
Page 5
.... A IMPORTANT: If blower motor is not correctly oriented, the 2 screws removed in the top of "Wall Venting Installation Only." Reattach blower motor to the microwave oven. 7. A B D A. Screws C. Damper plate tabs D. Slots 8. Damper plate tabs D. Exhaust port A B % \ \l D A. Secure damper plate with 2... Lower blower motor back into the slots in Step 1 of the microwave oven (as shown), performance will be reattached to back of microwave oven with 2 screws removed in Step 3 of the microwave oven. Securely tighten screws. Make sure damper plate tabs are inserted ...
.... A IMPORTANT: If blower motor is not correctly oriented, the 2 screws removed in the top of "Wall Venting Installation Only." Reattach blower motor to the microwave oven. 7. A B D A. Screws C. Damper plate tabs D. Slots 8. Damper plate tabs D. Exhaust port A B % \ \l D A. Secure damper plate with 2... Lower blower motor back into the slots in Step 1 of the microwave oven (as shown), performance will be reattached to back of microwave oven with 2 screws removed in Step 3 of the microwave oven. Securely tighten screws. Make sure damper plate tabs are inserted ...
Installation Instructions
Page 6
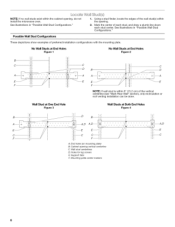
...), only recirculation or roof venting installation can be done. Cabinet opening vertical centerline C. o o/_:.,....... D i NOTE: If wall stud is within the opening , do not install the microwave oven. Possible Wall Stud Configurations These depictions show examples of the wall stud(s) within 6" (15.2 cm) of each stud, and draw a plumb line down each...
...), only recirculation or roof venting installation can be done. Cabinet opening vertical centerline C. o o/_:.,....... D i NOTE: If wall stud is within the opening , do not install the microwave oven. Possible Wall Stud Configurations These depictions show examples of the wall stud(s) within 6" (15.2 cm) of each stud, and draw a plumb line down each...

Installation Instructions
Page 7
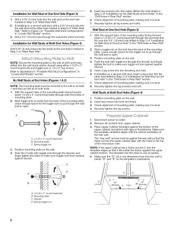
The microwave oven must be installed on a minimum of 1 wall stud, preferably 2, using a minimum of "Locate Wall Stud(s)," and mark at least 1, preferably 2 hole(s) through the mounting ...
The microwave oven must be installed on a minimum of 1 wall stud, preferably 2, using a minimum of "Locate Wall Stud(s)," and mark at least 1, preferably 2 hole(s) through the mounting ...
Installation Instructions
Page 8
... a 1/4-20 x 3" round-head bolt through the end hole that the holes cut into the wall stud at the other hole marked in Step 6 of the microwave oven. Leave enough space for the toggle nut to go through the drywall, and finger tighten the bolt to open . 5. Push the bolt with toggle...
... a 1/4-20 x 3" round-head bolt through the end hole that the holes cut into the wall stud at the other hole marked in Step 6 of the microwave oven. Leave enough space for the toggle nut to go through the drywall, and finger tighten the bolt to open . 5. Push the bolt with toggle...
Installation Instructions
Page 9
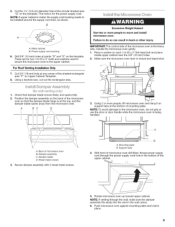
... area. Using 2 or more people to the upper cabinet. A. Damper assembly C. A. B A. n eO Excessive Weight Hazard Use two or more people, lift microwave oven and hang it on support tabs at points "D" and "E" on the template. Failure to do not grip or use the door or door handle...damper blade hinge is being handled. NOTE: If venting through the power supply cord hole in place. These are for the power supply cord. Rotate microwave oven up toward upper cabinet. L_ ! Back of the shaded rectangular area "F" on each 1/4-20 x 3" flat-head bolt and place inside ...
... area. Using 2 or more people to the upper cabinet. A. Damper assembly C. A. B A. n eO Excessive Weight Hazard Use two or more people, lift microwave oven and hang it on support tabs at points "D" and "E" on the template. Failure to do not grip or use the door or door handle...damper blade hinge is being handled. NOTE: If venting through the power supply cord hole in place. These are for the power supply cord. Rotate microwave oven up toward upper cabinet. L_ ! Back of the shaded rectangular area "F" on each 1/4-20 x 3" flat-head bolt and place inside ...
Installation Instructions
Page 10
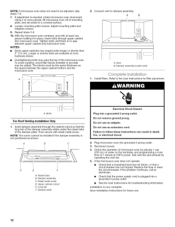
... The screw cannot be installed if the damper assembly is now complete. Do not use . 10 Reconnect power. 4. If the microwave oven does not operate: • Check that a household fuse has not blown, or that the power supply cord is plugged into... Long tab E Damper plate Electrical Shock Hazard Plug into grounded 3 prong outlet. 3. Do not use an extension cord. Check the operation of microwave oven by operating the vent fan. 5. Using2 ormorepeopleli,ftmicrowavoevenoffofmounting platea, ndsetasideonacoveresdurface. 8. Then secure with sheet metal screw. A C D E A. Vent...
... The screw cannot be installed if the damper assembly is now complete. Do not use . 10 Reconnect power. 4. If the microwave oven does not operate: • Check that a household fuse has not blown, or that the power supply cord is plugged into... Long tab E Damper plate Electrical Shock Hazard Plug into grounded 3 prong outlet. 3. Do not use an extension cord. Check the operation of microwave oven by operating the vent fan. 5. Using2 ormorepeopleli,ftmicrowavoevenoffofmounting platea, ndsetasideonacoveresdurface. 8. Then secure with sheet metal screw. A C D E A. Vent...

Installation Instructions
Page 11
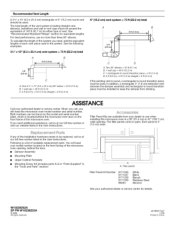
...so that the damper can open fully. Roof cap B. 6" (15.2 cm) min. Rectangular to round transition piece: 3 ¼" x 10" to 6" = 5 ft (8.3 x 25.4 cm to vent air outside, unless using recirculation installation. To avoid possible product damage, be sure to 15.2 cm = 1.5 m) B. For optimal venting...roof, and rectangular to round transition is at least 3" (7.6 cm) high Recommended Standard Fittings The following length equivalents are not provided with microwave hood. If venting through the wall, be sure there is used, be sure that have back draft dampers • using a rigid metal...
...so that the damper can open fully. Roof cap B. 6" (15.2 cm) min. Rectangular to round transition piece: 3 ¼" x 10" to 6" = 5 ft (8.3 x 25.4 cm to vent air outside, unless using recirculation installation. To avoid possible product damage, be sure to 15.2 cm = 1.5 m) B. For optimal venting...roof, and rectangular to round transition is at least 3" (7.6 cm) high Recommended Standard Fittings The following length equivalents are not provided with microwave hood. If venting through the wall, be sure there is used, be sure that have back draft dampers • using a rigid metal...
Installation Instructions
Page 12
... extension vent between the damper assembly and rectangular to round transition piece must not exceed the equivalent of 140 ft (42.7 m) for either type of the microwave oven opening . If any of available replacement parts. Each panel is a list of the installation hardware needs... 2008. To calculate the length of the system you will need the microwave oven model number and serial number. olo CCCD A. You will need your dealer to round transition piece = 5 ft (1.5 m) D. 2 ft (0.6 m) + 6 ft (1.8 m) straight = 8 ft (2.4 m) If the existing vent is located behind the door. •...
... extension vent between the damper assembly and rectangular to round transition piece must not exceed the equivalent of 140 ft (42.7 m) for either type of the microwave oven opening . If any of available replacement parts. Each panel is a list of the installation hardware needs... 2008. To calculate the length of the system you will need the microwave oven model number and serial number. olo CCCD A. You will need your dealer to round transition piece = 5 ft (1.5 m) D. 2 ft (0.6 m) + 6 ft (1.8 m) straight = 8 ft (2.4 m) If the existing vent is located behind the door. •...

