Owners Manual
Page 2
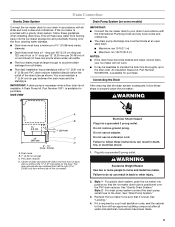
...; Do not use an adapter. ■ Do not use an extension cord. ■ Disconnect power before cleaning. ■ Disconnect power before servicing. ■ Replace all parts and panels before operating. ■ Use two or more people to move and install ice maker. Removing Packaging Materials Remove tape and glue from your...
...; Do not use an adapter. ■ Do not use an extension cord. ■ Disconnect power before cleaning. ■ Disconnect power before servicing. ■ Replace all parts and panels before operating. ■ Use two or more people to move and install ice maker. Removing Packaging Materials Remove tape and glue from your...
Owners Manual
Page 3
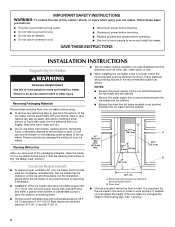
... undercounter installations. Using an adjustable wrench, change the height of the ice maker. Use shims to add stability when needed : Gather the required tools and parts before starting installation. ■ 9" level ■ Adjustable wrench NOTE: It is important to make several adjustments to the ice maker for the ice maker to...
... undercounter installations. Using an adjustable wrench, change the height of the ice maker. Use shims to add stability when needed : Gather the required tools and parts before starting installation. ■ 9" level ■ Adjustable wrench NOTE: It is important to make several adjustments to the ice maker for the ice maker to...
Owners Manual
Page 4
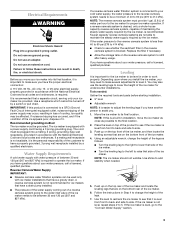
...the short, black plastic tube from the wall for service. Now you have the proper length needed REAR VIEW Gather the required tools and parts before starting installation: ■ Flat-blade screwdriver and ¹⁄₂" open-end wrenches or two adjustable wrenches A nut driver B.... 4 Nut 3. Copper tubing AB C D A. Tighten any local codes and ordinances. ■ Use copper tubing or Whirlpool supply line, Part Number 8212547RP, and check for leaks. Connect Water Supply Read all directions before making the final connection to the inlet of the water valve to...
...the short, black plastic tube from the wall for service. Now you have the proper length needed REAR VIEW Gather the required tools and parts before starting installation: ■ Flat-blade screwdriver and ¹⁄₂" open-end wrenches or two adjustable wrenches A nut driver B.... 4 Nut 3. Copper tubing AB C D A. Tighten any local codes and ordinances. ■ Use copper tubing or Whirlpool supply line, Part Number 8212547RP, and check for leaks. Connect Water Supply Read all directions before making the final connection to the inlet of the water valve to...
Owners Manual
Page 5
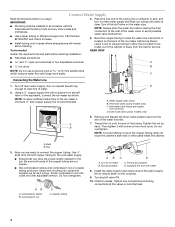
This will help keep water from flowing back into position so that it is level. A Drain Pump kit, Part Number 1901, is positioned over the PVC drain reducer. Connecting the Drain After ensuring that the drain system is provided with an approved caulking compound ... required by your ice maker will not work. ■ It may be 23" (58.4 cm) from front of the ice maker). An Insulation Sleeve kit, Part Number W10365792, is not available. Do not use an adapter. See "Gravity Drain System." See "Drain Pump System." 3. The drain should be desirable to insulate...
This will help keep water from flowing back into position so that it is level. A Drain Pump kit, Part Number 1901, is positioned over the PVC drain reducer. Connecting the Drain After ensuring that the drain system is provided with an approved caulking compound ... required by your ice maker will not work. ■ It may be 23" (58.4 cm) from front of the ice maker). An Insulation Sleeve kit, Part Number W10365792, is not available. Do not use an adapter. See "Gravity Drain System." See "Drain Pump System." 3. The drain should be desirable to insulate...
Owners Manual
Page 6
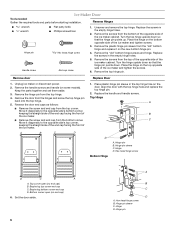
Ice Maker Door Tools needed: Gather the required tools and parts before starting installation. Unscrew and remove the top hinge. Place the hinge on the bottom opposite side of the ice maker cabinet. Remove the plastic ... putty knife ■ Phillips screwdriver 1. Place the hinge on the door. Remove the handle screws and handle (on the new bottom hinge pin. 4. Keep the parts together and set them aside. 3. Replace the handle and handle screws. Top corner open (no end cap) B. Beginning bottom corner end cap D. Bottom corner open...
Ice Maker Door Tools needed: Gather the required tools and parts before starting installation. Unscrew and remove the top hinge. Place the hinge on the bottom opposite side of the ice maker cabinet. Remove the plastic ... putty knife ■ Phillips screwdriver 1. Place the hinge on the door. Remove the handle screws and handle (on the new bottom hinge pin. 4. Keep the parts together and set them aside. 3. Replace the handle and handle screws. Top corner open (no end cap) B. Beginning bottom corner end cap D. Bottom corner open...

Owners Manual
Page 8
... operation, select OFF. NOTES: ■ Pressing the ON/OFF switch does not shut off and back on again, call 1-800-442-9991 and ask for Part Number 4396808. Wipe and dry. Ice Maker System Minerals that higher operating temperatures result in the water system. Use one 16 oz (473 mL) bottle...
... operation, select OFF. NOTES: ■ Pressing the ON/OFF switch does not shut off and back on again, call 1-800-442-9991 and ask for Part Number 4396808. Wipe and dry. Ice Maker System Minerals that higher operating temperatures result in the water system. Use one 16 oz (473 mL) bottle...
Owners Manual
Page 9
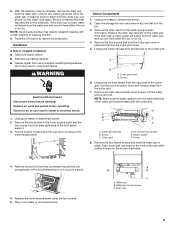
... spacer from the water pan, and you will empty from the water pan. Screw C. Screw 8. A B B C A. WARNING Electrical Shock Hazard Disconnect power before operating. Replace all parts and panels before cleaning. Unplug ice maker or disconnect power. 2. Open the storage bin door and remove any cleaning solution left in ice maker or...
... spacer from the water pan, and you will empty from the water pan. Screw C. Screw 8. A B B C A. WARNING Electrical Shock Hazard Disconnect power before operating. Replace all parts and panels before cleaning. Unplug ice maker or disconnect power. 2. Open the storage bin door and remove any cleaning solution left in ice maker or...
Owners Manual
Page 10
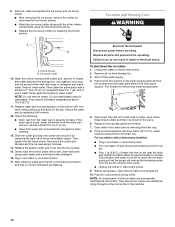
...Wash the interior components (cutter grid, exterior of household bleach in clean water. Rinse in 1 gal. (3.8 L) warm water. Then clean the same parts with the other interior components using the following : ■ Drain cap from the ice bin and the drain pump. ■ Unplug ice maker or...the room temperature will allow the water in ice maker or reconnect power. ■ Turn ice maker off the water supply. 4. Remove all parts and panels before servicing. 9. They cannot withstand temperatures above 145°F (63°C). 11. Disconnect the inlet and outlet lines to drain into...
...Wash the interior components (cutter grid, exterior of household bleach in clean water. Rinse in 1 gal. (3.8 L) warm water. Then clean the same parts with the other interior components using the following : ■ Drain cap from the ice bin and the drain pump. ■ Unplug ice maker or...the room temperature will allow the water in ice maker or reconnect power. ■ Turn ice maker off the water supply. 4. Remove all parts and panels before servicing. 9. They cannot withstand temperatures above 145°F (63°C). 11. Disconnect the inlet and outlet lines to drain into...
Owners Manual
Page 12
... ice in back or other injury. ■ Is the drain hose aligned over the drain? Make sure that all the packaging materials removed? Replace all parts and panels before servicing. Call a licensed, qualified plumber. 12 If there is loose, water will normally reduce ice production. Ice maker runs but produces very...
... ice in back or other injury. ■ Is the drain hose aligned over the drain? Make sure that all the packaging materials removed? Replace all parts and panels before servicing. Call a licensed, qualified plumber. 12 If there is loose, water will normally reduce ice production. Ice maker runs but produces very...

Owners Manual
Page 13
..., alteration, misuse, abuse, fire, flood, acts of God, improper installation, installation not in accordance with the product, Maytag brand of your major appliance, to parts or systems resulting from your model number and serial number on the label, located on how to correct house wiring or ...major appliance is located in -home service is covered by an authorized Maytag servicer is used for factory specified parts and repair labor to correct defects in the U.S.A., visit www.maytag.com In Canada, visit www.maytag.ca If you can find your major appliance. This warranty is ...
..., alteration, misuse, abuse, fire, flood, acts of God, improper installation, installation not in accordance with the product, Maytag brand of your major appliance, to parts or systems resulting from your model number and serial number on the label, located on how to correct house wiring or ...major appliance is located in -home service is covered by an authorized Maytag servicer is used for factory specified parts and repair labor to correct defects in the U.S.A., visit www.maytag.com In Canada, visit www.maytag.ca If you can find your major appliance. This warranty is ...
Warranty Information
Page 1
...appliance is operated and maintained according to instructions attached to or furnished with the product, Maytag brand of Whirlpool Corporation or Whirlpool Canada LP (hereafter "Maytag") will pay for factory specified parts and repair labor to correct defects in -home service is covered by this warranty. ... BY LAW. Please keep this limited warranty does not apply. Proof of consumables or cleaning products not approved by Maytag. 5. Consumable parts are excluded from unauthorized modifications made to be provided by the customer. If outside the 50 United States and Canada, ...
...appliance is operated and maintained according to instructions attached to or furnished with the product, Maytag brand of Whirlpool Corporation or Whirlpool Canada LP (hereafter "Maytag") will pay for factory specified parts and repair labor to correct defects in -home service is covered by this warranty. ... BY LAW. Please keep this limited warranty does not apply. Proof of consumables or cleaning products not approved by Maytag. 5. Consumable parts are excluded from unauthorized modifications made to be provided by the customer. If outside the 50 United States and Canada, ...


