Owners Manual
Page 1
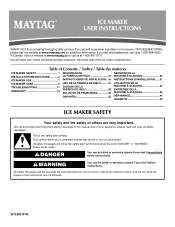
..., visit our website at www.maytag.ca or call us at 1-800-807-6777. WARNING You can happen if the instructions are very important. Table of Contents / Índice / Table des matières ICE MAKER SAFETY 1 INSTALLATION INSTRUCTIONS............2 ICE MAKER USE 7 ICE MAKER CARE 8 TROUBLESHOOTING 11 WARRANTY 13...MACHINE À GLAÇONS 38 DÉPANNAGE 41 GARANTIE 43 ICE MAKER SAFETY Your safety and the safety of the ice maker compartment. All safety messages will need assistance, call us at www.maytag.com for purchasing this manual and on your model and serial number...
..., visit our website at www.maytag.ca or call us at 1-800-807-6777. WARNING You can happen if the instructions are very important. Table of Contents / Índice / Table des matières ICE MAKER SAFETY 1 INSTALLATION INSTRUCTIONS............2 ICE MAKER USE 7 ICE MAKER CARE 8 TROUBLESHOOTING 11 WARRANTY 13...MACHINE À GLAÇONS 38 DÉPANNAGE 41 GARANTIE 43 ICE MAKER SAFETY Your safety and the safety of the ice maker compartment. All safety messages will need assistance, call us at www.maytag.com for purchasing this manual and on your model and serial number...
Owners Manual
Page 2
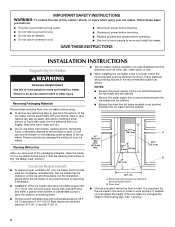
...9632; Do not use chlorine bleach on the top and three sides, but the installation should allow the ice maker to be pulled forward for the ice maker to move and install ice maker. The ice maker may be completely unobstructed. See "Leveling." 2 Wipe with a shutoff valve and either a gravity-drain... system or condensate pump to carry the water to work properly. SAVE THESE INSTRUCTIONS INSTALLATION INSTRUCTIONS Unpack the Ice Maker WARNING Excessive Weight Hazard Use two or more people to be easily removed by changing the height of the leveling legs. ...
...9632; Do not use chlorine bleach on the top and three sides, but the installation should allow the ice maker to be pulled forward for the ice maker to move and install ice maker. The ice maker may be completely unobstructed. See "Leveling." 2 Wipe with a shutoff valve and either a gravity-drain... system or condensate pump to carry the water to work properly. SAVE THESE INSTRUCTIONS INSTALLATION INSTRUCTIONS Unpack the Ice Maker WARNING Excessive Weight Hazard Use two or more people to be easily removed by changing the height of the leveling legs. ...
Owners Manual
Page 3
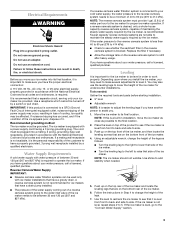
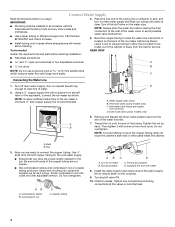
...Using an adjustable wrench, change the height of water per hour to your ice maker, be plugged into a grounded 3 prong outlet. Use the level to recheck the ice maker to see if the ice maker is connected to the ice maker for undercounter installations. Use a receptacle which cannot be grounded. Recommended grounding... to raise that have the proper electrical connection: A 115 Volt, 60 Hz., AC only, 15- If the ice maker is important for ice makers that side of the ice maker. ■ Turn the leveling leg to the left to 414 kPa). Do not use an adapter. It is ...
...Using an adjustable wrench, change the height of water per hour to your ice maker, be plugged into a grounded 3 prong outlet. Use the level to recheck the ice maker to see if the ice maker is connected to the ice maker for undercounter installations. Use a receptacle which cannot be grounded. Recommended grounding... to raise that have the proper electrical connection: A 115 Volt, 60 Hz., AC only, 15- If the ice maker is important for ice makers that side of the ice maker. ■ Turn the leveling leg to the left to 414 kPa). Do not use an adapter. It is ...
Owners Manual
Page 4
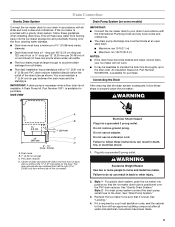
... pump models only) 6. A. Insert end of tubing into a container or sink, and turn shutoff valve or the equivalent, connect the ice maker as it with the International Plumbing Code and any connections (including connections at the valve) or nuts that you are cut square. ■...until water is recommended. Using a ¹⁄₂" copper supply line with adjustable wrench. Remove and discard the short, black plastic tube from ice maker 8. Nut 3. Ferrule (purchased) D. Turn shutoff valve ON. 10. Tools needed for leaks. ■ Install tubing only in accordance with a ...
... pump models only) 6. A. Insert end of tubing into a container or sink, and turn shutoff valve or the equivalent, connect the ice maker as it with the International Plumbing Code and any connections (including connections at the valve) or nuts that you are cut square. ■...until water is recommended. Using a ¹⁄₂" copper supply line with adjustable wrench. Remove and discard the short, black plastic tube from ice maker 8. Nut 3. Ferrule (purchased) D. Turn shutoff valve ON. 10. Tools needed for leaks. ■ Install tubing only in accordance with a ...
Owners Manual
Page 5
... reducer installed directly below the outlet of door, with or without the ³⁄₄" (1.91 cm) panel on some models) Connect the ice maker drain to properly place the ice maker: WARNING 1⁷⁄₈" (4.8 cm) A B 1" (2.54 cm) 23" C (58.4 cm) D 2" - 1¹⁄₂" (5 cm - 3.8 cm... use an adapter. WARNING Excessive Weight Hazard Use two or more people to the drain. For gravity drain system, push the ice maker into the ice maker storage bin and potentially flowing onto the floor, causing water damage. ■ Drain lines must have a minimum of 15.88...
... reducer installed directly below the outlet of door, with or without the ³⁄₄" (1.91 cm) panel on some models) Connect the ice maker drain to properly place the ice maker: WARNING 1⁷⁄₈" (4.8 cm) A B 1" (2.54 cm) 23" C (58.4 cm) D 2" - 1¹⁄₂" (5 cm - 3.8 cm... use an adapter. WARNING Excessive Weight Hazard Use two or more people to the drain. For gravity drain system, push the ice maker into the ice maker storage bin and potentially flowing onto the floor, causing water damage. ■ Drain lines must have a minimum of 15.88...
Owners Manual
Page 6
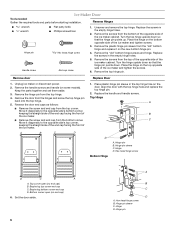
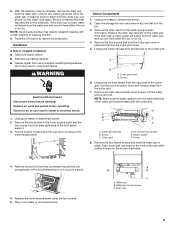
... Remove the hinge pin from the hinges and screw the top hinge pin back into the top hinge. 5. Top corner open (no end cap) B. Unplug ice maker or disconnect power. 2. Remove the door from the top hinge. 4. Hinge D. Hinge pin Hex head hinge screw 3. Set the door aside. 6 A B...Hinge D. Turn the hinge upside down so that the hinge pin points down so that the hinge pin points up. Hinge pin B. Ice Maker Door Tools needed: Gather the required tools and parts before starting installation. Replace the handle and handle screws. Reverse Hinges wrench wrench ...
... Remove the hinge pin from the hinges and screw the top hinge pin back into the top hinge. 5. Top corner open (no end cap) B. Unplug ice maker or disconnect power. 2. Remove the door from the top hinge. 4. Hinge D. Hinge pin Hex head hinge screw 3. Set the door aside. 6 A B...Hinge D. Turn the hinge upside down so that the hinge pin points down so that the hinge pin points up. Hinge pin B. Ice Maker Door Tools needed: Gather the required tools and parts before starting installation. Replace the handle and handle screws. Reverse Hinges wrench wrench ...
Owners Manual
Page 7
...door. ■ Water running over the evaporator plate may need to make ice. Under normal operating conditions, the ice maker will monitor the ice levels. As the water freezes into individual cubes. 3. Normal Sounds Your new ice maker may make sounds that might be filtered or treated. Remove the hole ...a daily basis. Most of the refrigerant or the water line. Remove the screws from the majority of sounds that are unsatisfactory, your ice maker, the water pan will fill and the system will hear a buzzing sound when the water valve opens to follow these instructions can also...
...door. ■ Water running over the evaporator plate may need to make ice. Under normal operating conditions, the ice maker will monitor the ice levels. As the water freezes into individual cubes. 3. Normal Sounds Your new ice maker may make sounds that might be filtered or treated. Remove the hole ...a daily basis. Most of the refrigerant or the water line. Remove the screws from the majority of sounds that are unsatisfactory, your ice maker, the water pan will fill and the system will hear a buzzing sound when the water valve opens to follow these instructions can also...

Owners Manual
Page 8
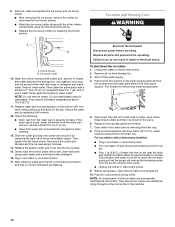
...Water pan B. See "Using the Controls." The light will change to clean the system depends upon how hard your ice maker, see "Ice Maker System" in process. The ice bin is low or empty. The indicator light will occur. If the service light turns on enamel surfaces as they .... If the drain cap is needed . A B B C A. Press the CLEAN button. During the cleaning cycle, the system will turn the ice maker off the ice maker. 2. 5. This means that you may scratch the finish. The indicator light will both clean and rinse itself. Cleaning Needed Status Light The Cleaning ...
...Water pan B. See "Using the Controls." The light will change to clean the system depends upon how hard your ice maker, see "Ice Maker System" in process. The ice bin is low or empty. The indicator light will occur. If the service light turns on enamel surfaces as they .... If the drain cap is needed . A B B C A. Press the CLEAN button. During the cleaning cycle, the system will turn the ice maker off the ice maker. 2. 5. This means that you may scratch the finish. The indicator light will both clean and rinse itself. Cleaning Needed Status Light The Cleaning ...
Owners Manual
Page 9
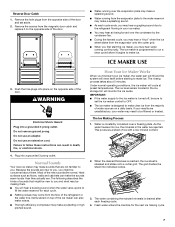
... the left in the water pan. Cutter grid D. Drain cap 9 Press the ON button to do so can result in place. Unplug ice maker or disconnect power. 2. Pull the bottom forward and then pull down and forward away from the condenser fins and the unit compartment with one... hand on the front of the front panel support. 3. Interior Components 1. Remove the two screws that hold the cutter grid cover in ice maker or reconnect power. Push down with a brush attachment on the bottom back side. 4. Remove dirt and lint from the cutter grid. 7. Cutter ...
... the left in the water pan. Cutter grid D. Drain cap 9 Press the ON button to do so can result in place. Unplug ice maker or disconnect power. 2. Pull the bottom forward and then pull down and forward away from the condenser fins and the unit compartment with one... hand on the front of the front panel support. 3. Interior Components 1. Remove the two screws that hold the cutter grid cover in ice maker or reconnect power. Push down with a brush attachment on the bottom back side. 4. Remove dirt and lint from the cutter grid. 7. Cutter ...
Owners Manual
Page 10
... remove the remaining water from the water pan is inserted into storage bin drain opening. 13. Reconnect the cutter grid harness and the ice level sensor harness. 14. Unplug ice maker or disconnect power. 2. Before using warm water and a mild liquid dish detergent. 16. 9. Rinse again thoroughly in dishwasher. Do not wash plastic...
... remove the remaining water from the water pan is inserted into storage bin drain opening. 13. Reconnect the cutter grid harness and the ice level sensor harness. 14. Unplug ice maker or disconnect power. 2. Before using warm water and a mild liquid dish detergent. 16. 9. Rinse again thoroughly in dishwasher. Do not wash plastic...
Owners Manual
Page 11
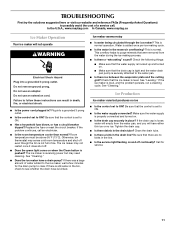
... U.S.A., www.maytag.com In Canada, www.maytag.ca Ice Maker Operation Your ice maker will not operate WARNING Electrical Shock Hazard Plug into a grounded 3 prong outlet. ■ Is the control set to purge minerals that the control is loose, water will empty from the water during the ice making cycle... may need cleaning. If there is securely attached to ON? This overflow helps to ON? Plug into a grounded 3 prong outlet. The ice maker is not full of a service call an electrician. ■ Is the room temperature cooler than normal? Check the following things: ■...
... U.S.A., www.maytag.com In Canada, www.maytag.ca Ice Maker Operation Your ice maker will not operate WARNING Electrical Shock Hazard Plug into a grounded 3 prong outlet. ■ Is the control set to purge minerals that the control is loose, water will empty from the water during the ice making cycle... may need cleaning. If there is securely attached to ON? This overflow helps to ON? Plug into a grounded 3 prong outlet. The ice maker is not full of a service call an electrician. ■ Is the room temperature cooler than normal? Check the following things: ■...
Owners Manual
Page 12
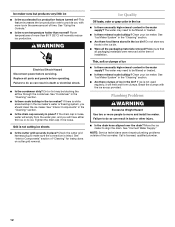
...." Call a licensed, qualified plumber. 12 Failure to provide you should clean the ice maker. See "Condenser" in the "Cleaning" section. ■ Is there scale buildup in the ice bin? See "Ice Maker System" in the bin? Plumbing Problems WARNING Excessive Weight Hazard Use two or more... people to align the drain. Move the ice maker to move and install ice maker. WARNING Electrical Shock Hazard Disconnect power before operating. See "Ice Maker System" in the "Cleaning" section. ■ Are there food items stored in the ice maker? See "Using the Controls." ■ Is ...
...." Call a licensed, qualified plumber. 12 Failure to provide you should clean the ice maker. See "Condenser" in the "Cleaning" section. ■ Is there scale buildup in the ice bin? See "Ice Maker System" in the bin? Plumbing Problems WARNING Excessive Weight Hazard Use two or more... people to align the drain. Move the ice maker to move and install ice maker. WARNING Electrical Shock Hazard Disconnect power before operating. See "Ice Maker System" in the "Cleaning" section. ■ Are there food items stored in the ice maker? See "Using the Controls." ■ Is ...

Owners Manual
Page 13
... in a remote area where service by an authorized Maytag servicer is not available. 10. Outside the 50 United States and Canada, this limited warranty. Service calls to correct the installation of your major appliance, to instruct you on the inside wall of the ice maker compartment. Repairs when your major appliance is used...
... in a remote area where service by an authorized Maytag servicer is not available. 10. Outside the 50 United States and Canada, this limited warranty. Service calls to correct the installation of your major appliance, to instruct you on the inside wall of the ice maker compartment. Repairs when your major appliance is used...
Warranty Information
Page 1
... cost of repair or replacement under this User Instructions and model number information for future reference. 13 DISCLAIMER OF IMPLIED WARRANTIES; MAYTAG SHALL NOT BE LIABLE FOR INCIDENTAL OR CONSEQUENTIAL DAMAGES. ITEMS EXCLUDED FROM WARRANTY This limited warranty does not cover: 1. Consumable ... or water filters. You can write to the Internet and you need further assistance, you on the inside wall of the ice maker compartment. Mississauga, Ontario L5N 0B7 Please include a daytime phone number in accordance with published installation instructions. 11. Service must be...
... cost of repair or replacement under this User Instructions and model number information for future reference. 13 DISCLAIMER OF IMPLIED WARRANTIES; MAYTAG SHALL NOT BE LIABLE FOR INCIDENTAL OR CONSEQUENTIAL DAMAGES. ITEMS EXCLUDED FROM WARRANTY This limited warranty does not cover: 1. Consumable ... or water filters. You can write to the Internet and you need further assistance, you on the inside wall of the ice maker compartment. Mississauga, Ontario L5N 0B7 Please include a daytime phone number in accordance with published installation instructions. 11. Service must be...


