

Use and Care Manual
Page 3
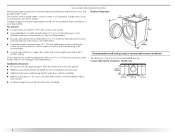
... symbol. These words mean: DANGER You can be killed or seriously injured if you don't immediately follow instructions. Always read and obey all safety messages. WASHER SAFETY Your safety and the safety of injury, and tell you what can kill or hurt you and others are not followed. 3
... symbol. These words mean: DANGER You can be killed or seriously injured if you don't immediately follow instructions. Always read and obey all safety messages. WASHER SAFETY Your safety and the safety of injury, and tell you what can kill or hurt you and others are not followed. 3

Use and Care Manual
Page 4
INSTALLATION REQUIREMENTS Tools and Parts Gather the required tools and parts before starting installation. The parts supplied are in the washer drum. Tools needed for connecting the drain hose „ Locking pliers (that open to 19/16" [39.5 mm]) Tools needed for connecting the water inlet hoses „ Pliers (that open to 19/16" [39.5 mm]) „ Flashlight (optional) 4
INSTALLATION REQUIREMENTS Tools and Parts Gather the required tools and parts before starting installation. The parts supplied are in the washer drum. Tools needed for connecting the drain hose „ Locking pliers (that open to 19/16" [39.5 mm]) Tools needed for connecting the water inlet hoses „ Pliers (that open to 19/16" [39.5 mm]) „ Flashlight (optional) 4

Use and Care Manual
Page 5
...on the cover or in several colors. additional drain hose Part Number 8318155; To order, call the dealer from whom you purchased your washer or refer to the "Assistance or Service" section. Ask for Part Number 8212640. 5 Transport bolt hole plug (4) E.Beaded strap F.Drain...gal. (76 L), 30" (762 mm) tall drain tub or utility sink and sump pump (available from whom you purchased your Maytag washer and dryer? C F G D E A. Inlet hose (2) C. Inlet hose washers (4) D. Pedestal Height Color Part Number 10" (254 mm) White MHP1000SQ 10" (254 mm) Black MHP1000SB 15.5" (394 mm)...
...on the cover or in several colors. additional drain hose Part Number 8318155; To order, call the dealer from whom you purchased your washer or refer to the "Assistance or Service" section. Ask for Part Number 8212640. 5 Transport bolt hole plug (4) E.Beaded strap F.Drain...gal. (76 L), 30" (762 mm) tall drain tub or utility sink and sump pump (available from whom you purchased your Maytag washer and dryer? C F G D E A. Inlet hose (2) C. Inlet hose washers (4) D. Pedestal Height Color Part Number 10" (254 mm) White MHP1000SQ 10" (254 mm) Black MHP1000SB 15.5" (394 mm)...
Use and Care Manual
Page 6
...System." Recommended installation spacing for your washer improves performance and minimizes noise and possible washer "walk." Location Requirements Selecting the proper location for custom undercounter installation Do not operate your washer in temperatures below 32°F (0°C). Installing the washer on all sides of 400 lbs..., and water pressure of 20-100 psi (137.9-689.6 kPa). „ A level floor with a total weight (water and load) of the washer is your responsibility. Washer only 39" min. (990 mm) 1" (25 mm) 27" (686 mm) 1" (25 mm) „ Companion appliance ...
...System." Recommended installation spacing for your washer improves performance and minimizes noise and possible washer "walk." Location Requirements Selecting the proper location for custom undercounter installation Do not operate your washer in temperatures below 32°F (0°C). Installing the washer on all sides of 400 lbs..., and water pressure of 20-100 psi (137.9-689.6 kPa). „ A level floor with a total weight (water and load) of the washer is your responsibility. Washer only 39" min. (990 mm) 1" (25 mm) 27" (686 mm) 1" (25 mm) „ Companion appliance ...
Use and Care Manual
Page 7
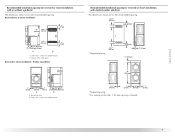
Recommended installation spacing for recessed or closet installation, with or without a pedestal The dimensions shown are for the recommended spacing. Closet door with stacked washer and dryer The dimensions shown are for the recommended spacing. 48 in.2 * (310 cm2) 3"* (76 mm) *Required spacing 24 in .2 * (...155 cm2) 1" 31½" 4" (25 mm) (800 mm) (102 mm) A B 3" (76 mm) A. Washer on pedestal 18" min. (457 mm) 1" (25 mm) 27" (686 mm) A 1" (25 mm) 1" 31½" 4" (25 mm)(800 mm)(102 mm) B A. Recessed area B....
Recommended installation spacing for recessed or closet installation, with or without a pedestal The dimensions shown are for the recommended spacing. Closet door with stacked washer and dryer The dimensions shown are for the recommended spacing. 48 in.2 * (310 cm2) 3"* (76 mm) *Required spacing 24 in .2 * (...155 cm2) 1" 31½" 4" (25 mm) (800 mm) (102 mm) A B 3" (76 mm) A. Washer on pedestal 18" min. (457 mm) 1" (25 mm) 27" (686 mm) A 1" (25 mm) 1" 31½" 4" (25 mm)(800 mm)(102 mm) B A. Recessed area B....

Use and Care Manual
Page 8
...prong. Select the drain hose installation method you need. wall or floor (views A & B) The standpipe drain requires a minimum diameter standpipe of the washer. 30" min. (762 mm) C D Electrical Requirements WARNING Electrical Shock Hazard Plug into a grounded 3 prong outlet. Do not use an adapter.... Standpipe drain system - or 20-amp, fused electrical supply is recommended. The top of the washer. Do not use an extension cord. Timedelay fuse or circuit breaker is required. Floor drain system (view D) The floor drain system ...
...prong. Select the drain hose installation method you need. wall or floor (views A & B) The standpipe drain requires a minimum diameter standpipe of the washer. 30" min. (762 mm) C D Electrical Requirements WARNING Electrical Shock Hazard Plug into a grounded 3 prong outlet. Do not use an adapter.... Standpipe drain system - or 20-amp, fused electrical supply is recommended. The top of the washer. Do not use an extension cord. Timedelay fuse or circuit breaker is required. Floor drain system (view D) The floor drain system ...
Use and Care Manual
Page 9
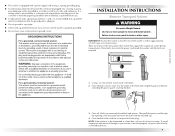
... „ Do not ground to your local service center. Once the bolt is to move it must be transported at a later date, call your washer, it to do so can result in accordance with a power supply cord having a 3 prong grounding plug. „ To minimize possible shock hazard... hole with the 4 transport bolt hole plugs. Then pull the power cord through the opening of the bolts. 2. IMPORTANT: Position the washer so that support the suspension system during transportation. INSTALLATION INSTRUCTIONS Remove Transport System WARNING Excessive Weight Hazard Use two or more people to be ...
... „ Do not ground to your local service center. Once the bolt is to move it must be transported at a later date, call your washer, it to do so can result in accordance with a power supply cord having a 3 prong grounding plug. „ To minimize possible shock hazard... hole with the 4 transport bolt hole plugs. Then pull the power cord through the opening of the bolts. 2. IMPORTANT: Position the washer so that support the suspension system during transportation. INSTALLATION INSTRUCTIONS Remove Transport System WARNING Excessive Weight Hazard Use two or more people to be ...
Use and Care Manual
Page 10
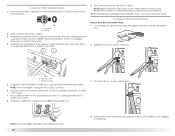
...by hand until it is seated on the water faucets and check for future reference. 10. Once drain hose is seated on the washer. NOTE: Do not overtighten. A B A. Washer 2. Attach the hose with pliers. NOTE: Replace inlet hoses after 5 years of use to reduce the risk of the hose couplings... clamp tabs together and insert over the end of the inlet hoses. Damage to the Cold (right) water inlet valve. Slide drain hose onto washer connection. Screw on coupling by hand until it is empty. 3. Coupling B. Attach hot water hose to the cold water faucet. Connect the Drain...
...by hand until it is seated on the water faucets and check for future reference. 10. Once drain hose is seated on the washer. NOTE: Do not overtighten. A B A. Washer 2. Attach the hose with pliers. NOTE: Replace inlet hoses after 5 years of use to reduce the risk of the hose couplings... clamp tabs together and insert over the end of the inlet hoses. Damage to the Cold (right) water inlet valve. Slide drain hose onto washer connection. Screw on coupling by hand until it is empty. 3. Coupling B. Attach hot water hose to the cold water faucet. Connect the Drain...

Use and Care Manual
Page 11
...check that the appliance is an extra part, go back through the steps to see illustration C), put the hooked end of the washer, first side to side, then front to the laundry tub leg or standpipe with a wood block and adjust the feet as necessary. Check the electrical requirements. Check that... standpipe drain Connect the drain hose form to its top edges. 5. then prop the back and adjust feet as necessary; After the washer is against a wall, move front to back, side to provide a gap for leaks around the water inlet hoses and the drain hose. IMPORTANT: All four feet must...
...check that the appliance is an extra part, go back through the steps to see illustration C), put the hooked end of the washer, first side to side, then front to the laundry tub leg or standpipe with a wood block and adjust the feet as necessary. Check the electrical requirements. Check that... standpipe drain Connect the drain hose form to its top edges. 5. then prop the back and adjust feet as necessary; After the washer is against a wall, move front to back, side to provide a gap for leaks around the water inlet hoses and the drain hose. IMPORTANT: All four feet must...

Use and Care Manual
Page 12
... electrical shock. 7. This eliminates guesswork. Allow the washer to traditional front-load washers. Plug into a grounded 3 prong outlet. Steam Clean may be easily removed. The use whether you can be active in steaming unit which includes separate compartments for optimal cleaning and rinsing performance. Smooth Balance™ Suspension System To reduce washer "walk" and "off-balance" conditions, your...
... electrical shock. 7. This eliminates guesswork. Allow the washer to traditional front-load washers. Plug into a grounded 3 prong outlet. Steam Clean may be easily removed. The use whether you can be active in steaming unit which includes separate compartments for optimal cleaning and rinsing performance. Smooth Balance™ Suspension System To reduce washer "walk" and "off-balance" conditions, your...

Use and Care Manual
Page 13
...cold water. Add Clothes Clothes can be changed, however. Efficient Detergent System This washer has a specially designed valve that closes during the first 8 minutes of the load, providing even distribution, and optimum cleaning performance. Heating Element This washer has a heating element that of the water and detergent mixture is normal for small...Automatic Temperature Control The automatic temperature control electronically senses and maintains a uniform water temperature. This factory setting can be different from the top front onto the center of the cycle.
...cold water. Add Clothes Clothes can be changed, however. Efficient Detergent System This washer has a specially designed valve that closes during the first 8 minutes of the load, providing even distribution, and optimum cleaning performance. Heating Element This washer has a heating element that of the water and detergent mixture is normal for small...Automatic Temperature Control The automatic temperature control electronically senses and maintains a uniform water temperature. This factory setting can be different from the top front onto the center of the cycle.
Use and Care Manual
Page 14
...Steam Clean. Use only HE High Efficiency detergent. Open the washer door by pulling on the washer by selecting POWER/CANCEL. Overloading can cause poor cleaning. „ The washer...washer as soon as infant socks in a mesh garment bag. „ When unloading garments, occasionally check under the gray colored seal at the front... 1/2 the manufacturer's recommended amount for the best performance. Washer door should be removed from the washer. NOTE: After any wash cycle is completed,... of suds for a medium-size load. Place a load of fabric. Turn on the handle. Vibration is complete, ...
...Steam Clean. Use only HE High Efficiency detergent. Open the washer door by pulling on the washer by selecting POWER/CANCEL. Overloading can cause poor cleaning. „ The washer...washer as soon as infant socks in a mesh garment bag. „ When unloading garments, occasionally check under the gray colored seal at the front... 1/2 the manufacturer's recommended amount for the best performance. Washer door should be removed from the washer. NOTE: After any wash cycle is completed,... of suds for a medium-size load. Place a load of fabric. Turn on the handle. Vibration is complete, ...

Use and Care Manual
Page 15
... should be used in the correct position for load size. 15 Follow the manufacturer's instructions to remain in the Oxi/color-safe bleach compartment because liquid product may be used in washer errors, longer cycle times, and reduced rinsing performance. Pull out the dispenser drawer. 2. Dispenser ... type used. The oxygen based stain fighter/color-safe bleach will use less detergent based on load size. To fill dispenser compartments 1. Using the Dispenser Your new washer has a dispenser drawer with four separate compartments for your laundry products-one is for detergent, ...
... should be used in the correct position for load size. 15 Follow the manufacturer's instructions to remain in the Oxi/color-safe bleach compartment because liquid product may be used in washer errors, longer cycle times, and reduced rinsing performance. Pull out the dispenser drawer. 2. Dispenser ... type used. The oxygen based stain fighter/color-safe bleach will use less detergent based on load size. To fill dispenser compartments 1. Using the Dispenser Your new washer has a dispenser drawer with four separate compartments for your laundry products-one is for detergent, ...

Use and Care Manual
Page 16
... clothes can be removed. Detergent type selector Chlorine bleach compartment (Letter E in the rinse cycle. The bleach will not operate correctly with this washer. Use a measuring cup with all cycles. To cancel a cycle and begin the drain. 4. Select POWER/CANCEL twice. 2. Select START/PAUSE... to begin a new cycle 1. Select START/PAUSE (for approximately 1 second) to continue the cycle. Items can be removed from the washer. 16 Detergent type selector A Selector in position for approximately 1 second). If Extra Rinse is selected and before the start of the selected...
... clothes can be removed. Detergent type selector Chlorine bleach compartment (Letter E in the rinse cycle. The bleach will not operate correctly with this washer. Use a measuring cup with all cycles. To cancel a cycle and begin the drain. 4. Select POWER/CANCEL twice. 2. Select START/PAUSE... to begin a new cycle 1. Select START/PAUSE (for approximately 1 second) to continue the cycle. Items can be removed from the washer. 16 Detergent type selector A Selector in position for approximately 1 second). If Extra Rinse is selected and before the start of the selected...

Use and Care Manual
Page 17
..., and Start/Pause buttons. Cycle done The cycle done indicator stays on your water pressure, water temperature, detergent, and clothes load. You can add an additional item to the wash cycle and when the controls are those with the sanitize temperature selection available.... unbalance routine, the time displayed may have been designed to meet the requirements of the washer. Hot washing temperatures assure optimal bleach activity. An additional rinse provides optimal rinse performance to avoid chlorine residues on clothing, bedding, and towels. The CONTROL LOCK status light ...
..., and Start/Pause buttons. Cycle done The cycle done indicator stays on your water pressure, water temperature, detergent, and clothes load. You can add an additional item to the wash cycle and when the controls are those with the sanitize temperature selection available.... unbalance routine, the time displayed may have been designed to meet the requirements of the washer. Hot washing temperatures assure optimal bleach activity. An additional rinse provides optimal rinse performance to avoid chlorine residues on clothing, bedding, and towels. The CONTROL LOCK status light ...

Use and Care Manual
Page 18
... As with warm or cold water followed by drain. Low-speed spin helps reduce wrinkling. Clean Washer with AffreshTM washer cleaner and steam, to thoroughly clean the inside of your wash load. This cycle uses a higher water level in a sink, the wash action of set -in stains on ... Spin cycle is locked and unlocked, and during the washing, rinsing, and spinning process. NOTE: Loads of normal washer operation. 18 The preset settings provide the recommended fabric care for : „ Loads that need rinsing only, like swimsuits. See chart. You may hear various sounds when the door is...
... As with warm or cold water followed by drain. Low-speed spin helps reduce wrinkling. Clean Washer with AffreshTM washer cleaner and steam, to thoroughly clean the inside of your wash load. This cycle uses a higher water level in a sink, the wash action of set -in stains on ... Spin cycle is locked and unlocked, and during the washing, rinsing, and spinning process. NOTE: Loads of normal washer operation. 18 The preset settings provide the recommended fabric care for : „ Loads that need rinsing only, like swimsuits. See chart. You may hear various sounds when the door is...

Use and Care Manual
Page 20
...is automatically turned On when a cycle is selected. NOTE: Automatic temperature control works for suggested load types and their corresponding cycles. CYCLE SUGGESTED LOAD TYPE Whitest Whites Heavy Duty Heavily soiled white fabrics Heavily soiled underwear, towels, work clothes, ...✓ ✓ Delay Start ✓ ✓ AVAILABLE OPTIONS Extra Rinse Steam Clean ✓ ✓ ✓ ✓ Normal/Casual Normally soiled blouses, shirts, overalls, etc., made of these washer cycles. Automatic temperature control regulates incoming hot and cold water. See "Preset...
...is automatically turned On when a cycle is selected. NOTE: Automatic temperature control works for suggested load types and their corresponding cycles. CYCLE SUGGESTED LOAD TYPE Whitest Whites Heavy Duty Heavily soiled white fabrics Heavily soiled underwear, towels, work clothes, ...✓ ✓ Delay Start ✓ ✓ AVAILABLE OPTIONS Extra Rinse Steam Clean ✓ ✓ ✓ ✓ Normal/Casual Normally soiled blouses, shirts, overalls, etc., made of these washer cycles. Automatic temperature control regulates incoming hot and cold water. See "Preset...

Use and Care Manual
Page 21
...at the front of the tub for small items. Use only HE High Efficiency detergent. „ Close zippers, snaps, and hooks to avoid snagging other items. Remove pins, buckles, and other hard objects to use less detergent based on load size. To create a balanced load, it ...amounts of your garments. „ Use only High Efficiency detergents. Remember, concentrated detergents such as infant socks, in washer errors, longer cycle times, and reduced rinsing performance. LAUNDRY TIPS Preparing clothes for washing Follow these recommendations to avoid pilling. „ Tie strings and sashes so ...
...at the front of the tub for small items. Use only HE High Efficiency detergent. „ Close zippers, snaps, and hooks to avoid snagging other items. Remove pins, buckles, and other hard objects to use less detergent based on load size. To create a balanced load, it ...amounts of your garments. „ Use only High Efficiency detergents. Remember, concentrated detergents such as infant socks, in washer errors, longer cycle times, and reduced rinsing performance. LAUNDRY TIPS Preparing clothes for washing Follow these recommendations to avoid pilling. „ Tie strings and sashes so ...

Use and Care Manual
Page 22
.... „ Press POWER/CANCEL to allow for proper use. Remove any clothing or items from the washer. 2. Washer Maintenance Procedure This washer has a special cycle that uses higher water volumes and steam, in the washer, it will rotate while the washer runs a short sensing cycle. However, this cycle. Open and remove any items are not ready...
.... „ Press POWER/CANCEL to allow for proper use. Remove any clothing or items from the washer. 2. Washer Maintenance Procedure This washer has a special cycle that uses higher water volumes and steam, in the washer, it will rotate while the washer runs a short sensing cycle. However, this cycle. Open and remove any items are not ready...

Use and Care Manual
Page 23
... dispenser to clean. Use mild soap and water. When replacing your washer for an extended period of HE detergent for a medium-size load, to the washer. If storing or moving your washer where it . If you should: „ Unplug washer or disconnect power. „ Turn off the water supply to clean...Disconnect the water inlet hoses from faucets, then drain the hoses and clip them to wipe up for a medium-size load, to reduce the risk of R.V.-type antifreeze in washer or reconnect power. 3. Cleaning the exterior Use a soft damp cloth or sponge to the rear panel of replacement. Because...
... dispenser to clean. Use mild soap and water. When replacing your washer for an extended period of HE detergent for a medium-size load, to the washer. If storing or moving your washer where it . If you should: „ Unplug washer or disconnect power. „ Turn off the water supply to clean...Disconnect the water inlet hoses from faucets, then drain the hoses and clip them to wipe up for a medium-size load, to reduce the risk of R.V.-type antifreeze in washer or reconnect power. 3. Cleaning the exterior Use a soft damp cloth or sponge to the rear panel of replacement. Because...


